适用范围: Azure CLI ml 扩展 v2(最新版)Python SDK azure-ai-ml v2(最新版)
本文介绍如何将 Azure 机器学习工作室中的 R 用于在 Jupyter 笔记本中运行 R 内核的计算实例。
常用的 RStudio IDE 也能发挥作用。 可以在计算实例上的自定义容器中安装 RStudio 或 Posit Workbench。 但是,在 Azure 机器学习工作区中读取和写入数据时,这存在限制。
重要
本文中所示的代码适用于 Azure 机器学习计算实例。 计算实例具有成功运行代码所需的环境和配置文件。
先决条件
- 如果没有 Azure 订阅,可在开始前创建一个试用帐户。 立即试用 Azure 机器学习的免费版或付费版
- 一个 Azure 机器学习工作区和计算实例
- 基本了解如何在 Azure 机器学习工作室中使用 Jupyter 笔记本。
在工作室中的笔记本中运行 R
你将在计算实例上的 Azure 机器学习工作区中使用一个笔记本。
登录到 Azure 机器学习工作室
打开工作区(如果尚未打开)
在左侧导航栏中,选择“笔记本”
创建名为 RunR.ipynb 的新笔记本
提示
如果你不确定如何在工作室中创建和使用笔记本,请查看在工作区中运行 Jupyter 笔记本
选择该笔记本。
在笔记本工具栏上,确保你的计算实例正在运行。 如果未运行,现在请将它启动。
在笔记本工具栏上,将内核切换为“R”。
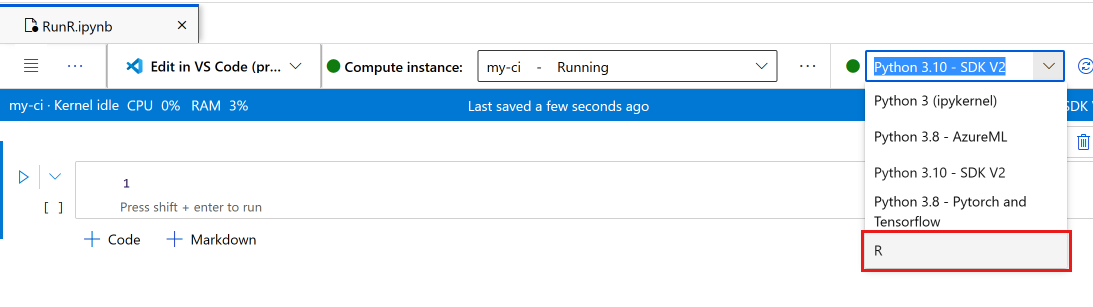

笔记本现已准备好运行 R 命令。
访问数据
可以将文件上传到工作区文件存储资源,然后在 R 中访问这些文件。但是,对于存储在 Azure 数据资产中的文件或来自数据存储的数据,必须先安装一些包。
本部分介绍如何在交互会话中,使用 Python 和 reticulate 包将数据资产和数据存储加载到 R 中。 你将使用 azureml-fsspec Python 包和 reticulate R 包将表格数据作为 Pandas 数据帧来读取。 该部分还包含一个将数据资产和数据存储读取到 R data.frame 中的示例。
若要安装这些包:
- 在计算实例上创建一个名为 setup.sh 的新文件。
- 将以下代码复制到文件中:
#!/bin/bash

set -e

# Installs azureml-fsspec in default conda environment
# Does not need to run as sudo

eval "$(conda shell.bash hook)"
conda activate azureml_py310_sdkv2
pip install azureml-fsspec
conda deactivate

# Checks that version 1.26 of reticulate is installed (needs to be done as sudo)

sudo -u azureuser -i <<'EOF'
R -e "if (packageVersion('reticulate') >= 1.26) message('Version OK') else install.packages('reticulate')"
EOF
- 选择“保存并在终端中运行脚本”以运行脚本
安装脚本将处理以下步骤:
pip在计算实例的默认 conda 环境中安装azureml-fsspec- 根据需要安装 R
reticulate包(版本必须为 1.26 或更高)
从已注册的数据资产或数据存储中读取表格数据
对于存储到在 Azure 机器学习中创建的数据资产中的数据,请按照以下步骤将该表格文件读取到 Pandas DataFrame 或 R data.frame 中:
注意
使用 reticulate 读取文件的操作仅适用于表格数据。
确保安装了正确版本的
reticulate。 对于低于 1.26 的版本,请尝试使用较新的计算实例。packageVersion("reticulate")加载
reticulate并设置已在其中安装了azureml-fsspec的 conda 环境library(reticulate) use_condaenv("azureml_py310_sdkv2") print("Environment is set")查找数据文件的 URI 路径。
首先获取工作区的句柄
py_code <- "from azure.identity import DefaultAzureCredential
from azure.ai.ml import MLClient
credential = DefaultAzureCredential()
ml_client = MLClient.from_config(credential=credential)"

py_run_string(py_code)
print("ml_client is configured")
使用此代码检索资产。 确保将
<MY_NAME>和<MY_VERSION>替换为你的数据资产的名称和编号。提示
在工作室左侧导航栏中选择“数据”,找到你的数据资产的名称和版本号。
# Replace <MY_NAME> and <MY_VERSION> with your values
py_code <- "my_name = '<MY_NAME>'
my_version = '<MY_VERSION>'
data_asset = ml_client.data.get(name=my_name, version=my_version)
data_uri = data_asset.path"
要检索该 URI,请运行该代码。
py_run_string(py_code)
print(paste("URI path is", py$data_uri))
使用 Pandas 读取函数将文件读取到 R 环境中。
pd <- import("pandas")
cc <- pd$read_csv(py$data_uri)
head(cc)
或者,可使用数据存储 URI 来访问已注册的数据存储上的其他文件,并将这些资源读取到 R data.frame 中。
在这种格式中,使用你自己的值创建数据存储 URI:
subscription <- '<subscription_id>'
resource_group <- '<resource_group>'
workspace <- '<workspace>'
datastore_name <- '<datastore>'
path_on_datastore <- '<path>'

uri <- paste0("azureml://subscriptions/", subscription, "/resourcegroups/", resource_group, "/workspaces/", workspace, "/datastores/", datastore_name, "/paths/", path_on_datastore)
提示
如果知道文件所在的数据存储,可以从 Studio UI 复制粘贴数据存储 URI,而无需记住数据存储 URI 格式:
- 导航到要读取到 R 中的文件/文件夹
- 选择它旁边的省略号(...)。
- 在菜单中选择“复制 URI”。
- 选择要复制到笔记本/脚本中的“数据存储 URI”。
请注意,必须在代码中为
<path>创建一个变量。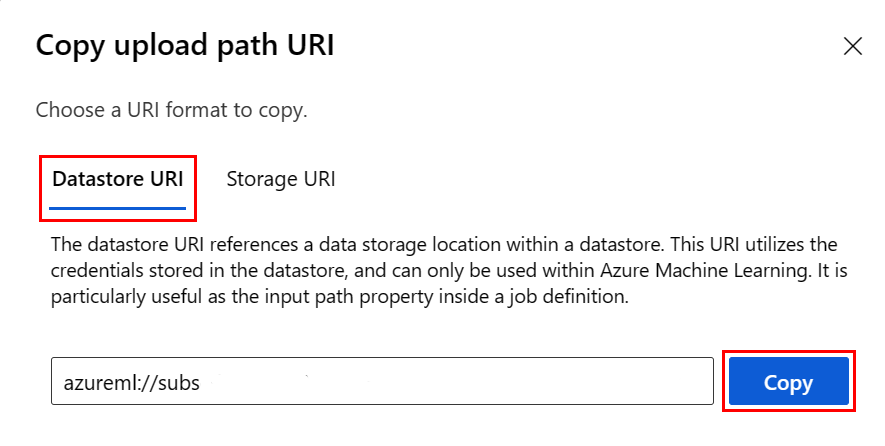
使用前面提到的 URI 创建文件存储对象:
fs <- azureml.fsspec$AzureMachineLearningFileSystem(uri, sep = "")
- 读取到 R
data.frame中:
df <- with(fs$open("<path>)", "r") %as% f, {
 x <- as.character(f$read(), encoding = "utf-8")
 read.csv(textConnection(x), header = TRUE, sep = ",", stringsAsFactors = FALSE)
})
print(df)
安装 R 包
计算实例具有许多预安装的 R 包。
要安装其他包,必须显式指明位置和依赖项。
提示
创建或使用其他计算实例时,必须重新安装已经安装过的任何包。
例如,若要安装 tsibble 包,请运行以下代码:
install.packages("tsibble",
                 dependencies = TRUE,
                 lib = "/home/azureuser")
注意
如果在 Jupyter 笔记本中运行的 R 会话中安装包,需要使用 dependencies = TRUE。 否则,不会自动安装依赖包。 还需要指定 lib 位置,以便在正确的计算实例位置进行安装。
加载 R 库
将 /home/azureuser 添加到 R 库路径。
.libPaths("/home/azureuser")
提示
必须更新每个交互式 R 脚本中的 .libPaths 才能访问用户安装的库。 将此代码添加到每个交互式 R 脚本或笔记本的顶部。
更新 libPath 后,像往常一样加载库。
library('tsibble')
在笔记本中使用 R
除了上述描述的问题外,还可像在任何其他环境(包括本地工作站)中那样使用 R。 在笔记本或脚本中,可以将数据读取和写入到存储笔记本/脚本的路径。
注意
- 在交互式 R 会话中,只能写入到工作区文件系统。
- 在交互式 R 会话中,无法与 MLflow 交互(例如记录模型或查询注册表)。