使用 Azure 机器学习托管特征存储可以发现、创建和将特征投入使用。 特征在机器学习生命周期中充当连接组织,该生命周期始于原型制作阶段,在此阶段你可以试验各种特征。 该生命周期会持续到操作化阶段,在此阶段你可以部署模型,并且推理步骤会查找特征数据。 有关特征存储的详细信息,请参阅特征存储概念资源。
Important
Azure Cache for Redis 已正式公布所有 SKU 的退役时间表。 建议尽快将现有的 Azure Redis 缓存实例移动到 Azure 托管 Redis。
迁移指南:
有关停用的更多详细信息:
本教程系列的第 1 部分介绍了如何使用自定义转换创建特征集规范,以及如何使用特征集生成训练数据。 本系列的第 2 部分展示了如何启用具体化功能,并执行回填。 此外,第 2 部分演示了如何试验特征以提高模型性能。 第 3 部分演示了特征存储如何提高试验和训练流的敏捷性。 第 3 部分还介绍了如何运行批处理推理。
在本教程中,我们将:
- 设置 Azure Cache for Redis
- 将缓存附加到特征存储作为在线具体化存储,并授予必要的权限
- 将功能集实现到在线商店
- 使用模拟数据测试联机部署
先决条件
注意
本教程将 Azure 机器学习笔记本与无服务器 Spark 计算配合使用。
- 请确保完成本系列教程的第 1 至 4 部分。 本教程将重复使用之前教程中创建的特征存储和其他资源。
设置
本教程使用 Python 特征存储核心 SDK (azureml-featurestore)。 该 Python SDK 用于在特征存储、特征集和特征存储实体上执行创建、读取、更新和删除 (CRUD) 操作。
无需为本教程显式安装这些资源,因为在此处所示的设置说明中,online.yml 文件涵盖了它们。
配置 Azure 机器学习 Spark 笔记本。
可以创建一个新笔记本,并分步执行本教程中的说明。 还可以打开并运行现有笔记本 featurestore_sample/notebooks/sdk_only/4.Enable-online-store-run-inference.ipynb。 可以将此教程保持在打开状态,并参考它来获取文档链接和更多说明。
在顶部导航的“计算”下拉列表中,选择“无服务器 Spark 计算”。
配置会话:
- 将 azureml-examples/sdk/python/featurestore-sample/project/env/online.yml 文件下载到本地计算机
- 在顶部导航的“配置会话”中,选择“Python 包”
- 选择“上传 Conda 文件”
- 按照第一个教程中描述的上传conda.yml文件的相同步骤,从本地计算机上传online.yml文件。
- (可选)增加会话超时时间(会话空闲时间)以避免频繁重新运行先决条件
此代码单元启动 Spark 会话。 安装所有依赖项并启动 Spark 会话大约需要 10 分钟。
   # Run this cell to start the spark session (any code block will start the session ). This can take approximately 10 mins.
   print("start spark session")
为示例设置根目录
   import os

   # Please update the dir to ./Users/{your-alias} (or any custom directory you uploaded the samples to).
   # You can find the name from the directory structure inm the left navigation panel.
   root_dir = "./Users/<your_user_alias>/featurestore_sample"

  if os.path.isdir(root_dir):
	  print("The folder exists.")
   else:
	  print("The folder does not exist. Please create or fix the path")
在教程笔记本运行的项目工作区中初始化
MLClient。MLClient用于执行创建、读取、更新和删除 (CRUD) 操作。import os from azure.ai.ml import MLClient from azure.ai.ml.identity import AzureMLOnBehalfOfCredential project_ws_sub_id = os.environ["AZUREML_ARM_SUBSCRIPTION"] project_ws_rg = os.environ["AZUREML_ARM_RESOURCEGROUP"] project_ws_name = os.environ["AZUREML_ARM_WORKSPACE_NAME"] version = "<VERSION>" # Connect to the project workspace ws_client = MLClient( AzureMLOnBehalfOfCredential(), project_ws_sub_id, project_ws_rg, project_ws_name )初始化特征存储工作区的
MLClient,以便在特征存储工作区上执行创建、读取、更新和删除操作。from azure.ai.ml import MLClient from azure.ai.ml.identity import AzureMLOnBehalfOfCredential # Feature store featurestore_name = "my-featurestore" # use the same name from part #1 of the tutorial featurestore_subscription_id = os.environ["AZUREML_ARM_SUBSCRIPTION"] featurestore_resource_group_name = os.environ["AZUREML_ARM_RESOURCEGROUP"] # Feature store MLClient fs_client = MLClient( AzureMLOnBehalfOfCredential(), featurestore_subscription_id, featurestore_resource_group_name, featurestore_name, )注意
特征存储工作区支持跨项目复用特征。 项目工作区(正在使用的当前工作区)利用特定特征存储中的特征来训练和推理模型。 许多项目工作区可以共享和重复使用同一个特征存储工作区。
如前所述,本教程使用 Python 特征存储核心 SDK (
azureml-featurestore)。 这一已初始化的 SDK 客户端用于在特征存储、特征集和特征存储实体上执行创建、读取、更新和删除 (CRUD) 操作。from azureml.featurestore import FeatureStoreClient from azure.ai.ml.identity import AzureMLOnBehalfOfCredential featurestore = FeatureStoreClient( credential=AzureMLOnBehalfOfCredential(), subscription_id=featurestore_subscription_id, resource_group_name=featurestore_resource_group_name, name=featurestore_name, )
准备 Azure Cache for Redis
本教程使用 Azure Cache for Redis 作为在线数据实体化存储。 可以创建新的 Redis 实例,或重复使用现有实例。
设置 Azure Cache for Redis 资源的值,以用作在线具体化存储。 在此代码单元中,定义要创建或重复使用的 Azure Cache for Redis 资源的名称。 可以覆盖其他默认设置。
   ws_location = ws_client.workspaces.get(ws_client.workspace_name).location

   redis_subscription_id = os.environ["AZUREML_ARM_SUBSCRIPTION"]
   redis_resource_group_name = os.environ["AZUREML_ARM_RESOURCEGROUP"]
   redis_name = "<REDIS_NAME>"
   redis_location = ws_location
可以创建新的 Redis 实例。 您将选择适当的 Redis 缓存层(基本、标准、高级或企业)。 选择可用于所选缓存层的 SKU 系列。 有关层级和缓存性能的详细信息,请访问此资源。 有关 SKU 层级和 Azure 缓存系列的详细信息,请访问此资源。
执行此代码单元以创建具有高级层、SKU 系列
P和缓存容量 2 的 Azure Cache for Redis。 准备 Redis 实例可能需要 5 到 10 分钟。from azure.mgmt.redis import RedisManagementClient from azure.mgmt.redis.models import RedisCreateParameters, Sku, SkuFamily, SkuName management_client = RedisManagementClient( AzureMLOnBehalfOfCredential(), redis_subscription_id ) # It usually takes about 5 - 10 min to finish the provision of the Redis instance. # If the following begin_create() call still hangs for longer than that, # please check the status of the Redis instance on the Azure portal and cancel the cell if the provision has completed. # This sample uses a PREMIUM tier Redis SKU from family P, which may cost more than a STANDARD tier SKU from family C. # Please choose the SKU tier and family according to your performance and pricing requirements. redis_arm_id = ( management_client.redis.begin_create( resource_group_name=redis_resource_group_name, name=redis_name, parameters=RedisCreateParameters( location=redis_location, sku=Sku(name=SkuName.PREMIUM, family=SkuFamily.P, capacity=2), ), ) .result() .id ) print(redis_arm_id)(可选)此代码单元重复使用具有以前定义的名称的现有 Redis 实例。
   redis_arm_id = "/subscriptions/{sub_id}/resourceGroups/{rg}/providers/Microsoft.Cache/Redis/{name}".format(
	  sub_id=redis_subscription_id,
	  rg=redis_resource_group_name,
	  name=redis_name,
   )
将在线实体化存储附加到特征存储
特征存储需要 Azure Cache for Redis 作为附加资源,用作在线内容化存储。 此代码单元处理该步骤。
from azure.ai.ml.entities import (
    ManagedIdentityConfiguration,
    FeatureStore,
    MaterializationStore,
)

online_store = MaterializationStore(type="redis", target=redis_arm_id)

materialization_identity1 = ManagedIdentityConfiguration(
    client_id=uai_client_id, principal_id=uai_principal_id, resource_id=uai_arm_id
)


ml_client = MLClient(
    AzureMLOnBehalfOfCredential(),
    subscription_id=featurestore_subscription_id,
    resource_group_name=featurestore_resource_group_name,
)

fs = FeatureStore(
    name=featurestore_name,
    online_store=online_store,
    materialization_identity=materialization_identity1,
)

fs_poller = ml_client.feature_stores.begin_create(fs, update_dependent_resources=True)
print(fs_poller.result())
注意
在特征存储更新期间,单独设置 grant_materiaization_permissions=True 不会向 UAI 授予所需的 RBAC 权限。 仅当更新以下任一项时,才会对 UAI 执行角色分配:
- 具体化标识
- 线下商店目标
- 网络商店目标
如需演示如何使用 SDK 执行此操作的示例,请访问教程:预配托管特征存储的不同方法资源。
将 accounts 特征集数据具体化到联机存储
在 accounts 功能集上启用实体化
在本教程系列的前面部分,你没有实现账户特征集,因为它的特征是预先计算的,并且只有批量推理场景会使用它。 此代码单元启用联机具体化,从而使这些特征在联机存储中可用,且其访问延迟较低。 为了实现一致性,它还启用了离线实体化。 启用离线物化是可选的。
from azure.ai.ml.entities import (
    MaterializationSettings,
    MaterializationComputeResource,
)

# Turn on both offline and online materialization on the "accounts" featureset.

accounts_fset_config = fs_client._featuresets.get(name="accounts", version=version)

accounts_fset_config.materialization_settings = MaterializationSettings(
    offline_enabled=True,
    online_enabled=True,
    resource=MaterializationComputeResource(instance_type="standard_e8s_v3"),
    spark_configuration={
        "spark.driver.cores": 4,
        "spark.driver.memory": "36g",
        "spark.executor.cores": 4,
        "spark.executor.memory": "36g",
        "spark.executor.instances": 2,
    },
    schedule=None,
)

fs_poller = fs_client.feature_sets.begin_create_or_update(accounts_fset_config)
print(fs_poller.result())
填充 account 功能集
begin_backfill 函数将数据回填到为此特征集启用的所有实体化存储。 此处,脱机和联机实现都已启用。 此代码单元将数据回填到联机和脱机具体化存储。
from datetime import datetime, timedelta

# Trigger backfill on the "accounts" feature set.
# Backfill from 01/01/2023 to all the way to 3 hours ago.

st = datetime(2020, 1, 1, 0, 0, 0, 0)
ed = datetime.now() - timedelta(hours=3)

poller = fs_client.feature_sets.begin_backfill(
    name="accounts",
    version=version,
    feature_window_start_time=st,
    feature_window_end_time=ed,
)
print(poller.result().job_id)
提示
-
feature_window_start_time和feature_window_end_time的粒度限制为秒。datetime对象中提供的任何毫秒值都将被忽略。 - 仅当特征窗口中存在与提交回填作业时定义的
data_status匹配的数据时,才会提交具体化作业。
此代码单元会跟踪回填作业的完成。 如果之前预配了 Azure Cache for Redis 高级层,此步骤可能需要大约 10 分钟才能完成。
# Get the job URL, and stream the job logs.
# With PREMIUM Redis SKU, SKU family "P", and cache capacity 2,
# it takes approximately 10 minutes to complete.
fs_client.jobs.stream(poller.result().job_id)
将 transactions 特征集数据生成到在线商店
在本教程较早部分,你已将 transactions 特征集数据物化到离线物化存储。
- 此代码单元启用
transactions功能集在线实现。
# Enable materialization to online store for the "transactions" feature set.

transactions_fset_config = fs_client._featuresets.get(
    name="transactions", version=version
)
transactions_fset_config.materialization_settings.online_enabled = True

fs_poller = fs_client.feature_sets.begin_create_or_update(transactions_fset_config)
print(fs_poller.result())
- 此代码单元将数据回填到联机和脱机具体化存储,以确保这两个存储都具有最新数据。 你在本系列教程第3部分中设置的周期性具体化作业现在会将数据具体化到联机和脱机的存储库中。
# Trigger backfill on the "transactions" feature set to fill in the online/offline store.
# Backfill from 01/01/2023 to all the way to 3 hours ago.

from datetime import datetime, timedelta

st = datetime(2020, 1, 1, 0, 0, 0, 0)
ed = datetime.now() - timedelta(hours=3)


poller = fs_client.feature_sets.begin_backfill(
    name="transactions",
	version=version,
	feature_window_start_time=st,
	feature_window_end_time=ed,
	)
	print(poller.result().job_id)
此代码单元会跟踪回填作业的完成。 使用之前预配的高级层 Azure Cache for Redis,此步骤可能需要大约 5 分钟才能完成。
# Get the job URL, and stream the job logs.
# With PREMIUM Redis SKU, SKU family "P", and cache capacity 2,
# it takes approximately 5 minutes to complete.
fs_client.jobs.stream(poller.result().job_id)
进一步探索联机特征具体化
可以从“具体化作业”UI 浏览特征集的特征具体化状态。
选择左侧窗格中的“特征存储”
从可访问的特征存储列表中,选择您执行回填操作的特征存储。
选择具体化任务选项卡
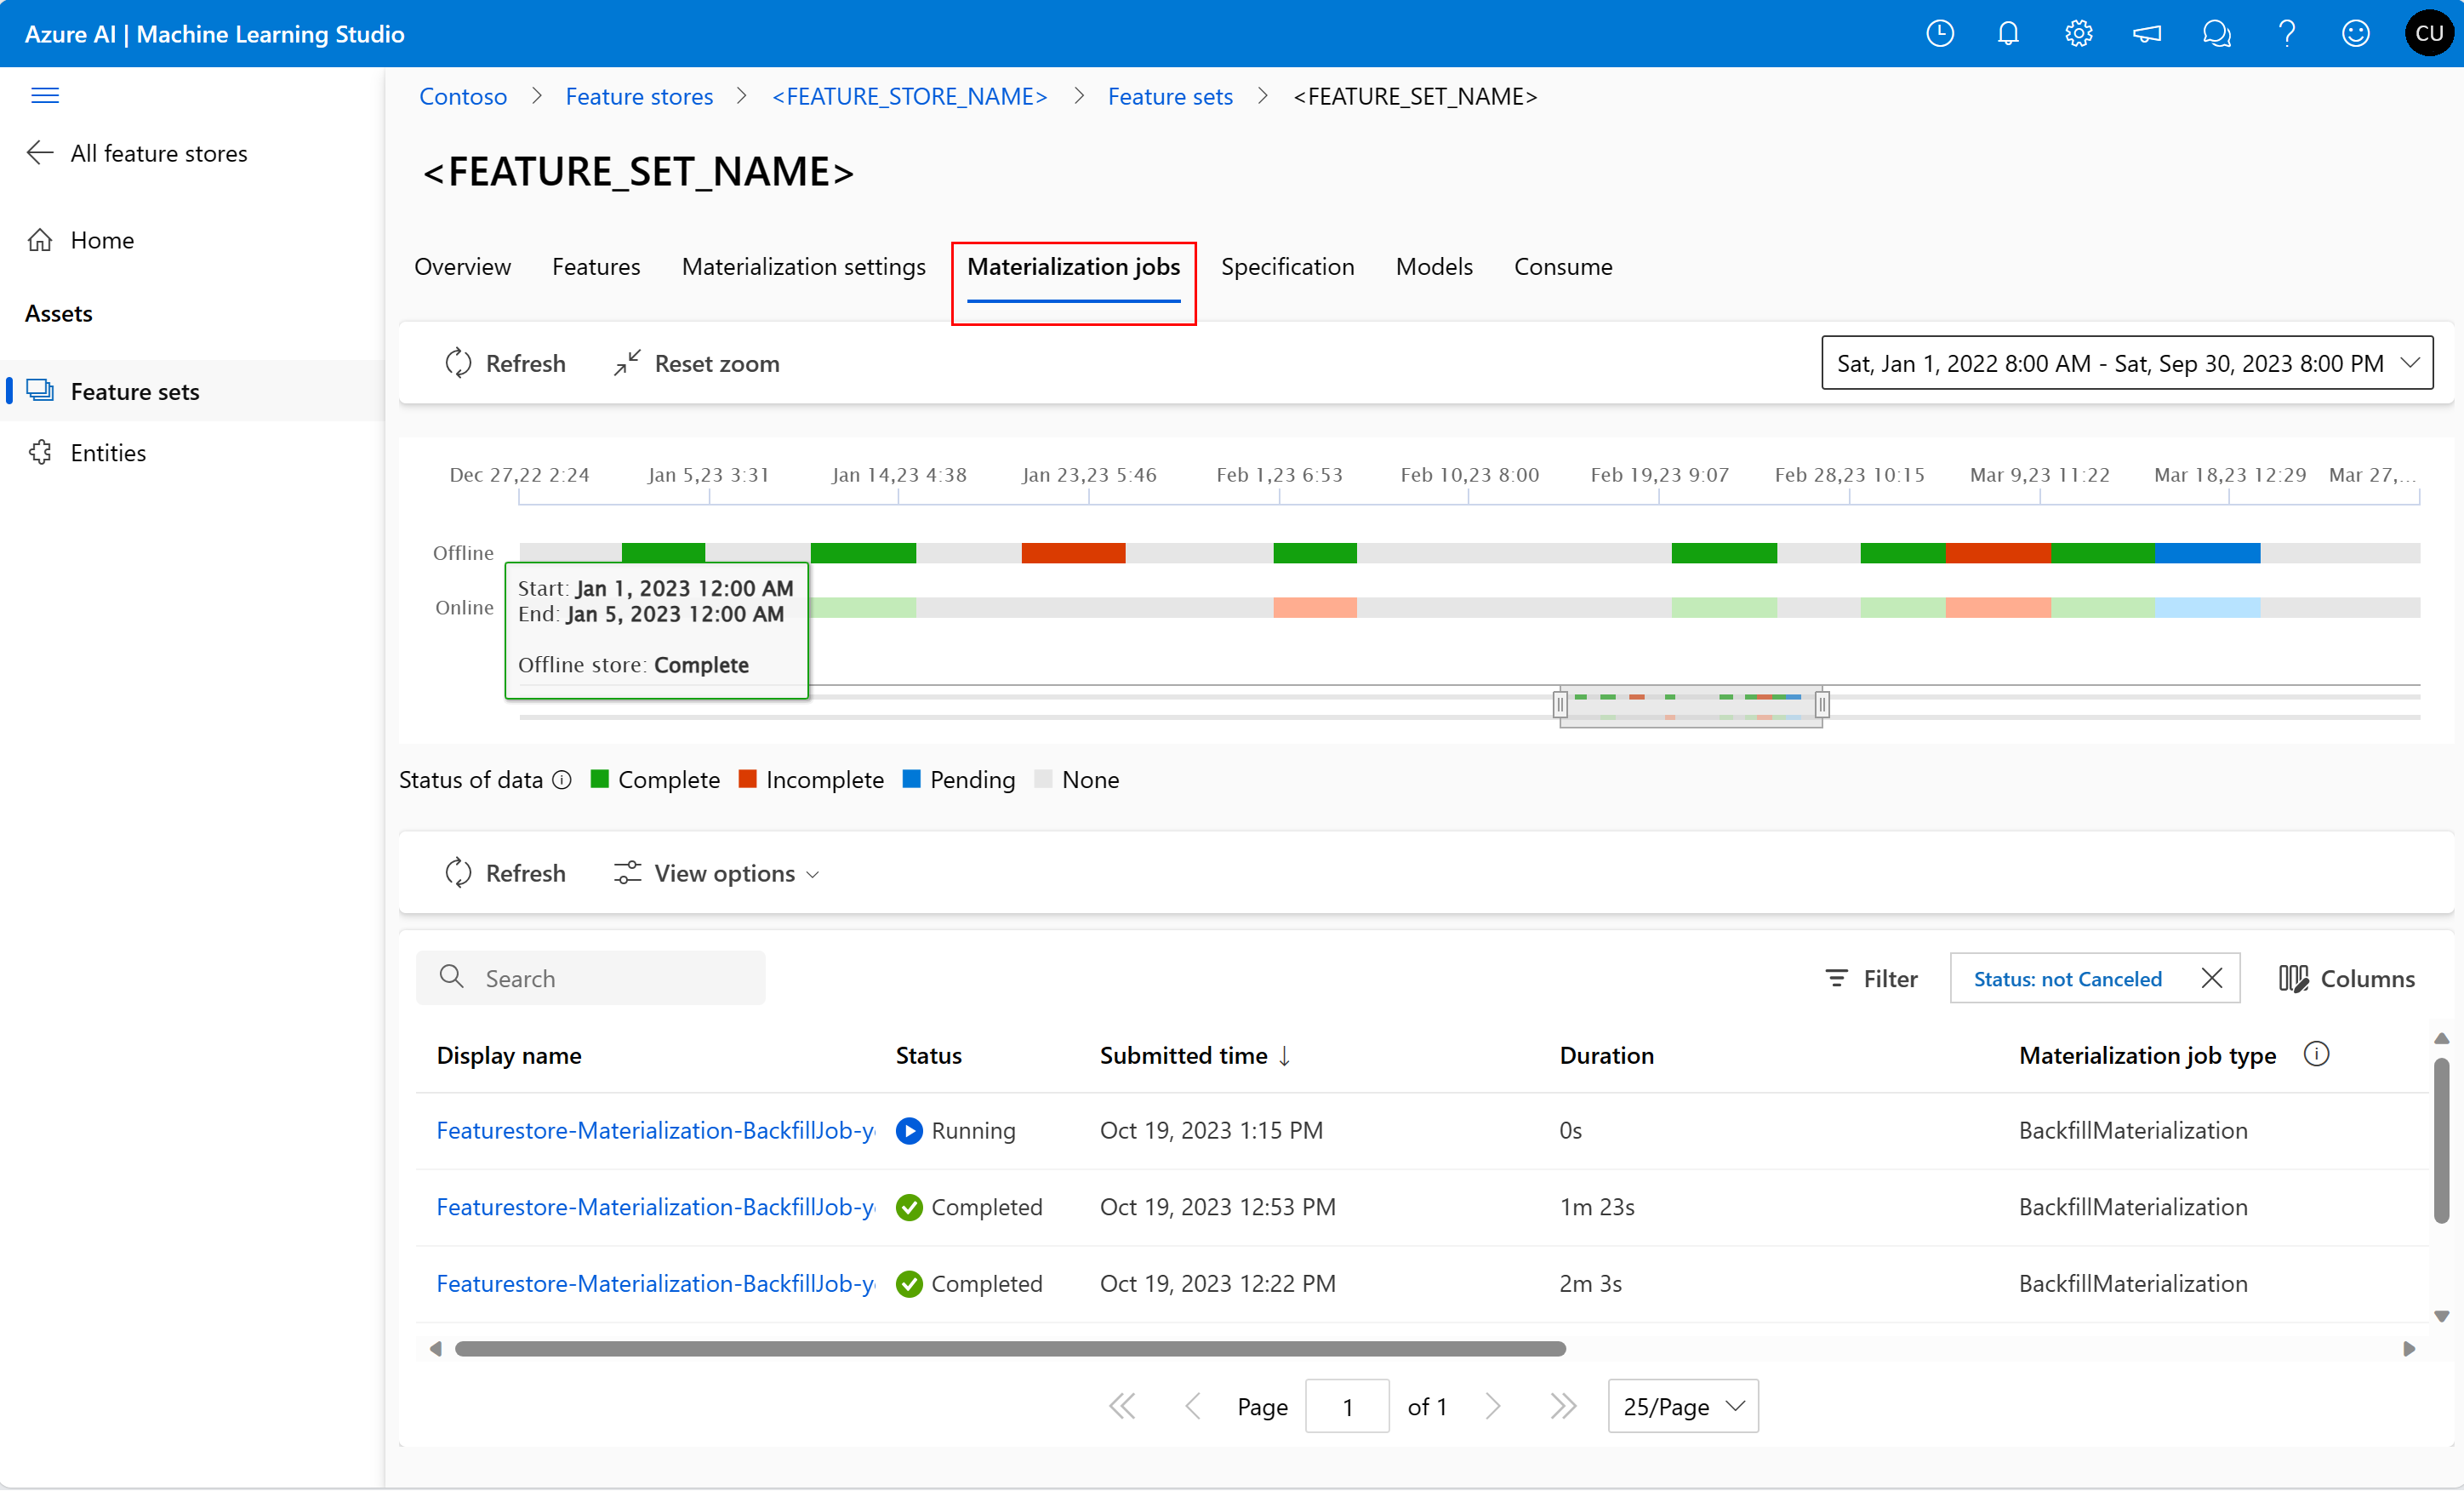

- 数据物化状态可以是
- 完成(绿色)
- 未完成(红色)
- 挂起状态(蓝色)
- 无(灰色)
- 数据间隔表示具有相同数据具体化状态的连续数据部分。 例如,前面的快照在脱机具体化存储中具有 16 个数据间隔。
- 数据最多可以有 2,000 个数据间隔。 如果数据包含的数据间隔超过 2,000 个,请创建新的特征集版本。
- 可以在单个回填作业中提供多个数据状态(例如,
["None", "Incomplete"])的列表。 - 在回填期间,会为定义的特征窗口中的每个数据间隔提交一个新的实体化作业。
- 如果具体化作业已处于挂起状态,或者在尚未回填的数据间隔内运行,则不会在该数据间隔内提交新作业。
更新在线物化存储
- 若要在特征存储级别更新联机具体化存储,则特征存储中的所有特征集都应禁用联机具体化。
- 如果对特征集禁用联机具体化,则会重置联机具体化存储中已具体化数据的具体化状态。 这会使得已具体化的数据不可用。 启用在线具体化后,必须重新提交具体化任务。
- 如果一开始只启用了特征集的脱机具体化,之后才启用联机具体化:
- 在线商店中数据的默认数据物化状态将为
None。 - 当提交第一个在线物化作业时,已经在离线存储中物化的数据(如果可用)将用于计算在线特征。
- 如果联机物化的数据间隔与脱机存储中已物化数据的数据间隔部分重叠,则会分别提交针对数据间隔重叠部分和非重叠部分的单独物化作业。
- 在线商店中数据的默认数据物化状态将为
本地测试
现在,使用开发环境从在线物化存储查找功能。 附加到“无服务器 Spark 计算”的教程笔记本用作开发环境。
此代码单元分析现有特征检索规范中的特征的列表。
# Parse the list of features from the existing feature retrieval specification.
feature_retrieval_spec_folder = root_dir + "/project/fraud_model/feature_retrieval_spec"

features = featurestore.resolve_feature_retrieval_spec(feature_retrieval_spec_folder)

features
此代码从联机具体化存储中检索特征值。
from azureml.featurestore import init_online_lookup
import time

# Initialize the online store client.
init_online_lookup(features, AzureMLOnBehalfOfCredential())
准备一些观测数据进行测试,并利用这些数据从在线物化存储中查找特征。 在联机查找期间,在观察样本数据中定义的键 (accountID) 可能不存在于 Redis 中(由于 TTL)。 在这种情况下:
- 打开 Azure 门户
- 导航到 Redis 实例
- 打开 Redis 实例的控制台,然后使用
KEYS *命令检查现有的键 - 将示例观察数据中的
accountID值替换为现有键
import pyarrow
from azureml.featurestore import get_online_features

# Prepare test observation data
obs = pyarrow.Table.from_pydict(
    {"accountID": ["A985156952816816", "A1055521248929430", "A914800935560176"]}
)

# Online lookup:
# It may happen that the keys defined in the observation sample data above does not exist in the Redis (due to TTL).
# If this happens, go to Azure portal and navigate to the Redis instance, open its console and check for existing keys using command "KEYS *"
# and replace the sample observation data with the existing keys.
df = get_online_features(features, obs)
df
这些步骤从联机商店查找功能。 在下一步中,你将使用 Azure 机器学习托管联机终结点测试联机特征。
从 Azure 机器学习托管在线终结点测试在线功能
托管在线端点部署和评分模型,以进行在线/实时推理。 你可以使用任何可用的推理技术,例如 Kubernetes。
此步骤涉及以下操作:
- 创建 Azure 机器学习托管在线终结点。
- 授予所需的基于角色的访问控制 (RBAC) 权限。
- 部署你已在本教程系列的教程 3 中训练的模型。 此步骤中使用的评分脚本包含用于查找联机特征的代码。
- 使用样本数据为模型评分。
创建 Azure 机器学习托管在线终结点
请访问此资源了解有关托管联机终结点的详细信息。 使用托管特征存储 API,还可以从其他推理平台查找联机特征。
此代码单元定义 fraud-model 托管在线终结点。
from azure.ai.ml.entities import (
    ManagedOnlineDeployment,
	ManagedOnlineEndpoint,
	Model,
	CodeConfiguration,
	Environment,
)


endpoint_name = "fraud-model"

endpoint = ManagedOnlineEndpoint(name=endpoint_name, auth_mode="key")
此代码单元创建在上一个代码单元中定义的托管联机终结点。
ws_client.online_endpoints.begin_create_or_update(endpoint).result()
授予所需的 RBAC 权限
在此,你需要向 Redis 实例和特征存储上的托管联机终结点授予所需的 RBAC 权限。 模型部署中的评分代码需要这些 RBAC 权限才能使用托管特征存储 API 成功搜索联机存储中的特征。
获取已管理在线终结点的管理身份
此代码单元检索托管联机终结点的托管标识:
# Get managed identity of the managed online endpoint.
endpoint = ws_client.online_endpoints.get(endpoint_name)

model_endpoint_msi_principal_id = endpoint.identity.principal_id
model_endpoint_msi_principal_id
将 Contributor 角色授予 Azure Cache for Redis 上的联机终结点托管标识
此代码单元将 Contributor 角色授予 Redis 实例上的在线终结点托管标识。 需要此 RBAC 权限才能将数据写入 Redis 联机存储中。
from azure.core.exceptions import ResourceExistsError
from azure.mgmt.msi import ManagedServiceIdentityClient
from azure.mgmt.msi.models import Identity
from azure.mgmt.authorization import AuthorizationManagementClient
from azure.mgmt.authorization.models import RoleAssignmentCreateParameters
from uuid import uuid4

auth_client = AuthorizationManagementClient(
    AzureMLOnBehalfOfCredential(), redis_subscription_id
)

scope = f"/subscriptions/{redis_subscription_id}/resourceGroups/{redis_resource_group_name}/providers/Microsoft.Cache/Redis/{redis_name}"


# The role definition ID for the "contributor" role on the redis cache
# You can find other built-in role definition IDs in the Azure documentation
role_definition_id = f"/subscriptions/{redis_subscription_id}/providers/Microsoft.Authorization/roleDefinitions/b24988ac-6180-42a0-ab88-20f7382dd24c"

# Generate a random UUID for the role assignment name
role_assignment_name = str(uuid4())

# Set up the role assignment creation parameters
role_assignment_params = RoleAssignmentCreateParameters(
    principal_id=model_endpoint_msi_principal_id,
	role_definition_id=role_definition_id,
	principal_type="ServicePrincipal",
)

# Create the role assignment
try:
    # Create the role assignment
	result = auth_client.role_assignments.create(
	    scope, role_assignment_name, role_assignment_params
	)
	print(
	    f"Redis RBAC granted to managed identity '{model_endpoint_msi_principal_id}'."
	)
except ResourceExistsError:
    print(
	    f"Redis RBAC already exists for managed identity '{model_endpoint_msi_principal_id}'."
	)
将 AzureML 数据科学家 角色授予特征存储上的联机终结点托管标识
此代码单元将 AzureML 数据科学家 角色授予特征库上的在线终结点托管标识。 将模型成功部署到联机终结点需要此 RBAC 权限。
auth_client = AuthorizationManagementClient(
    AzureMLOnBehalfOfCredential(), featurestore_subscription_id
)

scope = f"/subscriptions/{featurestore_subscription_id}/resourceGroups/{featurestore_resource_group_name}/providers/Microsoft.MachineLearningServices/workspaces/{featurestore_name}"

# The role definition ID for the "AzureML Data Scientist" role.
# You can find other built-in role definition IDs in the Azure documentation.
role_definition_id = f"/subscriptions/{featurestore_subscription_id}/providers/Microsoft.Authorization/roleDefinitions/f6c7c914-8db3-469d-8ca1-694a8f32e121"

# Generate a random UUID for the role assignment name.
role_assignment_name = str(uuid4())

# Set up the role assignment creation parameters.
role_assignment_params = RoleAssignmentCreateParameters(
    principal_id=model_endpoint_msi_principal_id,
	role_definition_id=role_definition_id,
	principal_type="ServicePrincipal",
)

# Create the role assignment
try:
    # Create the role assignment
	    result = auth_client.role_assignments.create(
	        scope, role_assignment_name, role_assignment_params
	    )
	    print(
	        f"Feature store RBAC granted to managed identity '{model_endpoint_msi_principal_id}'."
	    )
except ResourceExistsError:
        print(
	        f"Feature store RBAC already exists for managed identity '{model_endpoint_msi_principal_id}'."
	    )
将模型部署到联机终结点
查看评分脚本 project/fraud_model/online_inference/src/scoring.py。 评分脚本
- 从模型训练期间随模型一起打包的特征检索规范中加载特征元数据。 本教程系列的教程 3 介绍了此任务。 该规范包含来自
transactions和accounts特征集的特征。 - 收到输入的推理请求时,使用该请求中的索引键查找线上特性。 在这种情况下,对于这两个特征集,索引列为
accountID。 - 将特征传递给模型以执行推理,并返回响应。 响应是一个表示变量
is_fraud的布尔值。
接下来,执行此代码单元,以便为模型部署创建托管联机部署定义。
deployment = ManagedOnlineDeployment(
    name="green",
	endpoint_name=endpoint_name,
	model="azureml:fraud_model:1",
	code_configuration=CodeConfiguration(
	    code=root_dir + "/project/fraud_model/online_inference/src/",
	    scoring_script="scoring.py",
	),
	environment=Environment(
	    conda_file=root_dir + "/project/fraud_model/online_inference/conda.yml",
	    image="mcr.microsoft.com/azureml/openmpi4.1.0-ubuntu20.04",
	),
	instance_type="Standard_DS3_v2",
	instance_count=1,
)
使用此代码单元将模型部署到联机终结点。 部署可能需要 4 到 5 分钟。
# Model deployment to online enpoint may take 4-5 minutes.
ws_client.online_deployments.begin_create_or_update(deployment).result()
使用模拟数据测试联机部署
执行此代码单元可使用模拟数据测试联机部署。 单元格应显示 0 或 1 作为其输出。
# Test the online deployment using the mock data.
sample_data = root_dir + "/project/fraud_model/online_inference/test.json"
ws_client.online_endpoints.invoke(
    endpoint_name=endpoint_name, request_file=sample_data, deployment_name="green"
)
清理
本系列的教程五将介绍如何删除资源。