在本快速入门中,了解如何使用 Azure 门户、Azure PowerShell或Azure CLI创建 NAT 网关。 Azure NAT 网关服务为Azure中的虚拟机提供可缩放的出站连接。
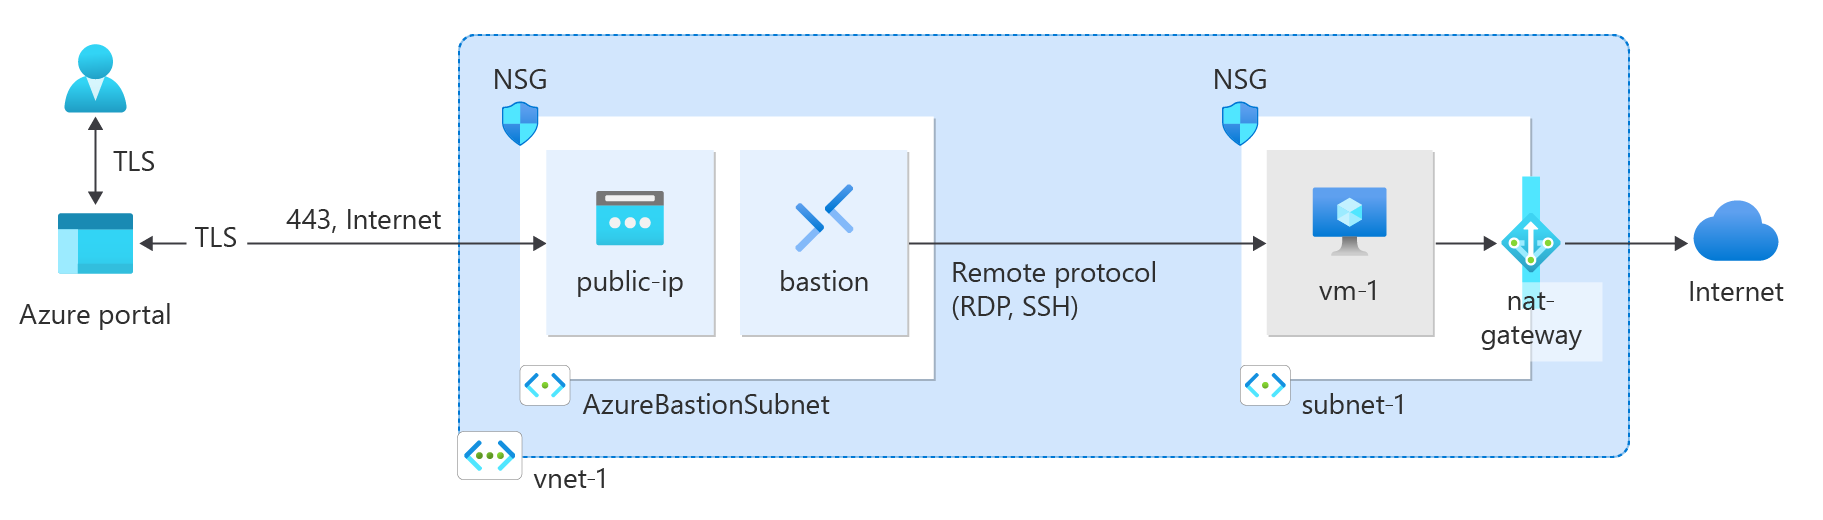
下图显示了在本快速入门中创建的资源。
Prerequisites
创建资源组
在门户顶部的搜索框中,输入 资源组。 在搜索结果中选择“资源组”。
选择+ 新建。
在 “创建资源组”中,输入或选择以下值:
| Setting |
Value |
|
项目详细信息 |
|
|
Subscription |
选择 Azure 订阅。 |
|
资源组 |
输入 test-rg。 |
|
资源详细信息 |
|
|
Region |
选择“中国北部 3”。 |
选择“查看 + 创建”。
选择 创建。
使用 New-AzResourceGroup 创建一个资源组。 Azure 资源组是在其中部署和管理 Azure 资源的逻辑容器。
以下示例在 test-rg 位置创建一个名为 chinanorth3 的资源组:
$rsg = @{
    Name = 'test-rg'
    Location = 'chinanorth3'
}
New-AzResourceGroup @rsg
使用 az group create 创建一个资源组。 Azure 资源组是在其中部署和管理 Azure 资源的逻辑容器。
az group create \
    --name test-rg \
    --location chinanorth3
创建虚拟网络
以下过程创建包含资源子网的虚拟网络:
在门户中,搜索并选择“虚拟网络”。
在“虚拟网络”页面上,选择“+ 创建”。
在创建虚拟网络的基本信息选项卡上输入或选择以下信息:
| Setting |
Value |
|
项目详细信息 |
|
|
Subscription |
选择订阅。 |
|
资源组 |
选择 test-rg。 |
|
实例详细信息 |
|
|
名称 |
输入“vnet-1”。 |
|
Region |
选择“中国北部 3”。 |
选择“下一步”,转到“安全性”选项卡。
选择下一步,转到IP 地址选项卡。
在“子网”的地址空间框中,选择“默认”子网。
在编辑子网中,输入或选择以下信息:
| Setting |
Value |
|
子网用途 |
保留 默认值。 |
|
名称 |
输入subnet-1。 |
|
IPv4 |
|
|
IPv4 地址范围 |
保留默认值“10.0.0.0/16”。 |
|
起始地址 |
保留默认值“10.0.0.0”。 |
|
大小 |
保留默认值“/24 (256 个地址)”。 |
选择“保存”。
选择窗格底部的 “查看 + 创建 ”。 虚拟网络通过验证后,选择“ 创建”。
使用 New-AzVirtualNetworkSubnetConfig 为虚拟机子网和Azure Bastion主机子网创建子网配置。
$subnet = @{
    Name = 'subnet-1'
    AddressPrefix = '10.0.0.0/24'
}
$subnetConfig = New-AzVirtualNetworkSubnetConfig @subnet

$bastsubnet = @{
    Name = 'AzureBastionSubnet'
    AddressPrefix = '10.0.1.0/26'
}
$bastsubnetConfig = New-AzVirtualNetworkSubnetConfig @bastsubnet
使用 New-AzVirtualNetwork 创建虚拟网络。
$net = @{
    Name = 'vnet-1'
    ResourceGroupName = 'test-rg'
    Location = 'chinanorth3'
    AddressPrefix = '10.0.0.0/16'
    Subnet = $subnetConfig, $bastsubnetConfig
}
$vnet = New-AzVirtualNetwork @net
使用 vnet-1 创建一个名为subnet-1的虚拟网络,以及一个名为az network vnet create的子网。
az network vnet create \
    --resource-group test-rg \
    --name vnet-1 \
    --address-prefix 10.0.0.0/16 \
    --subnet-name subnet-1 \
    --subnet-prefixes 10.0.0.0/24
使用 AzureBastionSubnet 创建名为 az network vnet subnet create 的Azure Bastion子网。
az network vnet subnet create \
    --name AzureBastionSubnet \
    --resource-group test-rg \
    --vnet-name vnet-1 \
    --address-prefix 10.0.1.0/26
部署 Azure Bastion
Azure Bastion 使用您的浏览器,通过其专用 IP 地址,以安全外壳(SSH)或远程桌面协议(RDP)连接到虚拟网络中的虚拟机(VM)。 虚拟机不需要公共 IP 地址、客户端软件或特殊配置。 有关详细信息,请参阅 什么是 Azure Bastion?。
Note
无论出站数据使用情况如何,按小时定价都从部署 Bastion 的时间开始算起。 有关详细信息,请参阅 定价 和 SKU。 如果要将 Bastion 部署为教程或测试的一部分,建议在使用完此资源后将其删除。
在门户顶部的搜索框中,输入“堡垒”。 在搜索结果中选择 Bastions 。
选择+ 新建。
在创建 Bastion的基本信息选项卡上,输入或选择以下信息:
| Setting |
Value |
|
项目详细信息 |
|
|
Subscription |
选择订阅。 |
|
资源组 |
选择 test-rg。 |
|
实例详细信息 |
|
|
名称 |
输入 堡垒。 |
|
Region |
选择“中国北部 3”。 |
|
级 |
选择 “开发人员”。 |
|
配置虚拟网络 |
|
|
虚拟网络 |
选择“vnet-1”。 |
选择“查看 + 创建”。
选择 创建。
使用 New-AzPublicIpAddress 为Azure Bastion主机创建公共 IP 地址。
$ip = @{
    Name = 'public-ip'
    ResourceGroupName = 'test-rg'
    Location = 'chinanorth3'
    Sku = 'Standard'
    AllocationMethod = 'Static'
    Zone = 1, 2, 3
}
$publicip = New-AzPublicIpAddress @ip
使用 New-AzBastion 创建Azure Bastion主机。
$bastion = @{
    Name = 'bastion'
    ResourceGroupName = 'test-rg'
    PublicIpAddressRgName = 'test-rg'
    PublicIpAddressName = 'public-ip'
    VirtualNetworkRgName = 'test-rg'
    VirtualNetworkName = 'vnet-1'
    Sku = 'Basic'
}
New-AzBastion @bastion -AsJob
Azure Bastion主机可能需要几分钟才能部署。
使用 az network public-ip create 为Azure Bastion主机创建公共 IP 地址。
az network public-ip create \
    --resource-group test-rg \
    --name public-ip \
    --sku Standard \
    --location chinanorth3 \
    --zone 1 2 3
使用 az network bastion create 创建Azure Bastion主机。
az network bastion create \
    --name bastion \
    --public-ip-address public-ip \
    --resource-group test-rg \
    --vnet-name vnet-1 \
    --location chinanorth3 \
    --sku Basic \
    --no-wait
Azure Bastion主机可能需要几分钟才能部署。
创建虚拟机
以下过程创建具有 SSH 密钥身份验证的 Linux 虚拟机:
在门户顶部的搜索框中,输入“虚拟机”。 在搜索结果中,选择“虚拟机”。
选择 + 创建,然后选择Azure虚拟机。
在“创建虚拟机的”基本信息“选项卡上,输入或选择以下值:
| Setting |
Value |
|
项目详细信息 |
|
|
Subscription |
选择 Azure 订阅。 |
|
资源组 |
选择 test-rg。 |
|
实例详细信息 |
|
|
虚拟机名称 |
输入“vm-1”。 |
|
Region |
选择“中国北部 3”。 |
|
可用性选项 |
选择“无需基础结构冗余”。 |
|
安全类型 |
选择“标准” 。 |
|
Image |
选择 Ubuntu Server 24.04 LTS - Gen2。 |
|
大小 |
选择大小或保留默认设置。 |
|
管理员帐户 |
|
|
身份验证类型 |
选择“SSH 公钥”。 |
|
用户名 |
输入“azureuser”。 |
|
SSH 公钥源 |
选择“生成新密钥对”。 |
|
密钥对名称 |
输入 vm-1_key。 |
选择“网络”选项卡,或者选择“下一步: 磁盘”“下一步: 网络”。
选择以下值:
| Setting |
Value |
|
网络接口 |
|
|
虚拟网络 |
选择“vnet-1”。 |
|
子网 |
选择 subnet-1。 |
|
公共 IP |
选择 “无”。 |
选择“查看 + 创建”。
检查设置,然后选择创建。
“生成新密钥对”窗口打开时,选择“下载私钥并创建资源” 。 密钥文件下载为 vm-1_key.pem。 请确保知道下载 .pem 文件的位置。 需要密钥文件的路径才能连接到 VM。
在本部分中,将创建一个虚拟机来测试 NAT 网关并验证出站连接的公共 IP 地址。
使用 New-AzVM 创建虚拟机。 创建 VM 期间会生成 SSH 密钥对。
$securePassword = ConvertTo-SecureString ' ' -AsPlainText -Force
$cred = New-Object System.Management.Automation.PSCredential ('azureuser', $securePassword)

$vm = @{
    ResourceGroupName = 'test-rg'
    Location = 'chinanorth3'
    Name = 'vm-1'
    Image = 'Ubuntu2204'
    Size = 'Standard_DS1_v2'
    VirtualNetworkName = 'vnet-1'
    SubnetName = 'subnet-1'
    PublicIpAddressName = ''
    GenerateSshKey = $true
    SshKeyName = 'vm-1_key'
    Credential = $cred
}
New-AzVM @vm
等待虚拟机创建完成,然后再转到下一部分。
使用 vm-1 创建名为 SSH 密钥身份验证的 az vm create Linux 虚拟机。
az vm create \
    --resource-group test-rg \
    --name vm-1 \
    --image Ubuntu2404 \
    --admin-username azureuser \
    --generate-ssh-keys \
    --public-ip-address "" \
    --subnet subnet-1 \
    --vnet-name vnet-1
等待虚拟机创建完成,然后再转到下一部分。
创建 NAT 网关
在本部分中,将创建 NAT 网关资源并将其与创建的虚拟网络的子网相关联。
在门户顶部的搜索框中,输入“NAT 网关”。 在搜索结果中选择“NAT 网关”。
选择+ 新建。
在 “创建网络地址转换”(NAT)网关中,在 “基本 信息”选项卡上输入或选择此信息:
| Setting |
Value |
|
项目详细信息 |
|
|
Subscription |
选择 Azure 订阅。 |
|
资源组 |
选择 test-rg。 |
|
实例详细信息 |
|
|
NAT 网关名称 |
输入“nat-gateway”。 |
|
Region |
选择“中国北部 3”。 |
|
SKU |
选择“标准” 。 |
|
可用性区域 |
选择“无区域”。 |
|
TCP 空闲超时(分钟) |
保留默认值“4”。 |
有关可用性区域和 NAT 网关的信息,请参阅 Azure NAT 网关中的可靠性。
选择“出站 IP”选项卡,或选择“下一步:出站 IP”。
输入或选择以下信息:
| Setting |
Value |
|
公共 IP 地址 |
选择“创建新的公共 IP 地址”。
在“名称”中输入 public-ip-nat。
选择“确定”。 |
选择“ 网络 ”选项卡,或选择“ 下一步:网络”。
在 虚拟网络中,选择 vnet-1。
在 “子网名称”中,选中 “子网 1 ”复选框。
选择“ 审阅 + 创建 ”选项卡,或选择窗格底部的 “审阅 + 创建 ”按钮。
选择 创建。
在本部分中,将创建 NAT 网关资源并将其与虚拟网络的子网相关联。
使用 New-AzPublicIpAddress 为 NAT 网关创建公共 IP 地址。
$ip = @{
    Name = 'public-ip-nat'
    ResourceGroupName = 'test-rg'
    Location = 'chinanorth3'
    Sku = 'Standard'
    AllocationMethod = 'Static'
    Zone = 1, 2, 3
}
$publicIP = New-AzPublicIpAddress @ip
使用 New-AzNatGateway 创建 NAT 网关资源。
$nat = @{
    ResourceGroupName = 'test-rg'
    Name = 'nat-gateway'
    IdleTimeoutInMinutes = '10'
    Sku = 'Standard'
    Location = 'chinanorth3'
    PublicIpAddress = $publicIP
}
$natGateway = New-AzNatGateway @nat
使用 subnet-1 将 NAT 网关与 Set-AzVirtualNetworkSubnetConfig 关联。 使用 Set-AzVirtualNetwork.. 应用配置。
$vnet = Get-AzVirtualNetwork -Name 'vnet-1' -ResourceGroupName 'test-rg'

$subnet = @{
    VirtualNetwork = $vnet
    Name = 'subnet-1'
    AddressPrefix = '10.0.0.0/24'
    NatGateway = $natGateway
}
Set-AzVirtualNetworkSubnetConfig @subnet

$vnet | Set-AzVirtualNetwork
在本部分中,将创建 NAT 网关资源并将其与虚拟网络的子网相关联。
使用 az network public-ip create 为 NAT 网关创建公共 IP 地址。
az network public-ip create \
    --resource-group test-rg \
    --name public-ip-nat \
    --sku Standard \
    --allocation-method Static \
    --location chinanorth3 \
    --zone 1 2 3
使用 az network nat gateway create 创建 NAT 网关资源。
az network nat gateway create \
    --resource-group test-rg \
    --name nat-gateway \
    --public-ip-addresses public-ip-nat \
    --idle-timeout 10
使用 subnet-1 将 NAT 网关与 az network vnet subnet update 关联。
az network vnet subnet update \
    --resource-group test-rg \
    --vnet-name vnet-1 \
    --name subnet-1 \
    --nat-gateway nat-gateway
测试 NAT 网关
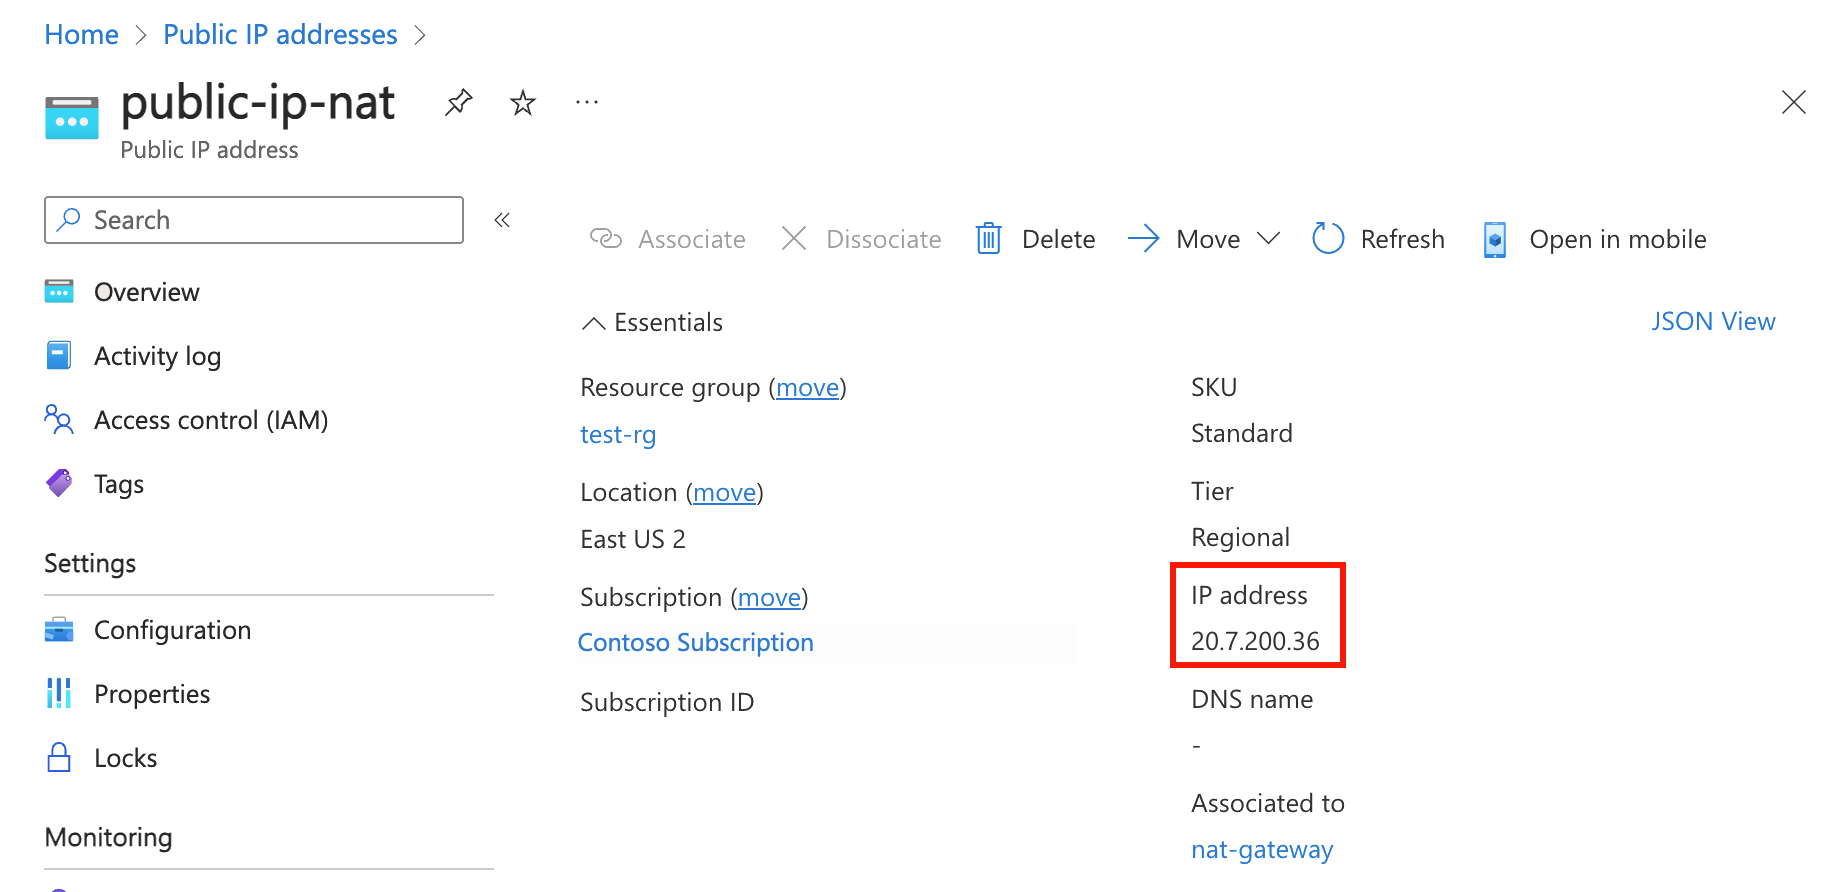
若要测试 NAT 网关,请先发现其公共 IP。 然后连接到测试虚拟机,并通过该公共 IP 验证出站连接。
在门户顶部的搜索框中,输入“公共 IP”。 在搜索结果中,选择“公共 IP 地址”。
选择“public-ip-nat”。
记下公共 IP 地址。
在门户顶部的搜索框中,输入“虚拟机”。 在搜索结果中,选择“虚拟机”。
选择 vm-1。
在“ 概述 ”页上,选择 “连接”,然后选择 “Bastion ”选项卡。
选择使用Bastion。
在 “身份验证类型”下, 从本地文件选择 SSH 私钥。
在 “用户名”中,输入 azureuser。
选择 “浏览 ”并转到在创建 VM 期间下载的 vm-1_key.pem 文件。
选择 连接。
在 Bash 提示符中,输入以下命令:
curl ifconfig.me
验证命令返回的 IP 地址是否与 NAT 网关的公共 IP 地址匹配。
azureuser@vm-1:~$ curl ifconfig.me
203.0.113.0.25
清理资源
清理资源
使用创建的资源之后,可以删除资源组及其所有资源:
在 Azure 门户中,搜索并选择“资源组”。
在“资源组”页上,选择“test-rg”资源组。
在“test-rg”页上,选择“删除资源组”。
在“输入资源组名称以确认删除”中输入“test-rg”,然后选择“删除”。
如果不再需要此应用程序,请使用以下命令删除虚拟网络、虚拟机和 NAT 网关:
Remove-AzResourceGroup -Name 'test-rg' -Force
如果不再需要此应用程序,请使用以下命令删除虚拟网络、虚拟机和 NAT 网关:
az group delete \
    --name test-rg \
    --yes
相关内容
