在本快速入门中,了解如何使用 Azure 门户、Azure CLI、PowerShell、Bicep、ARM 模板和 Terraform 创建 NAT 网关。 NAT 网关服务为 Azure 中的虚拟机提供可缩放的出站连接。
创建 NAT 网关
在部署 NAT 网关资源和其他资源之前,需要一个资源组来包含部署的资源。 在以下步骤中,你将创建资源组、NAT 网关资源和公共 IP 地址。 可以使用一个或多个公共 IP 地址资源和/或公共 IP 前缀。
有关公共 IP 前缀和 NAT 网关的信息,请参阅管理 NAT 网关。
在门户顶部的搜索框中,输入“NAT 网关”。 在搜索结果中选择“NAT 网关”。
选择+ 新建。
在“创建网络地址转换(NAT)网关”中,在“基本信息”选项卡中输入或选择以下信息 :
|
Setting |
Value |
|
项目详细信息 |
|
| Subscription |
选择 Azure 订阅。 |
| 资源组 |
选择“新建”。
输入 test-rg。
选择“确定”。 |
|
实例详细信息 |
|
| NAT 网关名称 |
输入 nat-gateway |
| Region |
选择“中国北部 3” |
| 可用性区域 |
选择“无区域”。 |
| TCP 空闲超时(分钟) |
保留默认值“4”。 |
有关可用性区域和 NAT 网关的信息,请参阅 NAT 网关和可用性区域。
选择“出站 IP”选项卡,或者选择“下一步:出站 IP”按钮(位于页面底部) 。
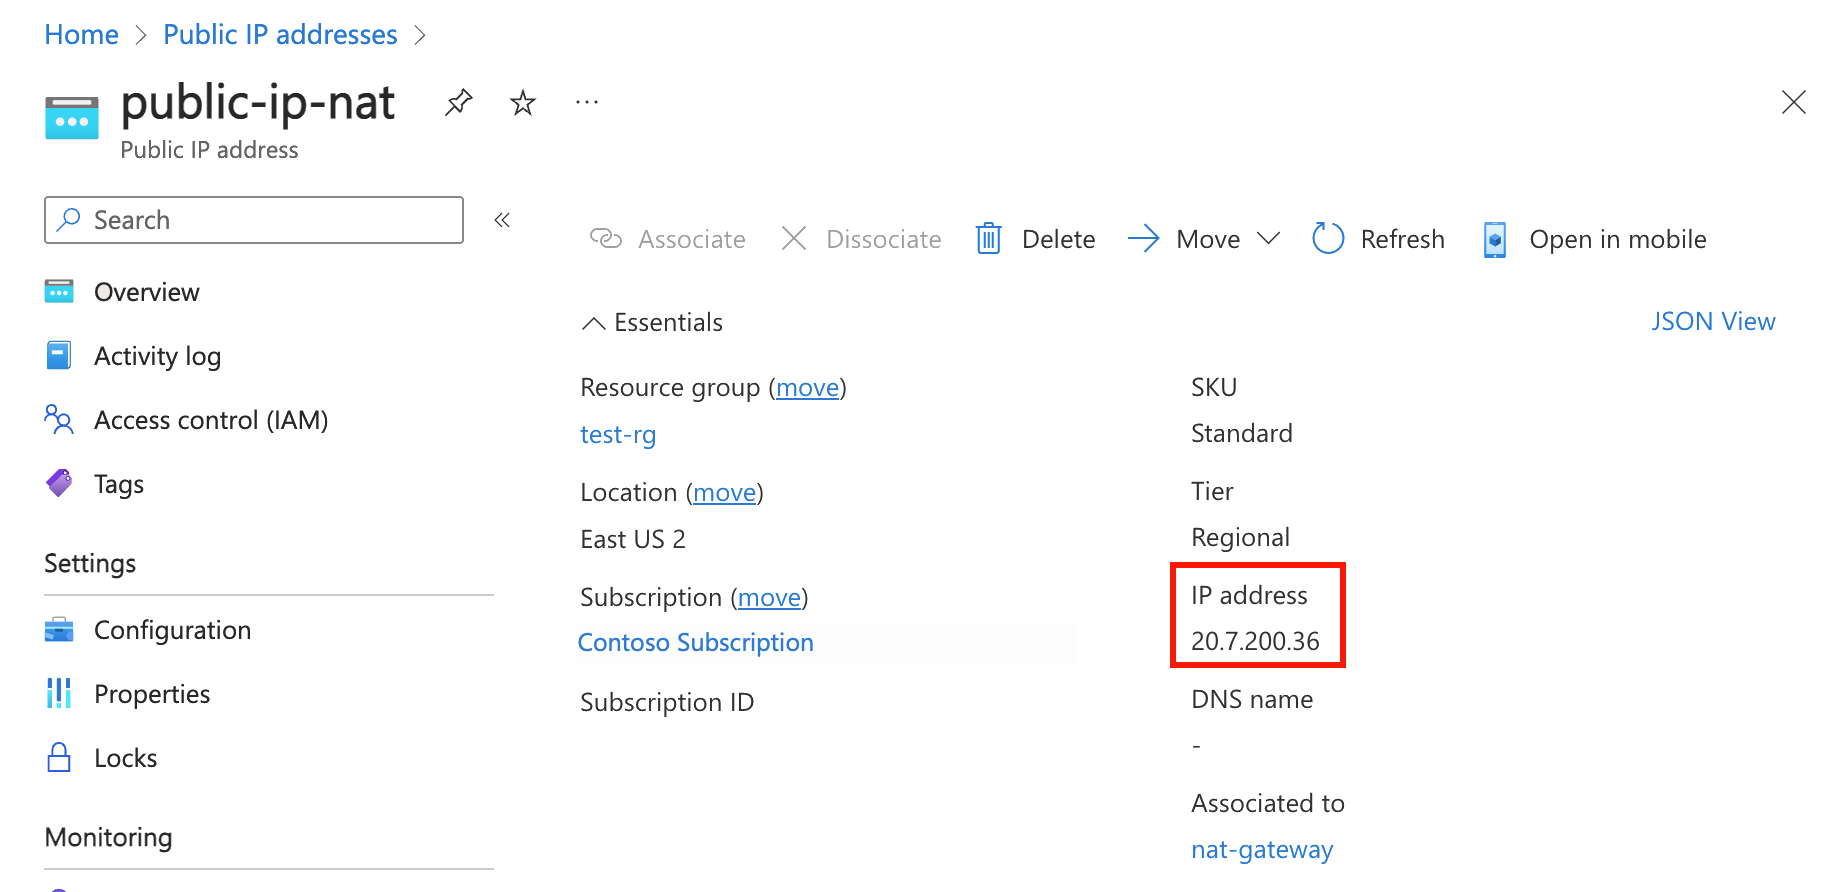
在“出站 IP”选项卡中,输入或选择以下信息:
|
Setting |
Value |
| 公共 IP 地址 |
选择“创建新的公共 IP 地址”。
在“名称”中输入 public-ip-nat。
选择“确定”。 |
选择“查看 + 创建”选项卡,或选择页面底部的“查看 + 创建”按钮 。
选择 创建。
创建虚拟网络和堡垒主机
以下过程创建包含资源子网、Azure Bastion 子网和 Azure Bastion 主机的虚拟网络。
在门户中,搜索并选择“虚拟网络”。
在“虚拟网络”页面上,选择“+ 创建”。
在创建虚拟网络的基本信息选项卡上输入或选择以下信息:
| Setting |
Value |
|
项目详细信息 |
|
| Subscription |
选择订阅。 |
| 资源组 |
选择 test-rg。 |
|
实例详细信息 |
|
| Name |
输入“vnet-1”。 |
| Region |
选择“中国北部 3”。 |
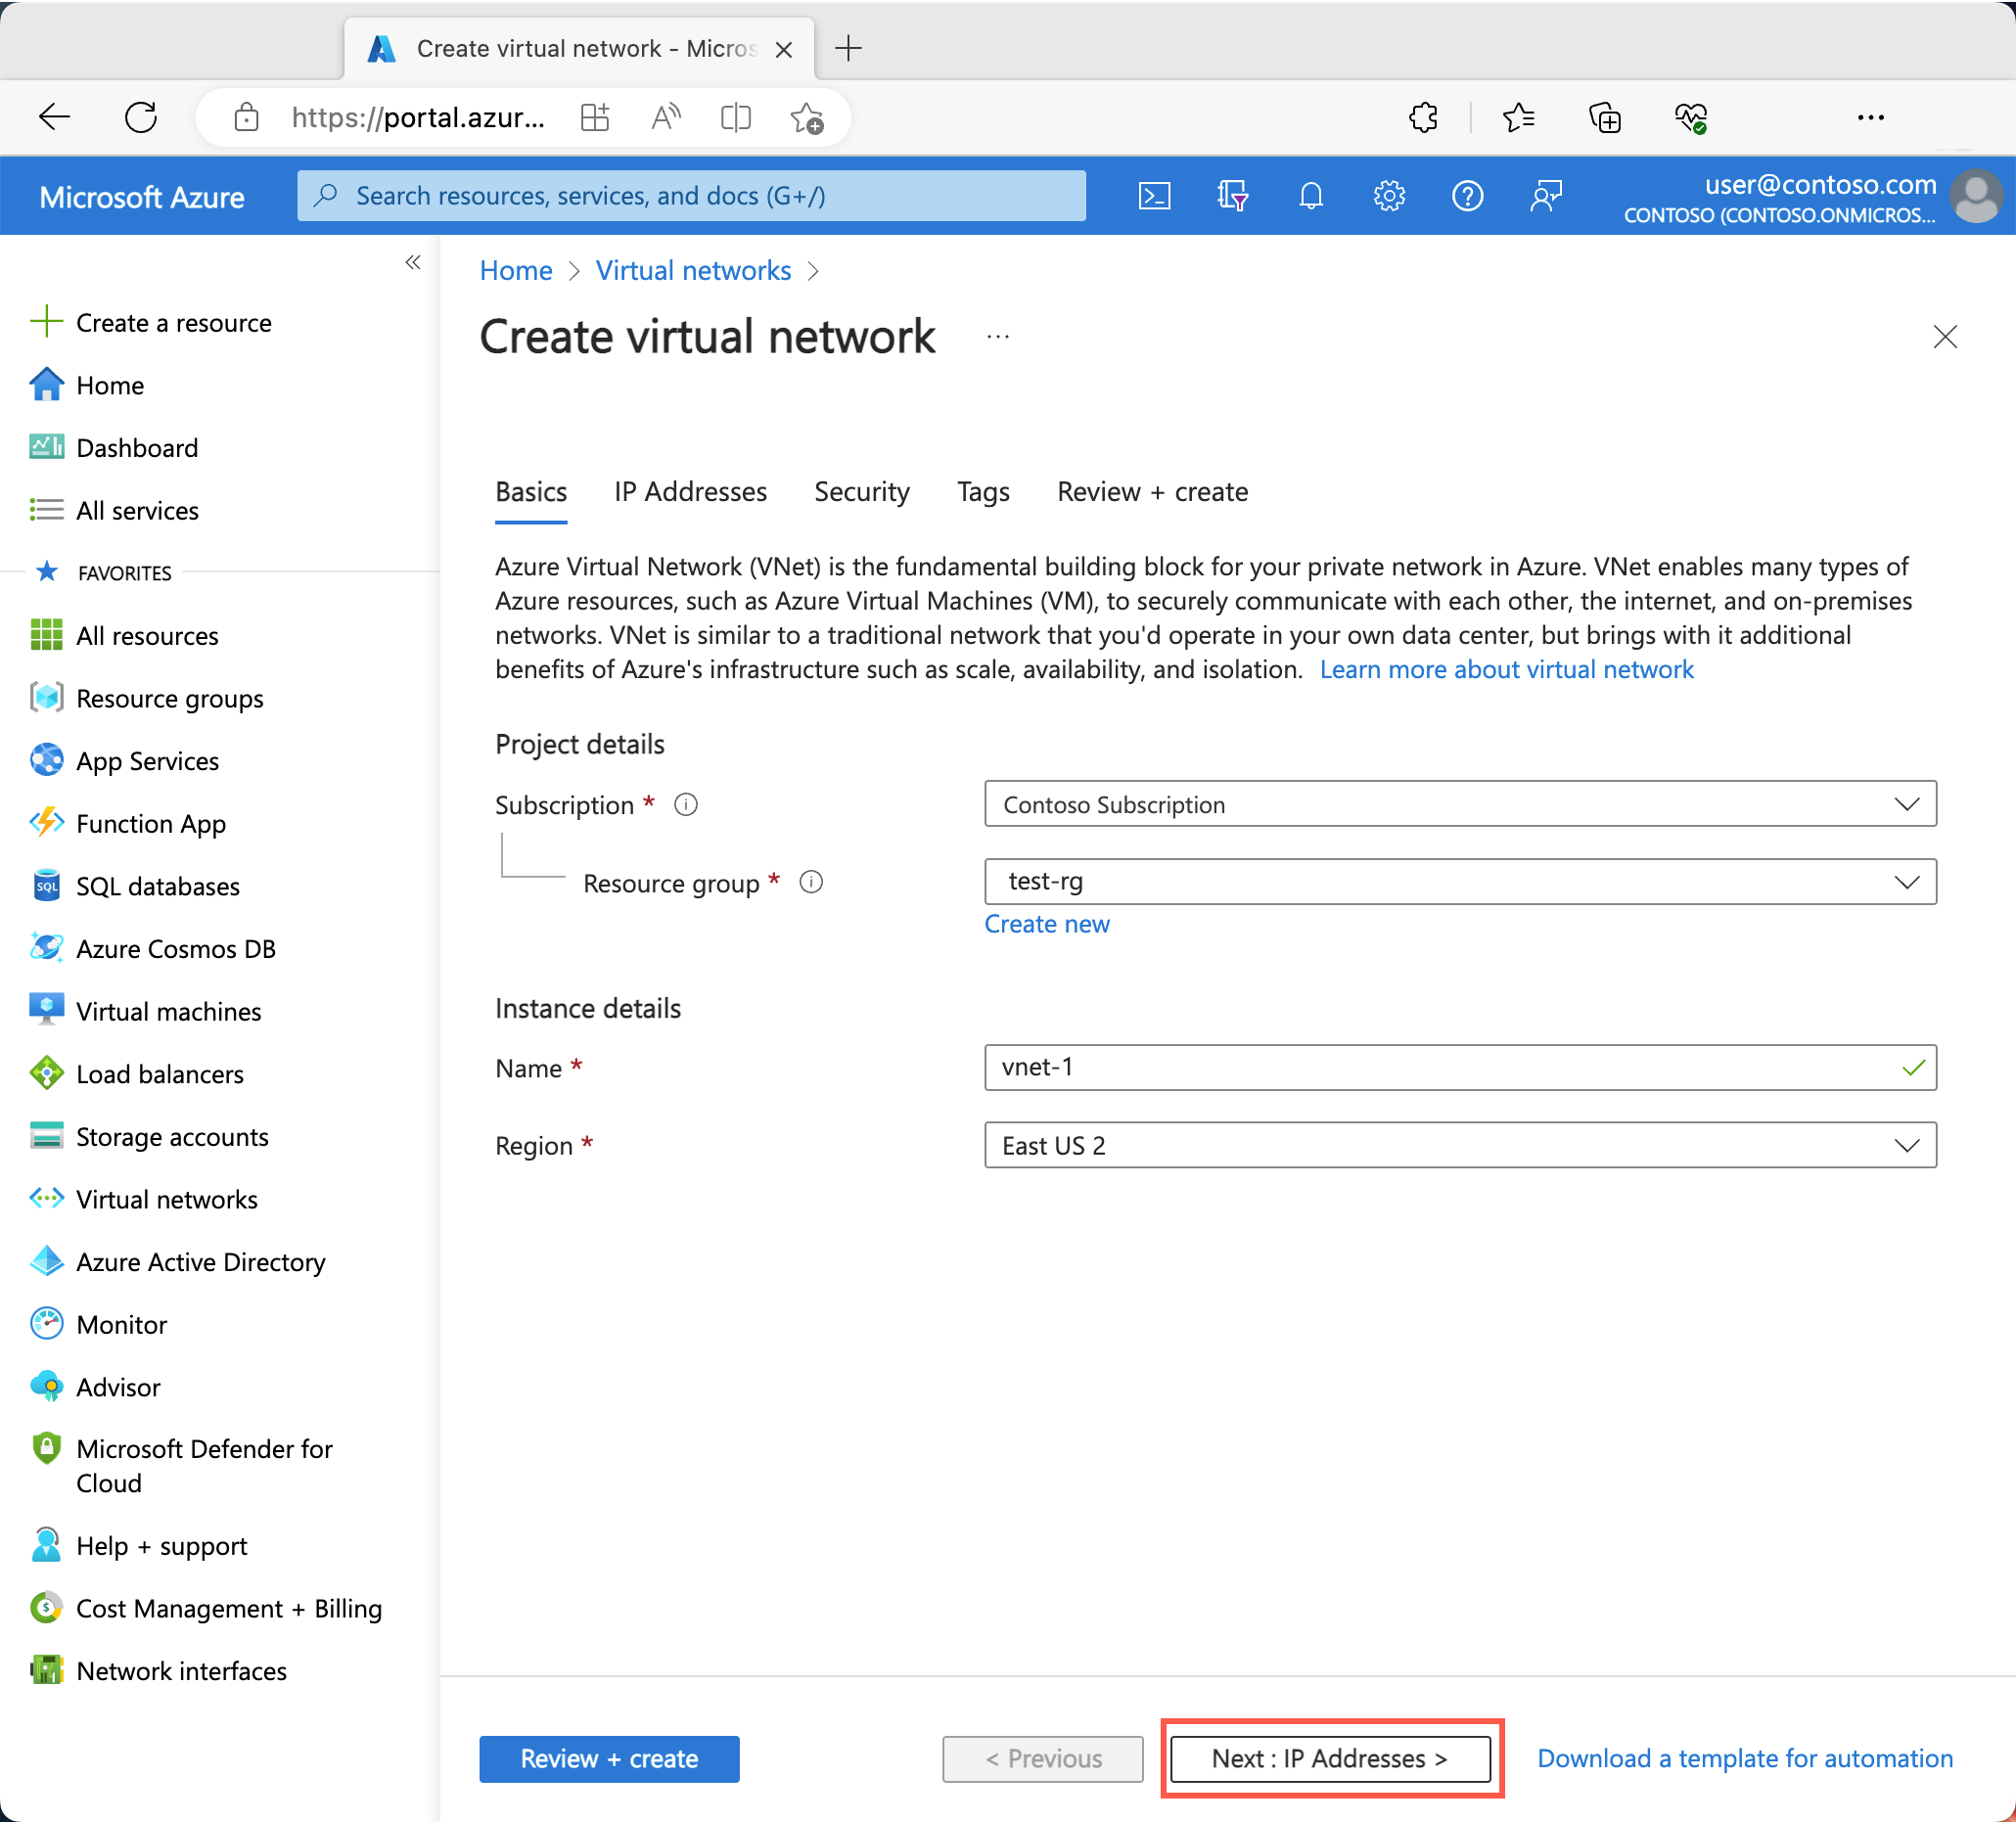
选择“下一步”,转到“安全性”选项卡。
在“安全性”选项卡的“Azure Bastion”部分,选择“启用 Azure Bastion”。
Azure Bastion 使用浏览器通过安全外壳 (SSH) 或远程桌面协议 (RDP),通过使用其专用 IP 地址连接虚拟网络中的虚拟机。 虚拟机不需要公共 IP 地址、客户端软件或特殊配置。 有关 Azure Bastion 的详细信息,请参阅 Azure Bastion
在“Azure Bastion”中,输入或选择以下信息:
| Setting |
Value |
| Azure Bastion 主机名 |
输入 堡垒。 |
| Azure Bastion 公共 IP 地址 |
选择“创建公共 IP 地址”。
在名称中输入 public-ip-bastion。
选择“确定”。 |
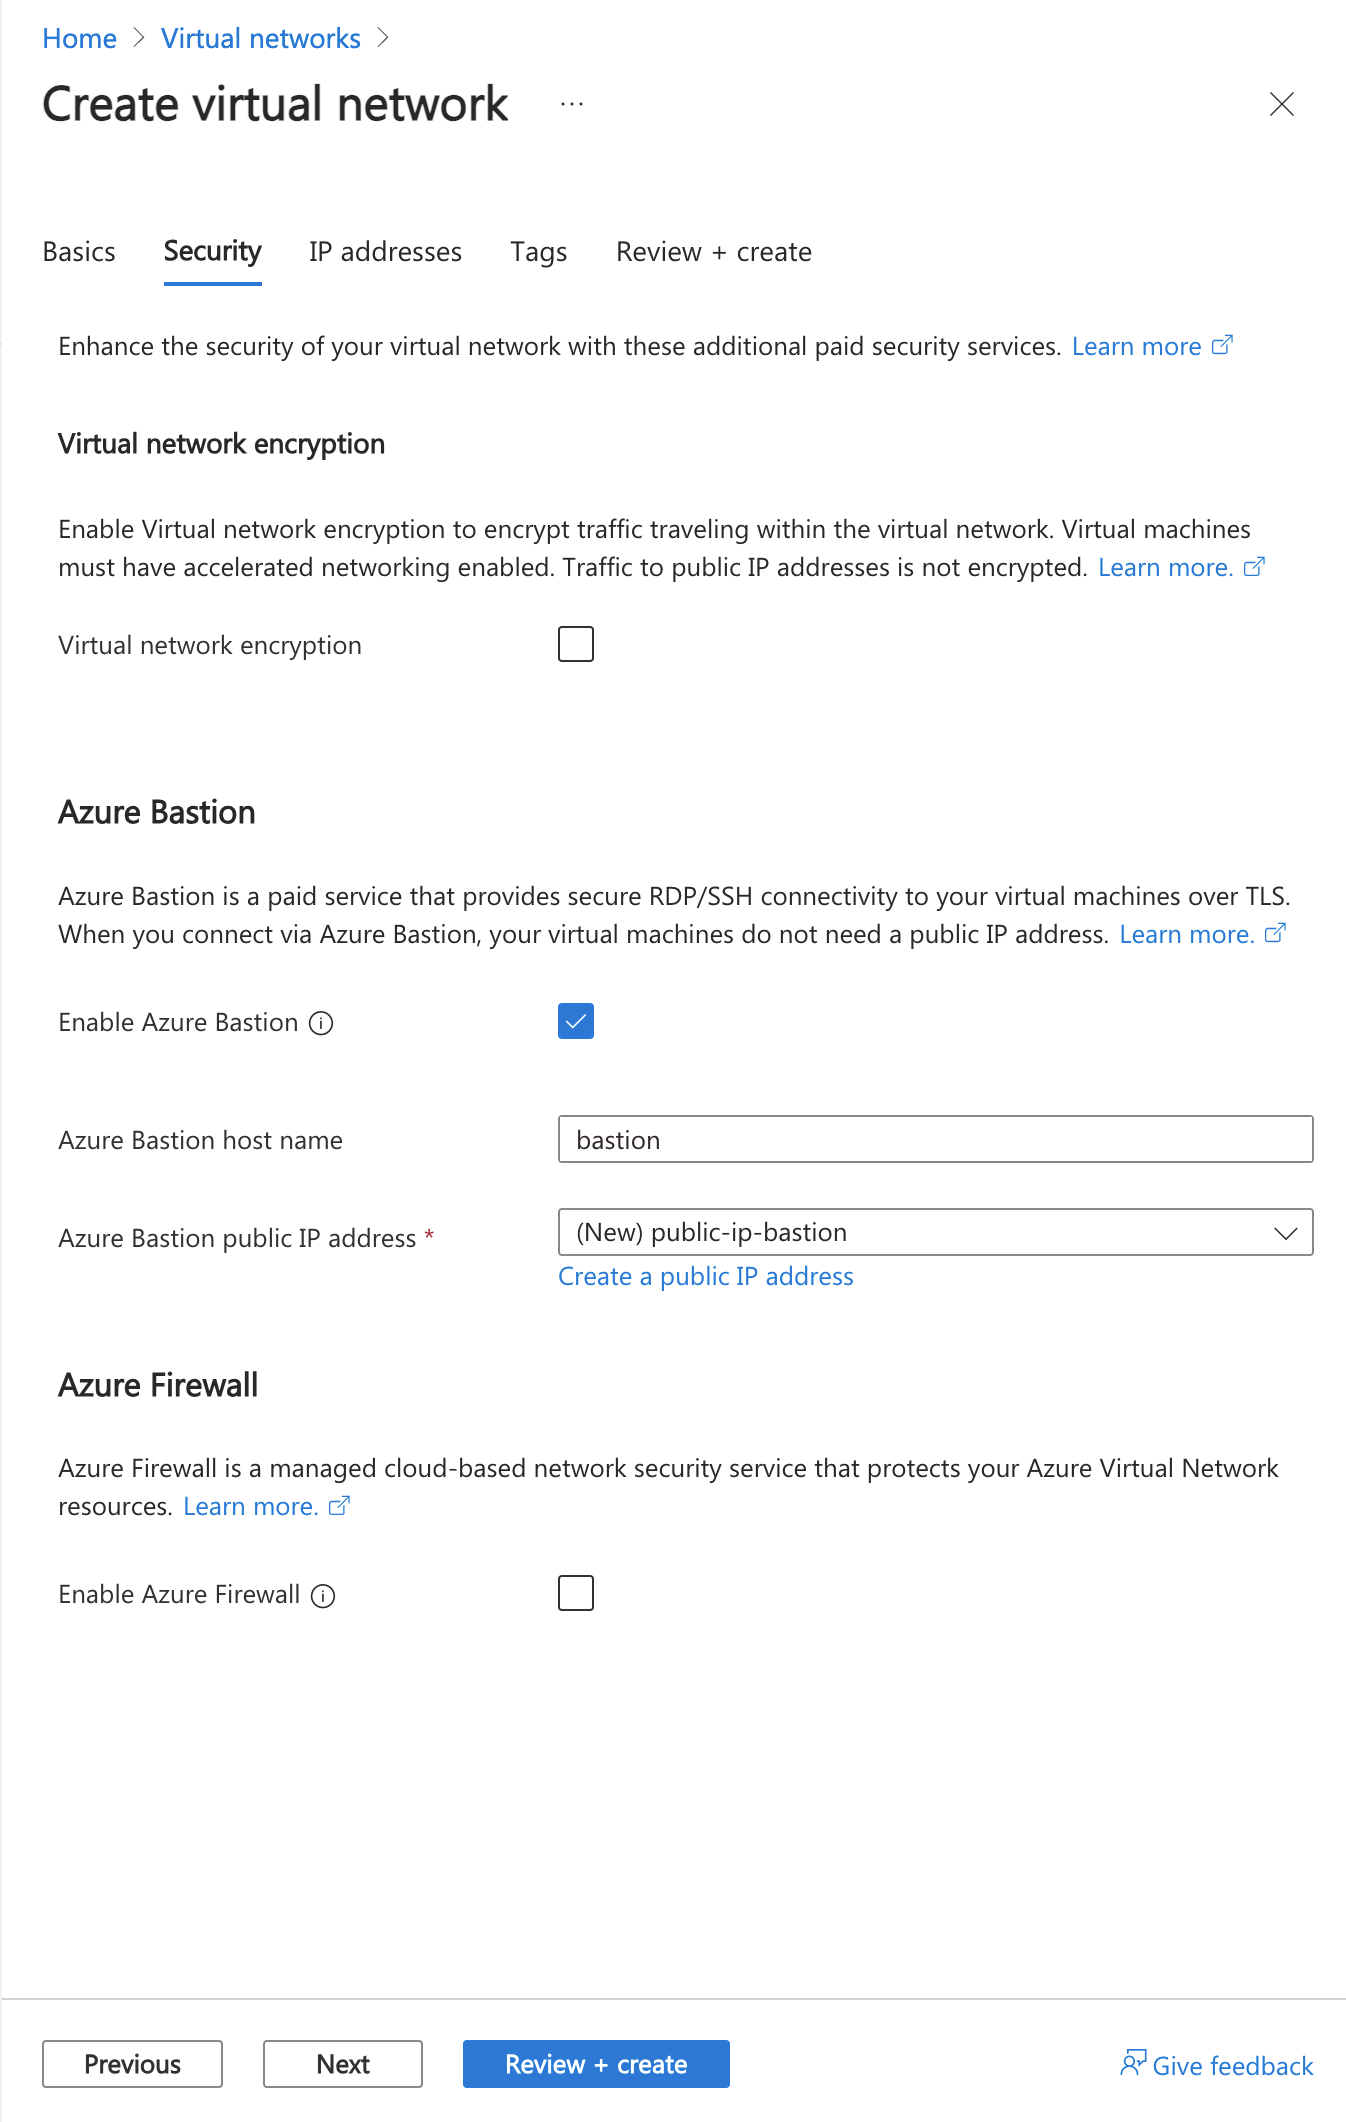
选择下一步,转到IP 地址选项卡。
在“子网”的地址空间框中,选择“默认”子网。
在编辑子网中,输入或选择以下信息:
| Setting |
Value |
| 子网用途 |
保留默认值“默认”。 |
| Name |
输入subnet-1。 |
|
IPv4 |
|
| IPv4 地址范围 |
保留默认值“10.0.0.0/16”。 |
| 起始地址 |
保留默认值“10.0.0.0”。 |
| Size |
保留默认值/24 (256 个地址)。 |
|
Security |
|
| NAT 网关 |
选择“nat-gateway”。 |

选择“保存”。
选择屏幕底部的“查看 + 创建”,然后在验证通过时选择“创建”。
创建测试虚拟机
以下过程会在虚拟网络中创建一个名为 vm-1 的测试虚拟机 (VM)。
在门户中,搜索并选择“虚拟机”。
在“虚拟机”中,选择“+ 创建”。
在“创建虚拟机”的“基本信息”选项卡上,输入或选择以下信息:
| Setting |
Value |
|
项目详细信息 |
|
| Subscription |
选择订阅。 |
| 资源组 |
选择 test-rg。 |
|
实例详细信息 |
|
| 虚拟机名称 |
输入“vm-1”。 |
| Region |
选择“(亚太)中国东部 2”。 |
| 可用性选项 |
选择“无需基础结构冗余”。 |
| 安全类型 |
保留默认值标准。 |
| 图像 |
选择“Ubuntu Server 22.04 LTS - Gen2”。 |
| Size |
请选择尺寸。 |
|
管理员帐户 |
|
| 身份验证类型 |
选择 “密码”。 |
| Username |
输入“azureuser”。 |
| Password |
输入密码。 |
| 确认密码 |
重新输入密码。 |
|
入站端口规则 |
|
| 公共入站端口 |
选择 “无”。 |
选择页面顶部的“网络”选项卡。
在“网络”选项卡中,输入或选择以下信息:
| Setting |
Value |
|
网络接口 |
|
| 虚拟网络 |
选择“vnet-1”。 |
| Subnet |
选择“subnet-1 (10.0.0.0/24)”。 |
| 公网 IP |
选择 “无”。 |
| NIC 网络安全组 |
选择 “高级”。 |
| 配置网络安全组 |
选择“新建”。
在“名称”中输入“nsg-1”。
将其余选项保留为默认设置,然后选择确定。 |
将其余设置保留为默认值,然后选择“查看 + 创建”。
检查设置,然后选择“创建”。
Note
虚拟网络中具有堡垒主机的虚拟机不需要公共 IP 地址。 Bastion 提供公共 IP,虚拟机使用专用 IP 在网络中进行通信。 可以从堡垒托管的虚拟网络的任何虚拟机中删除公共 IP。 有关详细信息,请参阅 将公共 IP 地址与 Azure VM 取消关联。
Note
Azure 会为未分配公共 IP 地址的 VM 或位于内部基本 Azure 负载均衡器的后端池中的 VM 提供默认出站访问 IP。 默认出站访问 IP 机制会提供不可配置的出站 IP 地址。
发生以下事件之一时,将禁用默认出站访问 IP:
- 将公共 IP 地址分配给 VM。
- 虚拟机被放置在标准负载均衡器的后端池中,可以有出站规则,也可以没有。
- 向 VM 的子网分配了 Azure NAT 网关资源。
在灵活业务流程模式下通过使用虚拟机规模集创建的 VM 没有默认的出站访问权限。
有关 Azure 中的出站连接的详细信息,请参阅 Azure 中的默认出站访问,使用源网络地址转换(SNAT)进行出站连接。
创建资源组
使用 New-AzResourceGroup 创建资源组。 Azure 资源组是在其中部署和管理 Azure 资源的逻辑容器。
以下示例在 chinanorth3 位置创建名为 test-rg 的资源组:
$rsg = @{
    Name = 'test-rg'
    Location = 'chinanorth3'
}
New-AzResourceGroup @rsg
创建 NAT 网关
本部分介绍了如何创建 NAT 网关和支持资源。
## Create public IP address for NAT gateway ##
$ip = @{
    Name = 'public-ip-nat'
    ResourceGroupName = 'test-rg'
    Location = 'chinanorth3'
    Sku = 'Standard'
    AllocationMethod = 'Static'
    Zone = 1,2,3
}
$publicIP = New-AzPublicIpAddress @ip

## Create NAT gateway resource ##
$nat = @{
    ResourceGroupName = 'test-rg'
    Name = 'nat-gateway'
    IdleTimeoutInMinutes = '10'
    Sku = 'Standard'
    Location = 'chinanorth3'
    PublicIpAddress = $publicIP
}
$natGateway = New-AzNatGateway @nat

## Create subnet config and associate NAT gateway to subnet##
$subnet = @{
    Name = 'subnet-1'
    AddressPrefix = '10.0.0.0/24'
    NatGateway = $natGateway
}
$subnetConfig = New-AzVirtualNetworkSubnetConfig @subnet

## Create Azure Bastion subnet ##
$bastsubnet = @{
    Name = 'AzureBastionSubnet'
    AddressPrefix = '10.0.1.0/26'
}
$bastsubnetConfig = New-AzVirtualNetworkSubnetConfig @bastsubnet

## Create the virtual network ##
$net = @{
    Name = 'vnet-1'
    ResourceGroupName = 'test-rg'
    Location = 'chinanorth3'
    AddressPrefix = '10.0.0.0/16'
    Subnet = $subnetConfig,$bastsubnetConfig
}
$vnet = New-AzVirtualNetwork @net

## Create public IP address for bastion host ##
$ip = @{
    Name = 'public-ip'
    ResourceGroupName = 'test-rg'
    Location = 'chinanorth3'
    Sku = 'Standard'
    AllocationMethod = 'Static'
    Zone = 1,2,3
}
$publicip = New-AzPublicIpAddress @ip

## Create bastion host ##
$bastion = @{
    Name = 'bastion'
    ResourceGroupName = 'test-rg'
    PublicIpAddressRgName = 'test-rg'
    PublicIpAddressName = 'public-ip'
    VirtualNetworkRgName = 'test-rg'
    VirtualNetworkName = 'vnet-1'
    Sku = 'Basic'
}
New-AzBastion @bastion
堡垒主机可能需要几分钟时间才能完成部署。 在进入下一部分之前,请等待堡垒主机部署完毕。
创建虚拟机
在本部分中,将创建一个虚拟机来测试 NAT 网关并验证出站连接的公共 IP 地址。
# Set the administrator and password for the VM ##
$cred = Get-Credential

## Place the virtual network into a variable ##
$vnet = Get-AzVirtualNetwork -Name 'vnet-1' -ResourceGroupName 'test-rg'

## Create network interface for virtual machine ##
$nic = @{
    Name = "nic-1"
    ResourceGroupName = 'test-rg'
    Location = 'chinanorth3'
    Subnet = $vnet.Subnets[0]
}
$nicVM = New-AzNetworkInterface @nic

## Create a virtual machine configuration ##
$vmsz = @{
    VMName = 'vm-1'
    VMSize = 'Standard_DS1_v2'
}
$vmos = @{
    ComputerName = 'vm-1'
    Credential = $cred
}
$vmimage = @{
    PublisherName = 'Canonical'
    Offer = '0001-com-ubuntu-server-jammy'
    Skus = '22_04-lts-gen2'
    Version = 'latest'
}
$vmConfig = New-AzVMConfig @vmsz `
    | Set-AzVMOperatingSystem @vmos -Linux `
    | Set-AzVMSourceImage @vmimage `
    | Add-AzVMNetworkInterface -Id $nicVM.Id

## Create the virtual machine ##
$vm = @{
    ResourceGroupName = 'test-rg'
    Location = 'chinanorth3'
    VM = $vmConfig
}
New-AzVM @vm
请先等待虚拟机创建完成,然后再转到下一部分。
创建资源组
使用 az group create 创建资源组。 Azure 资源组是在其中部署和管理 Azure 资源的逻辑容器。
az group create \
    --name test-rg \
    --location chinanorth3
创建 NAT 网关
本部分介绍了如何创建 NAT 网关和支持资源。
创建公共 IP 地址
若要访问 Internet,需要 NAT 网关的一个或多个公共 IP 地址。 使用 az network public-ip create 创建公共 IP 地址资源。
az network public-ip create \
    --resource-group test-rg \
    --name public-ip-nat \
    --sku Standard \
    --allocation-method Static \
    --location chinanorth3 \
    --zone 1 2 3
创建 NAT 网关资源
使用 az network nat gateway create 创建 NAT 网关资源。 NAT 网关使用在上一步中创建的公共 IP 地址。 空闲超时设置为 10 分钟。
az network nat gateway create \
    --resource-group test-rg \
    --name nat-gateway \
    --public-ip-addresses public-ip-nat \
    --idle-timeout 10
创建虚拟网络和子网
使用 az network vnet create 创建一个名为 vnet-1 的虚拟网络,以及一个名为 subnet-1 的子网。 虚拟网络的 IP 地址空间是 10.0.0.0/16。 虚拟网络中的子网是 10.0.0.0/24。
az network vnet create \
    --resource-group test-rg \
    --name vnet-1 \
    --address-prefix 10.0.0.0/16 \
    --subnet-name subnet-1 \
    --subnet-prefixes 10.0.0.0/24
创建 Azure Bastion 子网
使用 az network vnet subnet create 创建一个名为 AzureBastionSubnet 的 Azure Bastion 子网:
az network vnet subnet create \
    --name AzureBastionSubnet \
    --resource-group test-rg \
    --vnet-name vnet-1 \
    --address-prefix 10.0.1.0/26
将 NAT 网关关联到子网
使用 az network vnet subnet update 将 NAT 网关关联到子网:
az network vnet subnet update \
    --resource-group test-rg \
    --vnet-name vnet-1 \
    --name subnet-1 \
    --nat-gateway nat-gateway
为 Bastion 主机创建公共 IP 地址
使用 az network public-ip create 为 Bastion 主机创建公共 IP 地址:
az network public-ip create \
    --resource-group test-rg \
    --name public-ip \
    --sku Standard \
    --location chinanorth3 \
    --zone 1 2 3
创建 Bastion 主机
使用 az network bastion create 创建 Azure Bastion 主机:
az network bastion create \
    --name bastion \
    --public-ip-address public-ip \
    --resource-group test-rg \
    --vnet-name vnet-1 \
    --location chinanorth3
Bastion 主机可能需要几分钟才能部署。 等待 Bastion 主机部署,然后再转到下一部分。
创建虚拟机
创建名为 vm-1 的虚拟机来测试 NAT 网关,并验证出站连接的公共 IP 地址。 使用 az vm create:
az vm create \
    --resource-group test-rg \
    --name vm-1 \
    --image Ubuntu2204 \
    --admin-username azureuser \
    --authentication-type password \
    --public-ip-address "" \
    --subnet subnet-1 \
    --vnet-name vnet-1
请先等待虚拟机创建完成,然后再转到下一部分。
此 Terraform 文件会部署虚拟网络、NAT 网关资源和 Ubuntu 虚拟机。 Ubuntu 虚拟机将部署到与 NAT 网关资源关联的子网。
该脚本还会生成随机 SSH 公钥,并将其与虚拟机相关联以进行安全访问。 公钥在脚本执行结束时输出。
除了 AzureRM 提供程序之外,脚本还使用 Random 和 AzAPI 提供程序。 Random 提供程序用于生成资源组和 SSH 密钥的唯一名称。 AzAPI 提供程序用于生成 SSH 公钥。
与公钥一样,在运行脚本时,会打印创建的资源组、虚拟网络、子网和 NAT 网关的名称。
使用 Terraform 可以定义、预览和部署云基础结构。 使用 Terraform 时,请使用 HCL 语法来创建配置文件。 利用 HCL 语法,可指定 Azure 这样的云提供程序和构成云基础结构的元素。 创建配置文件后,请创建一个执行计划,利用该计划,可在部署基础结构更改之前先预览这些更改。 验证了更改后,请应用该执行计划以部署基础结构。
创建用于测试和运行示例 Terraform 代码的目录,并将其设为当前目录。
创建名为 main.tf 的文件并插入下列代码:
# Resource Group
resource "azurerm_resource_group" "rg" {
  location = var.resource_group_location
  name     = "${random_pet.prefix.id}-rg"
}

# Virtual Network
resource "azurerm_virtual_network" "my_terraform_network" {
  name                = "${random_pet.prefix.id}-vnet"
  address_space       = ["10.0.0.0/16"]
  location            = azurerm_resource_group.rg.location
  resource_group_name = azurerm_resource_group.rg.name
}

# Subnet 1
resource "azurerm_subnet" "my_terraform_subnet_1" {
  name                 = "subnet-1"
  resource_group_name  = azurerm_resource_group.rg.name
  virtual_network_name = azurerm_virtual_network.my_terraform_network.name
  address_prefixes     = ["10.0.0.0/24"]
}

# Public IP address for NAT gateway
resource "azurerm_public_ip" "my_public_ip" {
  name                = "public-ip-nat"
  location            = azurerm_resource_group.rg.location
  resource_group_name = azurerm_resource_group.rg.name
  allocation_method   = "Static"
  sku                 = "Standard"
}

# NAT Gateway
resource "azurerm_nat_gateway" "my_nat_gateway" {
  name                = "nat-gateway"
  location            = azurerm_resource_group.rg.location
  resource_group_name = azurerm_resource_group.rg.name
}

# Associate NAT Gateway with Public IP
resource "azurerm_nat_gateway_public_ip_association" "example" {
  nat_gateway_id       = azurerm_nat_gateway.my_nat_gateway.id
  public_ip_address_id = azurerm_public_ip.my_public_ip.id
}

# Associate NAT Gateway with Subnet
resource "azurerm_subnet_nat_gateway_association" "example" {
  subnet_id      = azurerm_subnet.my_terraform_subnet_1.id
  nat_gateway_id = azurerm_nat_gateway.my_nat_gateway.id
}

# Create public IP for virtual machine
resource "azurerm_public_ip" "my_public_ip_vm" {
  name                = "public-ip-vm"
  location            = azurerm_resource_group.rg.location
  resource_group_name = azurerm_resource_group.rg.name
  allocation_method   = "Static"
  sku                 = "Standard"
}

# Create Network Security Group and rule
resource "azurerm_network_security_group" "my_terraform_nsg" {
  name                = "nsg-1"
  location            = azurerm_resource_group.rg.location
  resource_group_name = azurerm_resource_group.rg.name

  security_rule {
    name                       = "SSH"
    priority                   = 1001
    direction                  = "Inbound"
    access                     = "Allow"
    protocol                   = "Tcp"
    source_port_range          = "*"
    destination_port_range     = "22"
    source_address_prefix      = "*"
    destination_address_prefix = "*"
  }
}

# Create network interface
resource "azurerm_network_interface" "my_terraform_nic" {
  name                = "nic-1"
  location            = azurerm_resource_group.rg.location
  resource_group_name = azurerm_resource_group.rg.name

  ip_configuration {
    name                          = "my_nic_configuration"
    subnet_id                     = azurerm_subnet.my_terraform_subnet_1.id
    private_ip_address_allocation = "Dynamic"
    public_ip_address_id          = azurerm_public_ip.my_public_ip_vm.id
  }
}

# Connect the security group to the network interface
resource "azurerm_network_interface_security_group_association" "example" {
  network_interface_id      = azurerm_network_interface.my_terraform_nic.id
  network_security_group_id = azurerm_network_security_group.my_terraform_nsg.id
}

# Generate random text for a unique storage account name
resource "random_id" "random_id" {
  keepers = {
    # Generate a new ID only when a new resource group is defined
    resource_group = azurerm_resource_group.rg.name
  }

  byte_length = 8
}

# Create storage account for boot diagnostics
resource "azurerm_storage_account" "my_storage_account" {
  name                     = "diag${random_id.random_id.hex}"
  location                 = azurerm_resource_group.rg.location
  resource_group_name      = azurerm_resource_group.rg.name
  account_tier             = "Standard"
  account_replication_type = "LRS"
}

# Create virtual machine
resource "azurerm_linux_virtual_machine" "my_terraform_vm" {
  name                  = "vm-1"
  location              = azurerm_resource_group.rg.location
  resource_group_name   = azurerm_resource_group.rg.name
  network_interface_ids = [azurerm_network_interface.my_terraform_nic.id]
  size                  = "Standard_DS1_v2"

  os_disk {
    name                 = "myOsDisk"
    caching              = "ReadWrite"
    storage_account_type = "Premium_LRS"
  }

  source_image_reference {
    publisher = "Canonical"
    offer     = "0001-com-ubuntu-server-jammy"
    sku       = "22_04-lts-gen2"
    version   = "latest"
  }

  computer_name  = "hostname"
  admin_username = var.username

  admin_ssh_key {
    username   = var.username
    public_key = azapi_resource_action.ssh_public_key_gen.output.publicKey
  }

  boot_diagnostics {
    storage_account_uri = azurerm_storage_account.my_storage_account.primary_blob_endpoint
  }
}

resource "random_pet" "prefix" {
  prefix = var.resource_group_name_prefix
  length = 1
}
- 创建名为
outputs.tf 的文件并插入下列代码:
output "resource_group_name" {
  description = "The name of the created resource group."
  value       = azurerm_resource_group.rg.name
}

output "virtual_network_name" {
  description = "The name of the created virtual network."
  value       = azurerm_virtual_network.my_terraform_network.name
}

output "subnet_name_1" {
  description = "The name of the created subnet 1."
  value       = azurerm_subnet.my_terraform_subnet_1.name
}

output "nat_gateway"{
  description = "The name of the created NAT gateway."
  value       = azurerm_nat_gateway.my_nat_gateway.id
}
- 创建名为
providers.tf 的文件并插入下列代码:
terraform {
  required_providers {
    azapi = {
      source  = "azure/azapi"
      version = "~>1.5"
    }
    azurerm = {
      source  = "hashicorp/azurerm"
      version = "~>3.0"
    }
    random = {
      source  = "hashicorp/random"
      version = "~>3.0"
    }
  }
}

provider "azurerm" {
  features {}
  environment = "china"
}
- 创建名为
ssh.tf 的文件并插入下列代码:
resource "random_pet" "ssh_key_name" {
  prefix    = "ssh"
  separator = ""
}

resource "azapi_resource_action" "ssh_public_key_gen" {
  type        = "Microsoft.Compute/sshPublicKeys@2022-11-01"
  resource_id = azapi_resource.ssh_public_key.id
  action      = "generateKeyPair"
  method      = "POST"

  response_export_values = ["publicKey", "privateKey"]
}

resource "azapi_resource" "ssh_public_key" {
  type      = "Microsoft.Compute/sshPublicKeys@2022-11-01"
  name      = random_pet.ssh_key_name.id
  location  = azurerm_resource_group.rg.location
  parent_id = azurerm_resource_group.rg.id
}

output "key_data" {
  value = azapi_resource_action.ssh_public_key_gen.output.publicKey
}
- 创建名为
variables.tf 的文件并插入下列代码:
variable "resource_group_location" {
  type        = string
  default     = "chinanorth3"
  description = "Location of the resource group."
}

variable "resource_group_name_prefix" {
  type        = string
  default     = "rg"
  description = "Prefix of the resource group name that's combined with a random ID so name is unique in your Azure subscription."
}

variable "username" {
  type        = string
  description = "The username for the local account that will be created on the new VM."
  default     = "azureuser"
}
运行 terraform init,将 Terraform 部署进行初始化。 此命令将下载管理 Azure 资源所需的 Azure 提供程序。
terraform init -upgrade
要点:
- 参数
-upgrade 可将必要的提供程序插件升级到符合配置版本约束的最新版本。
运行 terraform plan 以创建执行计划。
terraform plan -out main.tfplan
要点:
-
terraform plan 命令将创建一个执行计划,但不会执行它。 相反,它会确定需要执行哪些操作,以创建配置文件中指定的配置。 此模式允许你在对实际资源进行任何更改之前验证执行计划是否符合预期。
- 使用可选
-out 参数可以为计划指定输出文件。 使用 -out 参数可以确保所查看的计划与所应用的计划完全一致。
运行 terraform apply 以将执行计划应用到您的云基础架构。
terraform apply main.tfplan
要点:
- 示例
terraform apply 命令假设你先前运行了 terraform plan -out main.tfplan。
- 如果为
-out 参数指定了不同的文件名,请在对 terraform apply 的调用中使用该相同文件名。
- 如果未使用
-out 参数,请调用不带任何参数的 terraform apply。
验证结果
Azure CLI
- 获取 Azure 资源组名称。
resource_group_name=$(terraform output -raw resource_group_name)
- 获取 NAT 网关 ID。
nat_gateway=$(terraform output -raw nat_gateway)
- 运行az network nat gateway show以显示有关 NAT 网关的详细信息。
az network nat gateway show \
    --resource-group $resource_group_name \
    --ids $nat_gateway
PowerShell
- 获取 Azure 资源组名称。
$resource_group_name=$(terraform output -raw resource_group_name)
- 获取 NAT 网关 ID。
$nat_gateway=$(terraform output -raw nat_gateway)
- 运行 Get-AzNatGateway 以显示 NAT 网关的详细信息。
$nat = @{
    Name = $nat_gateway
    ResourceGroupName = $resource_group_name
}
Get-AzNatGateway @nat