概述
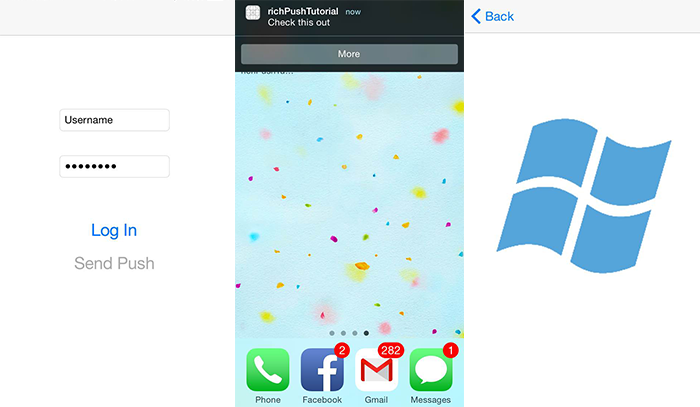
为了吸引用户使用即时丰富内容,除纯文本之外,应用程序可能还需要以其他形式进行推送。 这些通知将提升用户交互并显示 URL、声音、映像/优惠券等内容。 本教程以通知用户教程为基础,演示如何发送包含有效负载(例如映像)的推送通知。
本教程适用于 iOS 7 和 8。
在高级别中:
- 应用后端:
- 在后端数据库/本地存储中存储富有效负载(在本例中为映像)。
- 向设备发送此富通知的 ID。
- 设备上的应用:
- 与使用设备接收到的 ID 请求富有效负载的后端进行联系。
- 在数据检索完成后,向用户设备发送通知,并在用户点击“了解详细信息”时立即显示有效负载。
WebAPI 项目
在 Visual Studio 中,打开在通知用户教程中创建的 AppBackend 项目。
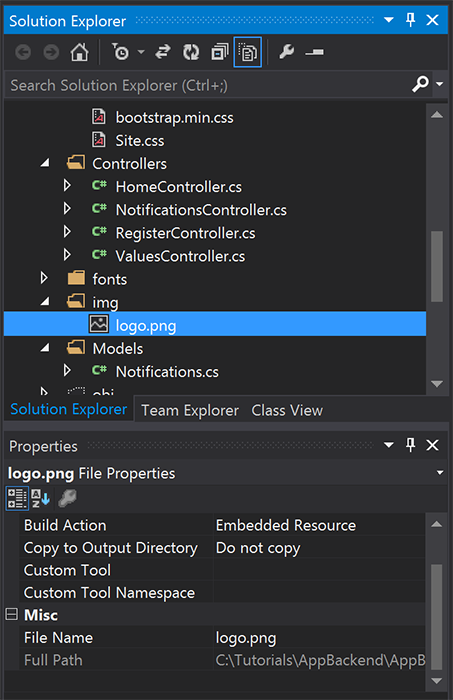
获取用于通知用户的映像,并将其置于项目目录的 img 文件夹中。
单击“解决方案资源管理器”中的“显示所有文件”,右键单击该文件夹以“包括在项目中”。
通过选定的映像,将“属性”窗口中的“生成操作”更改为“嵌入的资源” 。
在
Notifications.cs中,添加以下using语句:using System.Reflection;将
Notifications类替换为以下代码。 请确保将占位符替换为通知中心凭据和映像文件名:public class Notification { public int Id { get; set; } // Initial notification message to display to users public string Message { get; set; } // Type of rich payload (developer-defined) public string RichType { get; set; } public string Payload { get; set; } public bool Read { get; set; } } public class Notifications { public static Notifications Instance = new Notifications(); private List<Notification> notifications = new List<Notification>(); public NotificationHubClient Hub { get; set; } private Notifications() { // Placeholders: replace with the connection string (with full access) for your notification hub and the hub name from the Azure Classics Portal Hub = NotificationHubClient.CreateClientFromConnectionString("{conn string with full access}", "{hub name}"); } public Notification CreateNotification(string message, string richType, string payload) { var notification = new Notification() { Id = notifications.Count, Message = message, RichType = richType, Payload = payload, Read = false }; notifications.Add(notification); return notification; } public Stream ReadImage(int id) { var assembly = Assembly.GetExecutingAssembly(); // Placeholder: image file name (for example, logo.png). return assembly.GetManifestResourceStream("AppBackend.img.{logo.png}"); } }在
NotificationsController.cs中,使用以下代码重新定义NotificationsController。 这会将初始无提示的富通知 ID 发送到设备,并允许客户端对映像进行检索:// Return http response with image binary public HttpResponseMessage Get(int id) { var stream = Notifications.Instance.ReadImage(id); var result = new HttpResponseMessage(HttpStatusCode.OK); result.Content = new StreamContent(stream); // Switch in your image extension for "png" result.Content.Headers.ContentType = new System.Net.Http.Headers.MediaTypeHeaderValue("image/{png}"); return result; } // Create rich notification and send initial silent notification (containing id) to client public async Task<HttpResponseMessage> Post() { // Replace the placeholder with image file name var richNotificationInTheBackend = Notifications.Instance.CreateNotification("Check this image out!", "img", "{logo.png}"); var usernameTag = "username:" + HttpContext.Current.User.Identity.Name; // Silent notification with content available var aboutUser = "{\"aps\": {\"content-available\": 1, \"sound\":\"\"}, \"richId\": \"" + richNotificationInTheBackend.Id.ToString() + "\", \"richMessage\": \"" + richNotificationInTheBackend.Message + "\", \"richType\": \"" + richNotificationInTheBackend.RichType + "\"}"; // Send notification to apns await Notifications.Instance.Hub.SendAppleNativeNotificationAsync(aboutUser, usernameTag); return Request.CreateResponse(HttpStatusCode.OK); }现在,将此应用重新部署到 Azure 网站,以便可以从所有设备对其进行访问。 右键单击 AppBackend 项目,并选择“发布”。
选择 Azure 网站作为发布目标。 使用 Azure 帐户登录,选择现有网站或新网站,并记下“连接”选项卡中的“目标 URL”属性。在本教程后面的部分中,我们将此 URL 称为“后端终结点”。 选择“发布”。
修改 iOS 项目
现在,已将应用后端修改为只发送通知的 ID,更改 iOS 应用以处理该 ID,并从后端检索富消息:
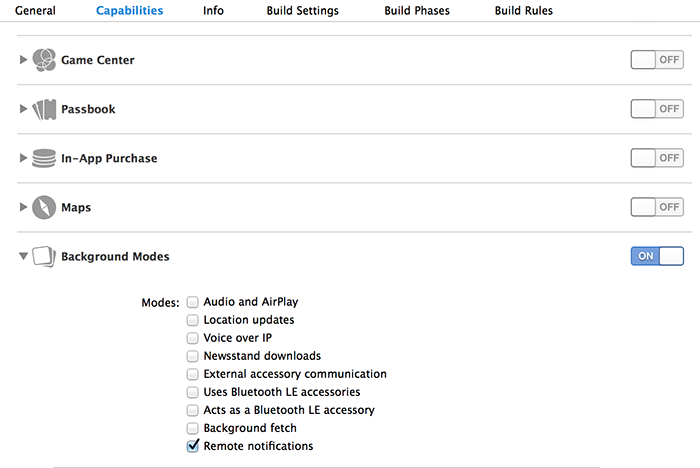
打开 iOS 项目,并转到“目标”部分的主应用目标来启用远程通知。
选择“功能”,启用“背景模式”,并选中“远程通知”复选框 。
打开
Main.storyboard,并确保具有通知用户教程中的视图控制器(本教程中称为“主页视图控制器”)。将“导航控制器”添加到情节提要,并按住 Ctrl 键并拖动“主页视图控制器”,使其成为导航的根视图 。 请确保只选中“导航控制器”的“属性检查器”中的“是初始视图控制器”。
将视图控制器添加到情节提要并添加映像视图 。 用户单击此通知选择了解详细信息后,会看到此页面。 Storyboard 应类似于:

单击情节提要中的“主页视图控制器”,并确保它将 homeViewController 作为其“自定义类”和标识检查器下方的“情节提要 ID” 。
为映像视图控制器执行同样的操作,确保 imageViewController 充当相应的内容。
然后,新建名为 imageViewController 的视图控制器类来处理刚才创建的 UI。
在 imageViewController.h 中,将以下代码添加到控制器的接口声明中。 请务必按住 Ctrl 键并从情节提要图像视图拖动到这些属性中,以链接两者:
@property (weak, nonatomic) IBOutlet UIImageView *myImage;
@property (strong) UIImage* imagePayload;
在
imageViewController.m中,在viewDidload的末尾添加以下内容:// Display the UI Image in UI Image View [self.myImage setImage:self.imagePayload];在
AppDelegate.m中,导入已创建的映像控制器:#import "imageViewController.h"使用以下声明添加接口部分:
@interface AppDelegate ()

@property UIImage* imagePayload;
@property NSDictionary* userInfo;
@property BOOL iOS8;

// Obtain content from backend with notification id
- (void)retrieveRichImageWithId:(int)richId completion: (void(^)(NSError*)) completion;

// Redirect to Image View Controller after notification interaction
- (void)redirectToImageViewWithImage: (UIImage *)img;

@end
在
AppDelegate中,确保应用在application: didFinishLaunchingWithOptions中注册了无提示通知:// Software version self.iOS8 = [[UIApplication sharedApplication] respondsToSelector:@selector(registerUserNotificationSettings:)] && [[UIApplication sharedApplication] respondsToSelector:@selector(registerForRemoteNotifications)]; // Register for remote notifications for iOS8 and previous versions if (self.iOS8) { NSLog(@"This device is running with iOS8."); // Action UIMutableUserNotificationAction *richPushAction = [[UIMutableUserNotificationAction alloc] init]; richPushAction.identifier = @"richPushMore"; richPushAction.activationMode = UIUserNotificationActivationModeForeground; richPushAction.authenticationRequired = NO; richPushAction.title = @"More"; // Notification category UIMutableUserNotificationCategory* richPushCategory = [[UIMutableUserNotificationCategory alloc] init]; richPushCategory.identifier = @"richPush"; [richPushCategory setActions:@[richPushAction] forContext:UIUserNotificationActionContextDefault]; // Notification categories NSSet* richPushCategories = [NSSet setWithObjects:richPushCategory, nil]; UIUserNotificationSettings *settings = [UIUserNotificationSettings settingsForTypes:UIUserNotificationTypeSound | UIUserNotificationTypeAlert | UIUserNotificationTypeBadge categories:richPushCategories]; [[UIApplication sharedApplication] registerUserNotificationSettings:settings]; [[UIApplication sharedApplication] registerForRemoteNotifications]; } else { // Previous iOS versions NSLog(@"This device is running with iOS7 or earlier versions."); [[UIApplication sharedApplication] registerForRemoteNotificationTypes: UIRemoteNotificationTypeAlert | UIRemoteNotificationTypeBadge | UIRemoteNotificationTypeSound | UIRemoteNotificationTypeNewsstandContentAvailability]; } return YES;将以下实现替换为
application:didRegisterForRemoteNotificationsWithDeviceToken以考虑情节提要 UI 更改情况:// Access navigation controller which is at the root of window UINavigationController *nc = (UINavigationController *)self.window.rootViewController; // Get home view controller from stack on navigation controller homeViewController *hvc = (homeViewController *)[nc.viewControllers objectAtIndex:0]; hvc.deviceToken = deviceToken;然后,将以下方法添加到
AppDelegate.m,以从终结点检索映像,并在检索完成后发送本地通知。 请确保将占位符{backend endpoint}替换为后端终结点:NSString *const GetNotificationEndpoint = @"{backend endpoint}/api/notifications"; // Helper: retrieve notification content from backend with rich notification id - (void)retrieveRichImageWithId:(int)richId completion: (void(^)(NSError*)) completion { UINavigationController *nc = (UINavigationController *)self.window.rootViewController; homeViewController *hvc = (homeViewController *)[nc.viewControllers objectAtIndex:0]; NSString* authenticationHeader = hvc.registerClient.authenticationHeader; // Check if authenticated if (!authenticationHeader) return; NSURLSession* session = [NSURLSession sessionWithConfiguration:[NSURLSessionConfiguration defaultSessionConfiguration] delegate:nil delegateQueue:nil]; NSURL* requestURL = [NSURL URLWithString:[NSString stringWithFormat:@"%@/%d", GetNotificationEndpoint, richId]]; NSMutableURLRequest* request = [NSMutableURLRequest requestWithURL:requestURL]; [request setHTTPMethod:@"GET"]; NSString* authorizationHeaderValue = [NSString stringWithFormat:@"Basic %@", authenticationHeader]; [request setValue:authorizationHeaderValue forHTTPHeaderField:@"Authorization"]; NSURLSessionDataTask* dataTask = [session dataTaskWithRequest:request completionHandler:^(NSData *data, NSURLResponse *response, NSError *error) { NSHTTPURLResponse* httpResponse = (NSHTTPURLResponse*) response; if (!error && httpResponse.statusCode == 200) { // From NSData to UIImage self.imagePayload = [UIImage imageWithData:data]; completion(nil); } else { NSLog(@"Error status: %ld, request: %@", (long)httpResponse.statusCode, error); if (error) completion(error); else { completion([NSError errorWithDomain:@"APICall" code:httpResponse.statusCode userInfo:nil]); } } }]; [dataTask resume]; } // Handle silent push notifications when id is sent from backend - (void)application:(UIApplication *)application didReceiveRemoteNotification:(NSDictionary *)userInfo fetchCompletionHandler:(void (^)(UIBackgroundFetchResult result))handler { self.userInfo = userInfo; int richId = [[self.userInfo objectForKey:@"richId"] intValue]; NSString* richType = [self.userInfo objectForKey:@"richType"]; // Retrieve image data if ([richType isEqualToString:@"img"]) { [self retrieveRichImageWithId:richId completion:^(NSError* error) { if (!error){ // Send local notification UILocalNotification* localNotification = [[UILocalNotification alloc] init]; // "5" is arbitrary here to give you enough time to quit out of the app and receive push notifications localNotification.fireDate = [NSDate dateWithTimeIntervalSinceNow:5]; localNotification.userInfo = self.userInfo; localNotification.alertBody = [self.userInfo objectForKey:@"richMessage"]; localNotification.timeZone = [NSTimeZone defaultTimeZone]; // iOS8 categories if (self.iOS8) { localNotification.category = @"richPush"; } [[UIApplication sharedApplication] scheduleLocalNotification:localNotification]; handler(UIBackgroundFetchResultNewData); } else{ handler(UIBackgroundFetchResultFailed); } }]; } // Add "else if" here to handle more types of rich content such as url, sound files, etc. }使用以下方法打开
AppDelegate.m中的映像视图控制器,处理先前的本地通知:// Helper: redirect users to image view controller - (void)redirectToImageViewWithImage: (UIImage *)img { UINavigationController *navigationController = (UINavigationController*) self.window.rootViewController; UIStoryboard *mainStoryboard = [UIStoryboard storyboardWithName:@"Main" bundle: nil]; imageViewController *imgViewController = [mainStoryboard instantiateViewControllerWithIdentifier: @"imageViewController"]; // Pass data/image to image view controller imgViewController.imagePayload = img; // Redirect [navigationController pushViewController:imgViewController animated:YES]; } // Handle local notification sent above in didReceiveRemoteNotification - (void)application:(UIApplication *)application didReceiveLocalNotification:(UILocalNotification *)notification { if (application.applicationState == UIApplicationStateActive) { // Show in-app alert with an extra "more" button UIAlertView *alert = [[UIAlertView alloc] initWithTitle:@"Notification" message:notification.alertBody delegate:self cancelButtonTitle:@"OK" otherButtonTitles:@"More", nil]; [alert show]; } // App becomes active from user's tap on notification else { [self redirectToImageViewWithImage:self.imagePayload]; } } // Handle buttons in in-app alerts and redirect with data/image - (void)alertView:(UIAlertView *)alertView clickedButtonAtIndex:(NSInteger)buttonIndex { // Handle "more" button if (buttonIndex == 1) { [self redirectToImageViewWithImage:self.imagePayload]; } // Add "else if" here to handle more buttons } // Handle notification setting actions in iOS8 - (void)application:(UIApplication *)application handleActionWithIdentifier:(NSString *)identifier forLocalNotification:(UILocalNotification *)notification completionHandler:(void (^)())completionHandler { // Handle richPush related buttons if ([identifier isEqualToString:@"richPushMore"]) { [self redirectToImageViewWithImage:self.imagePayload]; } completionHandler(); }
运行应用程序
- 在 XCode 中,在物理 iOS 设备上运行此应用(推送通知将无法在模拟器中正常工作)。
- 在 iOS 应用 UI 中,输入相同值的用户名和密码进行身份验证,并单击“登录”。
- 单击“发送推送”,应看到应用内警报。 如果单击“详细信息”,会转到选择要包括在应用后端中的映像。
- 也可以单击“发送推送”并立即按下设备的主页按钮。 几分钟后会收到推送通知。 如果点击推送通知或单击“详细信息”,会转到应用和富图像内容。