Ask Learn
Preview
Ask Learn is an AI assistant that can answer questions, clarify concepts, and define terms using trusted Microsoft documentation.
Please sign in to use Ask Learn.
Sign inThis browser is no longer supported.
Upgrade to Microsoft Edge to take advantage of the latest features, security updates, and technical support.
Note
Access to this page requires authorization. You can try signing in or changing directories.
Access to this page requires authorization. You can try changing directories.
This sample is a simple Azure Active Directory with web app that links to security resources for developing apps on Azure. The app implements security best practices that can help improve your application and your organization’s security posture when you develop apps on Azure.
The deployment scripts set up the infrastructure. After you run the deployment scripts, you'll need to do some manual configuration in the Azure portal to link the components and services together. This sample is targeted toward experienced developers on Azure who work within the retail industry and want to build a secured Azure Active Directory with secure Azure infrastructure.
In developing and deploying this app, you'll learn how to
After you develop and deploy this app, you will have set up the following sample web app along with the configuration and security measures that are described.
The app is a typical n-tier application with three tiers. The front end, back end, and database layer with monitoring and secret-management components integrated are shown here:
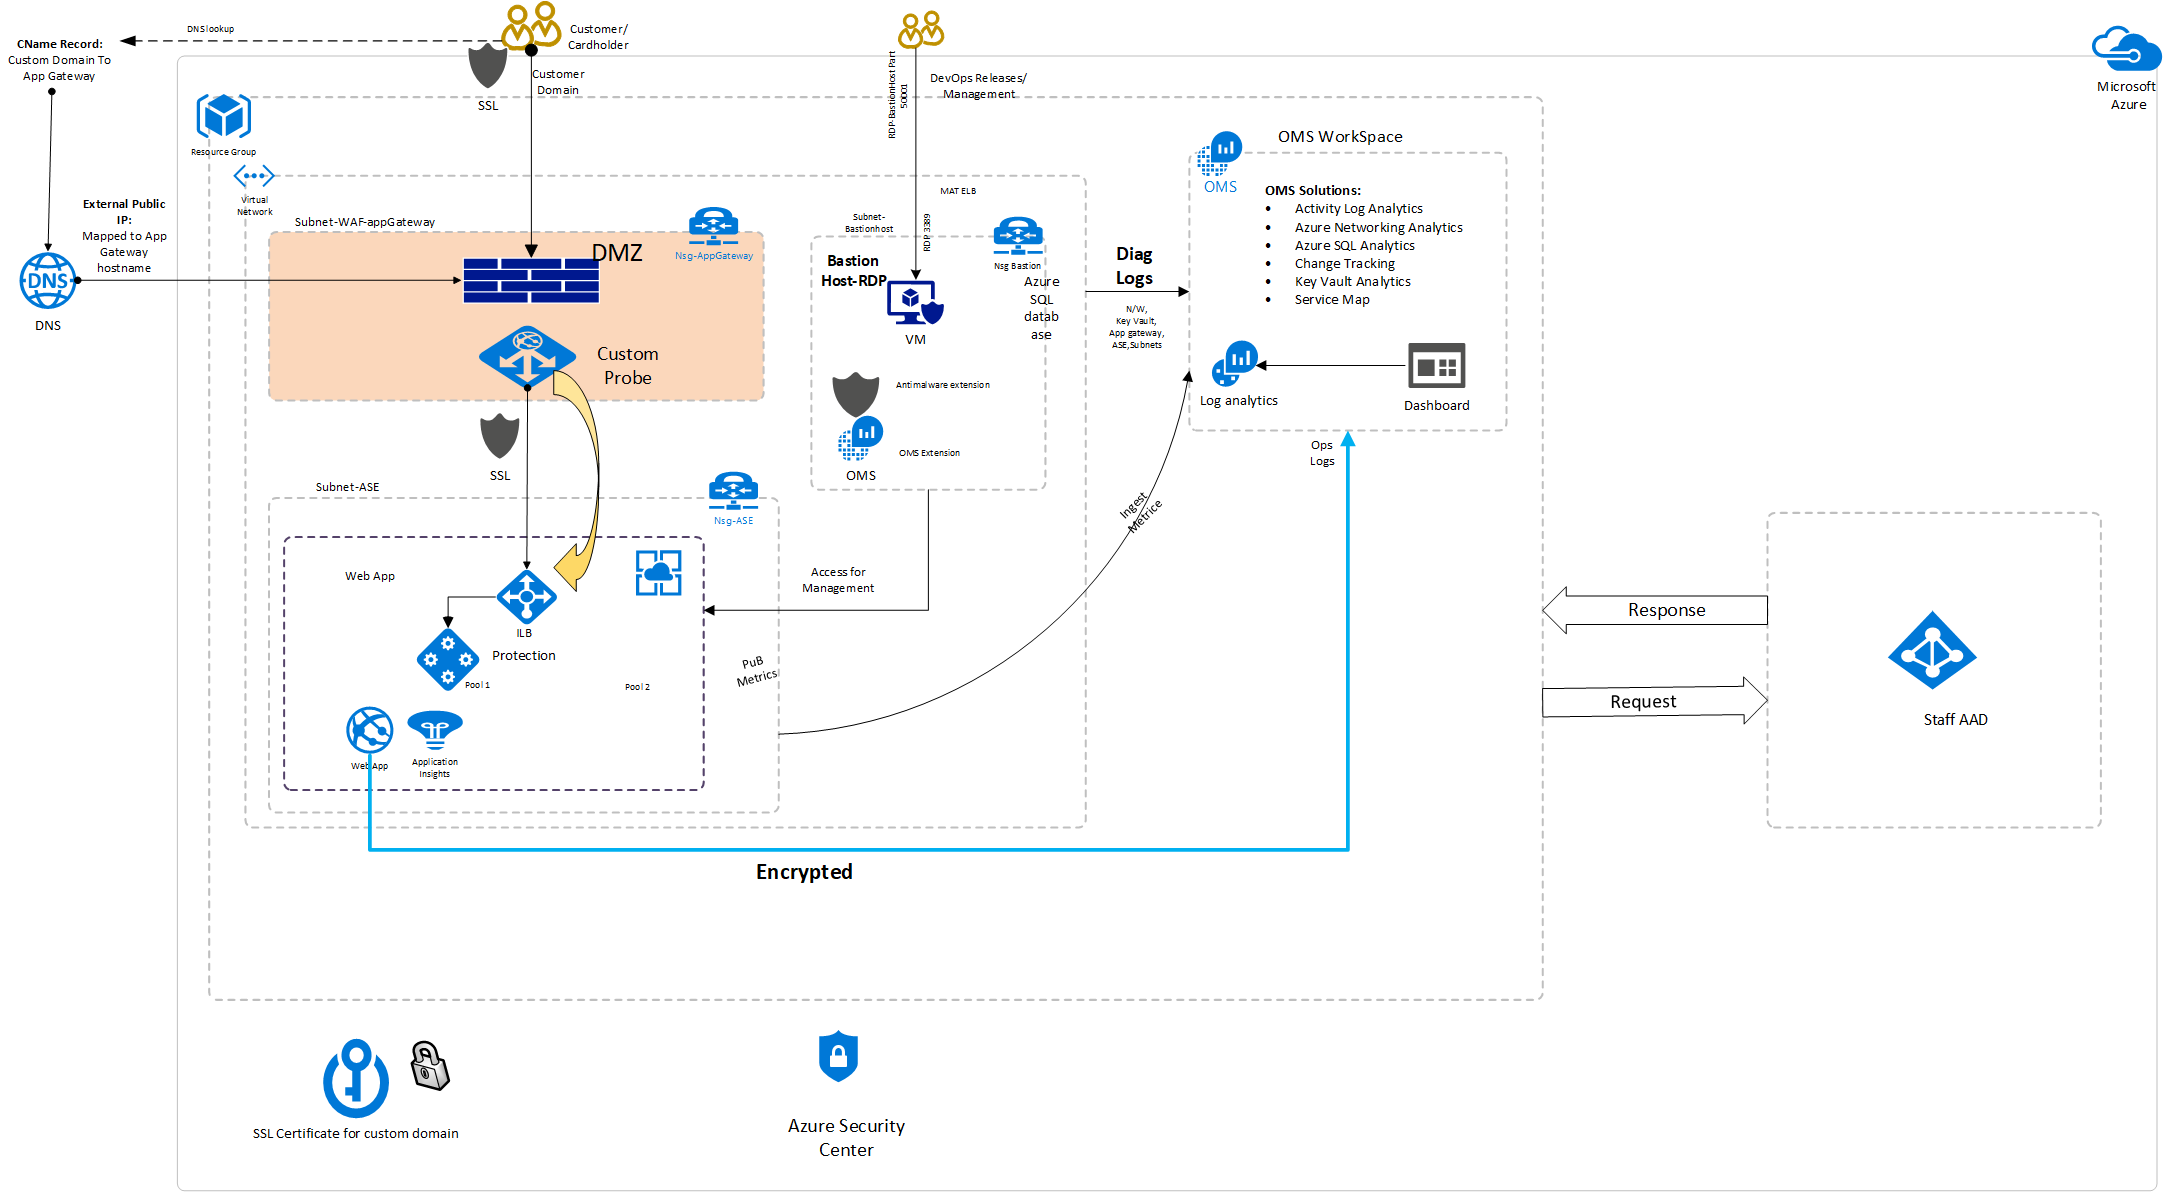
This solution uses the following Azure services. Details of the deployment architecture are in the Deployment Architecture section.
The architecture consists of these components
Threat modeling is the process of identifying potential security threats to your business and application and then ensuring that a proper mitigation plan is in place.
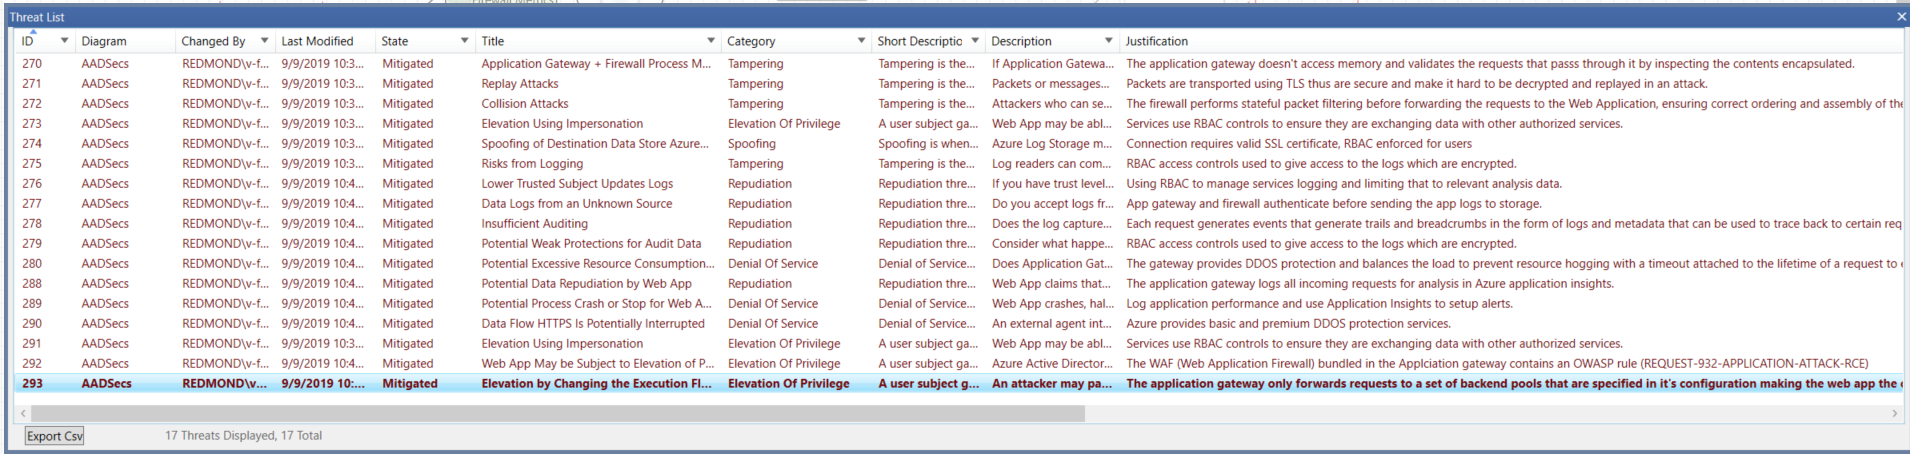
This sample used the Microsoft Threat Modeling Tool to implement threat modeling for the secure sample app. By diagramming the components and the data flows, you can identify issues and threats early in the development process. Time and money will be saved later by using this.
Here is the threat model for the sample app

Some sample threats and potential vulnerabilities that the threat modeling tool generates are shown in the following screenshot. The threat model gives an overview of the attack surface exposed and prompts the developers to think about how to mitigate the issues.
To get the application up and running, you need to install these tools:
You need an Azure subscription to deploy the sample app's resources. If you don't have an Azure subscription, you can create a free account to test the sample app.
After installing these tools, you’re ready to deploy the app on Azure.
The deployment script is one script that can be broken down into four phases. Each phase deploys and configures an Azure resource that's in the architecture diagram.
The four phases are
Each phase builds upon the preceding one by using configuration from the previously deployed resources.
To complete the implementation steps, make sure you’ve installed the tools listed under Prerequisites.
In this section, you create and deploy an Azure Key Vault instance that is used to store secrets and certificates.
After you complete the deployment, you have an Azure Key Vault instance deployed on Azure.
To deploy Azure Key Vault by using Powershell
$keyVaultAdminUsers = @($user1,user2)
Register-AzResourceProvider -ProviderNamespace Microsoft.KeyVault
New-AzKeyVault -Name $kvName
            -ResourceGroupName $ResourceGroup
            -Location 'East US'
            -EnabledForDiskEncryption
foreach ($keyVaultAdminUser in $keyVaultAdminUsers) {
$UserObjectId = (Get-AzADUser -SearchString $keyVaultAdminUser).Id
Set-AzKeyVaultAccessPolicy -VaultName $keyVaultName -ResourceGroupName $resourceGroupName -ObjectId $UserObjectId
-PermissionsToKeys all -PermissionsToSecrets all -PermissionsToCertificates all
}
Set-AzKeyVaultAccessPolicy -VaultName $keyVaultName
                       -ResourceGroupName $resourceGroupName
                       -UserPrincipalName 'user1@contoso.com
                       -PermissionsToCertificates list, get
                       -PermissionsToKeys list, get
                       -PermissionsToSecrets list, get
It's a best practice to use managed identities for Azure resources in apps that use Key Vault to access resources. Your security posture increases when access keys to Key Vault aren't stored in code or in configuration.
A root certificate is included in the container. The steps taken to obtain the certificate are
Download the certificate file from the Certificate Authority.
Decode your certificate file:
openssl x509 -inform DER -in BaltimoreCyberTrustRoot.crt -text -out root.crt
This script creates an assigned identity for the App Service instance that can be used with MSI to interact with Azure Key Vault without hard coding secrets in code or configuration.
Go to the Azure Key Vault instance in the portal to authorize the assigned identity on the access policy tab. Select Add new access policy. Under Select principal, search for the application name that is similar to the name of the App Service instance created. A service principal attached to the application should be visible. Select it and save access policy page, as shown in the following screenshot.
Because the application only needs to retrieve keys, select the Get permission in the secrets options, allowing access while reducing the privileges granted.
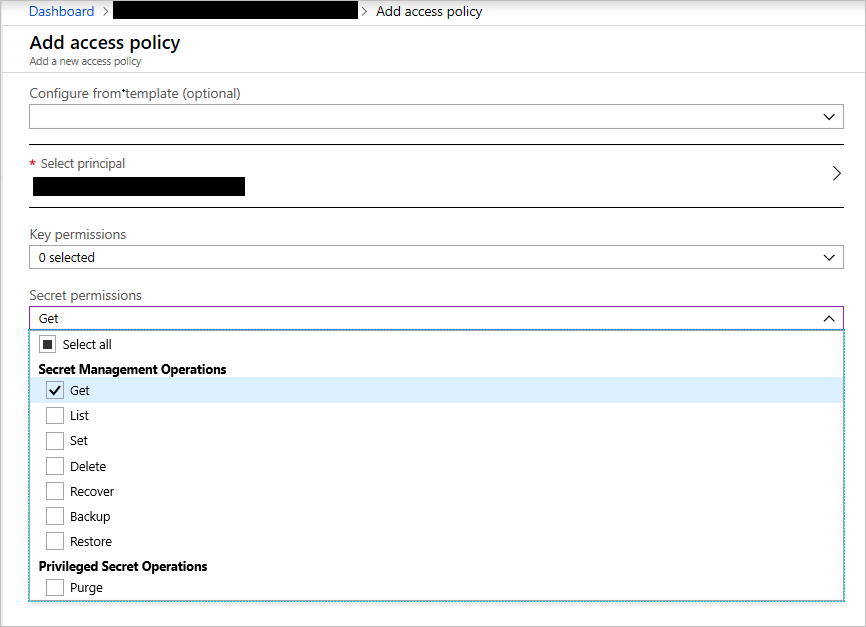
Create a Key Vault access policy
Save the access policy and then save the new change on the Access Policies tab to update the policies.
In web apps, it is not recommended that you expose services directly to the outside world on the internet. Load balancing and firewall rules provide more security and control over the incoming traffic and help you manage it.
To deploy an Application Gateway instance
Connect-AzAccount
Select-AzSubscription -SubscriptionId '$SubscriptionId'
New-AzResourceGroup -Name appgw-rg -Location "East US"

#Create a virtual network and a subnet for the application gateway

#Assign an address range for the subnet to be used for the application gateway.

$gwSubnet = New-AzVirtualNetworkSubnetConfig -Name 'appgwsubnet' -AddressPrefix 10.0.0.0/24

#Assign an address range to be used for the back-end address pool.

$nicSubnet = New-AzVirtualNetworkSubnetConfig  -Name 'appsubnet' -AddressPrefix 10.0.2.0/24

#Create a virtual network with the subnets defined in the preceding steps.

$vnet = New-AzvirtualNetwork -Name 'appgwvnet' -ResourceGroupName appgw-rg -Location "East US" -AddressPrefix 10.0.0.0/16 -Subnet $gwSubnet, $nicSubnet

#Retrieve the virtual network resource and subnet resources to be used in the steps that follow.

$vnet = Get-AzvirtualNetwork -Name 'appgwvnet' -ResourceGroupName appgw-rg
$gwSubnet = Get-AzVirtualNetworkSubnetConfig -Name 'appgwsubnet' -VirtualNetwork $vnet
$nicSubnet = Get-AzVirtualNetworkSubnetConfig -Name 'appsubnet' -VirtualNetwork $vnet


#Create a public IP address for the front-end configuration

$publicip = New-AzPublicIpAddress -ResourceGroupName appgw-rg -Name 'publicIP01' -Location "East US" -AllocationMethod Dynamic

#Create an application gateway configuration object

$gipconfig = New-AzApplicationGatewayIPConfiguration -Name 'gwconfig' -Subnet $gwSubnet

#Create a front-end IP configuration

$fipconfig = New-AzApplicationGatewayFrontendIPConfig -Name 'fip01' -PublicIPAddress $publicip

#Configure the back-end IP address pool with the IP addresses of the back-end web servers

$pool = New-AzApplicationGatewayBackendAddressPool -Name 'pool01' -BackendIPAddresses 10.0.3.11

#Configure the front-end IP port for the public IP endpoint

$fp = New-AzApplicationGatewayFrontendPort -Name 'port01'  -Port 443

#Configure the certificate for the application gateway. This certificate is used to decrypt and reencrypt the traffic on the application gateway

$passwd = ConvertTo-SecureString  "P@ssword!1" -AsPlainText -Force
$cert = New-AzApplicationGatewaySSLCertificate -Name cert01 -CertificateFile "C:\AAD\Securities\Certificates\sslcert.com.cer" -Password $passwd


#Create the HTTP listener for the application gateway

$listener = New-AzApplicationGatewayHttpListener -Name listener01 -Protocol Https -FrontendIPConfiguration $fipconfig -FrontendPort $fp -SSLCertificate $cert

#Upload the certificate to be used on the TLS/SSL-enabled back-end pool resources

#$authcert = New-AzApplicationGatewayAuthenticationCertificate -Name 'allowlistcert1' -CertificateFile C:\cert.cer

$trustedRootCert01 = New-AzApplicationGatewayTrustedRootCertificate -Name "test1" -CertificateFile "C:\AAD\Securities\Certificates\sslcert.com.cer"

#Configure the HTTP settings for the application gateway back end

$poolSetting01 = New-AzApplicationGatewayBackendHttpSettings -Name "setting01" -Port 443 -Protocol Https -CookieBasedAffinity Disabled -TrustedRootCertificate $trustedRootCert01 -HostName "test1"

#Create a load-balancer routing rule that configures the load balancer

$rule = New-AzApplicationGatewayRequestRoutingRule -Name 'rule01' -RuleType basic -BackendHttpSettings $poolSetting -HttpListener $listener -BackendAddressPool $pool

#Configure the instance size of the application gateway

$sku = New-AzApplicationGatewaySku -Name Standard_Small -Tier Standard -Capacity 2

#Configure the TLS/SSL policy to be used on the application gateway

$SSLPolicy = New-AzApplicationGatewaySSLPolicy -MinProtocolVersion TLSv1_2 -CipherSuite "TLS_ECDHE_ECDSA_WITH_AES_128_GCM_SHA256", "TLS_ECDHE_ECDSA_WITH_AES_256_GCM_SHA384", "TLS_RSA_WITH_AES_128_GCM_SHA256" -PolicyType Custom

$appgw = New-AzApplicationGateway -Name appgateway -SSLCertificates $cert -ResourceGroupName "appgw-rg" -Location "East US" -BackendAddressPools $pool -BackendHttpSettingsCollection $poolSetting01 -FrontendIpConfigurations $fipconfig -GatewayIpConfigurations $gipconfig -FrontendPorts $fp -HttpListeners $listener -RequestRoutingRules $rule -Sku $sku -SSLPolicy $SSLPolicy -TrustedRootCertificate $trustedRootCert01 -Verbose
Azure App Service enables you to build and host web apps using the languages like Python, Ruby, C#, and Java. Azure also supports custom containers, which can allow virtually all programming languages to run on the Azure App Service platform.
New-AzAppServicePlan -Name $webappname -Location $location -ResourceGroupName $webappname -Tier Free
New-AzWebApp -Name $webappname -Location $location -AppServicePlan $webappname -ResourceGroupName $webappname

Write-Host "Configure a CNAME record that maps $fqdn to $webappname.azurewebsites.net"
Read-Host "Press [Enter] key when ready ..."
Set-AzAppServicePlan -Name $webappname -ResourceGroupName $webappname -Tier Shared
Set-AzWebApp -Name $webappname -ResourceGroupName $webappname `-HostNames @($fqdn,"$webappname.azurewebsites.net")
After you complete the deployment, you have an application gateway with web application firewall enabled.
The gateway instance exposes port 443 for HTTPS. This configuration ensures that our app is only accessible on port 443 through HTTPS.
Blocking unused ports and limiting the attack surface exposure is a security best practice.
App Service instances can be integrated with virtual networks. This integration allows them to be configured with network security group policies that manage the app's incoming and outgoing traffic.
To enable this feature, on the Azure App service instance blade, under Settings, selects Networking. In the right pane, configure under VNet Integration.
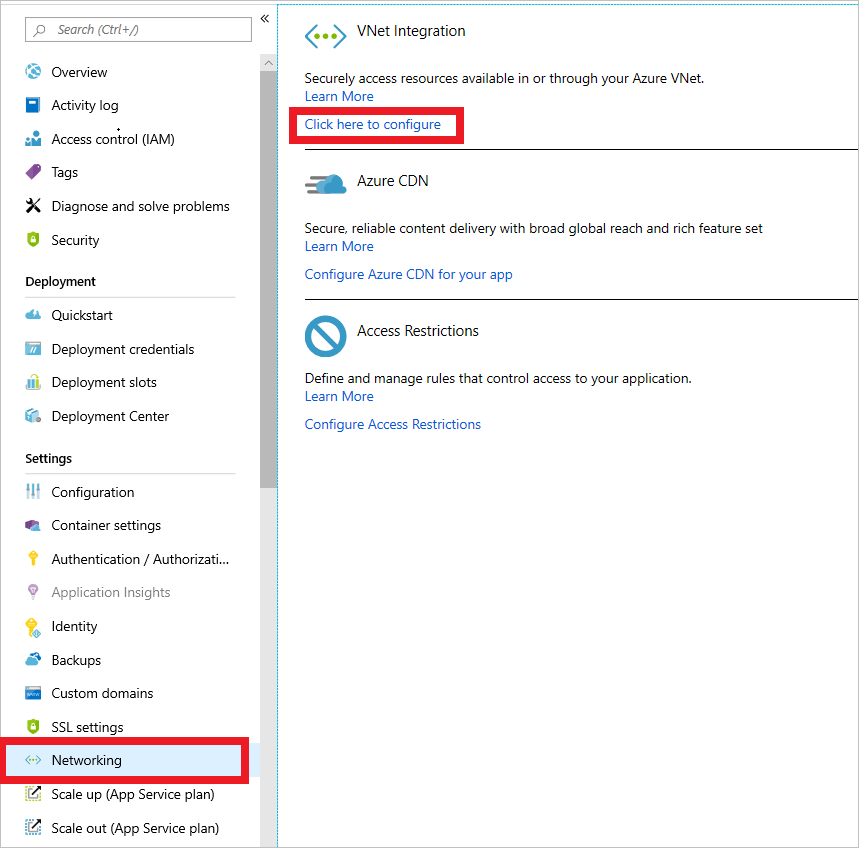
New virtual network integration for App Service
On the next page, select Add VNET (preview).
On the next menu, select the virtual network created in the deployment that starts with aad-vnet. You can either create a new subnet or select an existing one.
In this case, create a new subnet. Set the Address range to 10.0.3.0/24 and name the subnet app-subnet.
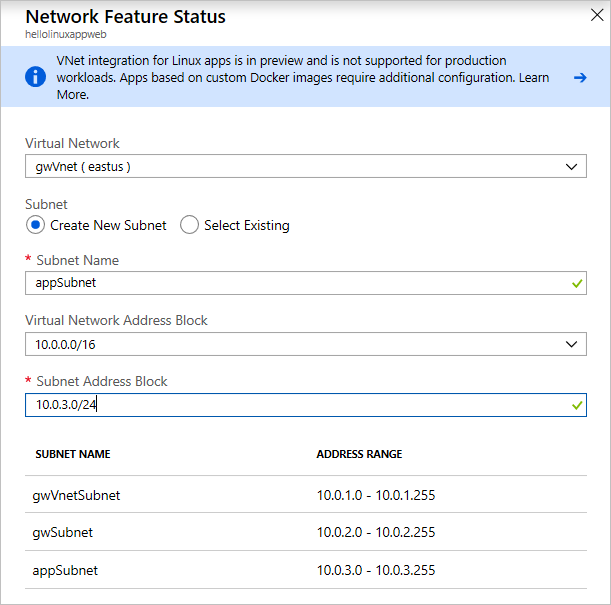
Virtual network configuration for App Service
Now that you've enabled the virtual network integration, you can add network security groups to our app.
Use the search box, search for network security groups. Select Network security groups in the results.

Search for network security groups
On the next menu, select Add. Enter the Name of the NSG and the Resource group in which it should be located. This NSG will be applied to the application gateway's subnet.
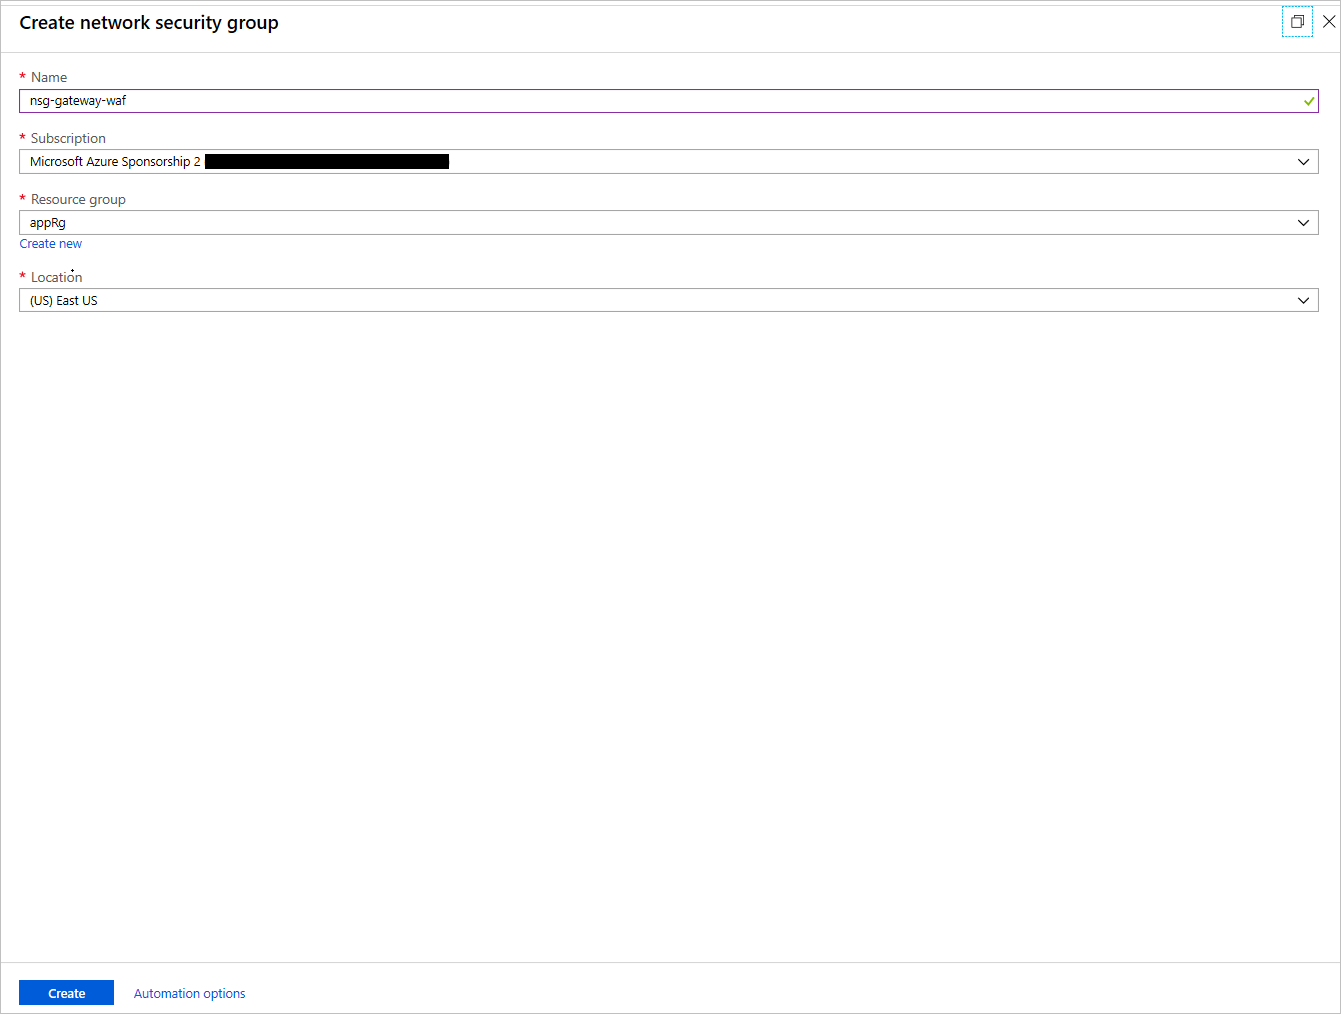
Create an NSG
After the NSG is created, select it. In its blade, under Settings, select Inbound Security rules. Configure these settings to allow connections coming into the application gateway over port 443.
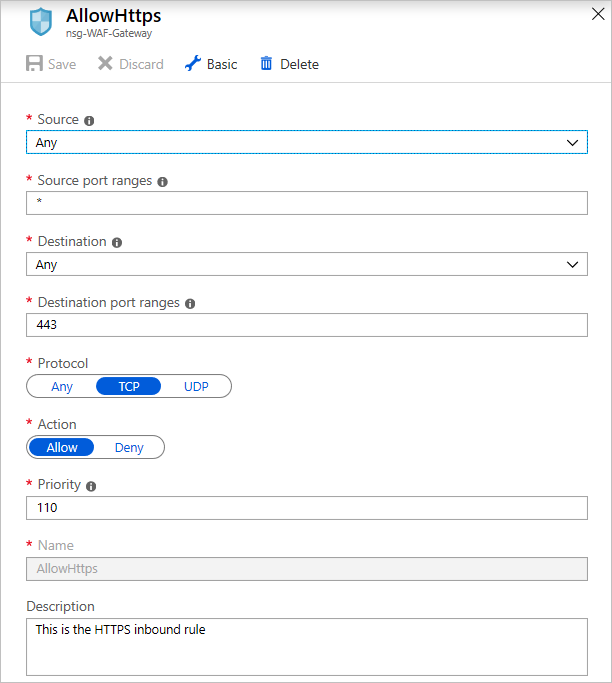
Configure the NSG
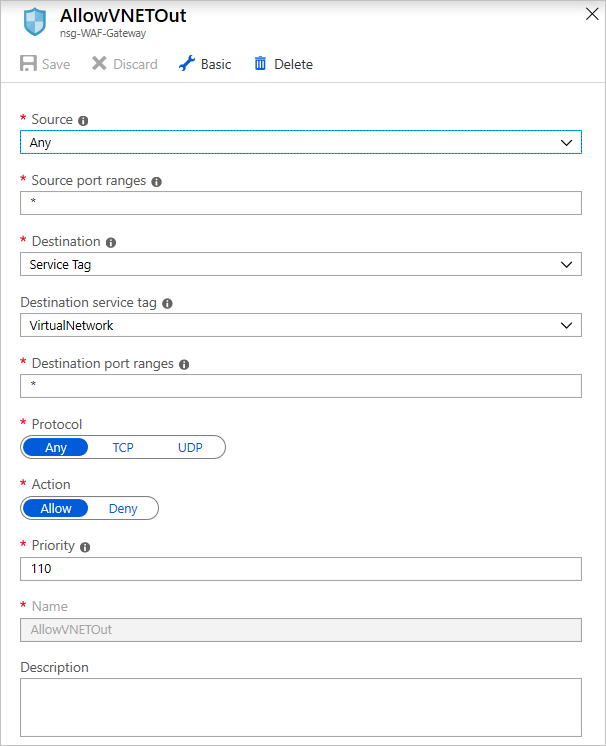
In the outbound rules for the gateway NSG, add a rule that allows outbound connections to the App Service instance by creating a rule that targets the service tag AppService
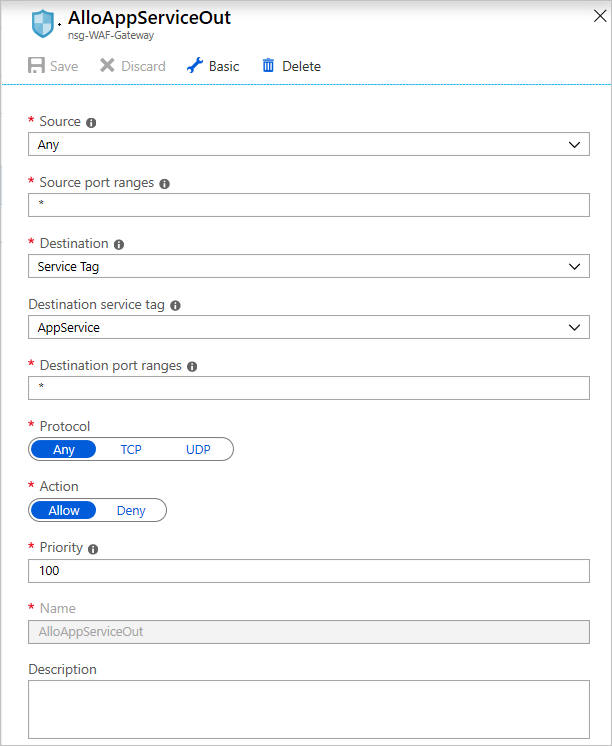
Add outbound rules for the NSG
Add another outbound rule to allow the gateway to send outbound rules to a virtual network.
Add another outbound rule
On the subnets blade of the NSG, select Associate, select the virtual network created in the deployment, and select the gateway subnet named gw-subnet. The NSG is applied to the subnet.
Create another NSG as in the earlier step, this time for the App Service instance. Give it a name. Add the inbound rule for port 443 as you did for the application gateway NSG.
If you have an App Service instance deployed on an App Service Environment instance, which is not the case for this app, you can add inbound rules to allow Azure Service Health probes by opening up ports 454-455 on the inbound security groups of your App Service NSG. Here's the configuration:
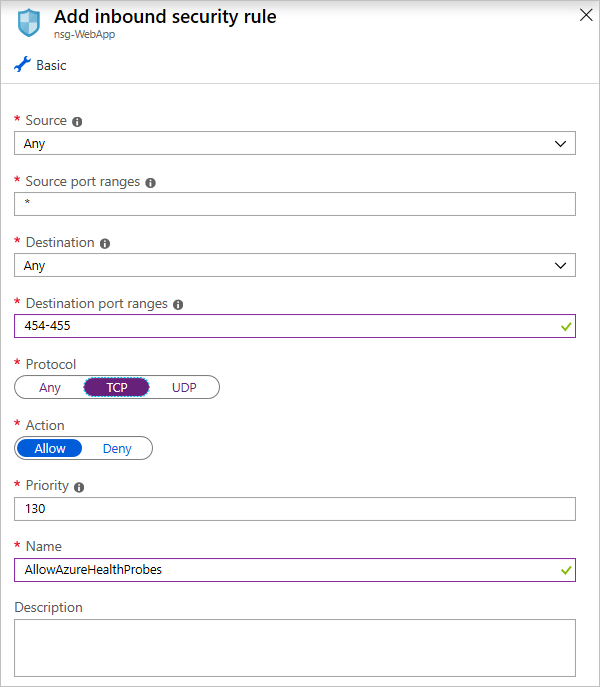
Add rules for Azure Service Health probes (App Service Environment only)
To limit the attack surface, modify the App Service network settings to allow only the application gateway to access the application.
To apply the settings, go to App Service network tab, selecting the IP Restrictions tab, and creating an allow rule that allows only the application gateway’s IP to directly access the service. You can retrieve the IP address of the gateway from its overview page. On the IP Address CIDR tab, enter the IP address in this format: <GATEWAY_IP_ADDRESS>/32.
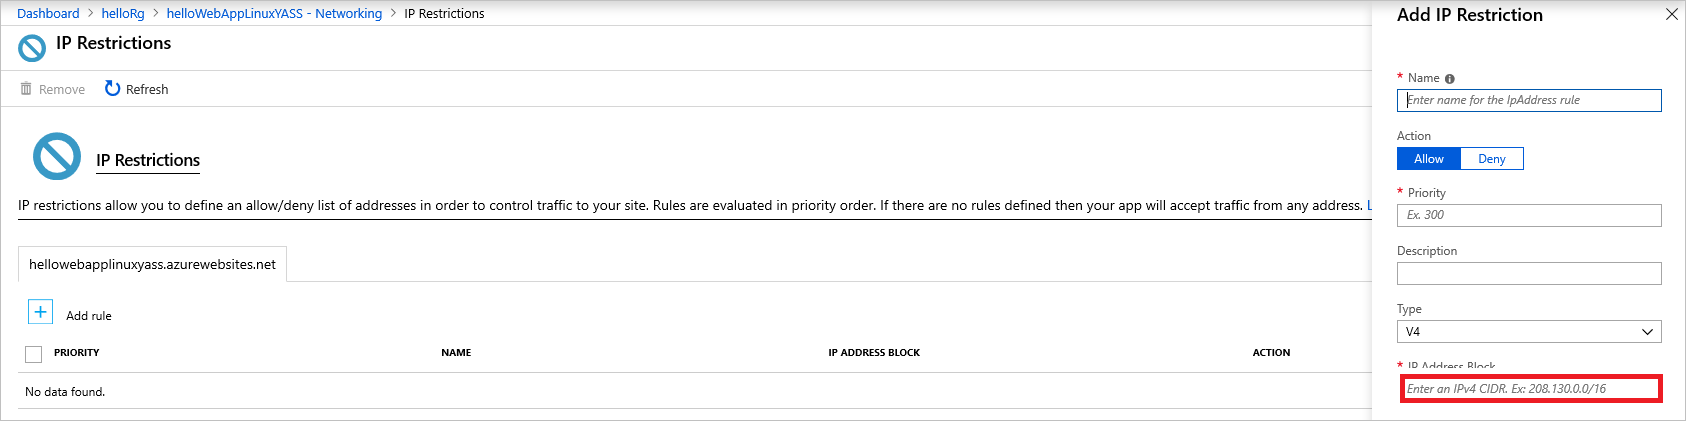
Allow only the gateway IP to access the App Service
The Azure Domain Name System, or Azure Domain Name System, is responsible for translating (or resolving) a website or service name to its IP address. Azure Domain Name System(https://docs.microsoft.com/azure/dns/dns-overview) is a hosting service for Domain Name System domains that provides name resolution using Azure infrastructure. By hosting domains in Azure, users can manage Domain Name System records using the same credentials, APIs, tools, and billing as other Azure services. Azure Domain Name System also supports private Domain Name System domains.
Azure Disk Encryption leverages the BitLocker feature of Windows to provide volume encryption for data disks. The solution integrates with Azure Key Vault to help control and manage the disk-encryption keys.
The following technologies provide capabilities to manage access to cardholder data in the Azure environment
The solution uses Azure Key Vault for the management of keys and secrets. Azure Key Vault helps safeguard cryptographic keys and secrets used by cloud applications and services. The following Azure Key Vault capabilities help customers protect and access such data
With Azure Security Center, customers can centrally apply and manage security policies across workloads, limit exposure to threats, and detect and respond to attacks. Additionally,
The architecture reduces the risk of security vulnerabilities using an Azure Application Gateway with a web application firewall configured, and the OWASP ruleset enabled. Additional capabilities include
Azure services extensively log system and user activity, as well as system health:
These logs are consolidated in Azure Monitor logs for processing, storing, and dashboard reporting. Once collected, the data is organized into separate tables for each data type within Log Analytics workspaces, which allows all data to be analyzed together regardless of its original source. Furthermore, Azure Security Center integrates with Azure Monitor logs allowing customers to use Kusto queries to access their security event data and combine it with data from other services.
The following Azure monitoring solutions are included as a part of this architecture
Azure Monitorhelps users track performance, maintain security, and identify trends by enabling organizations to audit, create alerts, and archive data, including tracking API calls in their Azure resources.
Application Insights is an extensible Application Performance Management service for web developers on multiple platforms. Application Insights detects performance anomalies and customers can use it to monitor the live web application. It includes powerful analytics tools to help customers diagnose issues and to understand what users actually do with their app. It's designed to help customers continuously improve performance and usability.
Create a vault for the organization in which to store keys, and maintain accountability for operational tasks like below
A secure VPN tunnel or ExpressRoute needed to be configured by securely establishing a connection to the resources deployed as a part of this PaaS web application reference architecture. By appropriately setting up a VPN or ExpressRoute, customers can add a layer of protection for data in transit.
By implementing a secure VPN tunnel with Azure, a virtual private connection between an on-premises network and an Azure Virtual Network can be created. This connection takes place over the Internet and allows customers to securely "tunnel" information inside an encrypted link between the customer's network and Azure. Site-to-Site VPN is a secure, mature technology that has been deployed by enterprises of all sizes for decades. The IPsec tunnel mode is used in this option as an encryption mechanism.
Because traffic within the VPN tunnel does traverse the Internet with a site-to-site VPN, Microsoft offers another, even more secure connection option. Azure ExpressRoute is a dedicated WAN link between Azure and an on-premises location or an Exchange hosting provider. As ExpressRoute connections do not go over the Internet, these connections offer more reliability, faster speeds, lower latencies, and higher security than typical connections over the Internet. Furthermore, because this is a direct connection of customer's telecommunication provider, the data does not travel over the Internet and therefore is not exposed to it.
Best practices for implementing a secure hybrid network that extends an on-premises network to Azure are available.
git clone https://github.com/Azure-Samples/AAD-Security
https://WebApp-OpenIDConnect-DotNet-code-v2-contoso.azurewebsites.net
https://WebApp-OpenIDConnect-DotNet-code-v2-contoso.azurewebsites.net/signin-oidc
o In the Advanced settings section set Logout URL to https://WebApp-OpenIDConnect-DotNet-code-v2-contoso.azurewebsites.net/signout-oidchttps://WebApp-OpenIDConnect-DotNet-code-v2-contoso.azurewebsites.net.
o Save the configuration.https://WebApp-OpenIDConnect-DotNet-code-v2-contoso.azurewebsites.net. Click Next.Administrators need to ensure that the subscription accounts in the portal are protected. The subscription is vulnerable to attacks because it manages the resources that you created. To protect the subscription, enable Multi-Factor Authentication on the Azure Active Directory tab of the subscription.
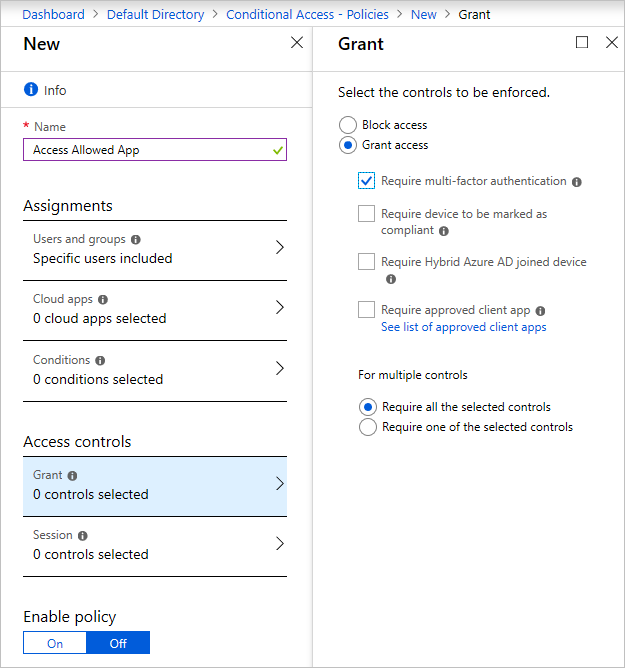
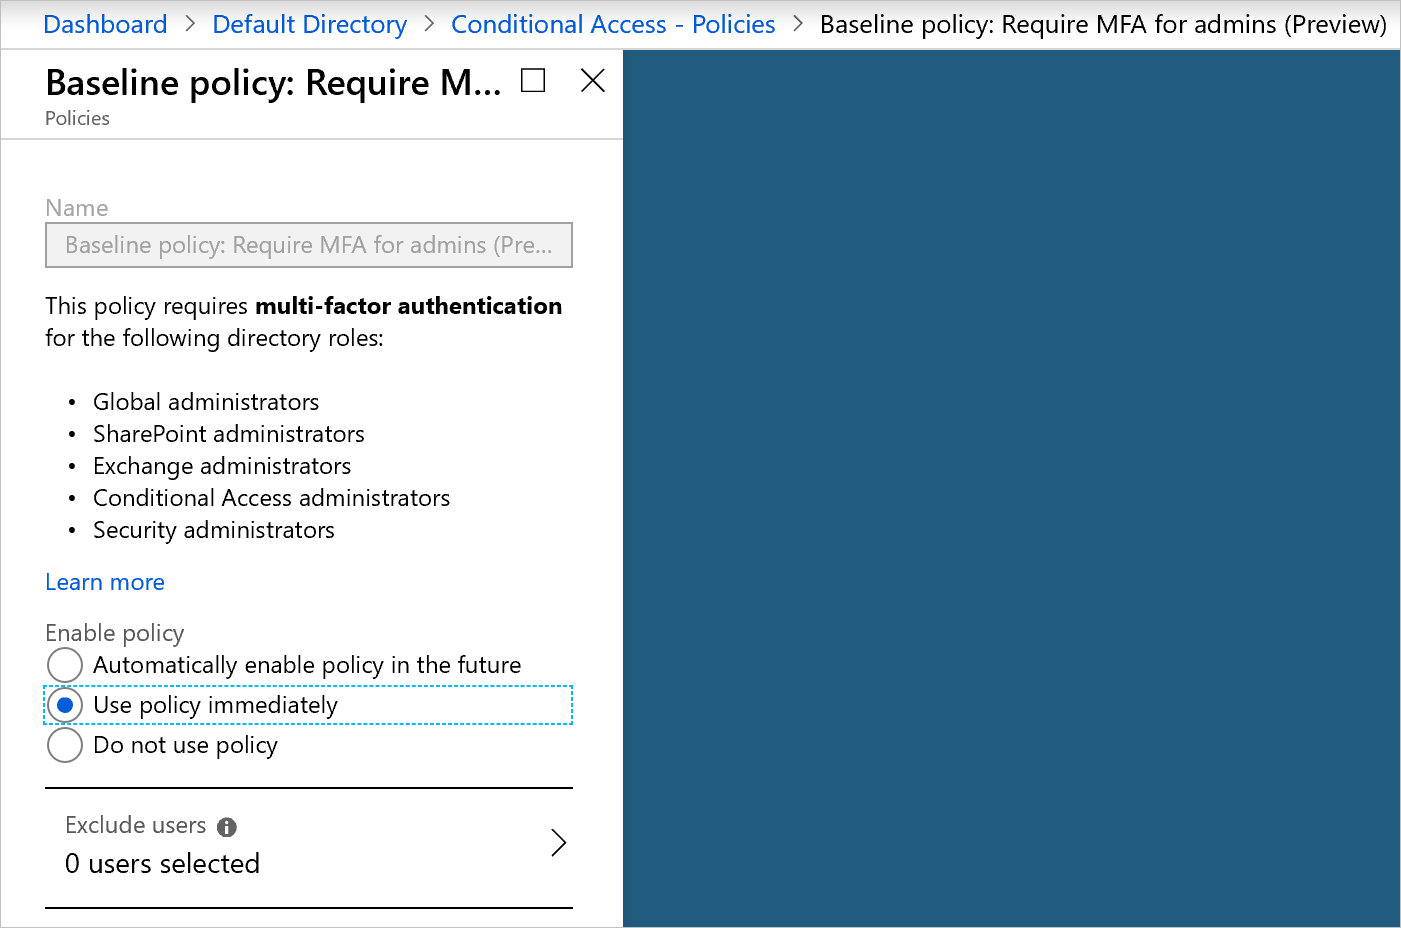
An Azure AD operates based on policies that are applied to a user or groups of users that fit a certain criteria. Azure creates a default policy specifying that administrators need two-factor authentication to sign in to the portal. After enabling this policy, you might be prompted to sign out and sign back in to the Azure portal.
To enable MFA for admin sign-ins
Go to the Azure Active Directory tab in the Azure portal
Under the security category, select conditional access. You see this screen
If you can't create a new policy
Return to the conditional access screen.
You can enable the policy by selecting the check box at the top of the screen or do so on the Conditional Access tab. When the policy is enabled, users need MFA to sign in to the portal.
There's a baseline policy that requires MFA for all Azure administrators. You can enable it immediately in the portal. Enabling this policy might invalidate the current session and force you to sign in again.
If the baseline policy isn't enabled
As an application grows, it becomes difficult to aggregate all the security signals and metrics received from resources and make them useful in an action-oriented way.
Azure Sentinel is designed to collect data, detect the types of threats possible, and provide visibility into security incidents. While it waits for manual intervention, Azure Sentinel can rely on pre-written playbooks to kick off alerts and incident management processes.
The sample app is composed of several resources that Azure Sentinel can monitor. To set up Azure Sentinel, you first need to create a Log Analytics workspace that stores all the data collected from the various resources.
To create this workspace
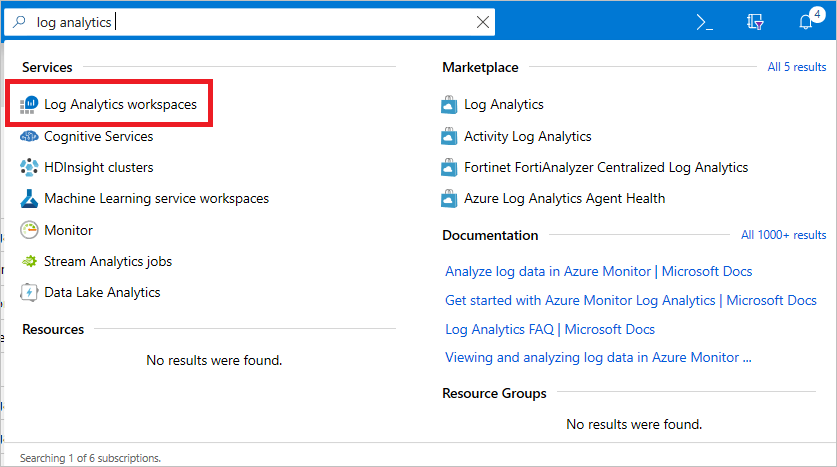
Search for Log Analytics workspaces
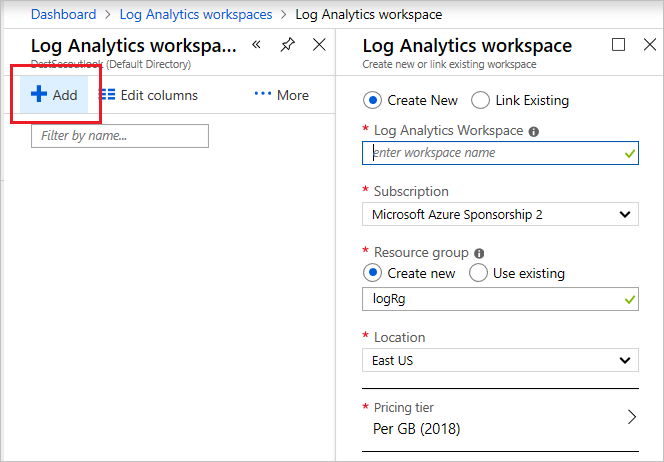
Create a Log Analytics workspace
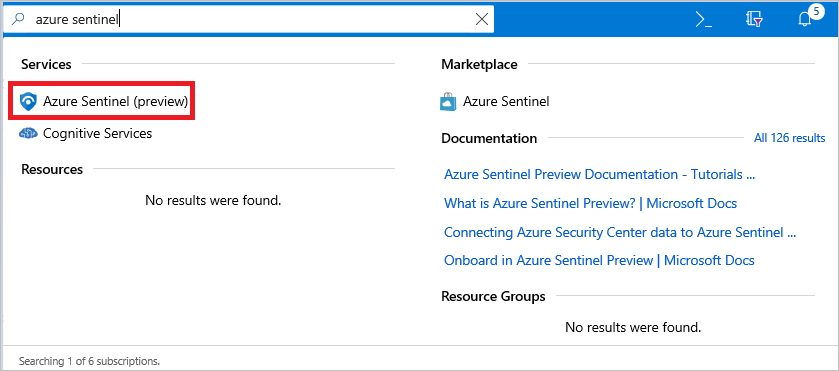
Search for Azure Sentinel
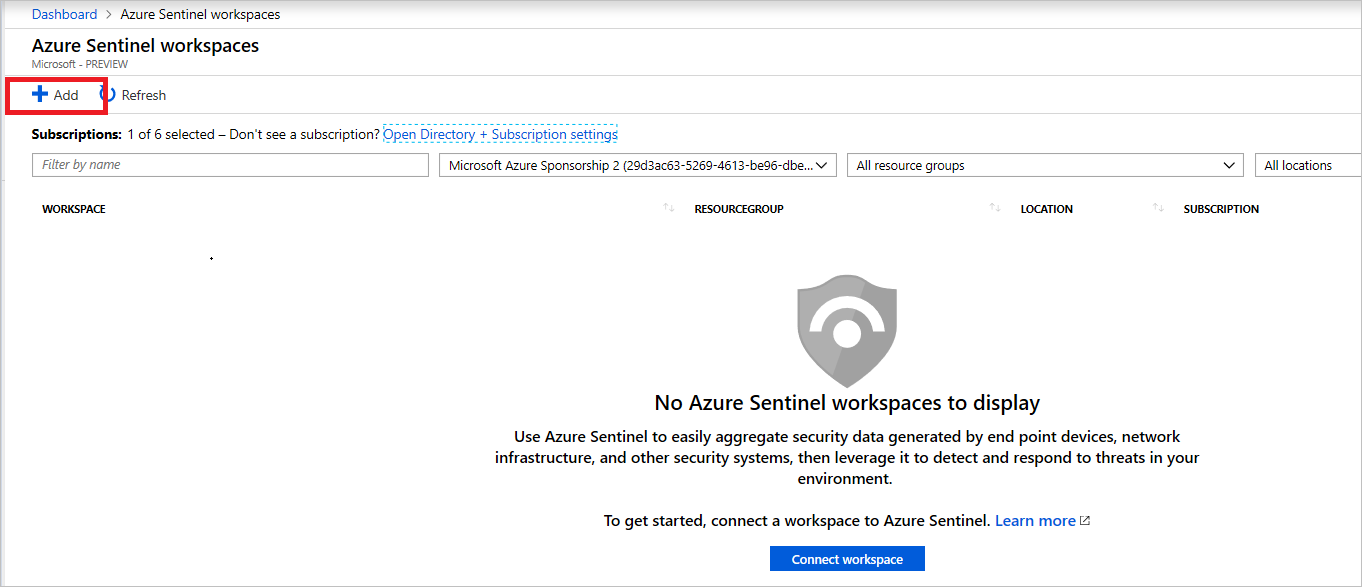
Add a Log Analytics workspace

*Add a data connector to Azure Sentinel*
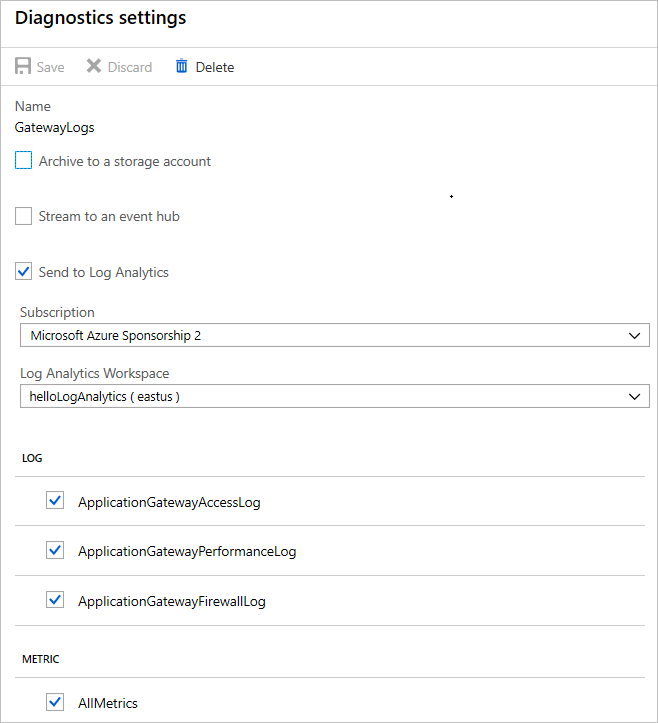
For example, to connect the application gateway, take these steps:
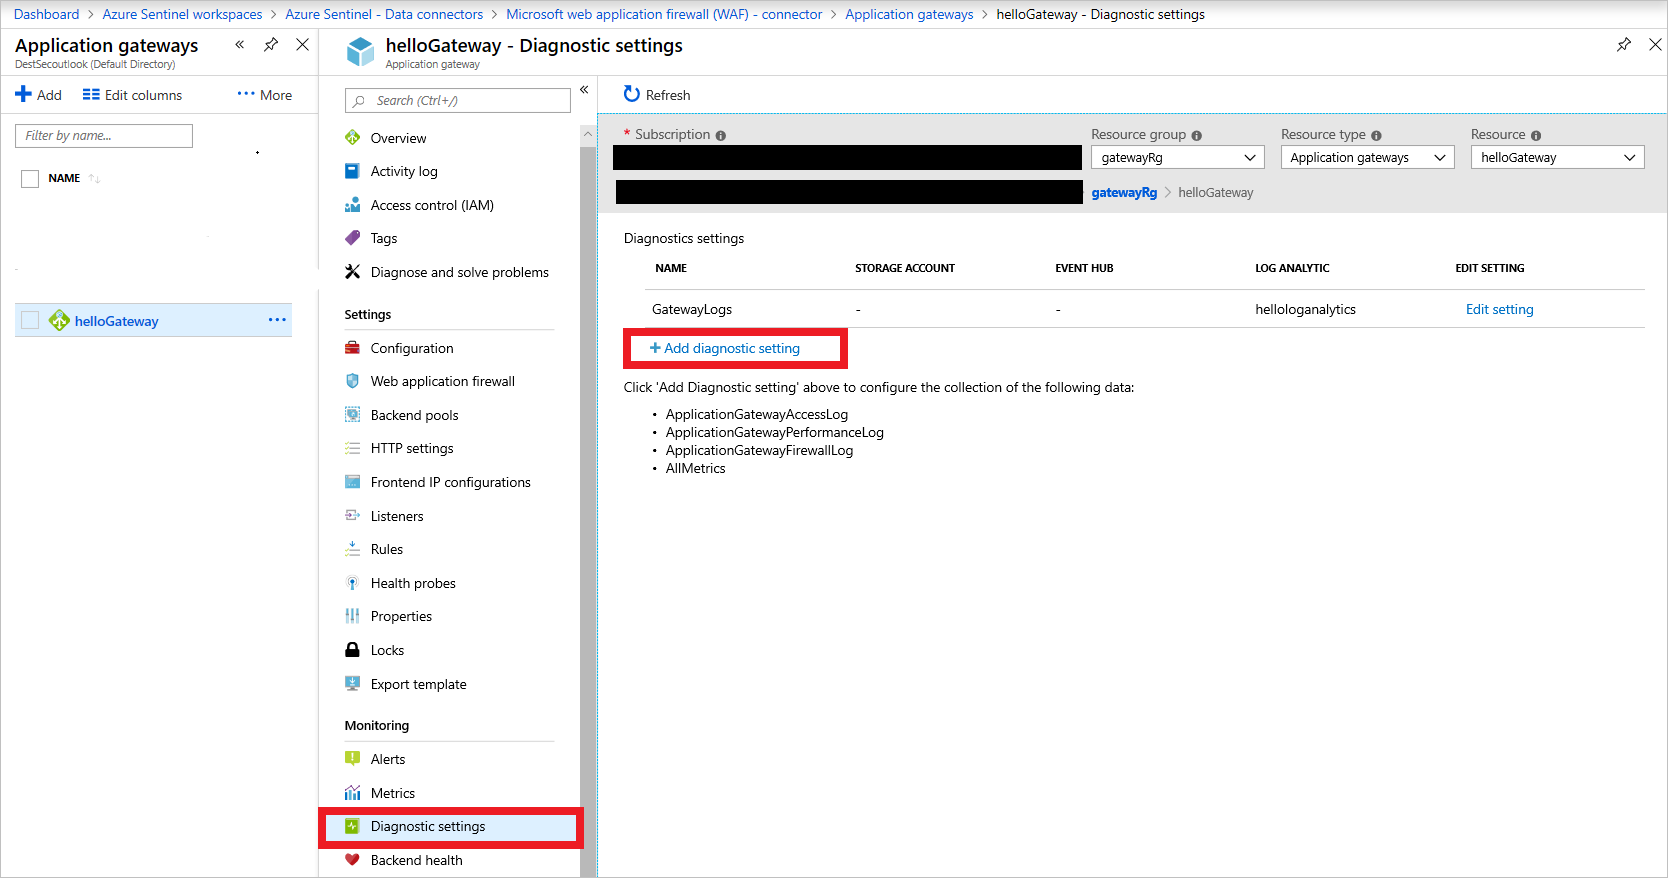
Add Application Gateway diagnostics
If you don't already have an Azure account, you can create a free one. Go to the free account page to get started, see what you can do with a free Azure account, and learn which products are free for 12 months.
To deploy the resources in the sample app with the security features, you need to pay for some premium features. As the app scales and the free tiers and trials offered by Azure need to be upgraded to meet application requirements, your costs might increase. Use the Azure pricing calculator to estimate your costs.
The following articles can help you design, develop, and deploy secure applications.
Ask Learn is an AI assistant that can answer questions, clarify concepts, and define terms using trusted Microsoft documentation.
Please sign in to use Ask Learn.
Sign in