必须使用帐户访问密钥或无密码连接对Azure Service Bus的应用程序请求进行身份验证。 但是,应尽可能确定应用程序中无密码连接的优先级。 本教程介绍如何从传统身份验证方法迁移到更安全、无密码的连接。
与访问密钥相关的安全风险
下面的代码示例演示如何使用包含访问密钥的connection string连接到Azure Service Bus。 创建Service Bus时,Azure自动生成这些密钥和连接字符串。 许多开发人员都倾向于使用此解决方案,因与过去使用的选项类似。 如果应用程序当前使用连接字符串,请考虑使用本文档介绍的步骤迁移到使用无密码连接。
await using ServiceBusClient client = new("<CONNECTION-STRING>");
client, err := azservicebus.NewClientFromConnectionString(
    "<CONNECTION-STRING>",
    nil)

if err != nil {
    // handle error
}
JMS:
ConnectionFactory factory = new ServiceBusJmsConnectionFactory(
    "<CONNECTION-STRING>",
    new ServiceBusJmsConnectionFactorySettings());
接收方客户端:
ServiceBusReceiverClient receiver = new ServiceBusClientBuilder()
    .connectionString("<CONNECTION-STRING>")
    .receiver()
    .topicName("<TOPIC-NAME>")
    .subscriptionName("<SUBSCRIPTION-NAME>")
    .buildClient();
发送方客户端:
ServiceBusSenderClient client = new ServiceBusClientBuilder()
    .connectionString("<CONNECTION-STRING>")
    .sender()
    .queueName("<QUEUE-NAME>")
    .buildClient();
const client = new ServiceBusClient("<CONNECTION-STRING>");
client = ServiceBusClient(
    fully_qualified_namespace = "<CONNECTION-STRING>"
)
应慎用连接字符串。 开发人员必须尽量避免在不安全的位置公开密钥。 能够访问密钥的任何人员都可以进行身份验证。 例如,如果帐户密钥被意外签入源代码管理、通过不安全的电子邮件发送或由不应具有权限的人员查看,则恶意用户访问应用程序存在风险。 请考虑改为将应用程序更新为使用无密码连接。
迁移到无密码连接
许多Azure服务通过Microsoft Entra ID和基于角色的访问控制(RBAC)支持无密码连接。 这些技术提供可靠的安全功能,可以使用Azure标识客户端库中的 DefaultAzureCredential 来实现。
重要
某些语言必须在代码中显式实现 DefaultAzureCredential,而其他语言则通过基础插件或驱动程序在内部使用 DefaultAzureCredential。
DefaultAzureCredential 支持多种身份验证方法,并自动确定应在运行时使用哪种方法。 应用通过此方法能够在不同环境(本地开发与生产)中使用不同的身份验证方法,而无需实现特定于环境的代码。
可以在DefaultAzureCredential中找到搜索凭据的顺序和位置,这些顺序和位置因语言而异。 例如,在本地使用 .NET 时,DefaultAzureCredential通常会使用开发人员用来登录Visual Studio、Azure CLI或Azure PowerShell的帐户进行身份验证。 将应用部署到Azure时,DefaultAzureCredential将自动发现和使用关联的托管服务的 托管标识,例如Azure App Service。 此转换不需要进行任何代码更改。
注意
托管标识提供用于表示应用或服务的安全标识。 标识由 Azure 平台管理,不需要预配或轮换任何机密。 可以在概述文档中了解更多关于托管标识的信息。
下面的代码示例演示如何使用无密码连接连接到Service Bus。 下一部分将更详细地介绍如何为特定服务迁移到此设置。
.NET应用程序可以将 DefaultAzureCredential 实例传递到服务客户端类的构造函数中。
DefaultAzureCredential 将自动发现该环境中可用的凭据。
client = new ServiceBusClient(
    "<NAMESPACE-NAME>.servicebus.chinacloudapi.cn",
    new DefaultAzureCredential());
将应用迁移到使用无密码身份验证的步骤
以下步骤说明如何将现有应用程序迁移到使用无密码连接,而不是使用基于密钥的解决方案。 首先配置本地开发环境,然后将这些概念应用到Azure应用托管环境。 无论是直接使用访问密钥还是通过连接字符串,这些迁移步骤都应适用。
在本地开发时,请确保访问Service Bus的用户帐户具有正确的权限。 在此示例中,你将使用 Azure Service Bus 数据所有者角色发送和接收数据,不过还可以使用更精细的角色。 若要自行分配此角色,您需要被分配 User Access Administrator 角色,或分配其他包含 Microsoft.Authorization/roleAssignments/write 操作的角色。 可以使用Azure门户、Azure CLI或Azure PowerShell向用户分配Azure RBAC 角色。 可以在范围概述页上详细了解角色分配的可用范围。
在此方案中,你将为用户帐户分配权限,其权限范围限定于特定的 Service Bus 命名空间,以遵循最低特权原则。 这种做法仅为用户提供所需的最低权限,并创建更安全的生产环境。
以下示例将Azure Service Bus数据所有者角色分配给用户帐户,以便发送和接收数据。
重要
在大多数情况下,角色分配在Azure中传播需要一两分钟,但在极少数情况下,可能需要长达 8 分钟的时间。 如果在首次运行代码时收到身份验证错误,请稍等片刻再试。
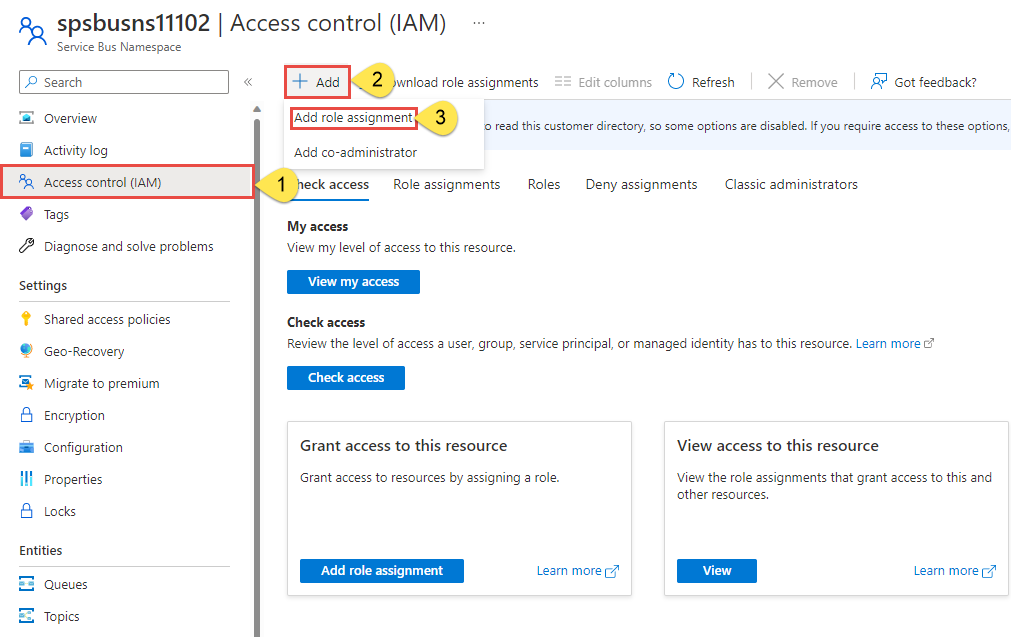
在Azure门户中,使用主搜索栏或左侧导航找到Service Bus命名空间。
在Service Bus概述页上,从左侧菜单中选择Access 控件(IAM)。
在“访问控制 (IAM)”页上,选择“角色分配”选项卡。
从顶部菜单中选择“+ 添加”,然后从出现的下拉菜单中选择“添加角色分配”。
使用搜索框将结果筛选为所需角色。 在此示例中,搜索 Azure Service Bus 数据所有者并选择匹配结果,然后选择 Next。
在“访问权限分配对象”下,选择“用户、组或服务主体”,然后选择“+ 选择成员”。
在对话框中,搜索Microsoft Entra用户名(通常是user@domain电子邮件地址),然后选择对话框底部的选择。
选择“查看 + 分配”转到最后一页,然后再次选择“查看 + 分配”完成该过程。
若要使用 Azure CLI 在资源级别分配角色,必须先使用 az servicebus namespace show 命令检索资源 ID。 可以使用 --query 参数筛选输出属性。
az servicebus namespace show --resource-group '<your-resource-group-name>' --name '<your-service-bus-namespace>' --query id
复制前面命令输出的结果 ID。 然后,可以使用Azure CLI的 az role 命令分配角色。
az role assignment create --assignee "<user@domain>" \
    --role "Azure Service Bus Data Owner" \
    --scope "<your-resource-id>"
若要使用 Azure PowerShell 在资源级别分配角色,必须先使用 Get-AzResource 命令检索资源 ID。
Get-AzResource -ResourceGroupName "<yourResourceGroupname>" -Name "<yourServiceBusName>"
复制上述命令输出中的 ID 值。 然后,可以使用 PowerShell 中的 New-AzRoleAssignment 命令分配角色。
New-AzRoleAssignment -SignInName <user@domain> `
    -RoleDefinitionName "Azure Service Bus Data Owner" `
    -Scope <yourServiceBusId>
登录并迁移应用代码以使用无密码连接
对于本地开发,请确保您使用分配给 Service Bus 命名空间角色的同一 Microsoft Entra 帐户进行身份验证。 可以通过 Azure CLI、Visual Studio、Azure PowerShell 或其他工具(如 IntelliJ)进行身份验证。
对于本地开发,请确保使用分配给该角色的同一Microsoft Entra帐户进行身份验证。 可以通过常用的开发工具(如Azure CLI或Azure PowerShell)进行身份验证。 可用于进行身份验证的开发工具因语言而异。
使用以下命令通过Azure CLI登录Azure:
az cloud set -n AzureChinaCloud
az login
# az cloud set -n AzureCloud   //means return to Public Azure.
选择Visual Studio右上角的 Sign in 按钮。
截图显示用于使用 Visual Studio 登录 Azure 的按钮。
通过之前您分配了角色的 Microsoft Entra 帐户登录。

需要安装 Azure CLI 才能通过 Visual Studio Code 使用 DefaultAzureCredential。
在Visual Studio Code的主菜单上,导航到 Terminal > New Terminal。
使用以下命令通过Azure CLI登录Azure:
az cloud set -n AzureChinaCloud
az login
# az cloud set -n AzureCloud   //means return to Public Azure.
使用以下命令通过 PowerShell 登录到 Azure:
Connect-AzAccount -Environment AzureChinaCloud
接下来,更新代码以使用无密码连接。
若要在 .NET 应用程序中使用 DefaultAzureCredential,请安装 Azure.Identity 包:
dotnet add package Azure.Identity
在文件的顶部,添加以下代码:
using Azure.Identity;
标识创建要连接到Azure Service Bus的 ServiceBusClient 对象的代码。 更新代码,使之与以下示例一致:
 var serviceBusNamespace = $"{namespace}.servicebus.chinacloudapi.cn";
 ServiceBusClient client = new(
     serviceBusNamespace,
     new DefaultAzureCredential());
若要在 Go 应用程序中使用 DefaultAzureCredential,请安装 azidentity 模块:
go get -u github.com/Azure/azure-sdk-for-go/sdk/azidentity
在文件的顶部,添加以下代码:
import (
    "github.com/Azure/azure-sdk-for-go/sdk/azidentity"
)
确定您的代码中创建 Client 实例来连接到 Azure Service Bus 的位置。 更新代码,使之与以下示例一致:
credential, err := azidentity.NewDefaultAzureCredential(nil)

if err != nil {
    // handle error
}

serviceBusNamespace := fmt.Sprintf(
    "%s.servicebus.chinacloudapi.cn",
    namespace)
client, err := azservicebus.NewClient(serviceBusNamespace, credential, nil)

if err != nil {
    // handle error
}
使用 DefaultAzureCredential 的步骤:
在 JMS 应用程序中,将 azure-servicebus-jms 包的最低 1.0.0 版本添加到你的应用程序:
<dependency>
    <groupId>com.microsoft.azure</groupId>
    <artifactId>azure-servicebus-jms</artifactId>
    <version>1.0.0</version>
</dependency>
在Java应用程序中,通过以下方法之一安装 azure-identity 包:
在文件的顶部,添加以下代码:
import com.azure.identity.DefaultAzureCredentialBuilder;
更新连接到Azure Service Bus的代码:
在 JMS 应用程序中,标识创建要连接到Azure Service Bus的 ServiceBusJmsConnectionFactory 对象的代码。 更新代码,使之与以下示例一致:
 DefaultAzureCredential credential = new DefaultAzureCredentialBuilder()
     .build();
 String serviceBusNamespace =
     namespace + ".servicebus.chinacloudapi.cn";

 ConnectionFactory factory = new ServiceBusJmsConnectionFactory(
     credential,
     serviceBusNamespace,
     new ServiceBusJmsConnectionFactorySettings());
在Java应用程序中,标识创建Service Bus发送方或接收方客户端对象以连接到Azure Service Bus的代码。 更新代码,使之与以下某个示例一致:
接收方客户端:
DefaultAzureCredential credential = new DefaultAzureCredentialBuilder()
    .build();
String serviceBusNamespace =
    namespace + ".servicebus.chinacloudapi.cn";

ServiceBusReceiverClient receiver = new ServiceBusClientBuilder()
    .credential(serviceBusNamespace, credential)
    .receiver()
    .topicName("<TOPIC-NAME>")
    .subscriptionName("<SUBSCRIPTION-NAME>")
    .buildClient();
发送方客户端:
DefaultAzureCredential credential = new DefaultAzureCredentialBuilder()
    .build();
String serviceBusNamespace =
    namespace + ".servicebus.chinacloudapi.cn";

ServiceBusSenderClient client = new ServiceBusClientBuilder()
    .credential(serviceBusNamespace, credential)
    .sender()
    .queueName("<QUEUE-NAME>")
    .buildClient();
若要在 Node.js 应用程序中使用 DefaultAzureCredential,请安装 @azure/identity 包:
npm install --save @azure/identity
在文件的顶部,添加以下代码:
const { DefaultAzureCredential } = require("@azure/identity");
标识创建要连接到Azure Service Bus的 ServiceBusClient 对象的代码。 更新代码,使之与以下示例一致:
const credential = new DefaultAzureCredential();
const serviceBusNamespace = `${namespace}.servicebus.chinacloudapi.cn`;

const client = new ServiceBusClient(
  serviceBusNamespace,
  credential
);
若要在 Python 应用程序中使用 DefaultAzureCredential,请安装 azure-identity 包:
pip install azure-identity
在文件的顶部,添加以下代码:
from azure.identity import DefaultAzureCredential
标识创建要连接到Azure Service Bus的 ServiceBusClient 对象的代码。 更新代码,使之与以下示例一致:
credential = DefaultAzureCredential()
service_bus_namespace = "%s.servicebus.chinacloudapi.cn" % namespace

client = ServiceBusClient(
    fully_qualified_namespace = service_bus_namespace,
    credential = credential
)
在本地运行应用
进行这些代码更改后,在本地运行应用程序。 新配置应选取本地凭据,例如 Azure CLI、Visual Studio 或 IntelliJ。 Azure中分配给本地开发用户的角色允许应用在本地连接到Azure服务。
将应用程序配置为使用无密码连接并在本地运行后,相同的代码可以在部署到Azure时向Azure服务进行身份验证。 例如,部署到启用了托管标识的Azure App Service实例的应用程序可以连接到Azure Service Bus。
使用 Azure 门户创建托管标识
以下步骤演示如何为各种 Web 托管服务创建系统分配的托管标识。 托管标识可以使用之前设置的应用配置安全地连接到其他Azure服务。
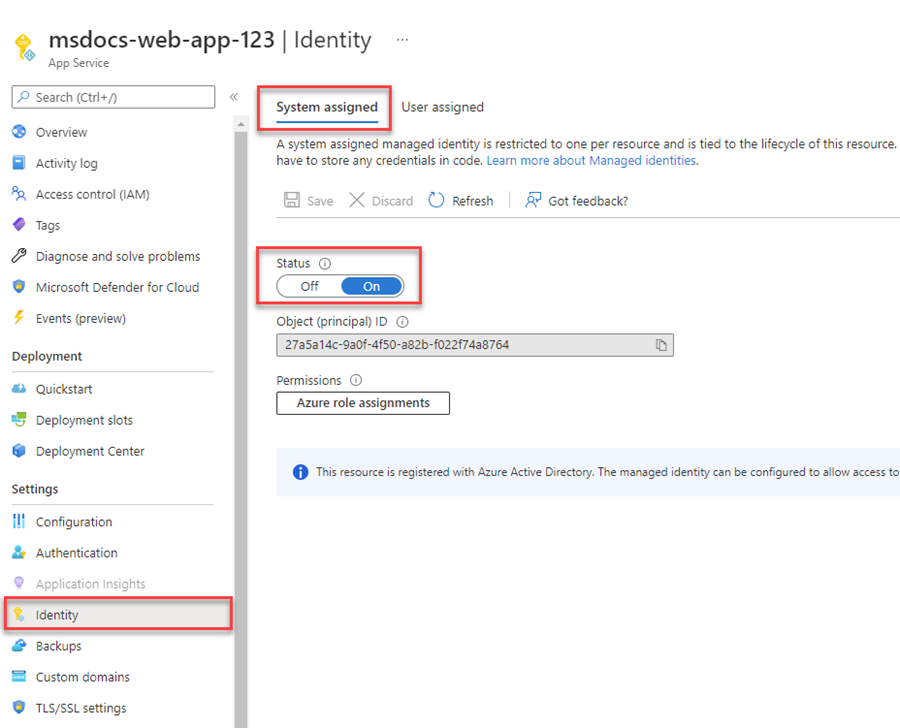
在Azure App Service实例的主概述页上,从左侧导航中选择Identity。
在“系统分配”选项卡下,确保将“状态”字段设置为“启用”。 系统分配的身份标识由Azure内部管理,代你处理管理任务。 身份的详细信息和 ID 永远不会在代码中被暴露。
在Azure Spring Apps实例的主概述页上,从左侧导航中选择Identity。
在“系统分配”选项卡下,确保将“状态”字段设置为“启用”。 系统分配的身份标识由Azure内部管理,代你处理管理任务。 身份的详细信息和 ID 永远不会在代码中被暴露。
屏幕截图显示如何为 Azure Spring Apps 启用托管标识。
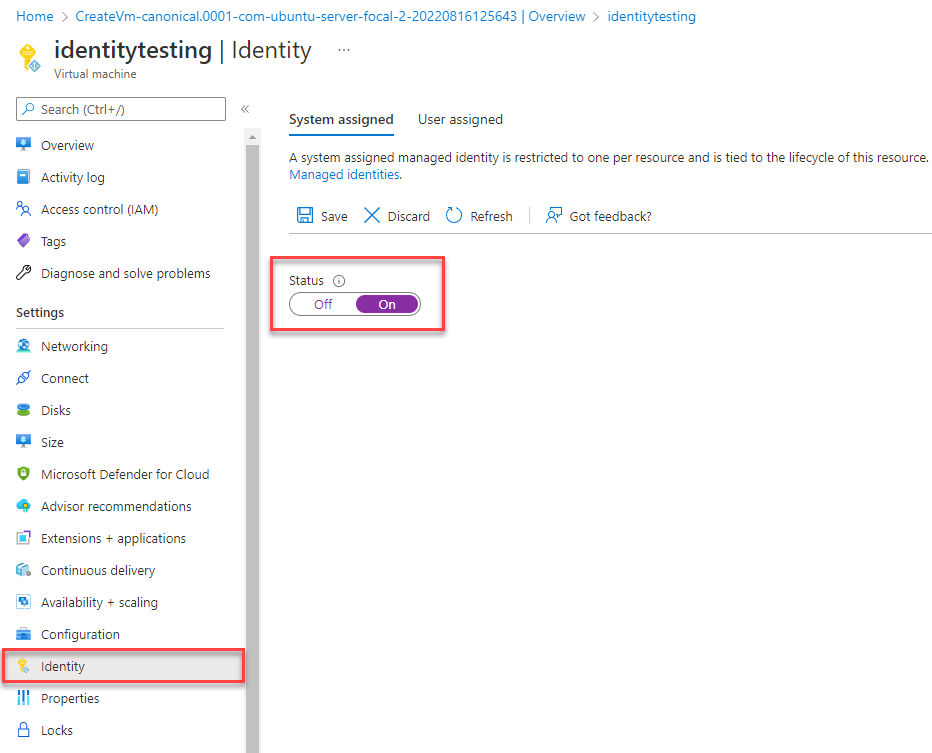
在虚拟机的概述主页上,从左侧导航中选择“身份验证”。
在“系统分配”选项卡下,确保将“状态”字段设置为“启用”。 系统分配的身份标识由Azure内部管理,代你处理管理任务。 身份的详细信息和 ID 永远不会在代码中被暴露。
或者,您还可以使用 Azure CLI,在 Azure 托管环境中启用托管身份。
可以使用服务连接器在Azure计算托管环境和目标服务之间使用 Azure CLI创建连接。 CLI 会自动处理创建托管标识并分配适当的角色,如门户说明中所述。
如果使用Azure App Service,请使用 az webapp connection 命令:
az webapp connection create servicebus \
    --resource-group <resource-group-name> \
    --name <webapp-name> \
    --target-resource-group <target-resource-group-name> \
    --namespace <target-service-bus-namespace> \
    --system-identity
如果使用 Azure Spring Apps,请使用 az spring connection 命令:
az spring connection create servicebus \
    --resource-group <resource-group-name> \
    --service <service-instance-name> \
    --app <app-name> \
    --deployment <deployment-name> \
    --target-resource-group <target-resource-group> \
    --namespace <target-service-bus-namespace> \
    --system-identity
如果使用Azure Container Apps,请使用 az containerapp connection 命令:
az containerapp connection create servicebus \
    --resource-group <resource-group-name> \
    --name <webapp-name> \
    --target-resource-group <target-resource-group-name> \
    --namespace <target-service-bus-namespace> \
    --system-identity
可以使用 az webapp identity assign 命令将托管标识分配给Azure App Service实例。
az webapp identity assign \
    --resource-group <resource-group-name> \
    --name <webapp-name>
可以使用 az spring app identity assign 命令将托管标识分配给Azure Spring Apps实例。
az spring app identity assign \
    --resource-group <resource-group-name> \
    --name <app-name> \
    --service <service-name>
可以使用 az 容器应用标识分配命令将托管标识分配给Azure Container Apps实例。
az containerapp identity assign \
    --resource-group <resource-group-name> \
    --name <app-name>
可以使用 az vm identity assign 命令将托管标识分配给虚拟机。
az vm identity assign \
    --resource-group <resource-group-name> \
    --name <virtual-machine-name>
可以使用 az aks update 命令将托管标识分配给Azure Kubernetes Service (AKS)实例。
az aks update \
    --resource-group <resource-group-name> \
    --name <virtual-machine-name> \
    --enable-managed-identity
为托管标识分配角色
接下来,您需要为创建的托管身份授予访问您的服务总线的权限。 将角色分配给托管标识,就像为你的本地开发用户所做的那样。
如果使用服务连接器连接服务,则无需完成此步骤。 已为你完成必要的配置:
导航到Service Bus概述页,然后从左侧导航中选择Access Control (IAM)。
选择“添加角色分配”。

在 Role 搜索框中,搜索 Azure Service Bus 数据所有者,这是用于管理 blob 数据操作的常见角色。 可以分配适合你的用例的任何角色。 从列表中选择 Azure Service Bus 数据所有者,然后选择 Next。
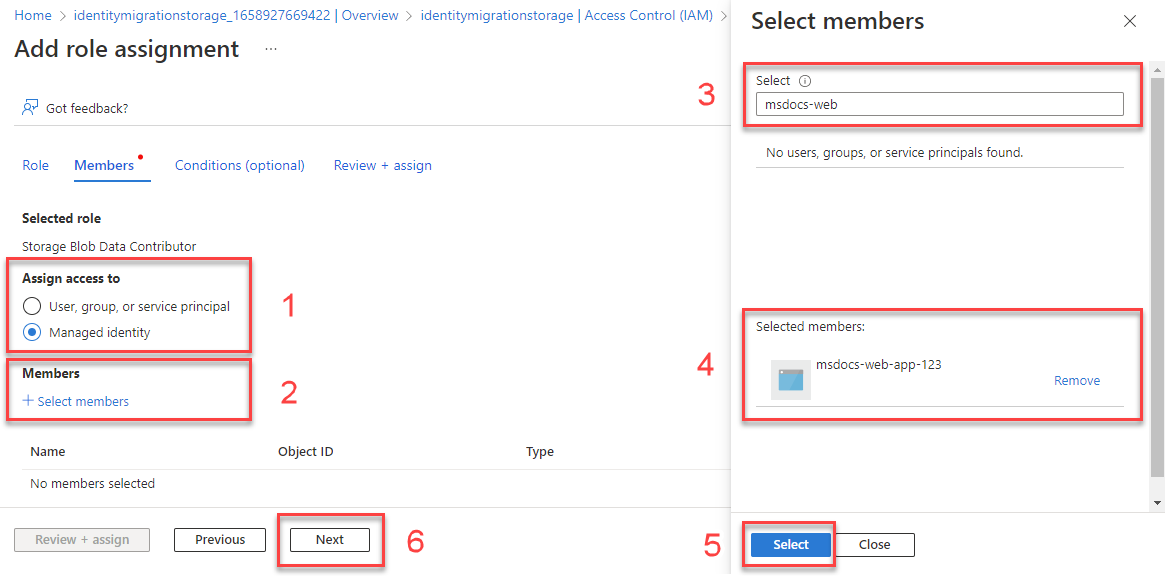
在“添加角色分配”屏幕上,针对“将访问权限分配给”选项,请选择“托管标识”。 然后选择“+选择成员”。
在弹出框中,通过输入应用服务的名称来搜索您创建的托管标识。 选择系统分配的标识,然后选择“选择”以关闭浮出控件菜单。

要连续选择“下一步”,直至能够选择“查看 + 分配”以完成角色分配。
若要使用 Azure CLI 在资源级别分配角色,必须先使用 az servicebus show 命令检索资源 ID。 可以使用 --query 参数筛选输出属性。
az servicebus show \
    --resource-group '<your-resource-group-name>' \
    --name '<your-service-bus-namespace>' \
    --query id
复制上述命令中的输出 ID。 然后,可以使用Azure CLI的 az role 命令分配角色。
az role assignment create \
    --assignee "<your-username>" \
    --role "Azure Service Bus Data Owner" \
    --scope "<your-resource-id>"
测试应用程序
进行这些代码更改后,在浏览器中浏览到托管应用程序。 应用应能够成功连接到Service Bus。 请记住,角色分配可能需要几分钟才能通过Azure环境传播。 应用程序现在配置为在本地和生产环境中运行,开发人员无需管理应用程序本身的机密。
后续步骤
本教程介绍了如何将应用程序迁移到无密码连接。