本文介绍如何将 Spring Boot 事件驱动的应用程序部署到 Azure Spring Apps。
示例项目是一个事件驱动型应用程序,该应用程序订阅名为 的lower-case,然后处理该消息,并将另一条消息发送到另一个名为 upper-case 的队列。 为了简化应用,消息处理只是将消息转换为大写。 下图描述了此过程:

本文介绍用于部署到 Azure Spring Apps 的以下选项:
- “Azure 门户”选项是创建资源和部署应用程序的最简单、最快的方式,只需点击一下即可。 此选项适用于需要将应用程序快速部署到 Azure 云服务的 Spring 开发人员。
- “Azure 门户 + Maven 插件”选项是一种更为传统的方法,可用于分步创建资源和部署应用程序。 此选项适合首次使用 Azure 云服务的 Spring 开发人员。
- “Azure Developer CLI”选项是一种更高效的方法,可通过简单的命令自动创建资源和部署应用程序。 Azure Developer CLI 使用模板来预配所需的 Azure 资源并部署应用程序代码。 此选项适合熟悉 Azure 云服务的 Spring 开发人员。
1.先决条件
- Azure 订阅。 如果没有 Azure 订阅,可在开始前创建一个试用帐户。
2. 准备 Spring 项目
下一部分中的“部署到 Azure”按钮将启动 Azure 门户体验,该体验从 GitHub 上的 ASA-Samples-Web-Application 发布页面下载 JAR 包。 不需要本地准备步骤。
使用以下步骤在本地准备示例:
GitHub 上已准备好示例项目。 使用以下命令克隆示例项目:
git clone https://github.com/Azure-Samples/ASA-Samples-Event-Driven-Application.git
使用以下命令生成示例项目:
cd ASA-Samples-Event-Driven-Application
./mvnw clean package
使用以下步骤在本地准备示例。 这些步骤使用 AZD 从 Azure Developer CLI 模板初始化事件驱动的应用程序。
打开终端,创建新的空文件夹,然后导航到它。
使用以下命令来初始化项目:
azd init --template Azure-Samples/ASA-Samples-Event-Driven-Application
以下列表描述了命令交互:
-
输入新的环境名称:提供环境名称,该名称将用作为保存所有 Azure 资源而创建的资源组的后缀。 此名称应在 Azure 订阅中具有唯一性。
控制台输出类似于以下示例的消息:
Initializing a new project (azd init)

(✓) Done: Initialized git repository
(✓) Done: Downloading template code to: <your-local-path>

Enter a new environment name: <your-env-name>

SUCCESS: New project initialized!
You can view the template code in your directory: <your-local-path>
Learn more about running 3rd party code on our DevHub: https://aka.ms/azd-third-party-code-notice
3. 准备云环境
运行此示例所需的主要资源是 Azure Spring Apps 实例、Azure 密钥保管库实例和 Azure 服务总线实例。 请执行以下步骤来创建这些资源。
本部分使用“部署到 Azure”按钮在 Azure 门户中启动部署体验。 此体验使用 ARM 模板来创建 Azure 资源。
3.1. 登录到 Azure 门户
转到 Azure 门户,输入登录到门户所需的凭据。 默认视图是服务仪表板。
3.2. 创建 Azure 资源
按以下步骤创建应用依赖的所有 Azure 资源:
选择以下“部署到 Azure”按钮在 Azure 门户中启动部署体验:

填写“基本信息”选项卡上的表单。填写表单时,请参考下表:
| 设置 |
建议值 |
描述 |
|
订阅 |
你的订阅名称。 |
要用于服务器的 Azure 订阅。 如果你有多个订阅,请选择要计费的资源所在的订阅。 |
|
资源组 |
myresourcegroup |
新的资源组名称,或订阅中的现有资源组。 |
|
区域 |
离用户最近的区域。 |
此区域用于创建资源组。 |
选择“查看 + 创建”,查看所选内容。 然后选择“创建”将应用部署到 Azure Spring Apps。
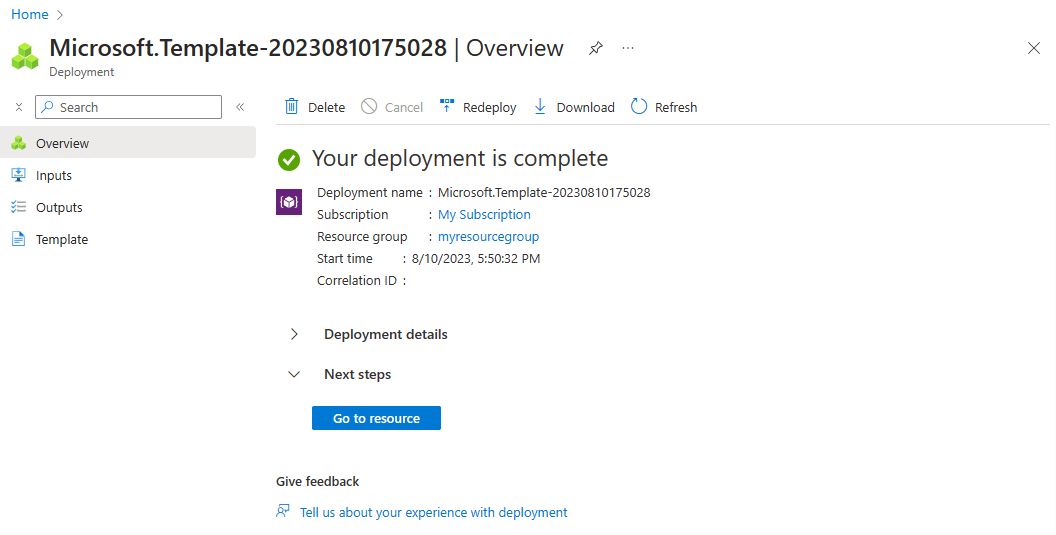
在工具栏上选择“通知”图标(铃铛)以监视部署过程。 完成部署后,可以选择“固定到仪表板”,以便在 Azure 门户仪表板上为此服务创建磁贴作为前往此服务的“概述”页的快捷方式。 选择“转到资源”以打开服务的“概述”页。

3.1. 登录到 Azure 门户
打开 Web 浏览器,并转到 Azure 门户。 输入登录到门户所需的凭据。 默认视图是服务仪表板。
3.2. 创建服务总线实例
使用以下步骤创建服务总线实例:
在 Azure 门户一角选择“创建资源”。
在“搜索服务和市场”搜索框中,搜索并选择“服务总线”。
在“服务总线”部分中,选择“创建”。
填写“基本信息”选项卡上的表单。填写表单时,请参考下表:
| 设置 |
建议值 |
描述 |
|
订阅 |
你的订阅名称。 |
要用于服务器的 Azure 订阅。 如果你有多个订阅,请选择要计费的资源所在的订阅。 |
|
资源组 |
myresourcegroup |
新的资源组名称,或订阅中的现有资源组。 |
|
命名空间名称 |
my-srvbus |
标识服务总线服务的唯一名称。 |
|
位置 |
最靠近用户的位置。 |
最靠近用户的位置。 |
|
托管选项和计划 |
基本 |
定价计划会确定与实例关联的资源和成本。 |
选择“查看和创建”以查看创建参数。 然后选择“创建”以完成服务总线实例的创建。
在工具栏上选择“通知”图标(铃铛)以监视部署过程。 完成部署后,可以选择“固定到仪表板”,以便在 Azure 门户仪表板上为此服务创建磁贴作为前往此服务的“概述”页的快捷方式。 选择“转到资源”以打开服务的“概述”页。

选择“转到资源”,以转到“服务总线命名空间”页。
在导航菜单上选择“共享访问策略”,然后选择“RootManageSharedAccessKey”。
在“SAS 策略:RootManageSharedAccessKey”页上,复制并保存“主连接字符串”值,该值用于设置来自 Spring 应用的连接。
选择导航菜单上的“队列”,然后选择“队列”。
在“创建队列”页上,为“名称”输入 lower-case,然后选择“创建”。
为“名称”输入 upper-case 重复上一步来创建另一个队列。
3.3. 创建 Azure Spring Apps 实例
使用以下步骤创建 Azure Spring Apps 实例:
在 Azure 门户一角选择“创建资源”。
选择“计算>Azure Spring Apps”。
填写“基本”表单,其中包含以下信息:
以下表为指南来填写窗体。 建议的计划为是基本。
| 设置 |
建议值 |
描述 |
|
订阅 |
订阅名称 |
要用于服务器的 Azure 订阅。 如果你有多个订阅,请选择要计费的资源所在的订阅。 |
|
资源组 |
myresourcegroup |
新的资源组名称,或订阅中的现有资源组。 |
|
名称 |
myasa |
用于标识 Azure Spring Apps 服务的唯一名称。 该名称必须为 4 到 32 个字符,只能包含小写字母、数字及连字符。 服务名称的第一个字符必须是字母,最后一个字符必须是字母或数字。 |
|
规划 |
标准 |
价格决定了与实例关联的资源和成本。 |
|
区域 |
离用户最近的区域 |
最靠近用户的位置。 |
|
区域冗余 |
未选定 |
是否在 Azure 可用性区域中创建 Azure Spring Apps 服务,目前仅有几个区域支持该服务。 |
选择“查看 + 创建”,查看所选内容。 选择“创建”来预配 Azure Spring Apps 实例。
在工具栏上选择“通知”图标(铃铛)以监视部署过程。 完成部署后,可以选择“固定到仪表板”,以便在 Azure 门户仪表板上为此服务创建磁贴作为到此服务的“概述”页的快捷方式。 选择“转到资源”可打开服务的“概述”页。

3.4. 将应用实例连接到服务总线实例
在 Azure 门户中转到 Azure Spring Apps 实例。
在导航菜单中选择“应用”,然后选择“创建应用”。
在“创建应用”页上,为“应用名称”输入 simple-event-driven-app,然后为“运行时平台”选择“Java 17”。

创建应用后,选择在上一步中创建的应用名称。
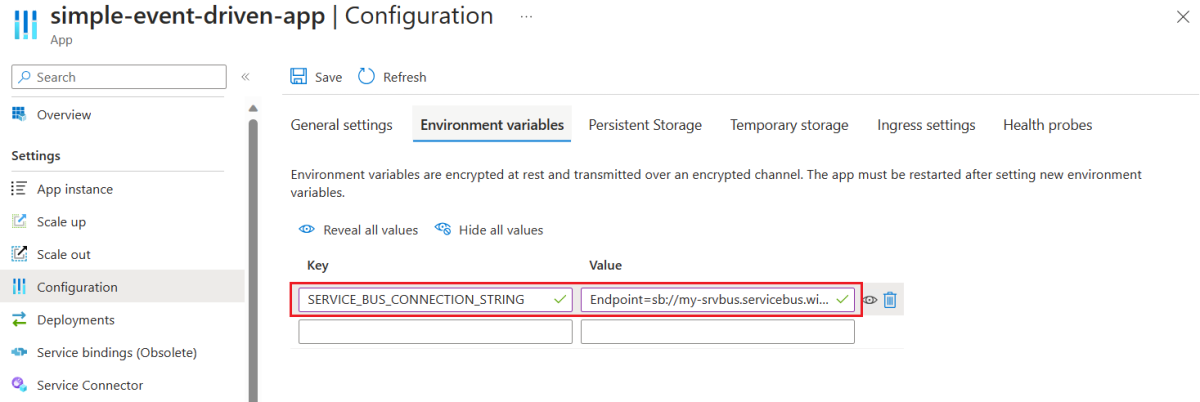
在“配置”页上,选择“环境变量”选项卡,输入 SERVICE_BUS_CONNECTION_STRING 作为“密钥”,粘贴服务总线连接字符串作为“值”,然后选择“保存”。

使用以下命令通过 OAuth2 登录到 Azure CLI。 如果已登录,请忽略此步。
azd auth login
控制台输出类似于以下示例的消息:
Logged in to Azure.
使用以下命令通过标准计划设置模板:
azd env set PLAN standard
使用以下命令打包应用程序的可部署副本,将模板的基础结构预配到 Azure,并将应用程序代码部署到这些新预配的资源:
azd provision
以下列表描述了命令交互:
-
选择要使用的 Azure 订阅:使用箭头移动,键入以进行筛选,然后按 Enter。
-
选择要使用的 Azure 位置:使用箭头移动,键入以进行筛选,然后按 Enter。
控制台输出类似于以下示例的消息:
SUCCESS: Your application was provisioned in Azure in xx minutes xx seconds.
You can view the resources created under the resource group rg-<your-environment-name> in Azure Portal:
https://portal.azure.cn/#@/resource/subscriptions/<your-subscription-id>/resourceGroups/rg-<your-environment-name>/overview
注意
此命令可能需要一段时间才能完成。 预配 Azure 资源时,系统将会显示进度指示器。
4. 将应用部署到 Azure Spring Apps
上一部分中的“部署到 Azure”按钮将启动包含应用程序部署的 Azure 门户体验,因此无需执行任何其他操作。
按照以下步骤,使用适用于 Azure Spring Apps 的 Maven 插件进行部署:
导航到完整目录,然后运行以下命令以在 Azure Spring Apps 中配置应用:
./mvnw com.microsoft.azure:azure-spring-apps-maven-plugin:1.19.0:config
以下列表描述了命令交互:
- OAuth2 登录:你需要根据 OAuth2 协议授权到 Azure 的登录。
-
选择订阅:选择所创建的 Azure Spring Apps 实例的订阅列表编号,它默认为列表中的第一个订阅。 如果使用默认编号,请直接按 Enter。
-
使用 Azure 中的现有 Azure Spring Apps:按 y 使用现有的 Azure Spring Apps 实例。
-
选择要部署的 Azure Spring Apps:选择所创建的 Azure Spring Apps 实例的列表编号。 如果使用默认编号,请直接按 Enter。
-
在 Azure Spring Apps 中使用现有应用 <your-instance-name>:按 y 使用已创建的应用。
-
确认保存上述所有配置:按 y。 如果按 n,则配置不会保存在 POM 文件中。
使用以下命令部署应用:
./mvnw azure-spring-apps:deploy
以下列表描述了命令交互:
- OAuth2 登录:你需要根据 OAuth2 协议授权到 Azure 的登录。
执行命令后,你会从以下日志消息中看到部署已成功:
[INFO] Deployment(default) is successfully created
[INFO] Starting Spring App after deploying artifacts...
[INFO] Deployment Status: Running
按照以下步骤使用 AZD 打包应用,预配 Web 应用程序所需的 Azure 资源,然后部署到 Azure Spring Apps。
使用以下命令打包应用程序的可部署副本:
azd package
控制台输出类似于以下示例的消息:
SUCCESS: Your application was packaged for Azure in xx seconds.
使用以下命令将应用程序代码部署到这些新预配的资源:
azd deploy
控制台输出类似于以下示例的消息:
Deploying services (azd deploy)

(✓) Done: Deploying service simple-event-driven-app
- No endpoints were found

SUCCESS: Your application was deployed to Azure in xx minutes xx seconds.
You can view the resources created under the resource group rg-<your-environment-name> in Azure Portal:
https://portal.azure.cn/#@/resource/subscriptions/<your-subscription-id>/resourceGroups/rg-<your-environment-name>/overview
5. 验证应用
使用以下步骤确认事件驱动型应用正常工作。 可以通过向 lower-case 队列发送消息,然后确认 upper-case 队列中存在消息来验证应用。
使用服务总线资源管理器将消息发送到 lower-case 队列。 有关详细信息,请参阅使用 Service Bus Explorer 在服务总线上运行数据操作的将消息发送到队列或主题部分。
确认有新消息发送到 upper-case 队列。 有关详细信息,请参阅使用 Service Bus Explorer 在服务总线上运行数据操作的速览消息部分。
转到 Azure Spring Apps 实例的“概述”页,然后选择“日志”以检查应用的日志。

6.清理资源
当不再需要在本文中创建的资源时,请务必将其删除。 可以删除 Azure 资源组,其中包括资源组中的所有资源。
按照以下步骤删除整个资源组(包括新创建的服务器):
在 Azure 门户中查找资源组。 在导航菜单上,选择“资源组”,然后选择资源组的名称。
在“资源组”页上,选择“删除”。 在文本框中输入资源组的名称以确认删除,然后选择“删除”。
按照以下步骤删除整个资源组(包括新创建的服务器):
在 Azure 门户中查找资源组。 在导航菜单上,选择“资源组”,然后选择资源组的名称。
在“资源组”页上,选择“删除”。 在文本框中输入资源组的名称以确认删除,然后选择“删除”。
使用以下命令删除此示例应用程序中使用的所有 Azure 资源:
azd down
以下列表描述了命令交互:
-
要删除的资源总数:<your-resources-total>,是否确实要继续?:按 y。
-
是否要改为永久删除这些资源,允许重复使用它们的名称?:按 y。 如果要重复使用密钥保管库,请按 n。
控制台输出类似于以下示例的消息:
SUCCESS: Your application was removed from Azure in xx minutes xx seconds.
7. 后续步骤
有关详细信息,请参阅以下文章:


