Azure encrypts all data in a storage account at rest, including Azure Files data, by using AES-256 encryption. By default, Microsoft manages the encryption keys for a storage account. For more control over encryption keys, use customer-managed keys (CMK) instead of Microsoft-managed keys to protect and control access to the encryption key that encrypts your data. This article explains how to configure customer-managed keys for Azure Files workloads. For an overview of encryption at rest and key options, see Encryption at rest for Azure Files.
When you configure customer-managed keys for a storage account, Azure Files data in that storage account is automatically encrypted by using the customer key. No per-share opt-in is required.
To use a key in Azure Key Vault in the same Microsoft Entra tenant as the storage account, complete these sections in order:
- Create or configure a key vault
- Create or import an encryption key
- Create a managed identity and assign permissions
- Configure customer-managed keys on the storage account
- Verify the configuration
For other key locations, see the section:
To enable customer-managed keys, you need an Azure storage account along with an Azure Key Vault with purge protection enabled. You can use an existing key vault or create a new one. The storage account and key vault can be in different regions or subscriptions within the same Microsoft Entra tenant. For cross-tenant scenarios, see About cross-tenant customer-managed keys.
To create a new key vault by using the Azure portal, follow these steps:
- In the Azure portal, search for Key vaults and select Create.
- Fill in the required fields (subscription, resource group, name, region).
- Under Recovery options, select Enable purge protection.
- Select Review + create, and then select Create.
If you want to use an existing key vault, follow these steps:
- Go to your key vault in the Azure portal.
- From the service menu, under Settings, select Properties.
- In the Purge protection section, select Enable purge protection, and then select Save.
- Make sure soft delete is enabled on your key vault. It's enabled by default for new key vaults.
To create a new key vault with purge protection enabled, run the following cmdlet. Replace <key-vault-name>, <resource-group>, and <region> with your own values.
$vaultParams = @{
    Name = "<key-vault-name>"
    ResourceGroupName = "<resource-group>"
    Location = "<region>"
    EnablePurgeProtection = $true
}
New-AzKeyVault @vaultParams
To enable purge protection on an existing key vault, run the following cmdlet. Replace <key-vault-name> and <resource-group> with your own values.
$vaultParams = @{
    VaultName = "<key-vault-name>"
    ResourceGroupName = "<resource-group>"
    EnablePurgeProtection = $true
}
Update-AzKeyVault @vaultParams
To create a new key vault with purge protection enabled, run the following command. Replace <key-vault-name>, <resource-group>, and <region> with your own values.
az keyvault create \
    --name <key-vault-name> \
    --resource-group <resource-group> \
    --location <region> \
    --enable-purge-protection true
To enable purge protection on an existing key vault, run the following command. Replace <key-vault-name> and <resource-group> with your own values.
az keyvault update \
    --name <key-vault-name> \
    --resource-group <resource-group> \
    --enable-purge-protection true
Assign the Key Vault Crypto Officer role
To create and manage keys in your key vault, you need the Key Vault Crypto Officer role on the key vault. Assign this role to yourself by using the Azure portal, PowerShell, or Azure CLI. If you already have this role on the key vault, skip this section and go to Create or import an encryption key.
You need the Owner or User Access Administrator RBAC role on the key vault scope to assign the Key Vault Crypto Officer role. Contact your admin if needed.
To assign the Key Vault Crypto Officer role to yourself by using the Azure portal, follow these steps:
- Go to your key vault.
- From the service menu, select Access control (IAM).
- Under Grant access to this resource, select Add role assignment.
- Search for and select Key Vault Crypto Officer, and then select Next.
- Under Assign access to, select User, group, or service principal.
- Under Members, choose +Select members.
- Search for and select your own account, then choose Select.
- Select Review + assign, and then Review + assign again.
To assign the Key Vault Crypto Officer role to yourself by using Azure PowerShell, run the following cmdlet. Replace <key-vault-name> with your own value.
$keyVault = Get-AzKeyVault -VaultName "<key-vault-name>"
$currentUser = (Get-AzADUser -SignedIn).Id

$roleParams = @{
    ObjectId = $currentUser
    RoleDefinitionName = "Key Vault Crypto Officer"
    Scope = $keyVault.ResourceId
}
New-AzRoleAssignment @roleParams
To assign the Key Vault Crypto Officer role to yourself by using Azure CLI, run the following commands. Replace <key-vault-name> with your own value.
KV_RESOURCE_ID=$(az keyvault show --name <key-vault-name> --query id -o tsv)
CURRENT_USER=$(az ad signed-in-user show --query id -o tsv)

az role assignment create \
    --assignee-object-id $CURRENT_USER \
    --assignee-principal-type User \
    --role "Key Vault Crypto Officer" \
    --scope $KV_RESOURCE_ID
Create or import an encryption key
You need an RSA key of size 2048, 3072, or 4096. Generate or import an RSA key in your key vault. Before you generate a key, make sure you have the Key Vault Crypto Officer role on the key vault.
To generate a new RSA encryption key by using the Azure portal, follow these steps:
- Go to your key vault in the Azure portal.
- From the service menu, under Objects, select Keys.
- Select Generate/Import. Under Options, select Generate.
- Enter a name for the key. Key names can only contain alphanumeric characters and dashes.
- Set Key type to RSA and RSA key size to 2048, 3072, or 4096.
- Select Create.
To import an existing RSA encryption key by using the Azure portal, follow these steps:
- Go to your key vault in the Azure portal.
- From the service menu, under Objects, select Keys.
- Select Generate/Import. Under Options, select Import.
- Select your key to upload.
- Enter a name for the key. Key names can only contain alphanumeric characters and dashes.
- Set Key type to RSA.
- Select Create.
To create an RSA key by using Azure PowerShell, run the following cmdlet. Replace <key-vault-name> and <key-name> with your own values. For Size, specify 2048, 3072, or 4096.
$keyParams = @{
    VaultName = "<key-vault-name>"
    Name = "<key-name>"
    Destination = "Software"
    KeyType = "RSA"
    Size = 2048
}
Add-AzKeyVaultKey @keyParams
To import an existing RSA encryption key by using Azure PowerShell, run the following cmdlet. Replace <key-vault-name>, <key-name>, and <key-path> with your own values. The first line prompts for the password of the key file. If the key file doesn't have a password, omit the Read-Host line and KeyFilePassword.
$password = Read-Host -Prompt "Key file password" -AsSecureString

$keyParams = @{
    VaultName = "<key-vault-name>"
    Name = "<key-name>"
    KeyFilePath = "<key-path>"
    KeyFilePassword = $password
}
Add-AzKeyVaultKey @keyParams
To create an RSA key by using Azure CLI, run the following command. Replace <key-vault-name> and <key-name> with your own values. For --size, specify 2048, 3072, or 4096.
az keyvault key create \
    --vault-name <key-vault-name> \
    --name <key-name> \
    --kty RSA \
    --size 2048
To import an existing RSA encryption key by using Azure CLI, run the following command. Replace <key-vault-name>, <key-name>, <key-path>, and <key-password> with your own values. If the key file doesn't have a password, omit the --pem-password parameter.
az keyvault key import \
    --vault-name <key-vault-name> \
    --name <key-name> \
    --pem-file <key-path> \
    --pem-password <key-password>
Create a managed identity and assign permissions
The storage account needs a managed identity to authenticate to the key vault. By using a managed identity, the storage account can securely access the encryption key in your key vault without storing credentials.
Create a user-assigned managed identity and grant that identity the Key Vault Crypto Service Encryption User role on the key vault.
Create a user-assigned managed identity
Create a user-assigned managed identity by using the Azure portal, Azure PowerShell, or Azure CLI.
To create a user-assigned managed identity by using the Azure portal, follow these steps:
- Search for Managed Identities and select Create.
- Choose a subscription, resource group, region, and name.
- Select Review + create, and then select Create.
To create a user-assigned managed identity by using Azure PowerShell, run the following cmdlet. Replace <resource-group>, <identity-name>, and <region> with your own values.
$identityParams = @{
    ResourceGroupName = "<resource-group>"
    Name = "<identity-name>"
    Location = "<region>"
}
New-AzUserAssignedIdentity @identityParams
To create a user-assigned managed identity by using Azure CLI, run the following command. Replace <resource-group>, <identity-name>, and <region> with your own values.
az identity create \
    --name <identity-name> \
    --resource-group <resource-group> \
    --location <region>
Assign the Key Vault Crypto Service Encryption User role to the managed identity
Assign the Key Vault Crypto Service Encryption User role to the managed identity you created by using the Azure portal, PowerShell, or Azure CLI.
To assign the Key Vault Crypto Service Encryption User role to the managed identity by using the Azure portal, follow these steps:
- Go to your key vault in the Azure portal.
- From the service menu, select Access control (IAM).
- Under Grant access to this resource, select Add role assignment.
- Search for and select Key Vault Crypto Service Encryption User, and then select Next.
- Under Assign access to, select Managed identity.
- Under Members, choose +Select members.
- The Select managed identities window opens. Under Managed identity, select User-assigned managed identity.
- Select the managed identity that you created, and then choose Select.
- Select Review + assign, and then Review + assign again.
To assign the Key Vault Crypto Service Encryption User role to the user-assigned managed identity by using Azure PowerShell, run the following cmdlet. Replace <resource-group>, <identity-name>, and <key-vault-name> with your own values.
$identityParams = @{
    ResourceGroupName = "<resource-group>"
    Name = "<identity-name>"
}
$identity = Get-AzUserAssignedIdentity @identityParams

$keyVault = Get-AzKeyVault -VaultName "<key-vault-name>"

$roleParams = @{
    ObjectId = $identity.PrincipalId
    RoleDefinitionName = "Key Vault Crypto Service Encryption User"
    Scope = $keyVault.ResourceId
}
New-AzRoleAssignment @roleParams
To assign the Key Vault Crypto Service Encryption User role to the user-assigned managed identity by using Azure CLI, run the following commands. Replace <resource-group>, <identity-name>, and <key-vault-name> with your own values.
# Get the principal ID of the user-assigned managed identity
IDENTITY_PRINCIPAL_ID=$(az identity show \
    --name <identity-name> \
    --resource-group <resource-group> \
    --query principalId -o tsv)

# Get the key vault resource ID
KV_RESOURCE_ID=$(az keyvault show \
    --name <key-vault-name> \
    --query id -o tsv)

# Assign the Key Vault Crypto Service Encryption User role to the user-assigned managed identity
az role assignment create \
    --assignee-object-id $IDENTITY_PRINCIPAL_ID \
    --assignee-principal-type ServicePrincipal \
    --role "Key Vault Crypto Service Encryption User" \
    --scope $KV_RESOURCE_ID
With the key vault, key, and managed identity in place, you can enable customer-managed keys on the storage account.
If you don't specify a key version, the storage account uses automatic key version updating (recommended). To use manual key version updating, specify a key version.
Important
For storage accounts that are associated with a network security perimeter, the key vault should ideally be in the same network security perimeter. If it isn't, then you must configure the network security perimeter profile of the key vault to allow the storage account to communicate with it.
You can configure customer-managed keys on an existing storage account by using the Azure portal, Azure PowerShell, or Azure CLI.
To configure customer-managed keys on an existing storage account by using the Azure portal, follow these steps. These steps use automatic key version updating. To use manual key version updating, select Enter key URI in step 4, and enter a key URI that includes the key version.
- Go to your storage account.
- From the service menu, under Security + networking, select Encryption.
- For Encryption type, select Customer-managed keys. If the storage account is already configured for CMK, select Change key.
- For Encryption key, select Select from key vault.
- Select Select a key vault and key. Choose your key vault and key, and then choose Select.
- For Identity type, choose User-assigned to use your previously created user-assigned managed identity.
- Select Select an identity. Search for and select the user-assigned managed identity, and then select Add.
- Select Save.

To configure customer-managed keys on an existing storage account by using Azure PowerShell with automatic key version updating (recommended), run the following cmdlet. Replace <resource-group>, <identity-name>, <storage-account-name>, <key-vault-name>, and <key-name> with your own values.
The following cmdlet uses your previously created user-assigned managed identity. If you want to use the storage account's system identity instead, set IdentityType to SystemAssigned, and remove the Get-AzUserAssignedIdentity lines, UserAssignedIdentityId, and KeyVaultUserAssignedIdentityId.
$resourceGroupName = "<resource-group>"
$keyVaultName = "<key-vault-name>"

$identityParams = @{
    ResourceGroupName = $resourceGroupName
    Name = "<identity-name>"
}
$identity = Get-AzUserAssignedIdentity @identityParams

$keyVault = Get-AzKeyVault -VaultName $keyVaultName
$key = Get-AzKeyVaultKey -VaultName $keyVaultName -Name "<key-name>"

$accountParams = @{
    ResourceGroupName = $resourceGroupName
    Name = "<storage-account-name>"
    IdentityType = "UserAssigned"
    UserAssignedIdentityId = $identity.Id
    KeyVaultUri = $keyVault.VaultUri
    KeyName = $key.Name
    KeyVaultEncryption = $true
    KeyVaultUserAssignedIdentityId = $identity.Id
}
Set-AzStorageAccount @accountParams
To use manual key version updating instead of automatic updating, add KeyVersion = $key.Version to $accountParams.
To configure customer-managed keys on an existing storage account by using Azure CLI with automatic key version updating (recommended), run the following commands. Replace <resource-group>, <identity-name>, <storage-account-name>, <key-vault-name>, and <key-name> with your own values.
The following command uses your previously created user-assigned managed identity. If you want to use the storage account's system identity instead, set --identity-type to SystemAssigned and omit the IDENTITY_RESOURCE_ID variable, --user-identity-id, and --key-vault-user-identity-id.
# Using user-assigned managed identity. Omit for system assigned.
IDENTITY_RESOURCE_ID=$(az identity show \
    --name <identity-name> \
    --resource-group <resource-group> \
    --query id -o tsv)

# Get the key vault URI
KEY_VAULT_URI=$(az keyvault show \
    --name <key-vault-name> \
    --query properties.vaultUri -o tsv)

az storage account update \
    --name <storage-account-name> \
    --resource-group <resource-group> \
    --encryption-key-vault $KEY_VAULT_URI \
    --encryption-key-name <key-name> \
    --encryption-key-source Microsoft.Keyvault \
    --key-vault-user-identity-id $IDENTITY_RESOURCE_ID \
    --identity-type UserAssigned \
    --user-identity-id $IDENTITY_RESOURCE_ID
To use manual key version updating instead of automatic updating, add --encryption-key-version <key-version> to the az storage account update command.
You can configure customer-managed keys when you create a new storage account by using the Azure portal, Azure PowerShell, or Azure CLI.
You can't use a system-assigned identity during storage account creation because the identity doesn't exist until the storage account is created. You must use a user-assigned managed identity.
To configure customer-managed keys for a new storage account by using the Azure portal, follow these steps. These steps use automatic key version updating. To use manual key version updating, select Enter key from URI in step 2, and enter a key URI that includes the key version.
On the Encryption tab during storage account creation, select Customer-managed keys (CMK) for Encryption type.
For Encryption key, select Select a key vault and key.
For Subscription, select the subscription that contains your key vault. The portal might default to a different subscription.
Select your key vault and key.
Under User-assigned identity, choose Select an identity. The Select user assigned managed identity window opens.
Search for and select the user-assigned managed identity that you created. New storage accounts can't use a system-assigned managed identity.
Select Add.
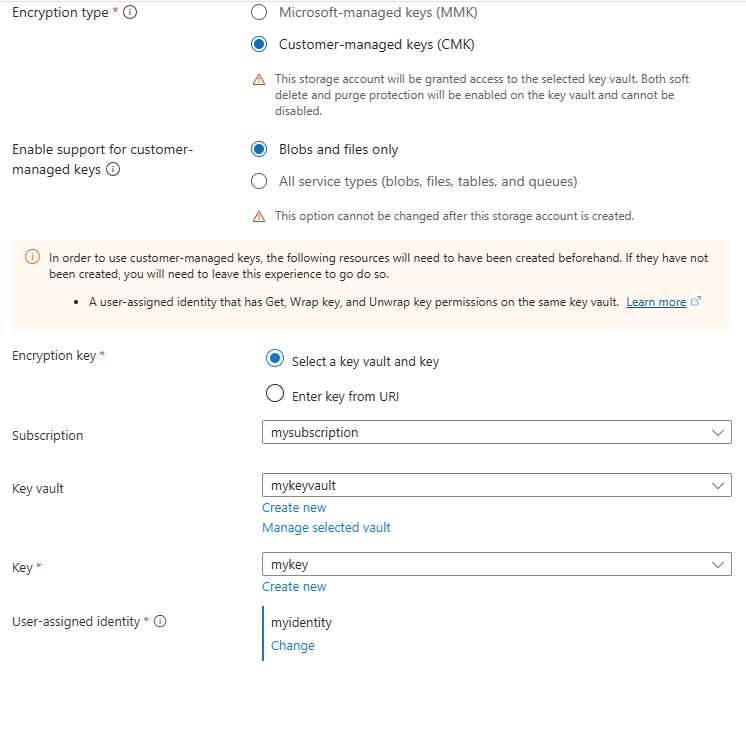
Complete the remaining tabs, select Review and create, and then select Create.
To create a new storage account with customer-managed keys by using Azure PowerShell, run the following cmdlet. Replace <resource-group>, <identity-name>, <storage-account-name>, <key-vault-name>, <key-name>, and <region> with your own values. You can specify different values for Kind and SkuName.
$resourceGroupName = "<resource-group>"
$keyVaultName = "<key-vault-name>"

$identityParams = @{
    ResourceGroupName = $resourceGroupName
    Name = "<identity-name>"
}
$identity = Get-AzUserAssignedIdentity @identityParams

$keyVault = Get-AzKeyVault -VaultName $keyVaultName
$key = Get-AzKeyVaultKey -VaultName $keyVaultName -Name "<key-name>"

$accountParams = @{
    ResourceGroupName = $resourceGroupName
    Name = "<storage-account-name>"
    Location = "<region>"
    SkuName = "Standard_LRS"
    Kind = "StorageV2"
    IdentityType = "UserAssigned"
    UserAssignedIdentityId = $identity.Id
    KeyVaultUri = $keyVault.VaultUri
    KeyName = $key.Name
    KeyVaultUserAssignedIdentityId = $identity.Id
}
New-AzStorageAccount @accountParams
To use manual key version updating instead of automatic, add KeyVersion = $key.Version to $accountParams.
To create a new storage account with customer-managed keys by using Azure CLI, run the following commands. Replace <resource-group>, <identity-name>, <storage-account-name>, <key-vault-name>, <key-name>, and <region> with your own values. You can specify different values for --kind and --sku.
IDENTITY_RESOURCE_ID=$(az identity show \
    --name <identity-name> \
    --resource-group <resource-group> \
    --query id -o tsv)

# Get the key vault URI
KEY_VAULT_URI=$(az keyvault show \
    --name <key-vault-name> \
    --query properties.vaultUri -o tsv)

az storage account create \
    --name <storage-account-name> \
    --resource-group <resource-group> \
    --location <region> \
    --sku Standard_LRS \
    --kind StorageV2 \
    --identity-type UserAssigned \
    --user-identity-id $IDENTITY_RESOURCE_ID \
    --encryption-key-vault $KEY_VAULT_URI \
    --encryption-key-name <key-name> \
    --encryption-key-source Microsoft.Keyvault \
    --key-vault-user-identity-id $IDENTITY_RESOURCE_ID
To use manual key version updating instead of automatic, add --encryption-key-version <key-version> to the az storage account create command.
Verify the configuration
After you enable customer-managed keys, confirm that encryption is properly configured on your storage account. You can do this by using the Azure portal, Azure PowerShell, or Azure CLI.
To verify the storage account configuration by using the Azure portal, follow these steps:
- Go to your storage account in the Azure portal.
- From the service menu, under Security + networking, select Encryption.
- Confirm that Encryption type shows Customer-managed keys.
- Verify that the information under Key selection is correct.
To verify the storage account configuration by using Azure PowerShell, run the following cmdlet. Replace <resource-group> and <storage-account-name> with your own values.
$accountParams = @{
    ResourceGroupName = "<resource-group>"
    Name = "<storage-account-name>"
}
$account = Get-AzStorageAccount @accountParams

$account.Encryption.KeySource
$account.Encryption.KeyVaultProperties
Confirm that KeySource is Microsoft.Keyvault and that KeyVaultProperties shows your key vault URI and key name.
To verify the configuration by using Azure CLI, run the following command. Replace <resource-group> and <storage-account-name> with your own values.
az storage account show \
    --name <storage-account-name> \
    --resource-group <resource-group> \
    --query encryption
Confirm that keySource is Microsoft.Keyvault and the keyVaultProperties section shows your key vault URI and key name.
About cross-tenant customer-managed keys
Many service providers building Software as a Service (SaaS) offerings on Azure want to offer their customers the option to manage their own encryption keys. Customer-managed keys allow a service provider to encrypt the customer's data using an encryption key that is managed by the service provider's customer and that isn't accessible to the service provider. In Azure, the service provider's customer can use Azure Key Vault to manage their encryption keys in their own Microsoft Entra tenant and subscription.
Azure platform services and resources that are owned by the service provider and that reside in the service provider's tenant require access to the key from the customer's tenant to perform the encryption/decryption operations.
The image below shows a data encryption at rest with federated identity in a cross-tenant customer-managed key workflow spanning a service provider and its customer.
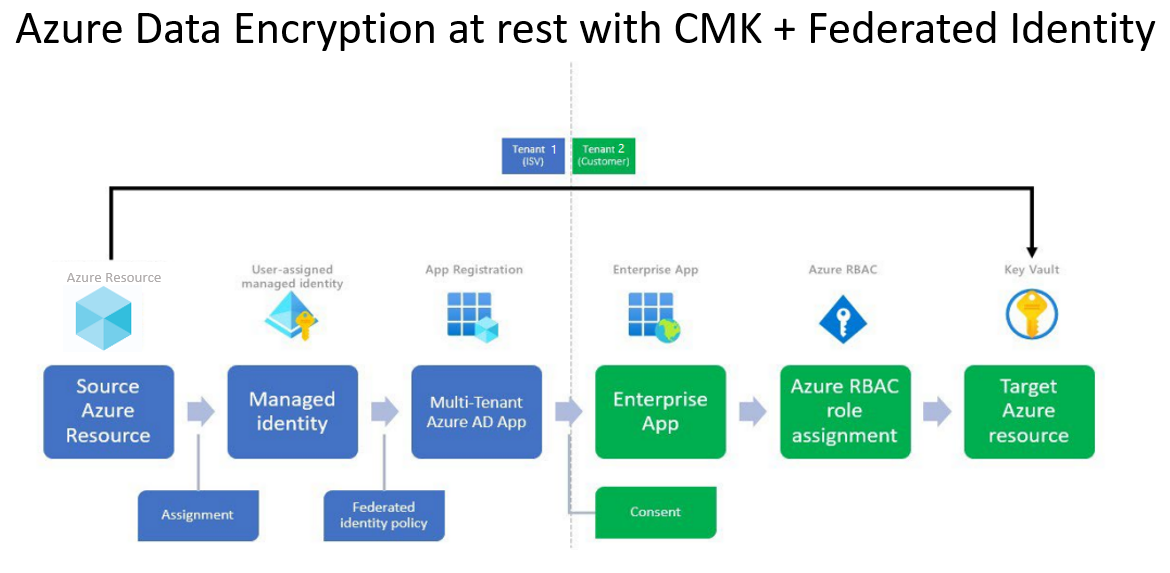
In the example above, there are two Microsoft Entra tenants: an independent service provider's tenant (Tenant 1), and a customer's tenant (Tenant 2). Tenant 1 hosts Azure platform services and Tenant 2 hosts the customer's key vault.
A multitenant application registration is created by the service provider in Tenant 1. A federated identity credential is created on this application using a user-assigned managed identity. Then, the name and application ID of the app is shared with the customer.
A user with the appropriate permissions installs the service provider's application in the customer tenant, Tenant 2. A user then grants the service principal associated with the installed application access to the customer's key vault. The customer also stores the encryption key, or customer-managed key, in the key vault. The customer shares the key location (the URL of the key) with the service provider.
The service provider now has:
- An application ID for a multitenant application installed in the customer's tenant, which has been granted access to the customer-managed key.
- A managed identity configured as the credential on the multitenant application.
- The location of the key in the customer's key vault.
With these three parameters, the service provider provisions Azure resources in Tenant 1 that can be encrypted with the customer-managed key in Tenant 2.
Let's divide the above end-to-end solution into three phases:
- The service provider configures identities.
- The customer grants the service provider's multitenant app access to an encryption key in Azure Key Vault.
- The service provider encrypts data in an Azure resource using the customer-managed key.
Operations in Phase 1 would be a one-time setup for most service provider applications. Operations in Phases 2 and 3 would repeat for each customer.
Considerations for service providers
- Azure Resource Manager (ARM) templates aren't recommended for creating Microsoft Entra applications.
- The same multitenant application can be used to access keys in any number of tenants, like Tenant 2, Tenant 3, Tenant 4, and so on. In each tenant, an independent instance of the application is created that has the same application ID but a different object ID. Each instance of this application is thus authorized independently. Consider how the application object used for this feature is used to partition your application across all customers.
- Application can have a maximum of 20 federated identity credentials, which requires a service provider to share federated identities among its customers. For more information about federated identities design considerations and restrictions, see Configure an app to trust an external identity provider
- In rare scenarios, a service provider might use a single Application object per its customer, but that requires significant maintenance costs to manage applications at scale across all customers.
Phase 2 - The customer authorizes access to the key vault
| Step |
Description |
Least privileged Azure RBAC roles |
Least privileged Microsoft Entra roles |
| 1. |
Recommended: Send the user to sign in to your app. If the user can sign in, then a service principal for your app exists in their tenant. Use Microsoft Graph, Microsoft Graph PowerShell, Azure PowerShell, or Azure CLI to create the service principal. Construct an admin-consent URL and grant tenant-wide consent to create the service principal using the application ID. |
None |
Users with permissions to install applications |
| 2. |
Create an Azure Key Vault and a key used as the customer-managed key. |
A user must be assigned the Key Vault Contributor role to create the key vault
A user must be assigned the Key Vault Crypto Officer role to add a key to the key vault |
None |
| 3. |
Grant the consented application identity access to the Azure key vault by assigning the role Key Vault Crypto Service Encryption User |
To assign the Key Vault Crypto Service Encryption User role to the application, you must have been assigned the User Access Administrator role. |
None |
| 4. |
Copy the key vault URL and key name into the customer-managed keys configuration of the SaaS offering. |
None |
None |
Considerations for customers of service providers
- In the customer tenant, Tenant 2, an admin can set policies to block non-admin users from installing applications. These policies can prevent non-admin users from creating service principals. If such a policy is configured, then users with permissions to create service principals need to be involved.
- Access to Azure Key Vault can be authorized using Azure RBAC or access policies. When granting access to a key vault, make sure to use the active mechanism for your key vault.
- A Microsoft Entra application registration has an application ID (client ID). When the application is installed in your tenant, a service principal is created. The service principal shares the same application ID as the app registration, but generates its own object ID. When you authorize the application to have access to resources, you might need to use the service principal
Name or ObjectID property.
Phase 3 - The service provider encrypts data in an Azure resource using the customer-managed key
After phases 1 and 2 are complete, the service provider can configure encryption on the Azure resource with the key and key vault in the customer's tenant and the Azure resource in the ISV's tenant. The service provider can configure cross-tenant customer-managed keys with the client tools supported by that Azure resource, with an ARM template, or with the REST API.
This section describes how to configure a cross-tenant customer-managed key and encrypt customer data. You learn how to encrypt customer data in a resource in Tenant1 using a customer-managed key stored in a key vault in Tenant2. You can use the Azure portal, Azure PowerShell, or Azure CLI.
Sign in to the Azure portal and follow these steps.
The following steps are performed by the service provider in the service provider's tenant Tenant1.
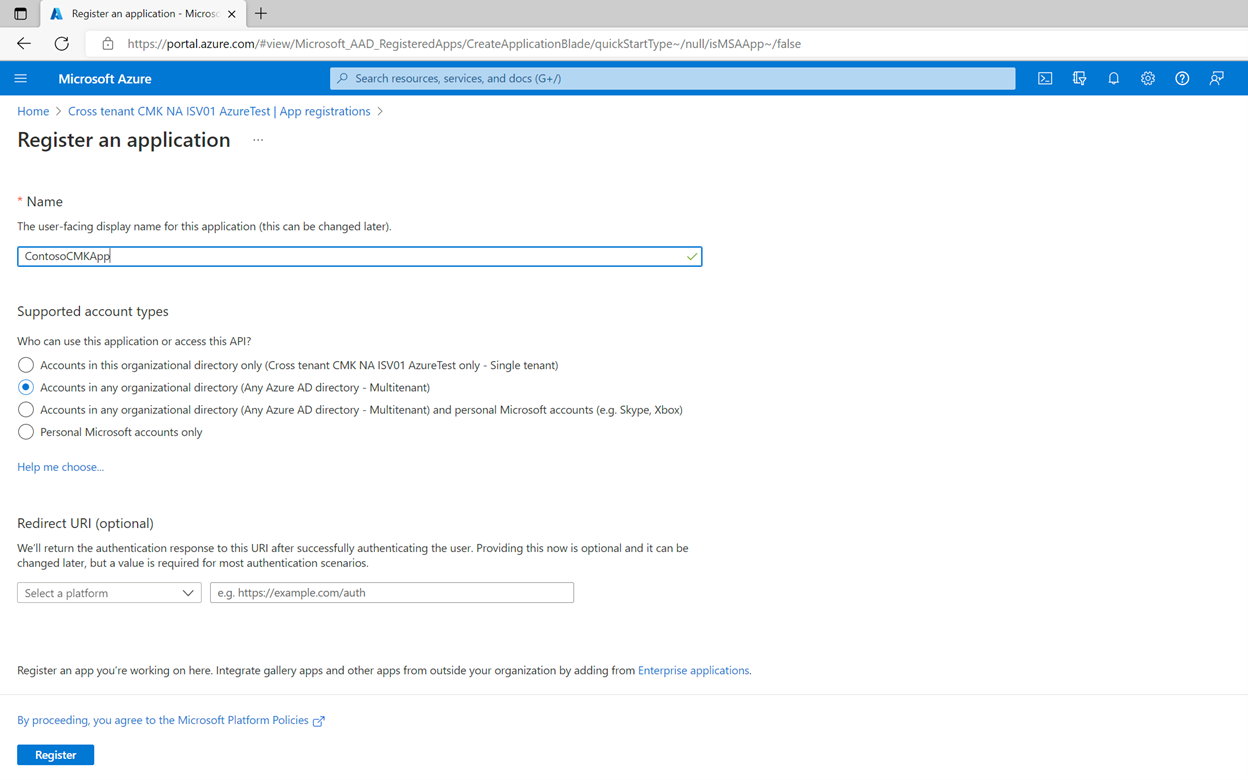
The service provider creates a new multi-tenant app registration
You can either create a new multi-tenant Microsoft Entra application registration or start with an existing multi-tenant application registration. If starting with an existing application registration, note the application ID (client ID) of the application.
To create a new registration:
Search for Microsoft Entra ID in the search box. Locate and select the Microsoft Entra ID extension.
Select Manage > App registrations from the left pane.
Select + New registration.
Provide the name for the application registration and select Account in any organizational directory (Any Microsoft Entra directory – Multitenant).
Select Register.
Note the ApplicationId/ClientId of the application.
The service provider creates a user-assigned managed identity
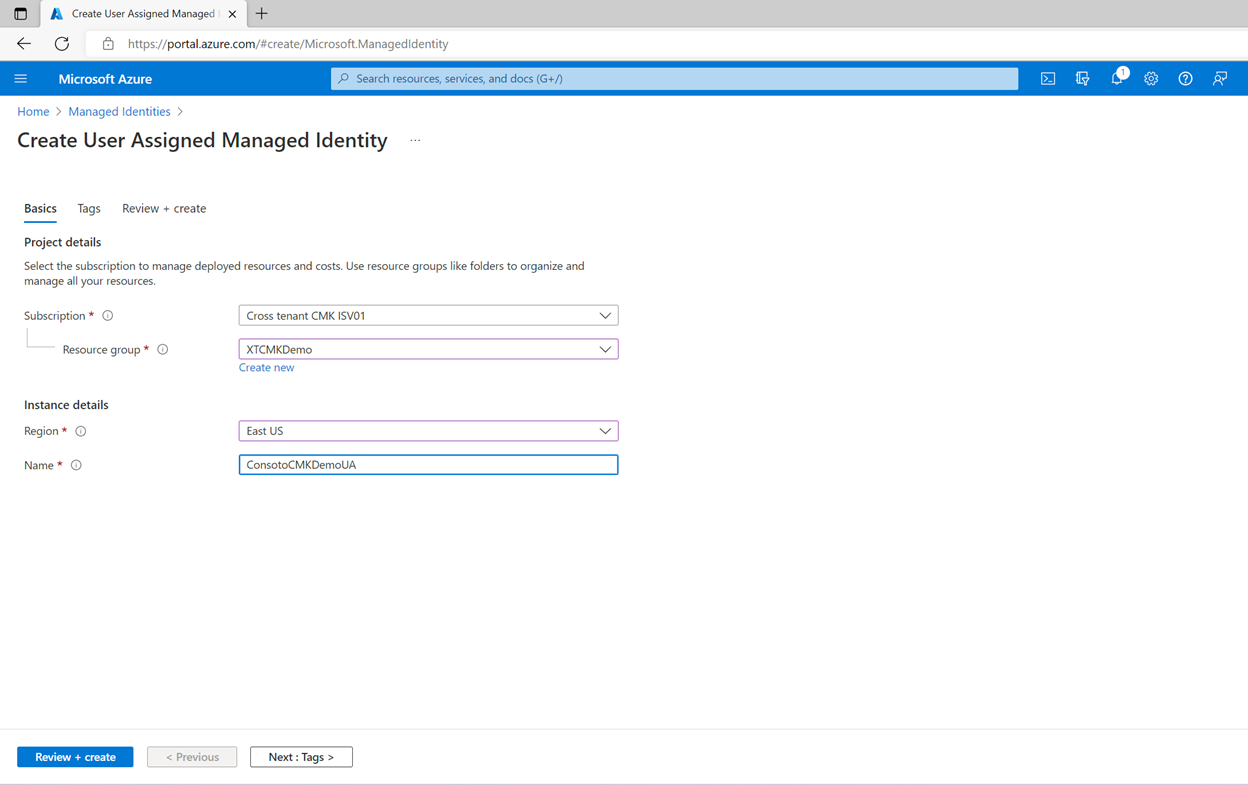
Create a user-assigned managed identity to be used as a federated identity credential.
Search for Managed Identities in the search box. Locate and select the Managed Identities extension.
Select + Create.
Provide the resource group, region, and name for the managed identity.
Select Review + create.
On successful deployment, note the Azure ResourceId of the user-assigned managed identity, which is available under Properties. For example:
/subscriptions/tttttttt-0000-tttt-0000-tttt0000tttt/resourcegroups/XTCMKDemo/providers/Microsoft.ManagedIdentity/userAssignedIdentities/ConsotoCMKDemoUA
Configure a user-assigned managed identity as a federated identity credential on the application, so that it can impersonate the identity of the application.
Navigate to Microsoft Entra ID > App registrations > your application.
Select Certificates & secrets.
Select Federated credentials.
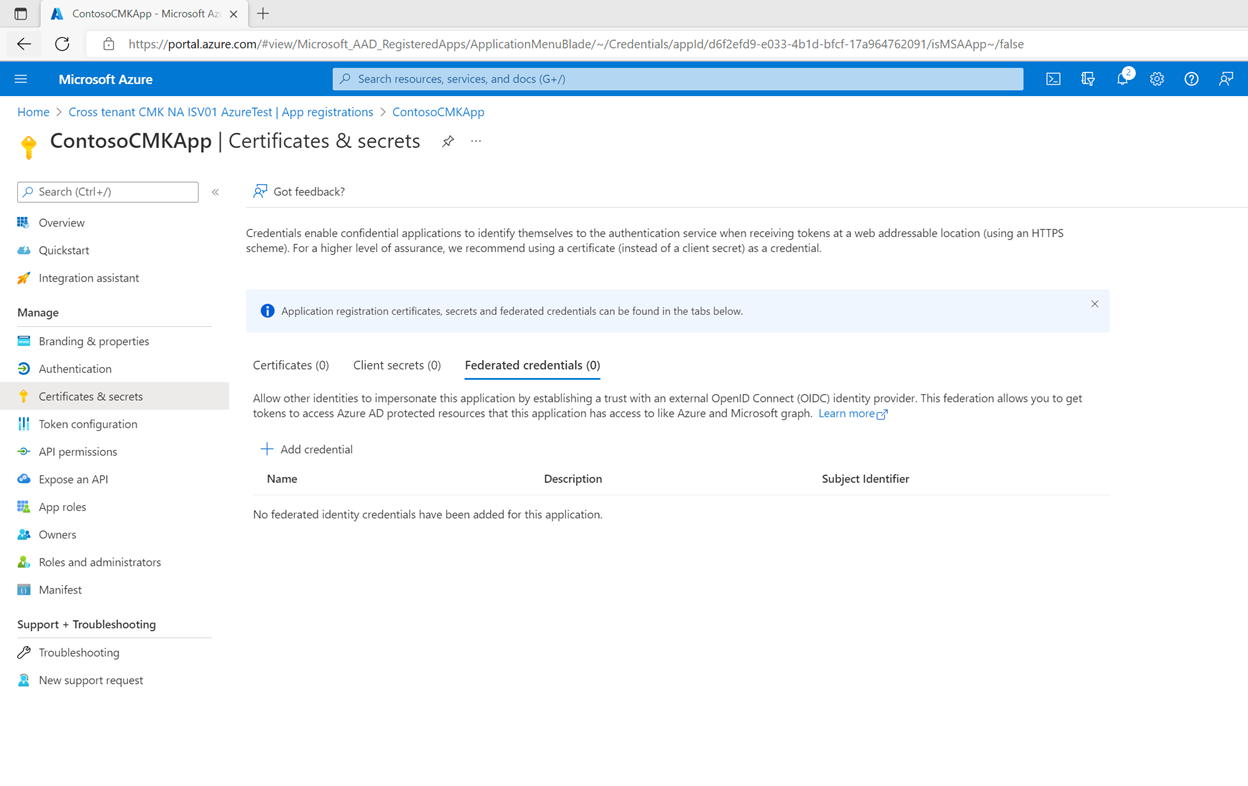
Select + Add credential.
Under Federated credential scenario, select Managed Identity.
Click Select a managed identity. From the pane, select the subscription. Under Managed identity, select User-assigned managed identity. In the Select box, search for the managed identity you created earlier, then click Select at the bottom of the pane.
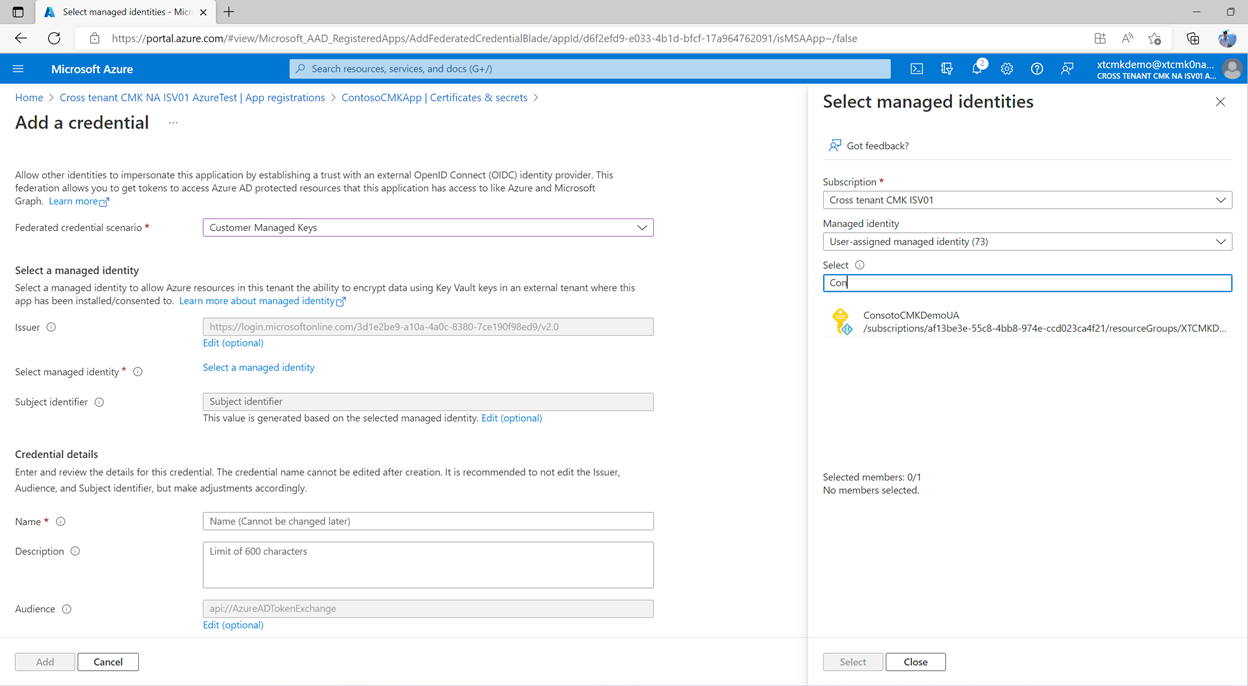
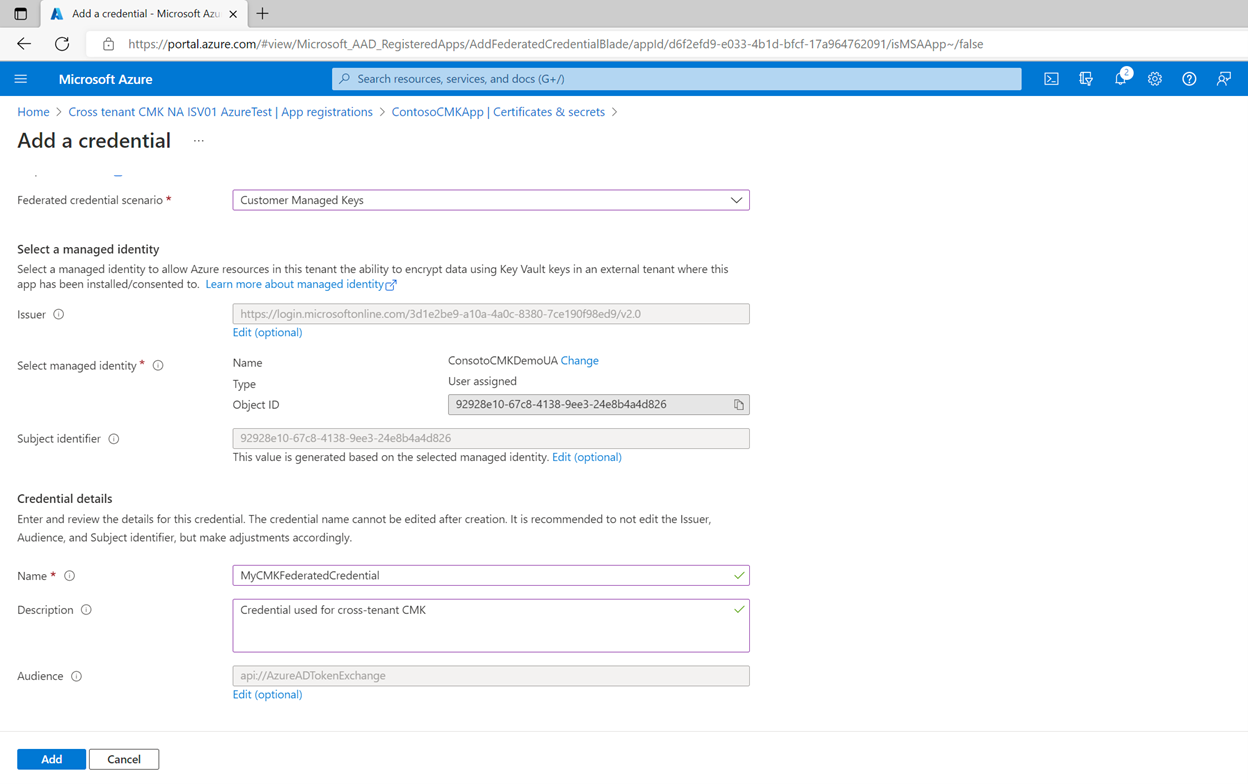
Under Credential details, provide a name and optional description for the credential and select Add.
To use Azure PowerShell to configure the ISV's tenant, install the latest Az module. For more information about installing PowerShell, see Install Azure PowerShell on Windows with PowerShellGet.
- If you choose to use Azure PowerShell locally:
The following steps are performed by the service provider (ISV) in the service provider's tenant, Tenant1.
The service provider signs into Azure
In Azure PowerShell, sign in to the ISV's tenant and set the active subscription to the ISV's subscription.
$isvTenantId="<isv-tenant-id>"
$isvSubscriptionId="<isv-subscription-id>"

# Sign in to Azure in the ISV's tenant.
Connect-AzAccount -Environment AzureChinaCloud -Tenant $isvTenantId
# Set the context to the ISV's subscription.
Set-AzContext -Subscription $isvSubscriptionId
The service provider creates a new multi-tenant app registration
Pick a name for your multi-tenant registered application in Tenant1, and create the multi-tenant application in the Azure portal.
The name that you provide for the multi-tenant application is used by the customer to identify the application in Tenant2. Note the app's object ID and application ID. You'll need these values in subsequent steps.
$multiTenantAppName="<multi-tenant-app>"
$multiTenantApp = New-AzADApplication -DisplayName $multiTenantAppName `
    -SignInAudience AzureADMultipleOrgs

# Object ID for the new multi-tenant app
$objectId = $multiTenantApp.Id
# Application (client) ID for the multi-tenant app
$multiTenantAppObjectId = $multiTenantApp.AppId
The service provider creates a user-assigned managed identity
Sign in to the ISV's tenant, and then create a user-assigned managed identity to be used as a federated identity credential. To create a new user-assigned managed identity, you must be assigned a role that includes the Microsoft.ManagedIdentity/userAssignedIdentities/write action.
$isvRgName="<isv-resource-group>"
$isvLocation="<location>"
$userIdentityName="<user-assigned-managed-identity>"

# Create a new resource group in the ISV's subscription.
New-AzResourceGroup -Location $isvLocation -ResourceGroupName $isvRgName

# Create the new user-assigned managed identity.
$userIdentity = New-AzUserAssignedIdentity -Name $userIdentityName `
    -ResourceGroupName $isvRgName `
    -Location $isvLocation `
    -SubscriptionId $isvSubscriptionId
Configure a user-assigned managed identity as a federated identity credential on the application, so that it can impersonate the identity of the application.
To configure the federated identity credential from PowerShell, first install version 6.3.0 or later of the Az.Resources module.
New-AzADAppFederatedCredential -ApplicationObjectId $multiTenantApp.Id `
    -Name "MyFederatedIdentityCredential" `
    -Audience "api://AzureADTokenExchange" `
    -Issuer "https://login.partner.microsoftonline.cn/<tenant-id>/v2.0" `
    -Subject $userIdentity.PrincipalId `
    -Description "Federated Identity Credential for a customer-managed key"
If you prefer to run CLI reference commands locally, install the Azure CLI. If you're running on Windows or macOS, consider running Azure CLI in a Docker container. For more information, see How to run the Azure CLI in a Docker container.
If you're using a local installation, sign in to the Azure CLI by using the az login command. To finish the authentication process, follow the steps displayed in your terminal. For other sign-in options, see Sign in with the Azure CLI.
When you're prompted, install the Azure CLI extension on first use. For more information about extensions, see Use extensions with the Azure CLI.
Run az version to find the version and dependent libraries that are installed. To upgrade to the latest version, run az upgrade.
The following steps are performed by the service provider in the service provider's tenant Tenant1.
The service provider signs in to Azure
Sign in to Azure to use Azure CLI.
az login
The service provider creates a new multi-tenant app registration
Pick a name for your multi-tenant application in Tenant1, and create the multi-tenant application in the Azure portal.
The name that you provide for the multi-tenant application is used by the customer to identify the application in Tenant2. Copy the application ID (or client ID) of the app, the object ID of the app, and also the tenant ID for the app. You'll need these values in the following steps.
multiTenantAppName="<multi-tenant-app>"
multiTenantAppObjectId=$(az ad app create --display-name $multiTenantAppName \
    --sign-in-audience AzureADMultipleOrgs \
    --query id \
    --output tsv)

multiTenantAppId=$(az ad app show --id $multiTenantAppObjectId --query appId --output tsv)
The service provider creates a user-assigned managed identity
Sign in to the ISV's tenant, and then create a user-assigned managed identity to be used as a federated identity credential. To create a new user-assigned managed identity, you must be assigned a role that includes the Microsoft.ManagedIdentity/userAssignedIdentities/write action.
isvSubscriptionId="<isv-subscription-id>"
isvRgName="<isv-resource-group>"
isvLocation="<location>"
userIdentityName="<user-assigned-managed-identity>"

az group create --location $isvLocation \
    --resource-group $isvRgName \
    --subscription $isvSubscriptionId

principalId=$(az identity create --name $userIdentityName \
    --resource-group $isvRgName \
    --location $isvLocation \
    --subscription $isvSubscriptionId \
    --query principalId \
    --out tsv)
Run the az ad app federated-credential create method to configure a federated identity credential on an app and create a trust relationship with an external identity provider.
Use api://AzureADTokenExchange as the audience value in the federated identity credential. See the API reference for more details.
# Create a file named "credential.json" with the following content.
# Replace placeholders in angle brackets with your own values.
{
    "name": "MyFederatedIdentityCredential",
    "issuer": "https://login.partner.microsoftonline.cn/<tenantID>/v2.0",
    "subject": "<user-assigned-identity-principal-id>",
    "description": "Federated Identity Credential for a customer-managed key",
    "audiences": [
        "api://AzureADTokenExchange"
    ]
}

az ad app federated-credential create --id $multiTenantAppObjectId --parameters credential.json
The service provider shares the application ID with the customer
Find the application ID (client ID) of the multi-tenant application and share it with the customer.
The customer grants the service provider's app access to the key in the key vault
The following steps are performed by the customer in the customer's tenant Tenant2. The customer can use the Azure portal, Azure PowerShell, or Azure CLI.
The user executing the steps must be an administrator with a privileged role such as Application Administrator, Cloud Application Administrator, or Global Administrator.
Sign in to the Azure portal and follow these steps.
The customer installs the service provider application in the customer tenant
To install the service provider's registered application in the customer's tenant, you create a service principal with the application ID from the registered app. You can create the service principal in either of the following ways:
The customer creates a key vault
To create the key vault, the user's account must be assigned the Key Vault Contributor role or another role that permits creation of a key vault.
From the Azure portal menu, or from the Home page, select + Create a resource. In the Search box, enter Key vaults. From the results list, select Key vaults. On the Key vaults page, select Create.
On the Basics tab, choose a subscription. Under Resource group, select Create new and enter a resource group name.
Enter a unique name for the key vault.
Select a region and pricing tier.
Enable purge protection for the new key vault.
On the Access policy tab, select Azure role-based access control for Permission model.
Select Review + create and then Create.
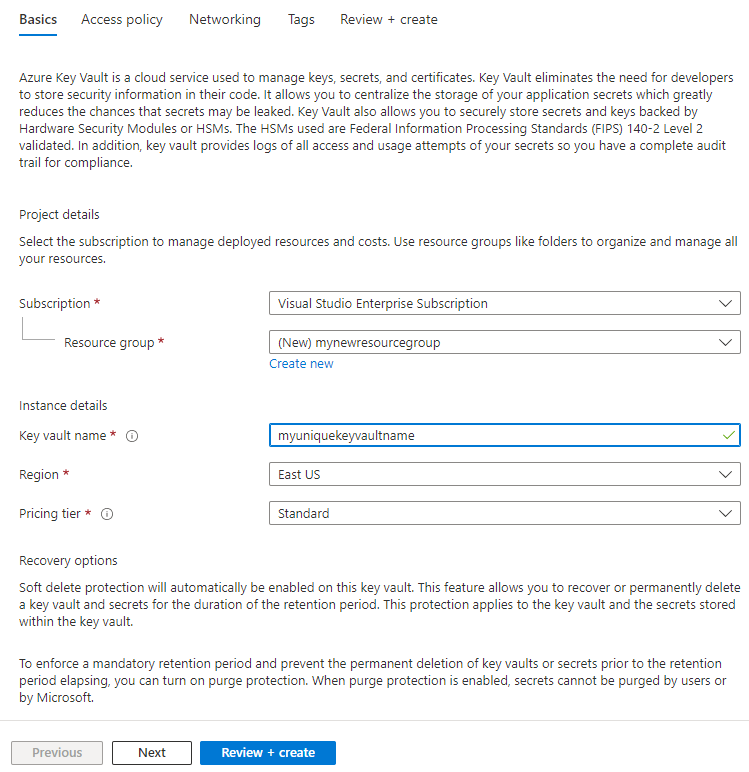
Take note of the key vault name and URI Applications that access your key vault must use this URI.
For more information, see Quickstart - Create an Azure Key Vault with the Azure portal.
The customer assigns Key Vault Crypto Officer role to a user account
This step ensures that you can create encryption keys.
- Navigate to your key vault and select Access Control (IAM) from the left pane.
- Under Grant access to this resource, select Add role assignment.
- Search for and select Key Vault Crypto Officer.
- Under Members, select User, group, or service principal.
- Select Members and search for your user account.
- Select Review + Assign.
The customer creates an encryption key
To create the encryption key, the user's account must be assigned the Key Vault Crypto Officer role or another role that permits creation of a key.
- On the Key Vault properties page, select Keys.
- Select Generate/Import.
- On the Create a key screen, specify a name for the key. Leave the other values to their defaults.
- Select Create.
- Copy the key URI.
The customer grants the service provider application access to the key vault
Assign the Azure RBAC role Key Vault Crypto Service Encryption User to the service provider's registered application so that it can access the key vault.
- Navigate to your key vault and select Access Control (IAM) from the left pane.
- Under Grant access to this resource, select Add role assignment.
- Search for and select Key Vault Crypto Service Encryption User.
- Under Members, select User, group, or service principal.
- Select Members and search for the application name of the application you installed from the service provider.
- Select Review + Assign.
Now you can configure customer-managed keys with the key vault URI and key.
To use Azure PowerShell to configure the client's tenant, install the latest Az module. For more information about installing PowerShell, see Install Azure PowerShell on Windows with PowerShellGet.
- If you choose to use Azure PowerShell locally:
The customer signs into Azure
In Azure PowerShell, sign in to the customer's tenant and set the active subscription to the customer's subscription.
$customerTenantId="<customer-tenant-id>"
$customerSubscriptionId="<customer-subscription-id>"

# Sign in to Azure in the customer's tenant.
Connect-AzAccount -Environment AzureChinaCloud -Tenant $customerTenantId
# Set the context to the customer's subscription.
Set-AzContext -Subscription $customerSubscriptionId
The customer installs the service provider application in the customer tenant
Once you receive the application ID of the service provider's multi-tenant application, install the application in your tenant, Tenant2, by creating a service principal.
Execute the following commands in the tenant where you plan to create the key vault.
$customerRgName="<customer-resource-group>"
$customerLocation="<location>"
$multiTenantAppId="<multi-tenant-app-id>" # appId value from Tenant1

# Create a resource group in the customer's subscription.
New-AzResourceGroup -Location $customerLocation -ResourceGroupName $customerRgName

# Create the service principal with the registered app's application ID (client ID).
$servicePrincipal = New-AzADServicePrincipal -ApplicationId $multiTenantAppId
The customer creates a key vault
To create the key vault, the customer's account must be assigned the Key Vault Contributor role or another role that permits creation of a key vault.
$kvName="<key-vault>"

$kv = New-AzKeyVault -Location $customerLocation `
    -Name $kvName `
    -ResourceGroupName $customerRgName `
    -SubscriptionId $customerSubscriptionId `
    -EnablePurgeProtection `
    -EnableRbacAuthorization
The customer assigns Key Vault Crypto Officer role to a user account
Assign the Key Vault Crypto Officer role to a user account. This step ensures that the user can create the key vault and encryption keys. The example below assigns the role to the current signed-in user.
$currentUserObjectId = (Get-AzADUser -SignedIn).Id

New-AzRoleAssignment -RoleDefinitionName "Key Vault Crypto Officer" `
    -Scope $kv.ResourceId `
    -ObjectId $currentUserObjectId
The customer creates an encryption key
To create the encryption key, the user's account must be assigned the Key Vault Crypto Officer role or another role that permits creation of a key.
$keyName="<key-name>"

Add-AzKeyVaultKey -Name $keyName `
    -VaultName $kvName `
    -Destination software
The customer grants the service provider application access to the key vault
Assign the Azure RBAC role Key Vault Crypto Service Encryption User to the service provider's registered application, via the service principal that you created earlier, so that it can access the key vault.
New-AzRoleAssignment -RoleDefinitionName "Key Vault Crypto Service Encryption User" `
    -Scope $kv.ResourceId `
    -ObjectId $servicePrincipal.Id
Now you can configure customer-managed keys with the key vault URI and key.
If you prefer to run CLI reference commands locally, install the Azure CLI. If you're running on Windows or macOS, consider running Azure CLI in a Docker container. For more information, see How to run the Azure CLI in a Docker container.
If you're using a local installation, sign in to the Azure CLI by using the az login command. To finish the authentication process, follow the steps displayed in your terminal. For other sign-in options, see Sign in with the Azure CLI.
When you're prompted, install the Azure CLI extension on first use. For more information about extensions, see Use extensions with the Azure CLI.
Run az version to find the version and dependent libraries that are installed. To upgrade to the latest version, run az upgrade.
The customer signs in to Azure
Sign in to Azure to use Azure CLI.
az login
The customer installs the service provider application in the customer tenant
Once you receive the application ID of the service provider's multi-tenant application, install the application in your tenant Tenant2 using the following command. Installing the application creates a service principal in your tenant.
Execute the following commands in the tenant where you plan to create the key vault.
# Create the service principal with the registered app's application ID (client ID)
multiTenantAppId="<multi-tenant-app-id>"
az ad sp create --id $multiTenantAppId --query id --out tsv
The customer creates a key vault
To create the key vault, the customer's account must be assigned the Key Vault Contributor role or another role that permits creation of a key vault.
customerSubscriptionId="<customer-subscription-id>"
customerRgName="<customer-resource-group>"
customerLocation="<location>"
kvName="<key-vault>"

az group create --location $customerLocation \
    --name $customerRgName

az keyvault create --name $kvName \
    --location $customerLocation \
    --resource-group $customerRgName \
    --subscription $customerSubscriptionId \
    --enable-purge-protection true \
    --enable-rbac-authorization true
The customer assigns Key Vault Crypto Officer role to a user account
This step ensures that you can create the key vault and encryption keys.
currentUserObjectId=$(az ad signed-in-user show --query id --output tsv)

kvResourceId=$(az keyvault show --resource-group $customerRgName \
    --name $kvName \
    --query id \
    --output tsv)

az role assignment create --role "Key Vault Crypto Officer" \
    --scope $kvResourceId \
    --assignee-object-id $currentUserObjectId
The customer creates an encryption key
To create the encryption key, the user's account must be assigned the Key Vault Crypto Officer role or another role that permits creation of a key.
keyName="<key-name>"
az keyvault key create --name $keyName --vault-name $kvName
The customer grants the service provider application access to the key vault
Assign the Azure RBAC role Key Vault Crypto Service Encryption User to the service provider's registered application, via the service principal that you created earlier, so that the registered application can access the key vault.
servicePrincipalId=$(az ad sp show --id $multiTenantAppId --query id --output tsv)

az role assignment create --role "Key Vault Crypto Service Encryption User" \
    --scope $kvResourceId \
    --assignee-object-id $servicePrincipalId
Now you can configure customer-managed keys with the key vault URI and key.
Up to this point, you configured the multitenant application on the ISV's tenant, installed the application on the customer's tenant, and configured the key vault and key on the customer's tenant. Next, you can configure customer-managed keys on an existing storage account with the key from the customer's tenant.
The following examples show how to configure customer-managed keys on an existing storage account by using a user-assigned managed identity to authorize access to the key vault. You can also use a system-assigned managed identity to configure customer-managed keys on an existing storage account. In either case, the managed identity must have appropriate permissions to access the key vault. For more information, see Authenticate to Azure Key Vault.
When you configure encryption with customer-managed keys for an existing storage account, you can choose to automatically update the key version used for encryption whenever a new version is available in the associated key vault. To enable this feature, omit the key version from the key URI. Alternatively, you can explicitly specify a key version to be used for encryption until the key version is manually updated. Including the key version on the key URI configures customer-managed keys for manual updating of the key version.
To configure cross-tenant customer-managed keys for an existing storage account in the Azure portal, follow these steps:
Go to your storage account.
Under Security + networking, select Encryption. By default, key management is set to Microsoft-managed keys.
Select the Customer-managed keys option.
Choose the Select from Key Vault option.
Select Enter key URI, and specify the key URI. Omit the key version from the URI if you want Azure Files to automatically check for a new key version and update it.
Select the subscription that contains the key vault and key.
In the Identity type field, select User-assigned, then specify the managed identity with the federated identity credential that you created previously.
Expand the Advanced section, and select the multitenant registered application that you previously created in the ISV's tenant.

Save your changes.
After you specify the key from the key vault in the customer's tenant, the Azure portal indicates that customer-managed keys are configured with that key. It also indicates that automatic updating of the key version is enabled, and displays the key version currently in use for encryption. The portal also displays the type of managed identity used to authorize access to the key vault, the principal ID for the managed identity, and the application ID of the multitenant application.

To configure cross-tenant customer-managed keys for an existing storage account with PowerShell, first install the Az.Storage PowerShell module, version 5.1.0 or later. This module is installed with the Az PowerShell module, version 9.1.0 or later.
Next, call Set-AzStorageAccount, providing the resource ID for the user-assigned managed identity that you configured previously in the ISV's subscription, and the application (client) ID for the multitenant application that you configured previously in the ISV's subscription. Provide the key vault URI and key name from the customer's key vault.
Remember to replace the placeholder values in brackets with your own values and to use the variables defined in the previous examples.
$accountName = "<storage-account>"
$kvUri = "<key-vault-uri>"
$keyName = "<key-name>"
$multiTenantAppId = "<multi-tenant-app-id>"

$accountParams = @{
    ResourceGroupName = $isvRgName
    Name = $accountName
    KeyVaultEncryption = $true
    UserAssignedIdentityId = $userIdentity.Id
    IdentityType = "SystemAssignedUserAssigned"
    KeyName = $keyName
    KeyVaultUri = $kvUri
    KeyVaultUserAssignedIdentityId = $userIdentity.Id
    KeyVaultFederatedClientId = $multiTenantAppId
}
Set-AzStorageAccount @accountParams
To configure cross-tenant customer-managed keys for an existing storage account with Azure CLI, first install the Azure CLI, version 2.42.0 or later. For more information about installing Azure CLI, see How to install the Azure CLI.
Next, call az storage account update, providing the resource ID for the user-assigned managed identity that you configured previously in the ISV's subscription, and the application (client) ID for the multitenant application that you configured previously in the ISV's subscription. Provide the key vault URI and key name from the customer's key vault.
Remember to replace the placeholder values in brackets with your own values and to use the variables defined in the previous examples.
accountName="<storage-account>"
kvUri="<key-vault-uri>"
keyName="<key-name>"
multiTenantAppId="<multi-tenant-app-id>" # appId value from multi-tenant app

# Get the resource ID for the user-assigned managed identity.
identityResourceId=$(az identity show --name $userIdentityName \
    --resource-group $isvRgName \
    --query id \
    --output tsv)

az storage account update --name $accountName \
    --resource-group $isvRgName \
    --identity-type SystemAssigned,UserAssigned \
    --user-identity-id $identityResourceId \
    --encryption-key-vault $kvUri \
    --encryption-key-name $keyName \
    --encryption-key-source Microsoft.Keyvault \
    --key-vault-user-identity-id $identityResourceId \
    --key-vault-federated-client-id $multiTenantAppId
The service provider creates a new storage account encrypted with the customer's key
You can also create a new storage account on the ISV's tenant and configure customer-managed keys with the key from the customer's tenant.
You must use an existing user-assigned managed identity to authorize access to the key vault when you configure customer-managed keys while creating the storage account. The user-assigned managed identity must have appropriate permissions to access the key vault. For more information, see Authenticate to Azure Key Vault.
When you configure encryption with customer-managed keys for a new storage account, you can choose to automatically update the key version used for encryption whenever a new version is available in the associated key vault. To do so, omit the key version from the key URI. Alternately, you can explicitly specify a key version to be used for encryption until the key version is manually updated. Including the key version on the key URI configures customer-managed keys for manual updating of the key version.
To configure cross-tenant customer-managed keys for a new storage account in the Azure portal, follow these steps:
In the Azure portal, go to the Storage accounts page in the ISV's tenant, and select the Create button to create a new account.
Follow the steps outlined in Create a classic file share to fill out the fields on the Basics, Advanced, Networking, and Data Protection tabs.
On the Encryption tab, indicate for which services you want to enable support for customer-managed keys in the Enable support for customer-managed keys field.
In the Encryption type field, select Customer-managed keys (CMK).
In the Encryption key field, choose Enter key from key vault, and specify the key URI. Omit the key version from the URI if you want Azure Files to automatically check for a new key version and update it.
For the User-assigned identity field, search for the user-assigned managed identity that you created previously in the ISV's tenant.
Expand the Advanced section, and select the multitenant registered application that you previously created in the ISV's tenant.
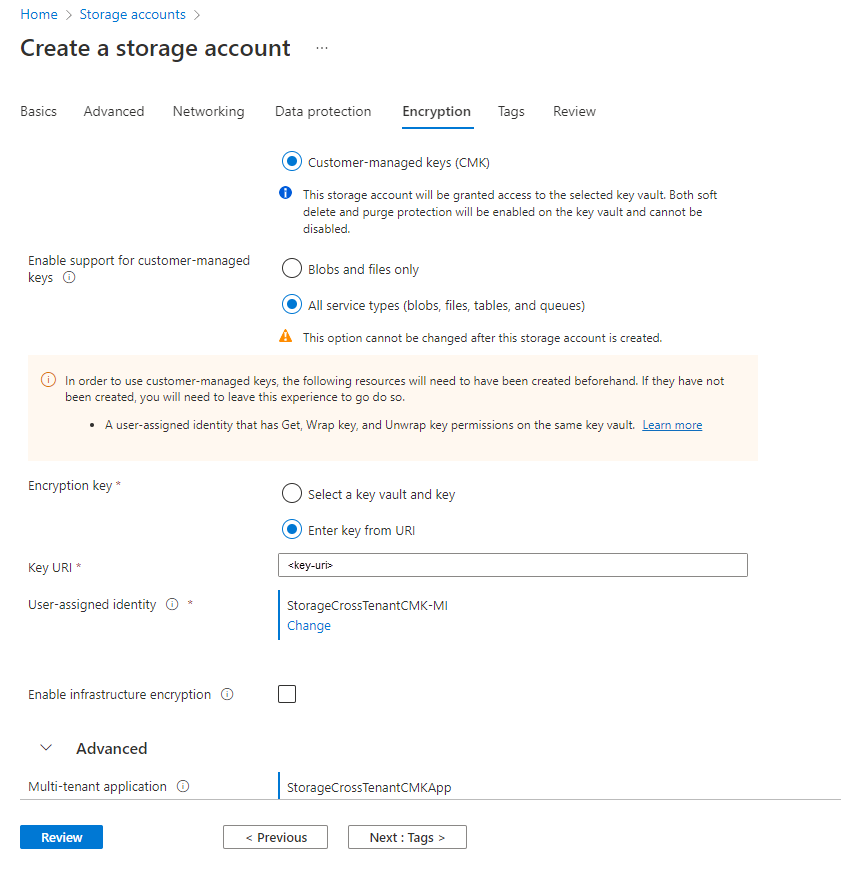
Select the Review button to validate and create the account.
To configure cross-tenant customer-managed keys for a new storage account in PowerShell, first install the Az.Storage PowerShell module, version 5.1.0 or later. This module is installed with the Az PowerShell module, version 9.1.0 or later.
Next, call New-AzStorageAccount, providing the resource ID for the user-assigned managed identity that you configured previously in the ISV's subscription, and the application (client) ID for the multitenant application that you configured previously in the ISV's subscription. Provide the key vault URI and key name from the customer's key vault.
Remember to replace the placeholder values in brackets with your own values and to use the variables defined in the previous examples.
$accountName = "<account-name>"
$kvUri = "<key-vault-uri>"
$keyName = "<key-name>"
$location = "<location>"
$multiTenantAppId = "<application-id>" # appId value from multi-tenant app

$userIdentity = Get-AzUserAssignedIdentity -Name "<user-assigned-identity>" -ResourceGroupName $isvRgName

$accountParams = @{
    ResourceGroupName = $isvRgName
    Name = $accountName
    Kind = "StorageV2"
    SkuName = "Standard_LRS"
    Location = $location
    UserAssignedIdentityId = $userIdentity.Id
    IdentityType = "SystemAssignedUserAssigned"
    KeyName = $keyName
    KeyVaultUri = $kvUri
    KeyVaultUserAssignedIdentityId = $userIdentity.Id
    KeyVaultFederatedClientId = $multiTenantAppId
}
New-AzStorageAccount @accountParams
To configure cross-tenant customer-managed keys for a new storage account with Azure CLI, first install the Azure CLI, version 2.42.0 or later. For more information about installing Azure CLI, see How to install the Azure CLI.
Next, call az storage account create, providing the resource ID for the user-assigned managed identity that you configured previously in the ISV's subscription, and the application (client) ID for the multitenant application that you configured previously in the ISV's subscription. Provide the key vault URI and key name from the customer's key vault.
Remember to replace the placeholder values in brackets with your own values and to use the variables defined in the previous examples.
accountName="<storage-account>"
kvUri="<key-vault-uri>"
keyName="<key-name>"
multiTenantAppId="<multi-tenant-app-id>" # appId value from multi-tenant app

# Get the resource ID for the user-assigned managed identity.
identityResourceId=$(az identity show --name $userIdentityName \
    --resource-group $isvRgName \
    --query id \
    --output tsv)

az storage account create \
    --name $accountName \
    --resource-group $isvRgName \
    --location $isvLocation \
    --sku Standard_LRS \
    --kind StorageV2 \
    --identity-type SystemAssigned,UserAssigned \
    --user-identity-id $identityResourceId \
    --encryption-key-vault $kvUri \
    --encryption-key-name $keyName \
    --encryption-key-source Microsoft.Keyvault \
    --key-vault-user-identity-id $identityResourceId \
    --key-vault-federated-client-id $multiTenantAppId
You can also configure customer-managed keys with manual updating of the key version when you create a new storage account. To do so, include the key version when you specify the key URI.
To rotate or change the key, revoke access, or switch back to Microsoft-managed keys, use the steps in the following sections. These steps are the same for cross-tenant customer-managed keys.
Key rotation
Regularly rotating your encryption key limits the exposure if a key is ever compromised. There are two ways to rotate encryption for a storage account that uses customer-managed keys:
- Rotate the key version - Create a new version of the same key in the key vault. The key name stays the same, but the version changes.
- Change the key - Switch the storage account to use an entirely different key (with a different name) in the same or a different key vault.
Important
Azure checks the key vault for a new key version only once daily. After rotating a key, wait 24 hours before disabling the previous key version.
Rotate the key version
For security best practices, rotate the key version at least once every two years.
Automatic key version rotation (recommended)
If you configure customer-managed keys without specifying a key version (the default), Azure automatically checks for new key versions daily. If you create a new version of the key in key vault, Azure picks it up within 24 hours. You can also configure automatic key rotation in Azure Key Vault to generate new key versions on a schedule.
Manual key version rotation
If you specify a key version when you configure customer-managed keys, Azure uses that specific version and doesn't automatically check for new versions. You must manually update the storage account configuration to point to the new key version.
To manually rotate the key version by using the Azure portal, follow these steps:
- Go to your key vault. From the service menu, under Objects, select Keys.
- Select the key, and then select the new key version. Copy the value of Key Identifier. The value includes the key version.
- Go to your storage account. From the service menu, under Security + networking, select Encryption.
- Select Change key.
- For Encryption key, select Enter key URI, and then paste the key identifier into Key URI.
- Select Save.
To manually rotate the key version by using Azure PowerShell, run the following cmdlet. Replace <resource-group>, <storage-account-name>, <key-vault-name>, and <key-name> with your own values.
$keyVaultName = "<key-vault-name>"
$keyVault = Get-AzKeyVault -VaultName $keyVaultName
$key = Get-AzKeyVaultKey -VaultName $keyVaultName -Name "<key-name>"

$accountParams = @{
    ResourceGroupName = "<resource-group>"
    Name = "<storage-account-name>"
    KeyVaultUri = $keyVault.VaultUri
    KeyName = $key.Name
    KeyVersion = $key.Version
    KeyVaultEncryption = $true
}
Set-AzStorageAccount @accountParams
To manually rotate the key version by using Azure CLI, run the following commands. Replace <storage-account-name>, <resource-group>, <key-vault-name>, and <key-name> with your own values.
# Get the key vault URI
KEY_VAULT_URI=$(az keyvault show \
    --name <key-vault-name> \
    --query properties.vaultUri -o tsv)

# Get the latest key version
KEY_VERSION=$(az keyvault key show \
    --vault-name <key-vault-name> \
    --name <key-name> \
    --query key.kid -o tsv | sed -e 's|.*/||')

az storage account update \
    --name <storage-account-name> \
    --resource-group <resource-group> \
    --encryption-key-vault $KEY_VAULT_URI \
    --encryption-key-name <key-name> \
    --encryption-key-version $KEY_VERSION \
    --encryption-key-source Microsoft.Keyvault
Change the key
To switch the storage account to use an entirely different key, create or import a new key in your key vault (see Create or import an encryption key), and then update the storage account encryption configuration to use the new key.
To change the key by using the Azure portal, follow these steps:
- Go to your storage account.
- From the service menu, under Security + networking, select Encryption.
- Select Change key.
- Select Select a key vault and key. Choose your key vault and new key, and then choose Select.
- Select Save.
To change the key by using Azure PowerShell, run the following cmdlet. Replace <resource-group>, <storage-account-name>, <key-vault-name>, and <new-key-name> with your own values.
The cmdlet sets KeyVersion to an empty value, which turns on automatic key version updating (recommended). If you omit KeyVersion and the storage account uses a key version that you specified earlier, the cmdlet keeps that version and fails, because the version doesn't exist for the new key. To use manual key version updating instead, set KeyVersion to $key.Version.
$keyVaultName = "<key-vault-name>"
$keyVault = Get-AzKeyVault -VaultName $keyVaultName
$key = Get-AzKeyVaultKey -VaultName $keyVaultName -Name "<new-key-name>"

$accountParams = @{
    ResourceGroupName = "<resource-group>"
    Name = "<storage-account-name>"
    KeyVaultUri = $keyVault.VaultUri
    KeyName = $key.Name
    KeyVersion = ""
    KeyVaultEncryption = $true
}
Set-AzStorageAccount @accountParams
To change the key by using Azure CLI, run the following commands. Replace <storage-account-name>, <resource-group>, <key-vault-name>, and <new-key-name> with your own values.
The command sets --encryption-key-version to an empty value, which turns on automatic key version updating (recommended). If you omit --encryption-key-version and the storage account uses a key version that you specified earlier, the command keeps that version and fails, because the version doesn't exist for the new key. To use manual key version updating instead, set --encryption-key-version to the version of the new key.
# Get the key vault URI
KEY_VAULT_URI=$(az keyvault show \
    --name <key-vault-name> \
    --query properties.vaultUri -o tsv)

az storage account update \
    --name <storage-account-name> \
    --resource-group <resource-group> \
    --encryption-key-vault $KEY_VAULT_URI \
    --encryption-key-name <new-key-name> \
    --encryption-key-version "" \
    --encryption-key-source Microsoft.Keyvault
Revoke access to file share data by disabling the key
You can block access to encrypted file share data by disabling or deleting the customer-managed key. Access isn't blocked immediately. It can take several minutes after you disable the key for data plane operations to start failing. While the key is disabled, all Azure Files data plane operations fail with HTTP 403 (Forbidden), including:
- List directories and files
- Create, get, or set directory or file
- Get or set file metadata
- Put range, copy file, rename file
To revoke access to your file share data, disable the key in key vault by using the Azure portal, Azure PowerShell, or Azure CLI. Re-enable the key to restore access.
To disable the key by using the Azure portal, follow these steps:
- Go to your key vault in the Azure portal.
- From the service menu, under Objects, select Keys.
- Right-click the key and select Disable.
To disable the key by using Azure PowerShell, run the following cmdlet. Replace <key-vault-name> and <key-name> with your own values.
$keyParams = @{
    VaultName = "<key-vault-name>"
    Name = "<key-name>"
    Enable = $false
}
Update-AzKeyVaultKey @keyParams
To disable the key by using Azure CLI, run the following command. Replace <key-vault-name> and <key-name> with your own values.
az keyvault key set-attributes \
    --vault-name <key-vault-name> \
    --name <key-name> \
    --enabled false
Switch back to Microsoft-managed keys
If you no longer need customer-managed keys, you can switch the storage account back to using Microsoft-managed keys for encryption by using the Azure portal, Azure PowerShell, or Azure CLI.
To switch back to Microsoft-managed keys by using the Azure portal, follow these steps:
- Go to your storage account in the Azure portal.
- From the service menu, under Security + networking, select Encryption.
- Change Encryption type to Microsoft-managed keys.
- Select Save.
To switch back to Microsoft-managed keys by using Azure PowerShell, run the following cmdlet. Replace <resource-group> and <storage-account-name> with your own values.
$accountParams = @{
    ResourceGroupName = "<resource-group>"
    Name = "<storage-account-name>"
    StorageEncryption = $true
}
Set-AzStorageAccount @accountParams
To switch back to Microsoft-managed keys by using Azure CLI, run the following command. Replace <resource-group> and <storage-account-name> with your own values.
az storage account update \
    --name <storage-account-name> \
    --resource-group <resource-group> \
    --encryption-key-source Microsoft.Storage
Related content
