本文介绍如何为 Azure 自动化帐户添加用户分配的托管标识,以及如何使用该标识来访问其他资源。 有关托管标识如何与 Azure 自动化配合使用的详细信息,请参阅托管标识。
注意
在已为自动化帐户创建了托管标识(系统分配或用户分配)的情况下,无法在混合 Runbook 工作程序上使用用户分配的托管标识。 如果托管标识尚未分配给自动化帐户,则可以在具有已分配托管标识的 Azure 虚拟机上的混合 Runbook 辅助角色中使用虚拟机的系统分配托管标识或用户分配托管标识。
如果没有 Azure 订阅,可在开始前创建一个试用帐户。
先决条件
一个 Azure 自动化帐户。 有关说明,请参阅创建 Azure 自动化帐户。
用户分配的托管标识以及 runbook 使用该标识管理的目标 Azure 资源可位于不同的 Azure 订阅中。
Azure 帐户模块的最新版本。 当前版本为 2.2.8。 (请参阅 Az.Accounts,了解此版本的相关详情。)
您希望从自动化作业本访问的 Azure 资源。 此资源需要为用户分配的托管标识定义角色,以帮助自动化 Runbook 对资源访问进行身份验证。 若要添加角色,需要成为相应 Microsoft Entra 租户中资源的所有者。
若要分配 Azure 角色,必须拥有
Microsoft.Authorization/roleAssignments/write权限,例如 用户访问管理员 或 所有者。
为 Azure 自动化帐户添加用户分配的托管标识
可以使用 Azure 门户、PowerShell、Azure REST API 或 ARM 模板为 Azure 自动化帐户添加用户分配的托管标识。 对于涉及 PowerShell 的示例,首先使用 Connect-AzAccount cmdlet 以交互方式登录 Azure,并按照说明进行操作。
# Sign in to your Azure subscription
$sub = Get-AzSubscription -ErrorAction SilentlyContinue
if(-not($sub))
{
    Connect-AzAccount -Environment AzureChinaCloud
}

# If you have multiple subscriptions, set the one to use
# Select-AzSubscription -SubscriptionId "<SUBSCRIPTIONID>"
然后初始化一组要在整个示例中使用的变量。 修改以下值,然后执行
$subscriptionID = "subscriptionID"
$resourceGroup = "resourceGroupName"
$automationAccount = "automationAccountName"
$userAssignedOne = "userAssignedIdentityOne"
$userAssignedTwo = "userAssignedIdentityTwo"
使用 Azure 门户添加
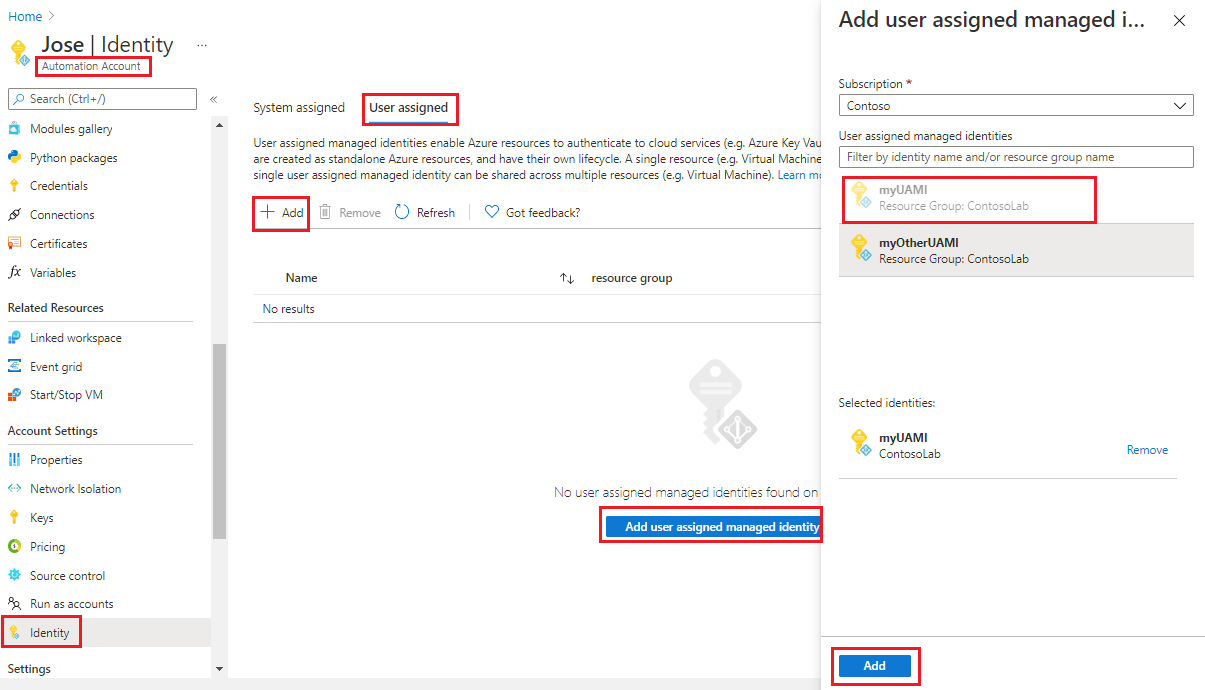
执行以下步骤:
登录 Azure 门户。
在 Azure 门户中,导航到自动化帐户。
在“帐户设置”下选择“标识” 。
选择“用户分配”选项卡,然后选择“添加” 。
选择现有的用户分配的托管标识,然后选择“添加”。 随后你将返回到“用户分配”选项卡。
使用 PowerShell 添加
使用 PowerShell cmdlet Set-AzAutomationAccount 添加用户分配的托管标识。 您必须首先考虑是否存在系统分配的托管身份。 以下示例将两个现有的用户分配的托管标识添加到现有自动化帐户,并禁用系统分配的托管标识(如果存在)。
$output = Set-AzAutomationAccount `
    -ResourceGroupName $resourceGroup `
    -Name $automationAccount `
    -AssignUserIdentity "/subscriptions/$subscriptionID/resourcegroups/$resourceGroup/providers/Microsoft.ManagedIdentity/userAssignedIdentities/$userAssignedOne", `
        "/subscriptions/$subscriptionID/resourcegroups/$resourceGroup/providers/Microsoft.ManagedIdentity/userAssignedIdentities/$userAssignedTwo"

$output
若要保留现有的系统分配的托管标识,请使用以下命令:
$output = Set-AzAutomationAccount `
    -ResourceGroupName $resourceGroup `
    -Name $automationAccount `
    -AssignUserIdentity "/subscriptions/$subscriptionID/resourcegroups/$resourceGroup/providers/Microsoft.ManagedIdentity/userAssignedIdentities/$userAssignedOne", `
        "/subscriptions/$subscriptionID/resourcegroups/$resourceGroup/providers/Microsoft.ManagedIdentity/userAssignedIdentities/$userAssignedTwo" `
    -AssignSystemIdentity

$output
输出应如下所示:
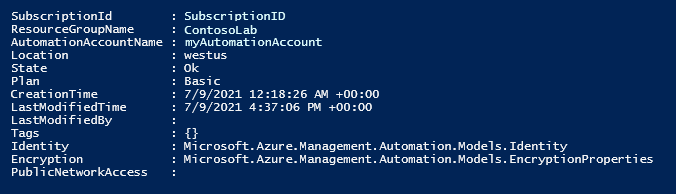
对于其他输出,请执行:$output.identity | ConvertTo-Json。
使用 REST API 添加
下面提供了语法和示例步骤。
语法
下面的样本文法将启用系统分配的托管身份(如果尚未启用),并将两个现有的用户分配的托管身份分配给现有的自动化帐户。
补丁
{
  "identity": {
    "type": "SystemAssigned, UserAssigned",
    "userAssignedIdentities": {
      "/subscriptions/00a000aa-00a0-00aa-00aa-0a0aa000aa00/resourceGroups/resource-group-name/providers/Microsoft.ManagedIdentity/userAssignedIdentities/firstIdentity": {},
      "/subscriptions/00a000aa-00a0-00aa-00aa-0a0aa000aa00/resourceGroups/resource-group-name/providers/Microsoft.ManagedIdentity/userAssignedIdentities/secondIdentity": {}
    }
  }
}
API 的语法如下:
https://management.chinacloudapi.cn/subscriptions/00a000aa-00a0-00aa-00aa-0a0aa000aa00/resourceGroups/resource-group-name/providers/Microsoft.Automation/automationAccounts/automation-account-name?api-version=2020-01-13-preview
示例
执行以下步骤。
修改上面的正文语法并将其保存到名为
body_ua.json的文件中。 将该文件保存在本地计算机或 Azure 存储帐户中。修改以下变量值,然后执行。
$file = "path\body_ua.json"此示例使用 PowerShell cmdlet Invoke-RestMethod 将 PATCH 请求发送到自动化帐户。
# build URI
$URI = "https://management.chinacloudapi.cn/subscriptions/$subscriptionID/resourceGroups/$resourceGroup/providers/Microsoft.Automation/automationAccounts/$automationAccount`?api-version=2020-01-13-preview"

# build body
$body = Get-Content $file

# obtain access token
$azContext = Get-AzContext
$azProfile = [Microsoft.Azure.Commands.Common.Authentication.Abstractions.AzureRmProfileProvider]::Instance.Profile
$profileClient = New-Object -TypeName Microsoft.Azure.Commands.ResourceManager.Common.RMProfileClient -ArgumentList ($azProfile)
$token = $profileClient.AcquireAccessToken($azContext.Subscription.TenantId)
$authHeader = @{
    'Content-Type'='application/json'
    'Authorization'='Bearer ' + $token.AccessToken
}

# Invoke the REST API
$response = Invoke-RestMethod -Uri $URI -Method PATCH -Headers $authHeader -Body $body

# Review output
$response.identity | ConvertTo-Json
输出应如下所示:
{
"type": "SystemAssigned, UserAssigned",
"principalId": "00a000aa-00a0-00aa-00aa-0a0aa000aa00",
"tenantId": "00a000aa-00a0-00aa-00aa-0a0aa000aa00",
"userAssignedIdentities":  {
    "/subscriptions/ContosoID/resourcegroups/ContosoLab/providers/Microsoft.ManagedIdentity/userAssignedIdentities/ContosoUAMI1":  {
            "PrincipalId":  "00a000aa-00a0-00aa-00aa-0a0aa000aa00",
            "ClientId":  "00001111-aaaa-2222-bbbb-3333cccc4444"
                },
    "/subscriptions/ContosoID/resourcegroups/ContosoLab/providers/Microsoft.ManagedIdentity/userAssignedIdentities/ContosoUAMI2":  {
            "PrincipalId":  "00a000aa-00a0-00aa-00aa-0a0aa000aa00",
            "ClientId":  "00001111-aaaa-2222-bbbb-3333cccc4444"
                }
    }
}
使用 ARM 模板添加
下面提供了语法和示例步骤。
模板语法
以下示例模板语法启用系统分配的托管标识(如果尚未启用),并将两个现有的用户分配的托管标识分配给现有自动化帐户。
{
  "$schema": "https://schema.management.azure.com/schemas/2019-04-01/deploymentTemplate.json#",
  "contentVersion": "1.0.0.0",
  "parameters": {
    "automationAccountName": {
     "defaultValue": "YourAutomationAccount",
      "type": "String",
      "metadata": {
        "description": "Automation account name"
      }
    },
    "userAssignedOne": {
     "defaultValue": "userAssignedOne",
      "type": "String",
      "metadata": {
        "description": "User-assigned managed identity"
      }
	  },
    "userAssignedTwo": {
     "defaultValue": "userAssignedTwo",
      "type": "String",
      "metadata": {
        "description": "User-assigned managed identity"
      }
	  }
   },
  "resources": [
    {
      "type": "Microsoft.Automation/automationAccounts",
      "apiVersion": "2020-01-13-preview",
      "name": "[parameters('automationAccountName')]",
      "location": "[resourceGroup().location]",
      "identity": {
        "type": "SystemAssigned, UserAssigned",
        "userAssignedIdentities": {
          "[resourceID('Microsoft.ManagedIdentity/userAssignedIdentities/',parameters('userAssignedOne'))]": {},
          "[resourceID('Microsoft.ManagedIdentity/userAssignedIdentities/',parameters('userAssignedTwo'))]": {}
        }
      },
      "properties": {
        "sku": {
          "name": "Basic"
        },
        "encryption": {
          "keySource": "Microsoft.Automation",
          "identity": {}
        }
      }
    }
  ]
}
示例
执行以下步骤。
将模板复制并粘贴到名为
template_ua.json的文件中。 将该文件保存在本地计算机或 Azure 存储帐户中。修改以下变量值,然后执行。
$templateFile = "path\template_ua.json"使用 PowerShell cmdlet New-AzResourceGroupDeployment 部署模板。
New-AzResourceGroupDeployment `
    -Name "UserAssignedDeployment" `
    -ResourceGroupName $resourceGroup `
    -TemplateFile $templateFile `
    -automationAccountName $automationAccount `
    -userAssignedOne $userAssignedOne `
    -userAssignedTwo $userAssignedTwo
该命令不会生成输出;但是,你可以使用以下代码进行验证:
(Get-AzAutomationAccount `
-ResourceGroupName $resourceGroup `
-Name $automationAccount).Identity | ConvertTo-Json
输出类似于前面 REST API 示例显示的输出。
向用户分配的托管身份指派角色
自动化帐户可以使用其用户分配的托管标识获取令牌,以访问其他受 Microsoft Entra ID 保护的资源(例如 Azure 密钥保管库)。 这些令牌不代表应用程序的任何特定用户。 它们代表访问资源的应用程序。 例如,在本例中,令牌表示自动化帐户。
在使用用户分配的托管标识进行身份验证之前,必须为该标识设置在计划使用该标识的 Azure 资源的访问权限。 若要完成此任务,请在目标 Azure 资源上向该标识分配适当的角色。
遵循最小权限原则,仔细分配仅执行 runbook 所需的权限。 例如,如果自动化帐户仅需用于启动或停止 Azure 虚拟机,则分配给 Run As 帐户或托管身份的权限只需要用于启动或停止虚拟机。 同样,如果 Runbook 要从 Blob 存储中读取,则分配只读权限。
此示例使用 Azure PowerShell 演示如何将订阅中的参与者角色分配给目标 Azure 资源。 “参与者”角色用作示例,在你的案例中不一定需要用到。 或者,也可以将角色分配给 Azure 门户中的目标 Azure 资源。
New-AzRoleAssignment `
    -ObjectId <automation-Identity-object-id> `
    -Scope "/subscriptions/<subscription-id>" `
    -RoleDefinitionName "Contributor"
验证用户管理的标识的角色分配
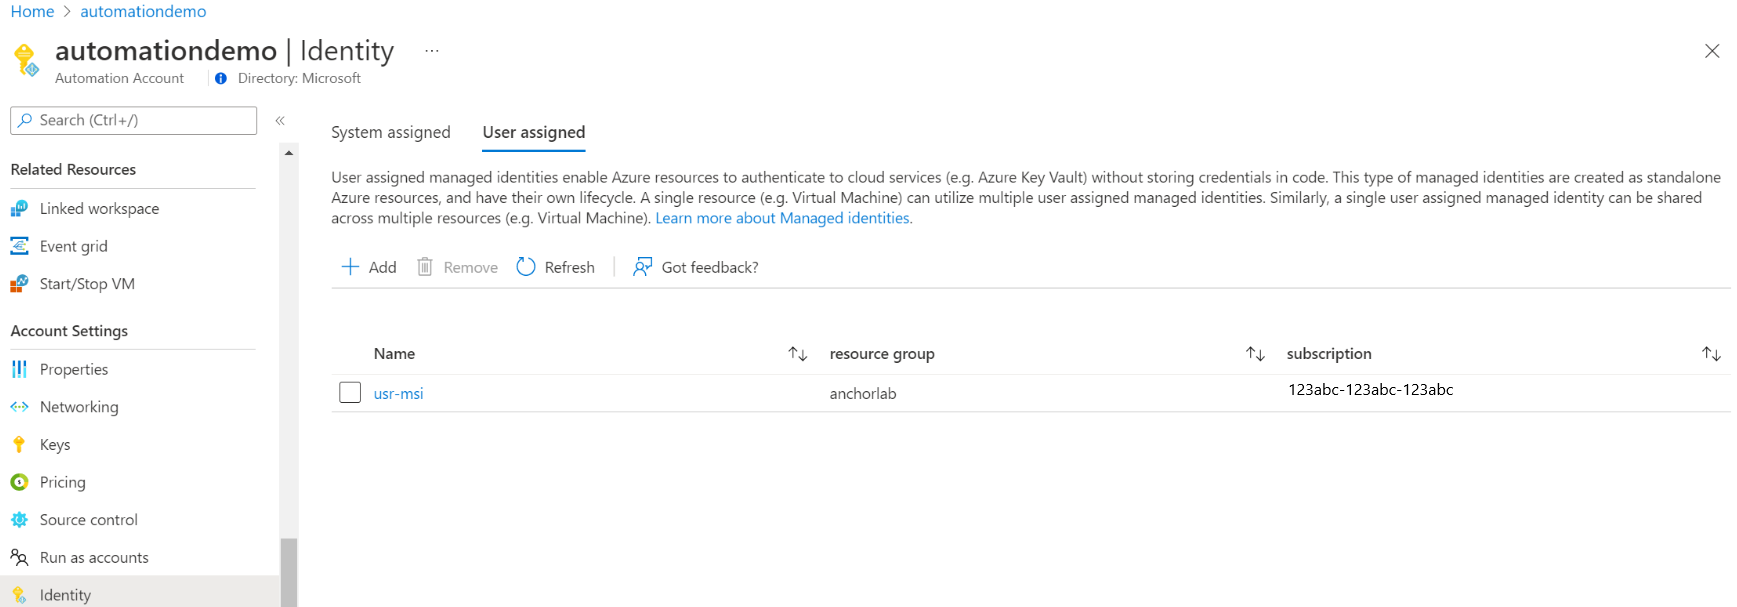
要验证自动化帐户所分配的用户托管标识的角色,请按照以下步骤进行:
登录 Azure 门户。
返回到自动化帐户。
在“帐户设置”下,依次选择“标识”、“用户分配”。
单击用户分配的身份名称。
如果已将角色分配到所选的用户分配的托管标识,可以看到角色分配的列表。 此列表包括你有权查看的所有角色分配。
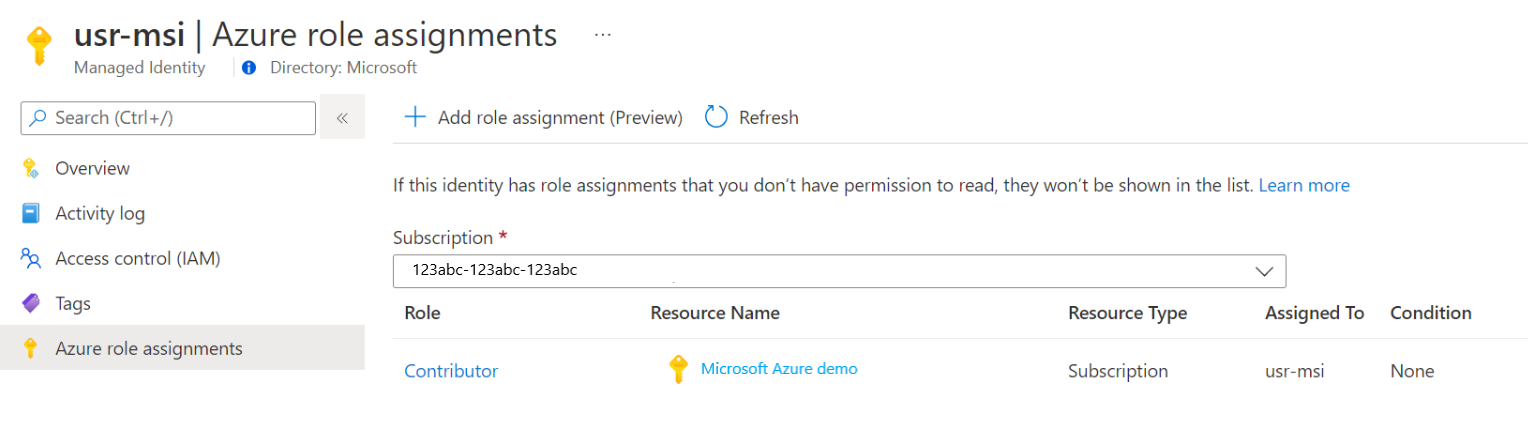
要更改订阅,请单击“订阅”下拉列表并选择适当的订阅。
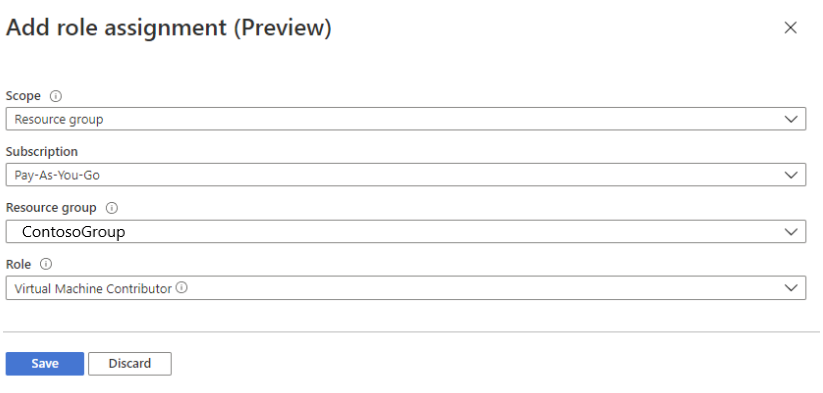
单击“添加角色分配(预览版)”
在下拉列表中,选择角色分配适用的资源集:“订阅”、“资源组”、“角色”和“范围”。
如果你没有进行角色分配,可以将选定范围的写入权限作为内联消息查看。在“角色”下拉列表中,选择一个角色作为“虚拟机贡献者”。
单击“保存” 。


几分钟后,即会在所选范围内为托管标识分配角色。
使用用户分配的托管标识对访问进行身份验证
为自动化帐户启用用户分配的托管标识并授予该身份对目标资源的访问权限后,可以在与支持托管标识的资源相关的运行手册中指定此标识。 为了支持身份验证,请使用 Az cmdlet Connect-AzAccount。
# Ensures you do not inherit an AzContext in your runbook
Disable-AzContextAutosave -Scope Process

# Connect to Azure with user-assigned managed identity
$AzureContext = (Connect-AzAccount -Identity -AccountId <user-assigned-identity-ClientId> -Environment AzureChinaCloud).context

# set and store context
$AzureContext = Set-AzContext -SubscriptionName $AzureContext.Subscription -DefaultProfile $AzureContext
在不使用 Azure cmdlet 的情况下生成访问令牌
对于 HTTP 终结点,请确保以下事项。
- 元数据标头必须存在并且应设置为“true”。
- 资源必须作为 GET 请求的查询参数和 POST 请求的表单数据,与请求一起传递。
- 将环境变量 IDENTITY_HEADER 的值设置为 X-IDENTITY-HEADER。
- Post 请求的内容类型必须是
application/x-www-form-urlencoded。
使用 HTTP Get 获取用户分配的托管标识的访问令牌
$resource= "?resource=https://management.chinacloudapi.cn/"
$client_id="&client_id=<ClientId of USI>"
$url = $env:IDENTITY_ENDPOINT + $resource + $client_id
$Headers = New-Object "System.Collections.Generic.Dictionary[[String],[String]]"
$Headers.Add("Metadata", "True")
$headers.Add("X-IDENTITY-HEADER", $env:IDENTITY_HEADER)
$accessToken = Invoke-RestMethod -Uri $url -Method 'GET' -Headers $Headers
Write-Output $accessToken.access_token
使用 HTTP Post 获取用户分配的托管身份的访问令牌
$url = $env:IDENTITY_ENDPOINT
$headers = New-Object "System.Collections.Generic.Dictionary[[String],[String]]"
$headers.Add("Metadata", "True")
$headers.Add("X-IDENTITY-HEADER", $env:IDENTITY_HEADER)
$body = @{'resource'='https://management.chinacloudapi.cn/'
'client_id'='<ClientId of USI>'}
$accessToken = Invoke-RestMethod $url -Method 'POST' -Headers $headers -ContentType 'application/x-www-form-urlencoded' -Body $body
Write-Output $accessToken.access_token
在 Azure PowerShell 中使用用户分配的托管标识
Write-Output "Connecting to azure via  Connect-AzAccount -Identity -AccountId <ClientId of USI> -Environment AzureChinaCloud"
Connect-AzAccount -Identity -AccountId <ClientId of USI> -Environment AzureChinaCloud
Write-Output "Successfully connected with Automation account's Managed Identity"
Write-Output "Trying to fetch value from key vault using User Assigned Managed identity. Make sure you have given correct access to Managed Identity"
$secret = Get-AzKeyVaultSecret -VaultName '<KVname>' -Name '<KeyName>'
$ssPtr = [System.Runtime.InteropServices.Marshal]::SecureStringToBSTR($secret.SecretValue)
try {
  $secretValueText = [System.Runtime.InteropServices.Marshal]::PtrToStringBSTR($ssPtr)
    Write-Output $secretValueText
} finally {
    [System.Runtime.InteropServices.Marshal]::ZeroFreeBSTR($ssPtr)
}
在 Python Runbook 中使用用户分配的托管标识
#!/usr/bin/env python3
import os
import requests

resource = "?resource=https://management.chinacloudapi.cn/"
client_id = "&client_id=<ClientId of USI>"
endPoint = os.getenv('IDENTITY_ENDPOINT')+ resource +client_id
identityHeader = os.getenv('IDENTITY_HEADER')
payload={}
headers = {
  'X-IDENTITY-HEADER': identityHeader,
  'Metadata': 'True'
}
response = requests.request("GET", endPoint, headers=headers, data=payload)
print(response.text)
后续步骤
若要排查与用户分配的托管标识相关的问题,请参阅 Troubleshoot Azure 自动化 托管标识问题。
如果需要禁用托管标识,请参阅禁用 Azure 自动化帐户托管标识。
有关 Azure 自动化帐户安全性的概述,请参阅自动化帐户身份验证概述。