注意
Azure 托管应用程序的托管标识支持当前处于预览阶段。 使用 2018-09-01-preview API 版本来利用托管标识。
了解如何将托管应用程序配置为包含托管标识。 托管标识可用于允许客户向托管应用程序授予对现有资源的访问权限。 标识由 Azure 平台托管,且无需预配或轮换任何机密。 有关 Microsoft Entra ID 中的托管标识的详细信息,请参阅 Azure 资源的托管标识。
你的应用程序可以被授予两种类型的标识:
- 系统分配的托管标识与你的应用程序相绑定,如果删除应用,标识也会被删除。 一个应用只能具有一个系统分配的托管标识。
- 用户分配的托管标识是可以分配给应用的独立 Azure 资源。 一个应用可以有多个用户分配的托管标识。
如何使用托管标识
托管标识支持托管应用程序的多种场景。 可解决的常见方案包括:
- 部署链接到现有 Azure 资源的托管应用程序。 例如,在托管应用程序中部署已附加到现有网络接口的 Azure 虚拟机 (VM)。
- 向托管应用程序和发布者授予对受管理资源组外部的 Azure 资源的访问权限。
- 为 Azure 中的活动日志及其他服务提供托管应用程序的运行时标识。
添加托管标识
要创建具有托管标识的托管应用程序,需要在 Azure 资源上设置另一个属性。 以下示例显示了一个identity属性示例:
{
  "identity": {
    "type": "SystemAssigned, UserAssigned",
    "userAssignedIdentities": {
      "/subscriptions/aaaa0a0a-bb1b-cc2c-dd3d-eeeeee4e4e4e/resourceGroups/testRG/providers/Microsoft.ManagedIdentity/userassignedidentites/myuserassignedidentity": {}
    }
  }
}
有两种常用方法来创建具有identity的托管应用程序:createUiDefinition.json 和 Azure 资源管理器模板。 对于简单的单一创建方案,应使用 createUiDefinition 来启用托管标识,因为它提供了更丰富的体验。 但是,在处理需要自动化部署或多个托管应用程序部署的高级系统或复杂系统时,可以使用模板。
使用 createUiDefinition
可以通过 CreateUIDefinition.json 为托管应用程序配置托管标识。 在输出部分中,键 managedIdentity 可用于替代托管应用程序模板的标识属性。 以下示例在托管应用程序上启用系统分配的托管标识。 可以通过使用 createUiDefinition 元素要求使用者提供输入,来构建更复杂的标识对象。 这些输入可用于构造具有用户分配的托管标识的托管应用程序。
"outputs": {
  "managedIdentity": { "Type": "SystemAssigned" }
}
何时使用 createUiDefinition 来启用托管标识
下面是有关何时使用 createUiDefinition 以在托管应用程序中启用托管标识的一些建议。
- 托管应用程序的创建通过 Azure 门户或 Azure 市场来完成。
- 托管标识需要用户进行复杂输入。
- 创建托管应用程序时需要托管标识。
托管标识 createUiDefinition 控件
createUiDefinition.json 支持内置的 托管标识控件。
{
  "$schema": "https://schema.management.azure.com/schemas/0.1.2-preview/CreateUIDefinition.MultiVm.json#",
  "handler": "Microsoft.Azure.CreateUIDef",
  "version": "0.1.2-preview",
  "parameters": {
    "basics": [],
    "steps": [
      {
        "name": "applicationSettings",
        "label": "Application Settings",
        "subLabel": {
          "preValidation": "Configure your application settings",
          "postValidation": "Done"
        },
        "bladeTitle": "Application Settings",
        "elements": [
          {
            "name": "appName",
            "type": "Microsoft.Common.TextBox",
            "label": "Managed application Name",
            "toolTip": "Managed application instance name",
            "visible": true
          },
          {
            "name": "appIdentity",
            "type": "Microsoft.ManagedIdentity.IdentitySelector",
            "label": "Managed Identity Configuration",
            "toolTip": {
              "systemAssignedIdentity": "Enable system assigned identity to grant the managed application access to additional existing resources.",
              "userAssignedIdentity": "Add user assigned identities to grant the managed application access to additional existing resources."
            },
            "defaultValue": {
              "systemAssignedIdentity": "Off"
            },
            "options": {
              "hideSystemAssignedIdentity": false,
              "hideUserAssignedIdentity": false,
              "readOnlySystemAssignedIdentity": false
            },
            "visible": true
          }
        ]
      }
    ],
    "outputs": {
      "applicationResourceName": "[steps('applicationSettings').appName]",
      "location": "[location()]",
      "managedIdentity": "[steps('applicationSettings').appIdentity]"
    }
  }
}

使用 Azure 资源管理器模板
注意
对于通过 Azure 门户创建流程进行操作的客户,系统会自动生成市场托管应用程序模板。
对于这些场景,必须使用 managedIdentity 中的 输出键来启用标识功能。
也可以通过 Azure 资源管理器模板启用托管标识。 以下示例在托管应用程序上启用系统分配的托管标识。 可以通过使用 Azure 资源管理器模板参数提供输入,来构建更复杂的标识对象。 这些输入可用于构造具有用户分配的托管标识的托管应用程序。
何时使用 Azure 资源管理器模板来启用托管标识
下面是有关何时使用 Azure 资源管理器模板在托管应用程序中启用托管标识的一些建议。
- 可以基于模板以编程方式部署托管应用程序。
- 要预配托管应用程序,需要为托管标识分配自定义角色。
- 托管应用程序不需要 Azure 门户和 Azure 市场创建流。
SystemAssigned 模板
用于部署具有系统分配的托管标识的托管应用程序的基本 Azure 资源管理器模板。
"resources": [
  {
    "type": "Microsoft.Solutions/applications",
    "name": "[parameters('applicationName')]",
    "apiVersion": "2018-09-01-preview",
    "location": "[parameters('location')]",
    "identity": {
        "type": "SystemAssigned"
    },
    "properties": {
        "ManagedResourceGroupId": "[parameters('managedByResourceGroupId')]",
        "parameters": { }
    }
  }
]
UserAssigned 模板
用于部署具有用户分配的托管标识的托管应用程序的基本 Azure 资源管理器模板。
"resources": [
  {
    "type": "Microsoft.ManagedIdentity/userAssignedIdentities",
    "name": "[parameters('managedIdentityName')]",
    "apiVersion": "2018-11-30",
    "location": "[parameters('location')]"
  },
  {
    "type": "Microsoft.Solutions/applications",
    "name": "[parameters('applicationName')]",
    "apiVersion": "2018-09-01-preview",
    "location": "[parameters('location')]",
    "identity": {
        "type": "UserAssigned",
        "userAssignedIdentities": {
            "[resourceID('Microsoft.ManagedIdentity/userAssignedIdentities/',parameters('managedIdentityName'))]": {}
        }
    },
    "properties": {
        "ManagedResourceGroupId": "[parameters('managedByResourceGroupId')]",
        "parameters": { }
    }
  }
]
授予对 Azure 资源的访问权限
为托管应用程序授予标识后,可通过创建角色分配为该应用程序授予对现有 Azure 资源的访问权限。
为此,请搜索并选择托管应用程序或用户分配的托管标识的名称,然后选择“访问控制 (IAM)”。 有关详细步骤,请参阅使用 Azure 门户分配 Azure 角色。
链接现有的 Azure 资源
注意
在部署托管应用程序之前,必须配置用户分配的托管标识。 此外,托管应用程序的链接资源部署仅支持用于 Marketplace 类型。
托管标识还可用于部署在部署期间需要访问现有资源的托管应用程序。 当客户预配了托管应用程序,可以添加用户分配的托管标识以在 mainTemplate 部署中提供更多授权。
编写包含链接资源的 createUiDefinition
将托管应用程序的部署关联到现有资源时,必须同时提供现有的 Azure 资源,以及在该资源上具有相应角色分配的用户分配的托管标识。
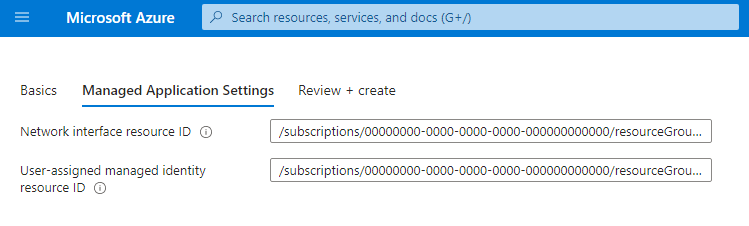
一个需要两个输入的示例 createUiDefinition.json:网络接口资源 ID 和用户分配的托管身份资源 ID。
{
  "$schema": "https://schema.management.azure.com/schemas/0.1.2-preview/CreateUIDefinition.MultiVm.json#",
  "handler": "Microsoft.Azure.CreateUIDef",
  "version": "0.1.2-preview",
  "parameters": {
    "basics": [
      {}
    ],
    "steps": [
      {
        "name": "managedApplicationSetting",
        "label": "Managed Application Settings",
        "subLabel": {
          "preValidation": "Managed Application Settings",
          "postValidation": "Done"
        },
        "bladeTitle": "Managed Application Settings",
        "elements": [
          {
            "name": "networkInterfaceId",
            "type": "Microsoft.Common.TextBox",
            "label": "Network interface resource ID",
            "defaultValue": "/subscriptions/aaaa0a0a-bb1b-cc2c-dd3d-eeeeee4e4e4e/resourceGroups/testRG/providers/Microsoft.Network/networkInterfaces/existingnetworkinterface",
            "toolTip": "Must represent the identity as an Azure Resource Manager resource identifier format ex. /subscriptions/sub1/resourcegroups/myGroup/providers/Microsoft.Network/networkInterfaces/networkinterface1",
            "visible": true
          },
          {
            "name": "userAssignedId",
            "type": "Microsoft.Common.TextBox",
            "label": "User-assigned managed identity resource ID",
            "defaultValue": "/subscriptions/aaaa0a0a-bb1b-cc2c-dd3d-eeeeee4e4e4e/resourceGroups/testRG/providers/Microsoft.ManagedIdentity/userassignedidentites/myuserassignedidentity",
            "toolTip": "Must represent the identity as an Azure Resource Manager resource identifier format ex. /subscriptions/sub1/resourcegroups/myGroup/providers/Microsoft.ManagedIdentity/userAssignedIdentities/identity1",
            "visible": true
          }
        ]
      }
    ],
    "outputs": {
      "existingNetworkInterfaceId": "[steps('managedApplicationSetting').networkInterfaceId]",
      "managedIdentity": "[parse(concat('{\"Type\":\"UserAssigned\",\"UserAssignedIdentities\":{',string(steps('managedApplicationSetting').userAssignedId),':{}}}'))]"
    }
  }
}
此 createUiDefinition.json 生成包含两个字段的“创建用户”体验。 第一个字段可让用户输入要链接到托管应用程序部署的资源的 Azure 资源 ID。 第二个字段可让使用者输入有权访问所链接 Azure 资源的用户分配的托管标识 Azure 资源 ID。 生成的体验如下所示:
使用链接资源编写 mainTemplate
除了更新 createUiDefinition 以外,还需要更新主模板才能接受传入的链接资源 ID。 可以通过添加新的参数来更新主要模板,以接受新的输出。 由于 managedIdentity 输出将替代生成的托管应用程序模板中的值,因此不会将其传递到主模板,并且不应将其包含在参数部分中。
一个示例主模板,用于在 createUiDefinition.json 提供的现有网络接口中设置网络配置文件。
{
  "$schema": "https://schema.management.azure.com/schemas/2015-01-01/deploymentTemplate.json#",
  "contentVersion": "1.0.0.0",
  "parameters": {
    "existingNetworkInterfaceId": { "type": "string" }
  },
  "variables": {
  },
  "resources": [
    {
      "apiVersion": "2016-04-30-preview",
      "type": "Microsoft.Compute/virtualMachines",
      "name": "myLinkedResourceVM",
      "location": "[resourceGroup().location]",
      "properties": {
        …,
        "networkProfile": {
          "networkInterfaces": [
            {
              "id": "[parameters('existingNetworkInterfaceId')]"
            }
          ]
        }
      }
    }
  ]
}
使用带有链接资源的托管应用程序
创建托管应用程序包后,可通过 Azure 门户使用该托管应用程序。 需要完成几个前提步骤才能使用该应用程序。
- 必须创建所需链接 Azure 资源的实例。
- 必须创建用户分配的托管标识并为其提供链接资源的角色分配。
- 将现有的链接资源 ID 和用户分配的托管标识 ID 提供给 createUiDefinition。
访问托管标识令牌
现在,可以通过发布者租户中的 listTokens API 访问受管理应用程序的令牌。 示例请求可能如下所示:
POST https://management.chinacloudapi.cn/subscriptions/{subscriptionId}/resourceGroups/{resourceGroup}/providers/Microsoft.Solutions/applications/{applicationName}/listTokens?api-version=2018-09-01-preview HTTP/1.1

{
  "authorizationAudience": "https://management.chinacloudapi.cn/",
  "userAssignedIdentities": [
      "/subscriptions/{subscriptionId}/resourceGroups/{resourceGroup}/providers/Microsoft.ManagedIdentity/userAssignedIdentities/{userAssignedIdentityName}"
  ]
}
请求正文参数:
| 参数 | 必填 | 说明 |
|---|---|---|
authorizationAudience |
否 | 目标资源的应用 ID URI。 它也是颁发的令牌的 aud(受众)声明。 默认值为 https://management.chinacloudapi.cn/"; |
userAssignedIdentities |
否 | 用于检索令牌的用户分配的托管标识列表。 如果未指定,listTokens 将返回系统分配的托管标识的令牌。 |
示例响应可能如下所示:
HTTP/1.1 200 OK
Content-Type: application/json

{
  "value": [
    {
      "access_token": "eyJ0eXAi…",
      "expires_in": "2…",
      "expires_on": "1557…",
      "not_before": "1557…",
      "authorizationAudience": "https://management.chinacloudapi.cn/",
      "resourceId": "/subscriptions/{subscriptionId}/resourceGroups/{resourceGroup}/providers/Microsoft.Solutions/applications/{applicationName}",
      "token_type": "Bearer"
    }
  ]
}
响应在 value 属性下包含令牌数组:
| 参数 | 说明 |
|---|---|
access_token |
请求的访问令牌。 |
expires_in |
访问令牌的有效秒数。 |
expires_on |
访问令牌过期的时间范围。 此值表示自纪元以来的秒数。 |
not_before |
访问令牌生效的时间范围。 此值表示自纪元以来的秒数。 |
authorizationAudience |
请求访问令牌时所针对的 aud(受众)。 此值与 listTokens 请求中提供的值相同。 |
resourceId |
已颁发令牌的 Azure 资源 ID。 此值为托管应用程序 ID 或用户分配的托管标识 ID。 |
token_type |
令牌的类型。 |
为托管应用程序创建托管标识和角色分配
本节介绍如何使用发布者访问模式在托管应用程序中创建托管标识和分配角色。
使用 Azure 资源管理器模板创建托管标识。
{
  "$schema": "https://schema.management.azure.com/schemas/2019-04-01/deploymentTemplate.json#",
  "contentVersion": "1.0.0.0",
  "resources": [
    {
      "type": "Microsoft.ManagedIdentity/userAssignedIdentities",
      "apiVersion": "2018-11-30",
      "name": "myManagedIdentity",
      "location": "[resourceGroup().location]"
    }
  ]
}
若要允许传播托管标识,请创建 30 秒睡眠时间。
由于托管标识不在目标范围的主租户中,因此必须在创建托管标识和分配角色之间应用延迟,以允许托管标识在租户之间传播。 如果没有此延迟,Azure 资源管理器在模板中使用时可能无法识别此标识,并在将来的部署脚本中失败。
{
  "type": "Microsoft.Resources/deploymentScripts",
  "apiVersion": "2020-10-01",
  "name": "sleepScript",
  "location": "[resourceGroup().location]",
  "properties": {
    "azPowerShellVersion": "2.0",
    "scriptContent": "Start-Sleep -Seconds 30",
    "timeout": "PT1H",
    "cleanupPreference": "OnSuccess",
    "retentionInterval": "P1D"
  },
  "dependsOn": [
    "myManagedIdentity"
  ]
}
在托管资源组的范围将参与者角色分配给托管标识。
{
  "type": "Microsoft.Authorization/roleAssignments",
  "apiVersion": "2020-04-01-preview",
  "name": "[guid(resourceGroup().id, 'Contributor')]",
  "properties": {
    "roleDefinitionId": "[subscriptionResourceId('Microsoft.Authorization/roleDefinitions', 'b24988ac-6180-42a0-ab88-20f7382dd24c')]",
    "principalId": "[reference(resourceId('Microsoft.ManagedIdentity/userAssignedIdentities', 'myManagedIdentity'), '2018-11-30').principalId]",
    "scope": "[resourceGroup().id]",
    "delegatedManagedIdentityResourceId": "[resourceId('Microsoft.ManagedIdentity/userAssignedIdentities','myManagedIdentity')]"
  },
  "dependsOn": [
    "myManagedIdentity",
    "sleepScript"
  ]
}