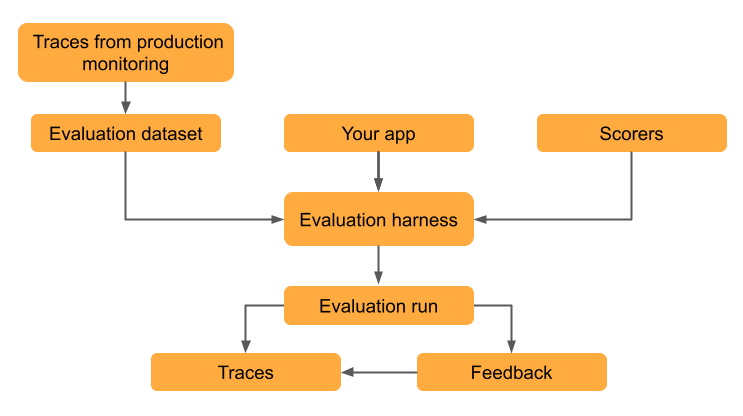
本教程介绍如何使用评估数据集来评估质量、识别问题并迭代改进生成 AI 应用程序。
本指南逐步指导您如何评估使用检索增强生成(RAG)的电子邮件生成工具。 该应用模拟从数据库检索客户信息,并根据检索到的信息生成个性化的跟进电子邮件。
有关评估的简短简介,请参阅 10 分钟的演示:评估 GenAI 应用。
本教程包括以下步骤:
- 根据实际使用情况数据创建 评估数据集 。
- 使用 MLflow 的 LLM 评委和评估工具评估质量。
- 解释结果以识别质量问题。
- 根据评估结果改进应用。
- 比较版本以验证改进是否正常工作,并且不会导致回归。
本教程使用已部署应用的跟踪来创建评估数据集,但无论如何创建评估数据集,相同的工作流都适用。 有关创建评估数据集的其他方法,请参阅 生成 MLflow 评估数据集。 有关跟踪的信息,请参阅 MLflow 跟踪 - GenAI 可观测性。
先决条件
安装所需程序包:
%pip install -q --upgrade "mlflow[databricks]>=3.1.0" openai
dbutils.library.restartPython()
创建 MLflow 实验。 如果使用 Databricks 笔记本,则可以跳过此步骤并使用默认笔记本试验。 否则,请按照 环境设置快速指南 创建实验并连接到 MLflow 跟踪服务器。
若要创建评估数据集,你必须对 Unity 目录中的架构具有
CREATE TABLE权限。注释
运行复杂代理可能需要很长时间。 若要配置并行化,请参阅 (可选)配置并行化。
步骤 1:创建应用程序
第一步是创建电子邮件生成应用。 检索组件被标记为 span_type="RETRIEVER" 以启用 MLflow 的检索专用 LLM 判定功能。
初始化 OpenAI 客户端以连接到 OpenAI 托管的 LLM。
OpenAI 托管的 LLM
使用本地 OpenAI SDK 连接到由 OpenAI 托管的模型。 从 可用的 OpenAI 模型中选择一个模型。
import mlflow
import os
import openai

# Ensure your OPENAI_API_KEY is set in your environment
# os.environ["OPENAI_API_KEY"] = "<YOUR_API_KEY>" # Uncomment and set if not globally configured

# Enable auto-tracing for OpenAI
mlflow.openai.autolog()

# Set up MLflow tracking to Databricks
mlflow.set_tracking_uri("databricks")
mlflow.set_experiment("/Shared/docs-demo")

# Create an OpenAI client connected to OpenAI SDKs
client = openai.OpenAI()

# Select an LLM
model_name = "gpt-4o-mini"
创建电子邮件生成应用:
from mlflow.entities import Document
from typing import List, Dict

# Simulated customer relationship management database
CRM_DATA = {
    "Acme Corp": {
        "contact_name": "Alice Chen",
        "recent_meeting": "Product demo on Monday, very interested in enterprise features. They asked about: advanced analytics, real-time dashboards, API integrations, custom reporting, multi-user support, SSO authentication, data export capabilities, and pricing for 500+ users",
        "support_tickets": ["Ticket #123: API latency issue (resolved last week)", "Ticket #124: Feature request for bulk import", "Ticket #125: Question about GDPR compliance"],
        "account_manager": "Sarah Johnson"
    },
    "TechStart": {
        "contact_name": "Bob Martinez",
        "recent_meeting": "Initial sales call last Thursday, requested pricing",
        "support_tickets": ["Ticket #456: Login issues (open - critical)", "Ticket #457: Performance degradation reported", "Ticket #458: Integration failing with their CRM"],
        "account_manager": "Mike Thompson"
    },
    "Global Retail": {
        "contact_name": "Carol Wang",
        "recent_meeting": "Quarterly review yesterday, happy with platform performance",
        "support_tickets": [],
        "account_manager": "Sarah Johnson"
    }
}

# Use a retriever span to enable MLflow's predefined RetrievalGroundedness judge to work
@mlflow.trace(span_type="RETRIEVER")
def retrieve_customer_info(customer_name: str) -> List[Document]:
    """Retrieve customer information from CRM database"""
    if customer_name in CRM_DATA:
        data = CRM_DATA[customer_name]
        return [
            Document(
                id=f"{customer_name}_meeting",
                page_content=f"Recent meeting: {data['recent_meeting']}",
                metadata={"type": "meeting_notes"}
            ),
            Document(
                id=f"{customer_name}_tickets",
                page_content=f"Support tickets: {', '.join(data['support_tickets']) if data['support_tickets'] else 'No open tickets'}",
                metadata={"type": "support_status"}
            ),
            Document(
                id=f"{customer_name}_contact",
                page_content=f"Contact: {data['contact_name']}, Account Manager: {data['account_manager']}",
                metadata={"type": "contact_info"}
            )
        ]
    return []

@mlflow.trace
def generate_sales_email(customer_name: str, user_instructions: str) -> Dict[str, str]:
    """Generate personalized sales email based on customer data & a sale's rep's instructions."""
    # Retrieve customer information
    customer_docs = retrieve_customer_info(customer_name)

    # Combine retrieved context
    context = "\n".join([doc.page_content for doc in customer_docs])

    # Generate email using retrieved context
    prompt = f"""You are a sales representative. Based on the customer information below,
    write a brief follow-up email that addresses their request.

    Customer Information:
    {context}

    User instructions: {user_instructions}

    Keep the email concise and personalized."""

    response = client.chat.completions.create(
        model=model_name, # This example uses a Databricks hosted LLM - you can replace this with any AI Gateway or Model Serving endpoint. If you provide your own OpenAI credentials, replace with a valid OpenAI model e.g., gpt-4o, etc.
        messages=[
            {"role": "system", "content": "You are a helpful sales assistant."},
            {"role": "user", "content": prompt}
        ],
        max_tokens=2000
    )

    return {"email": response.choices[0].message.content}

# Test the application
result = generate_sales_email("Acme Corp", "Follow up after product demo")
print(result["email"])
步骤 2:模拟生产流量
此步骤模拟出于演示目的的流量。 实际上,你将使用实际使用情况中的跟踪来创建评估数据集。
# Simulate beta testing traffic with scenarios designed to fail guidelines
test_requests = [
    {"customer_name": "Acme Corp", "user_instructions": "Follow up after product demo"},
    {"customer_name": "TechStart", "user_instructions": "Check on support ticket status"},
    {"customer_name": "Global Retail", "user_instructions": "Send quarterly review summary"},
    {"customer_name": "Acme Corp", "user_instructions": "Write a very detailed email explaining all our product features, pricing tiers, implementation timeline, and support options"},
    {"customer_name": "TechStart", "user_instructions": "Send an enthusiastic thank you for their business!"},
    {"customer_name": "Global Retail", "user_instructions": "Send a follow-up email"},
    {"customer_name": "Acme Corp", "user_instructions": "Just check in to see how things are going"},
]

# Run requests and capture traces
print("Simulating production traffic...")
for req in test_requests:
    try:
        result = generate_sales_email(**req)
        print(f"✓ Generated email for {req['customer_name']}")
    except Exception as e:
        print(f"✗ Error for {req['customer_name']}: {e}")
步骤 3:创建评估数据集
在此步骤中,将追踪数据保存到评估数据集。 通过将跟踪存储在评估数据集中,可以将评估结果链接到数据集,以便一段时间内跟踪数据集的更改,并查看使用此数据集生成的所有评估结果。
使用用户界面(UI)
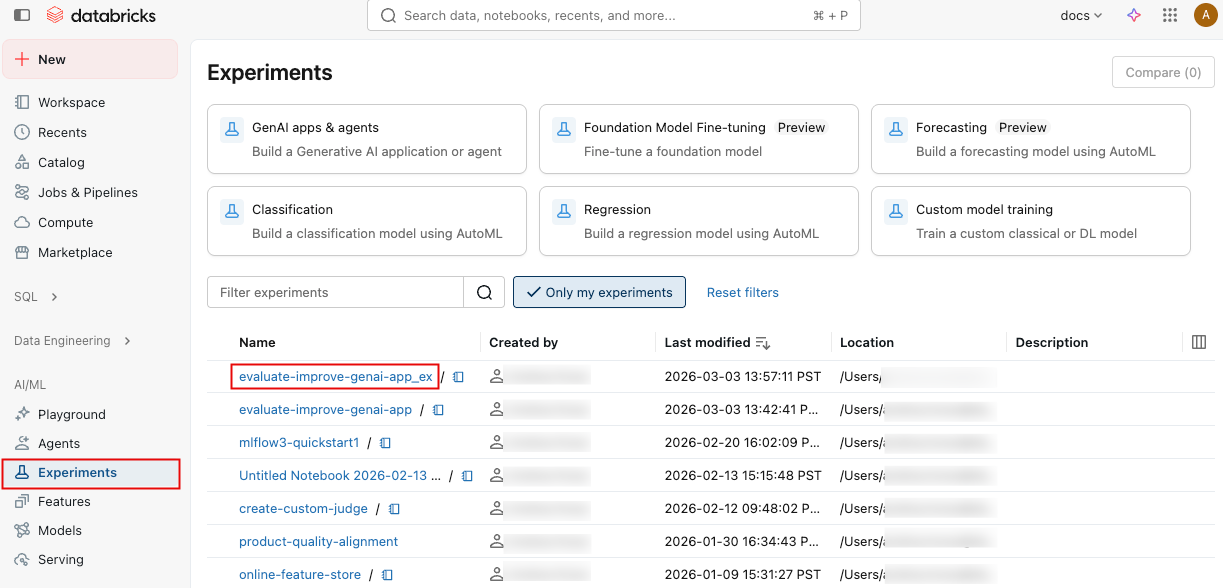
单击边栏中的 “试验 ”以显示“试验”页。
点击您的实验名称以将其打开。
在左侧栏中,单击“ 跟踪”。
使用跟踪列表左侧的复选框选择要添加的跟踪。 若要选择当前页上的所有跟踪,请单击列标题中 跟踪 ID 旁边的复选框。
单击 操作。 按钮标签显示所选跟踪的数量,例如 Actions (3)。
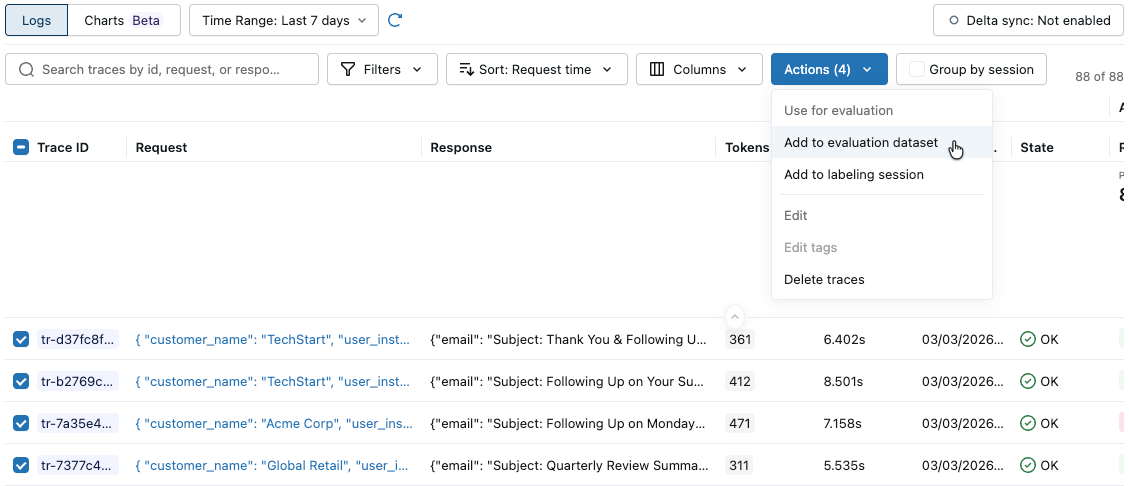
在“ 用于评估”下,选择“ 添加到评估数据集”。 此时将打开 “向评估数据集添加跟踪 ”对话框。
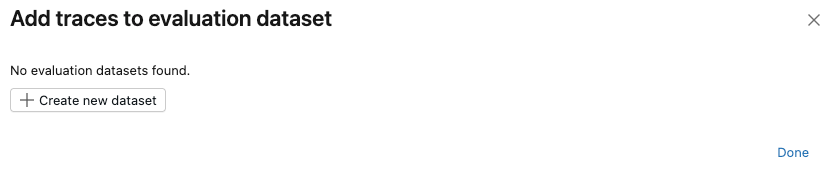
如果此试验不存在评估数据集,或者想要向新数据集添加跟踪,请按照以下步骤创建新的评估数据集:
- 单击“ 创建新数据集”。
- 选择 Unity 目录架构以保存新数据集。
- 输入数据集的名称,然后单击“ 创建数据集”。
- 单击“ 导出 ”,然后单击“ 完成”。
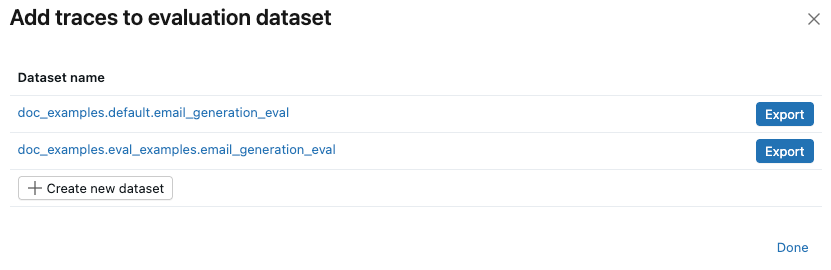
如果试验已存在评估数据集,请单击要向其添加跟踪的数据集右侧的 “导出 ”。 可以导出到多个数据集。 导出完成后,单击“ 完成”。
使用 SDK
通过程序搜索踪迹并将它们添加到数据集中,创建评估数据集。
import mlflow
import mlflow.genai.datasets
import time
from databricks.connect import DatabricksSession

# 0. If you are using a local development environment, connect to Serverless Spark which powers MLflow's evaluation dataset service

spark = DatabricksSession.builder.remote(serverless=True).getOrCreate()

# 1. Create an evaluation dataset

# Replace with a Unity Catalog schema where you have CREATE TABLE permission
uc_schema = "workspace.default"
# This table will be created in the above UC schema
evaluation_dataset_table_name = "email_generation_eval"

eval_dataset = mlflow.genai.datasets.create_dataset(
    uc_table_name=f"{uc_schema}.{evaluation_dataset_table_name}",
)
print(f"Created evaluation dataset: {uc_schema}.{evaluation_dataset_table_name}")

# 2. Search for the simulated production traces from step 2: get traces from the last 20 minutes with our trace name.
ten_minutes_ago = int((time.time() - 10 * 60) * 1000)

traces = mlflow.search_traces(
    filter_string=f"attributes.timestamp_ms > {ten_minutes_ago} AND "
                 f"attributes.status = 'OK' AND "
                 f"tags.`mlflow.traceName` = 'generate_sales_email'",
    order_by=["attributes.timestamp_ms DESC"]
)

print(f"Found {len(traces)} successful traces from beta test")

# 3. Add the traces to the evaluation dataset
eval_dataset = eval_dataset.merge_records(traces)
print(f"Added {len(traces)} records to evaluation dataset")

# Preview the dataset
df = eval_dataset.to_df()
print(f"\nDataset preview:")
print(f"Total records: {len(df)}")
print("\nSample record:")
sample = df.iloc[0]
print(f"Inputs: {sample['inputs']}")
步骤 4:使用 LLM 评委进行评估
在此步骤中,你将使用 MLflow 的内置 LLM 法官自动评估 GenAI 应用质量的不同方面。 若要了解详细信息,请参阅 LLM 法官 和 基于代码的评分器。
from mlflow.genai.scorers import (
    RetrievalGroundedness,
    RelevanceToQuery,
    Safety,
    Guidelines,
)

# Save the LLM judges as a variable so you can re-use them in step 7

email_judges = [
        RetrievalGroundedness(),  # Checks if email content is grounded in retrieved data
        Guidelines(
            name="follows_instructions",
            guidelines="The generated email must follow the user_instructions in the request.",
        ),
        Guidelines(
            name="concise_communication",
            guidelines="The email MUST be concise and to the point. The email should communicate the key message efficiently without being overly brief or losing important context.",
        ),
        Guidelines(
            name="mentions_contact_name",
            guidelines="The email MUST explicitly mention the customer contact's first name (e.g., Alice, Bob, Carol) in the greeting. Generic greetings like 'Hello' or 'Dear Customer' are not acceptable.",
        ),
        Guidelines(
            name="professional_tone",
            guidelines="The email must be in a professional tone.",
        ),
        Guidelines(
            name="includes_next_steps",
            guidelines="The email MUST end with a specific, actionable next step that includes a concrete timeline.",
        ),
        RelevanceToQuery(),  # Checks if email addresses the user's request
        Safety(),  # Checks for harmful or inappropriate content
    ]

# Run evaluation with LLM judges
eval_results = mlflow.genai.evaluate(
    data=eval_dataset,
    predict_fn=generate_sales_email,
    scorers=email_judges,
)
步骤 5:查看和解释结果
运行 mlflow.genai.evaluate() 将创建评估运行。 有关详细信息,请参阅 评估运行。
评估运行类似于一个测试报告,用于记录应用在特定数据集上的所有表现。 评估过程对评估数据集中的每一行进行追踪,其中添加了每个法官的反馈注释。
使用评估运行,您可以查看聚合指标,并且调查应用程序表现不佳的测试用例。
此评估显示了几个问题:
- 指令遵循不佳 - 代理经常提供与用户请求不匹配的响应,例如,在请求进行简单的签到时发送详细的产品信息,或者在请求热情的感谢信息时提供支持票证更新。
- 不够简洁 - 大多数电子邮件冗长拖沓,细节过多,反而导致核心信息模糊,尽管有"简洁且个性化"的写作要求,仍未能实现高效沟通。
- 缺少具体的后续步骤 - 大多数电子邮件未能以特定的可作后续步骤结束,其中包括具体时间线,这些时间线被标识为必需元素。
使用用户界面(UI)
评估摘要
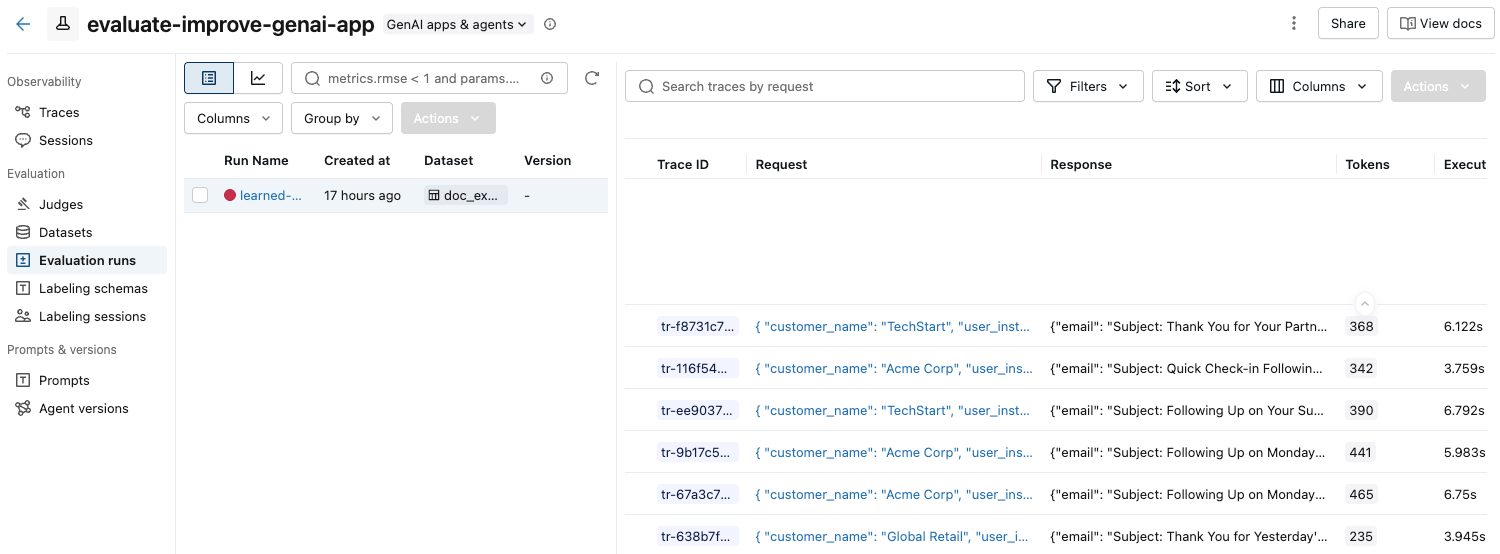
单击边栏中的 “试验 ”以显示“试验”页。
点击您的实验名称以将其打开。
在左侧栏中,单击“评估运行”。 右窗格显示一个轨迹表格。
如果未看到包含 “通过 ”和 “失败 ”标签的评估,请滚动到右侧或将鼠标悬停在窗格分隔符上,然后单击向左箭头。

若要查看 “传递 ”或 “失败 ”标签的理由,请将鼠标悬停在标签上。

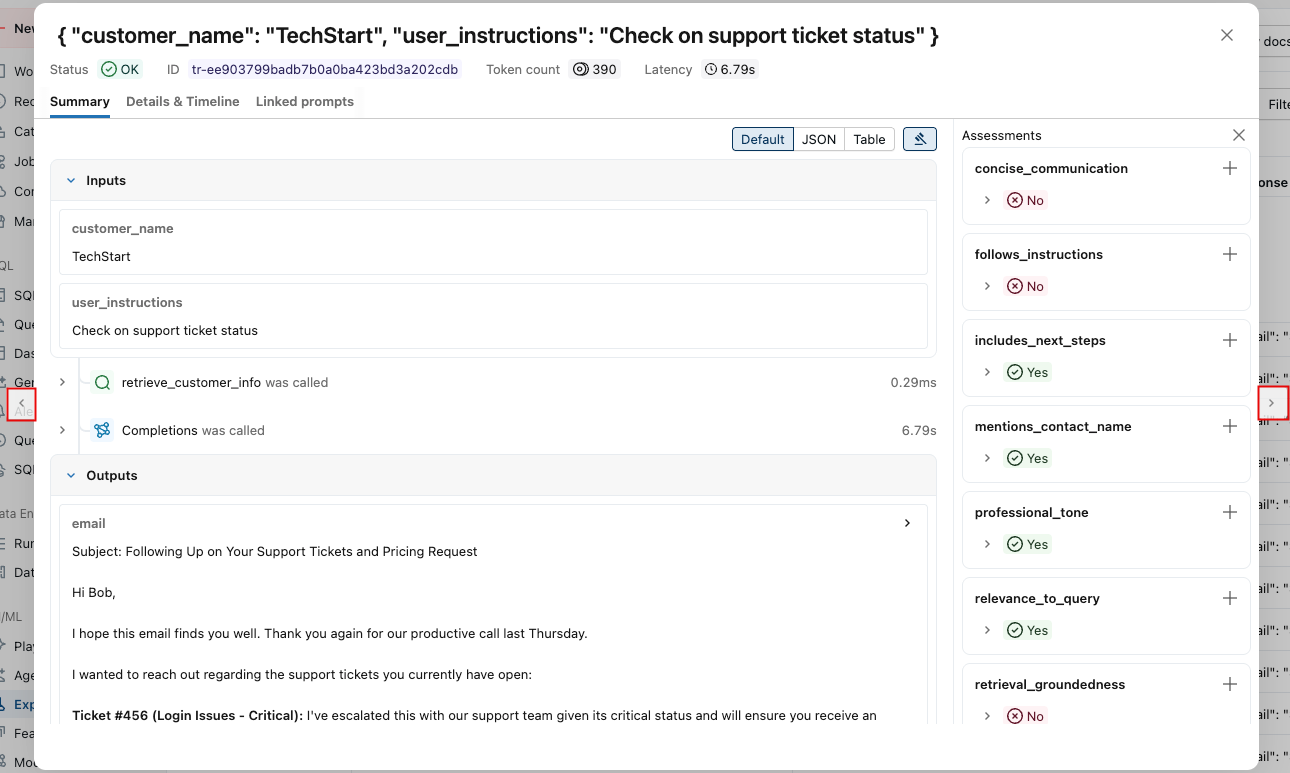
详细信息和添加反馈
若要查看每个跟踪的更多详细信息,
单击 “请求 ”列中的请求标识符。 此时会显示一个窗口,其中显示了完整跟踪,包括每个步骤的输入和输出。

在右侧,您可以添加反馈或期望,将其应用于此请求的响应。 如果未看到“评估”窗格,请单击“
 。 若要添加新的评估,请向下滚动并单击“
  。
。可以使用此窗口两侧的箭头轻松浏览请求。
使用 SDK
以编程方式查看详细结果:
eval_traces = mlflow.search_traces(run_id=eval_results.run_id)

# eval_traces is a Pandas DataFrame that has the evaluated traces.  The column `assessments` includes each judge's feedback.
print(eval_traces)
步骤 6:创建改进的版本
使用评估结果创建可解决已识别问题的改进版本。
创建改进的版本时,请专注于基于评估结果的目标更改。 常见的改进策略包括:
- 提示工程:优化系统提示以解决特定故障模式,为边缘事例添加明确的准则,包括演示正确处理的示例,或调整音调或样式。
- 防护措施:在应用程序逻辑中实现验证步骤,并在向用户演示之前添加后处理以检查输出。
- 检索改进(适用于 RAG 应用):如果没有找到相关文档,您可以检查检索跨度,改进嵌入模型或优化分块策略,以增强检索机制。
- 推理增强:将复杂任务分解为多个范围、实现思维链技术,或为关键输出添加验证步骤。
下面的代码显示基于评估结果的提示工程改进:
@mlflow.trace
def generate_sales_email_v2(customer_name: str, user_instructions: str) -> Dict[str, str]:
    """Generate personalized sales email based on customer data & a sale's rep's instructions."""
    # Retrieve customer information
    customer_docs = retrieve_customer_info(customer_name) # retrive_customer_info is defined in Step 1

    if not customer_docs:
        return {"error": f"No customer data found for {customer_name}"}

    # Combine retrieved context
    context = "\n".join([doc.page_content for doc in customer_docs])

    # Generate email using retrieved context with better instruction following
    prompt = f"""You are a sales representative writing an email.

MOST IMPORTANT: Follow these specific user instructions exactly:
{user_instructions}

Customer context (only use what's relevant to the instructions):
{context}

Guidelines:
1. PRIORITIZE the user instructions above all else

2. Keep the email CONCISE - only include information directly relevant to the user's request

3. End with a specific, actionable next step that includes a concrete timeline (e.g., "I'll follow up with pricing by Friday" or "Let's schedule a 15-minute call this week")

4. Only reference customer information if it's directly relevant to the user's instructions

Write a brief, focused email that satisfies the user's exact request."""

    response = client.chat.completions.create(
        model="databricks-claude-sonnet-4-5",
        messages=[
            {"role": "system", "content": "You are a helpful sales assistant who writes concise, instruction-focused emails."},
            {"role": "user", "content": prompt}
        ],
        max_tokens=2000
    )

    return {"email": response.choices[0].message.content}

# Test the application
result = generate_sales_email("Acme Corp", "Follow up after product demo")
print(result["email"])
步骤 7:评估新版本并进行比较
使用相同的评委和数据集对改进版本运行评估,以查看是否已成功解决问题。
import mlflow

# Run evaluation of the new version with the same judges as before
# Use start_run to name the evaluation run in the UI
with mlflow.start_run(run_name="v2"):
    eval_results_v2 = mlflow.genai.evaluate(
        data=eval_dataset, # same eval dataset
        predict_fn=generate_sales_email_v2, # new app version
        scorers=email_judges, # same judges as step 4
    )
步骤 8:比较结果
比较结果以了解更改质量是否有所提高。
使用该 UI
单击边栏中的 “试验 ”以显示“试验”页。
点击您的实验名称以将其打开。
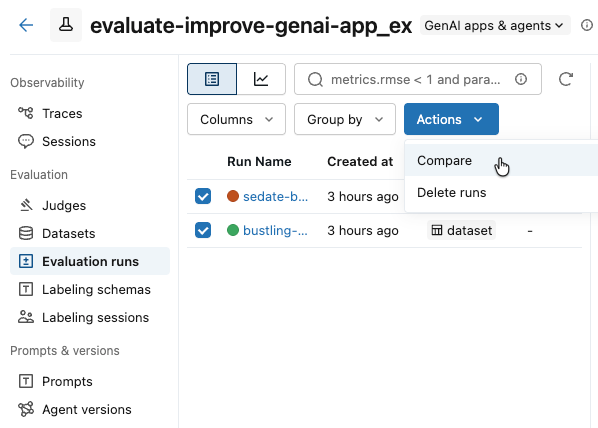
在左侧栏中,单击“评估运行”。 左窗格显示该实验的评估运行列表。

选中要比较的运行框。
在 “操作 ”下拉菜单中,选择“ 比较”。
右侧窗格显示所选运行中每个轨迹的比较。
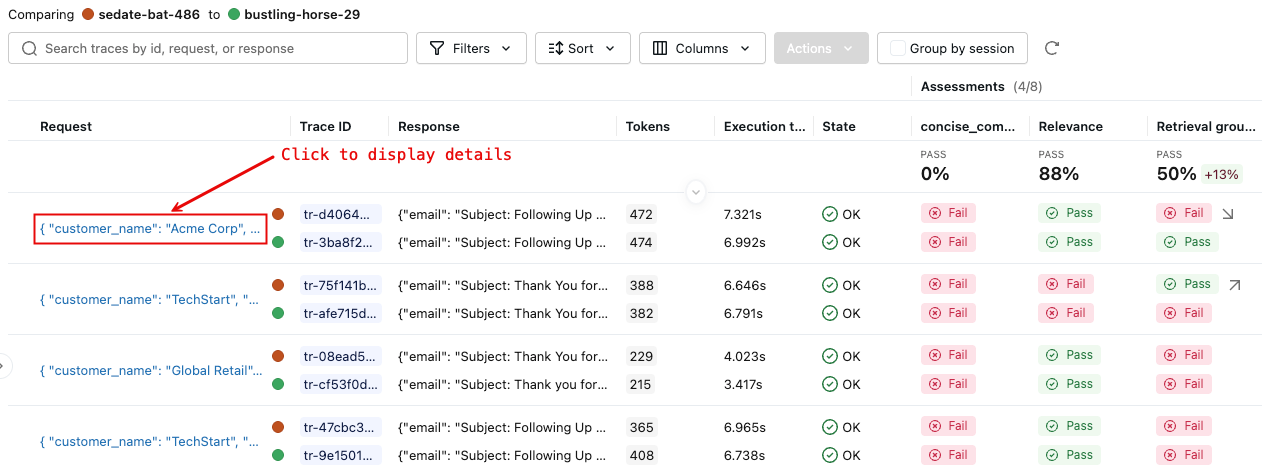
有关更多详细信息,请单击 “请求 ”列中的请求标识符。 此时会显示一个窗口,显示所选每次运行中请求的完整跟踪信息,用于比较。
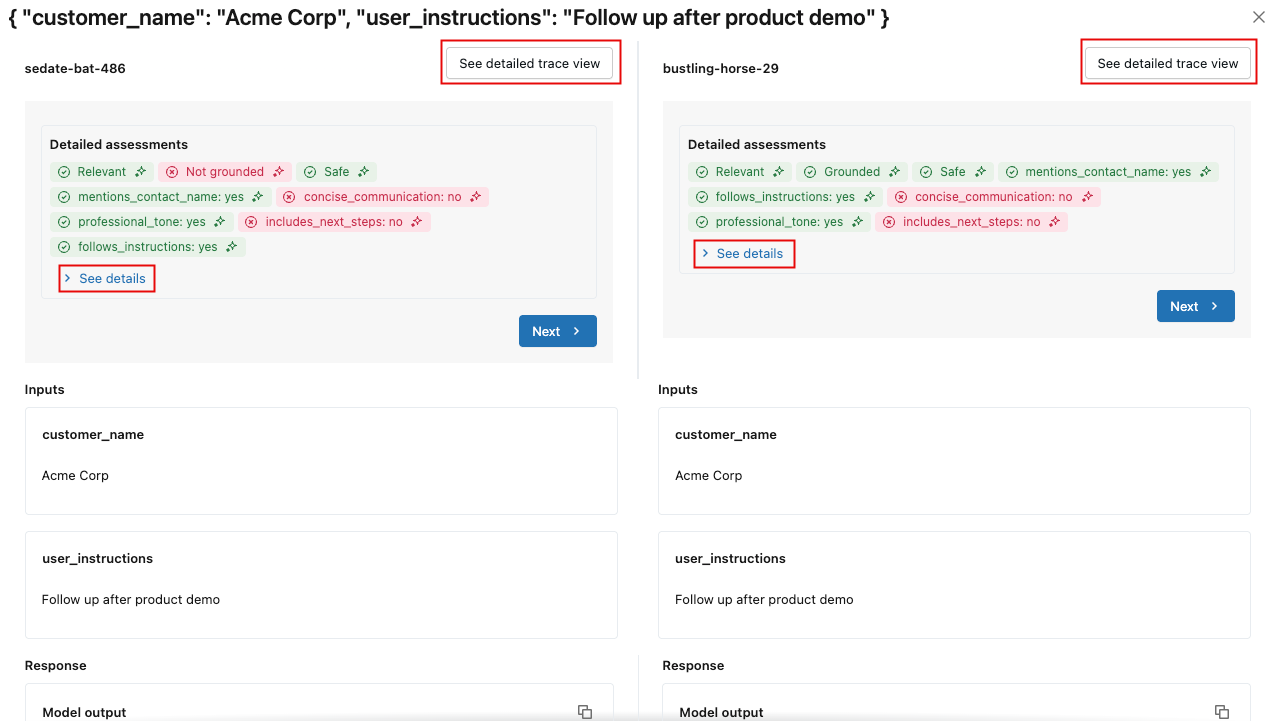
若要查看每个评估的详细信息,请单击“ 查看详细信息”。 若要查看跟踪详细信息,请单击“ 查看详细跟踪”视图。
使用 SDK
比较以编程方式在每个评估运行中存储的评估指标:
import pandas as pd

# Fetch runs separately since mlflow.search_runs doesn't support IN or OR operators
run_v1_df = mlflow.search_runs(
    filter_string=f"run_id = '{eval_results_v1.run_id}'"
)
run_v2_df = mlflow.search_runs(
    filter_string=f"run_id = '{eval_results_v2.run_id}'"
)

# Extract metric columns (they end with /mean, not .aggregate_score)
# Skip the agent metrics (latency, token counts) for quality comparison
metric_cols = [col for col in run_v1_df.columns
               if col.startswith('metrics.') and col.endswith('/mean')
               and 'agent/' not in col]

# Create comparison table
comparison_data = []
for metric in metric_cols:
    metric_name = metric.replace('metrics.', '').replace('/mean', '')
    v1_score = run_v1_df[metric].iloc[0]
    v2_score = run_v2_df[metric].iloc[0]
    improvement = v2_score - v1_score

    comparison_data.append({
        'Metric': metric_name,
        'V1 Score': f"{v1_score:.3f}",
        'V2 Score': f"{v2_score:.3f}",
        'Improvement': f"{improvement:+.3f}",
        'Improved': '✓' if improvement >= 0 else '✗'
    })

comparison_df = pd.DataFrame(comparison_data)
print("\n=== Version Comparison Results ===")
print(comparison_df.to_string(index=False))

# Calculate overall improvement (only for quality metrics)
avg_v1 = run_v1_df[metric_cols].mean(axis=1).iloc[0]
avg_v2 = run_v2_df[metric_cols].mean(axis=1).iloc[0]
print(f"\nOverall average improvement: {(avg_v2 - avg_v1):+.3f} ({((avg_v2/avg_v1 - 1) * 100):+.1f}%)")
=== Version Comparison Results ===
                Metric V1 Score V2 Score Improvement Improved
                safety    1.000    1.000      +0.000        ✓
     professional_tone    1.000    1.000      +0.000        ✓
  follows_instructions    0.571    0.714      +0.143        ✓
   includes_next_steps    0.286    0.571      +0.286        ✓
 mentions_contact_name    1.000    1.000      +0.000        ✓
retrieval_groundedness    0.857    0.571      -0.286        ✗
 concise_communication    0.286    1.000      +0.714        ✓
    relevance_to_query    0.714    1.000      +0.286        ✓

Overall average improvement: +0.143 (+20.0%)
查找评估指标回归的特定示例,以便你可以专注于这些指标。
import pandas as pd
# Get detailed traces for both versions
traces_v1 = mlflow.search_traces(run_id=eval_results_v1.run_id)
traces_v2 = mlflow.search_traces(run_id=eval_results_v2.run_id)

# Create a merge key based on the input parameters
traces_v1['merge_key'] = traces_v1['request'].apply(
    lambda x: f"{x.get('customer_name', '')}|{x.get('user_instructions', '')}"
)
traces_v2['merge_key'] = traces_v2['request'].apply(
    lambda x: f"{x.get('customer_name', '')}|{x.get('user_instructions', '')}"
)

# Merge on the input data to compare same inputs
merged = traces_v1.merge(
    traces_v2,
    on='merge_key',
    suffixes=('_v1', '_v2')
)

print(f"Found {len(merged)} matching examples between v1 and v2")

# Find examples where specific metrics did NOT improve
regression_examples = []

for idx, row in merged.iterrows():
    v1_assessments = {a['assessment_name']: a for a in row['assessments_v1']}
    v2_assessments = {a['assessment_name']: a for a in row['assessments_v2']}

    # Check each judge for regressions
    for scorer_name in ['follows_instructions', 'concise_communication', 'includes_next_steps', 'retrieval_groundedness']:
        v1_assessment = v1_assessments.get(scorer_name)
        v2_assessment = v2_assessments.get(scorer_name)

        if v1_assessment and v2_assessment:
            v1_val = v1_assessment['feedback']['value']
            v2_val = v2_assessment['feedback']['value']

            # Check if metric got worse (yes -> no)
            if v1_val == 'yes' and v2_val == 'no':
                regression_examples.append({
                    'index': idx,
                    'customer': row['request_v1']['customer_name'],
                    'instructions': row['request_v1']['user_instructions'],
                    'metric': scorer_name,
                    'v1_score': v1_val,
                    'v2_score': v2_val,
                    'v1_rationale': v1_assessment['rationale'],
                    'v2_rationale': v2_assessment['rationale'],
                    'v1_response': row['response_v1']['email'],
                    'v2_response': row['response_v2']['email']
                })

# Display regression examples
if regression_examples:
    print(f"\n=== Found {len(regression_examples)} metric regressions ===\n")

    # Group by metric
    by_metric = {}
    for ex in regression_examples:
        metric = ex['metric']
        if metric not in by_metric:
            by_metric[metric] = []
        by_metric[metric].append(ex)

    # Show examples for each regressed metric
    for metric, examples in by_metric.items():
        print(f"\n{'='*80}")
        print(f"METRIC REGRESSION: {metric}")
        print(f"{'='*80}")

        # Show the first example for this metric
        ex = examples[0]
        print(f"\nCustomer: {ex['customer']}")
        print(f"Instructions: {ex['instructions']}")
        print(f"\nV1 Score: ✓ (passed)")
        print(f"V1 Rationale: {ex['v1_rationale']}")
        print(f"\nV2 Score: ✗ (failed)")
        print(f"V2 Rationale: {ex['v2_rationale']}")

        print(f"\n--- V1 Response ---")
        print(ex['v1_response'][:800] + "..." if len(ex['v1_response']) > 800 else ex['v1_response'])

        print(f"\n--- V2 Response ---")
        print(ex['v2_response'][:800] + "..." if len(ex['v2_response']) > 800 else ex['v2_response'])

        if len(examples) > 1:
            print(f"\n(+{len(examples)-1} more examples with {metric} regression)")
else:
    print("\n✓ No metric regressions found - V2 improved or maintained all metrics!")
Found 7 matching examples between v1 and v2

=== Found 2 metric regressions ===

================================================================================
METRIC REGRESSION: retrieval_groundedness
================================================================================

Customer: TechStart
Instructions: Check on support ticket status

V1 Score: ✓ (passed)
V1 Rationale: The response mentions a follow-up email regarding support ticket status, addressed to Bob, discussing three tickets (#456, #457, and #458) and their current status. The retrieved context confirms the existence of these tickets and their issues: Ticket #456 (login issues - critical), Ticket #457 (performance degradation), and Ticket #458 (CRM integration failure). The retrieved context also mentions that the initial sales call was last Thursday and that Mike Thompson is the account manager. All these details match the information provided in the response.

V2 Score: ✗ (failed)
V2 Rationale: The response mentions three support tickets: Ticket #456 (Login issues), Ticket #457 (Performance degradation), and Ticket #458 (CRM integration failure). The retrieved context confirms the existence of these tickets and their statuses: Ticket #456 is open and critical, Ticket #457 is reported, and Ticket #458 is failing with their CRM. The response also mentions that Mike Thompson will provide a detailed status update by the end of the day tomorrow, which is not directly supported by the retrieved context. Therefore, the part about Mike Thompson providing a detailed status update is not supported by the retrieved context.

--- V1 Response ---
# Follow-up Email: Support Ticket Status Update

Subject: Update on Your Support Tickets - Critical Issues Being Addressed

Dear Bob,

I hope you're doing well following our initial discussion last Thursday about pricing options.

I wanted to personally follow up regarding your open support tickets:

- Ticket #456 (Critical): Our technical team has prioritized your login issues and is working to resolve them urgently
- Ticket #457: The performance degradation investigation is in progress
- Ticket #458: Our integration specialists are addressing the CRM connection failures

Mike Thompson, your Account Manager, is closely monitoring these issues. We understand how critical these matters are to your operations.

Would you be available for a brief call tomorrow to discuss both the support prog...

--- V2 Response ---
# Subject: Update on Your Support Tickets

Hi Bob,

I'm following up on your open support tickets:

- Ticket #456 (Login issues): Currently marked as critical and open
- Ticket #457 (Performance degradation): Under investigation
- Ticket #458 (CRM integration failure): Being reviewed by our technical team

I'll contact our support team today and provide you with a detailed status update by end of day tomorrow.

Please let me know if you need any immediate assistance with these issues.

Best regards,
Mike Thompson

(+1 more examples with retrieval_groundedness regression)
步骤 9:继续迭代
根据评估结果,可以继续迭代以提高应用程序的质量并测试每个新修补程序。
示例笔记本
以下笔记本包括此页上的所有代码。
评估 GenAI 应用快速入门笔记本
后续步骤
- 生成评估数据集 - 为一致的评估运行准备数据
- 评估对话 - 使用专用评分者评估多轮次对话
- 对话模拟 - 生成合成对话,以测试代理在各种情境下的表现
- 创建自定义 LLM 法官 - 进一步自定义本指南中使用的 LLM 法官
- 使评审与人工反馈保持一致 - 将评审的准确性提高 30-50% 以符合团队的标准
- 创建自定义代码评分器 - 使用基于确定性的基于代码的评分器评估应用
- 设置生产监视 - 使用相同的记分器监视生产质量
- 跟踪应用和提示版本 - 使用 MLflow 跟踪应用程序和提示版本。
参考指南
-
评估工具 -
mlflow.genai.evaluate()的综合参考 - 评分者 - 深入了解评分者如何评估质量
- 评估数据集 - 了解版本化数据集,以确保测试的一致性