Note
Access to this page requires authorization. You can try signing in or changing directories.
Access to this page requires authorization. You can try changing directories.
Document translation is a cloud-based feature of the Azure Translator service that asynchronously translates whole documents in supported languages and various file formats. In this quickstart, learn to use Document translation with a programming language of your choice to translate a source document into a target language while preserving structure and text formatting.
The Document translation API supports two translation processes:
Asynchronous batch translation supports the processing of multiple documents and large files. The batch translation process requires an Azure Blob storage account with storage containers for your source and translated documents.
Synchronous single file supports the processing of single file translations. The file translation process doesn't require an Azure Blob storage account. The final response contains the translated document and is returned directly to the calling client.
Let's get started.
Prerequisites
You need an active Azure subscription. If you don't have an Azure subscription, you can create one for trial.
Once you have your Azure subscription, create an Azure Translator resource in the Azure portal.
Note
- For this quickstart, we recommend that you use an Azure Translator text single-service global resource unless your business or application requires a specific region. If you're planning on using a system-assigned managed identity for authentication, choose a geographic region like China North.
- With a single-service global resource, you include one authorization header (Ocp-Apim-Subscription-key) with the REST API request. The value for
Ocp-Apim-Subscription-keyis your Azure secret key for your Azure Translator Text subscription.
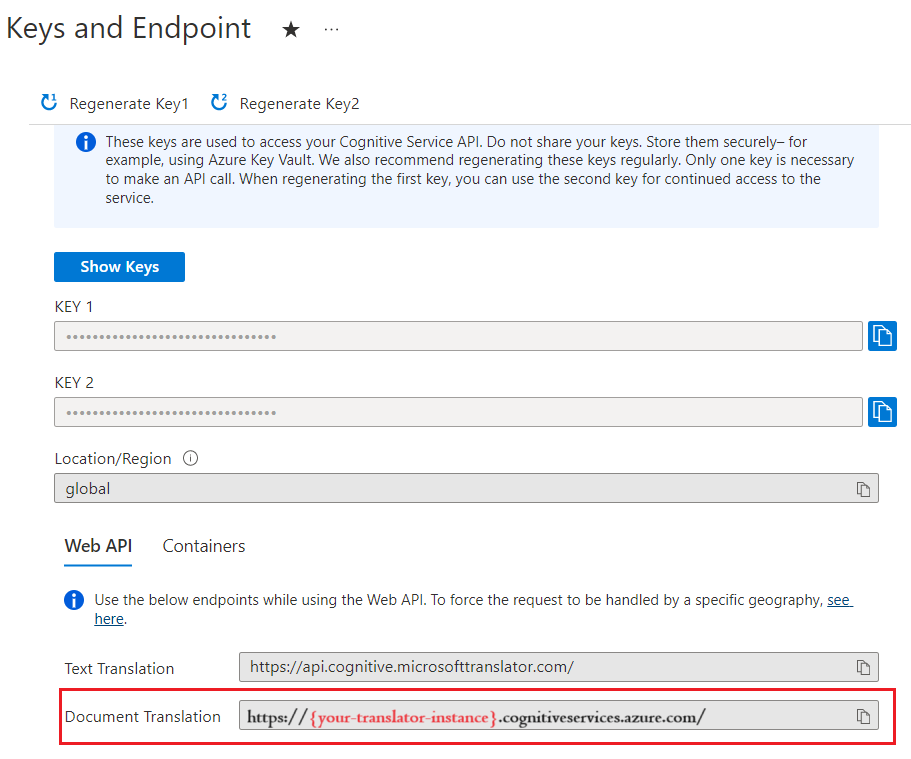
After your resource deploys, select Go to resource and retrieve your key and endpoint.
You need the key and endpoint from the resource to connect your application to the Azure Translator. You paste your key and endpoint into the code later in the quickstart. You can find these values on the Azure portal Keys and Endpoint page.
For this project, we use the cURL command-line tool to make REST API calls.
Note
The cURL package is preinstalled on most Windows 10 and Windows 11 and most macOS and Linux distributions. You can check the package version with the following commands: Windows:
curl.exe -VmacOScurl -VLinux:curl --version
Asynchronously translate documents (POST)
Using your preferred editor or IDE, create a new directory for your app named
document-translation.Create a new json file called document-translation.json in your document-translation directory.
Copy and paste the document translation request sample into your
document-translation.jsonfile. Replace{your-source-container-SAS-URL}and{your-target-container-SAS-URL}with values from your Azure portal Storage account containers instance.Request sample:
{
  "inputs":[
    {
      "source":{
        "sourceUrl":"{your-source-container-SAS-URL}"
      },
      "targets":[
        {
          "targetUrl":"{your-target-container-SAS-URL}",
          "language":"fr"
        }
      ]
    }
  ]
}
Storage container authorization
You can choose one of the following options to authorize access to your Azure Translator resource.
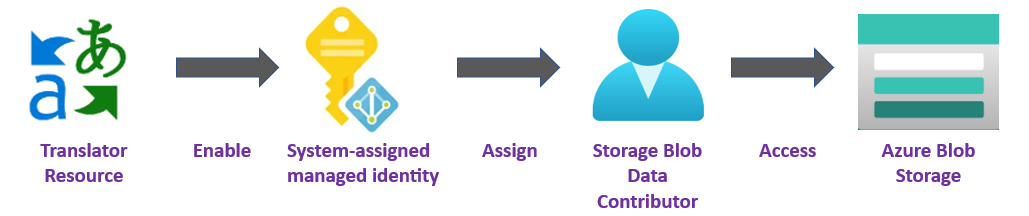
✔️ Managed Identity. A managed identity is a service principal that creates a Microsoft Entra identity and specific permissions for an Azure managed resource. Managed identities enable you to run your Azure Translator application without having to embed credentials in your code. Managed identities are a safer way to grant access to storage data and replace the requirement for you to include shared access signature tokens (SAS) with your source and target URLs.
To learn more, see Managed identities for Document translation.
✔️ Shared Access Signature (SAS). A shared access signature is a URL that grants restricted access for a specified period of time to your Translator. To use this method, you need to create Shared Access Signature (SAS) tokens for your source and target containers. The sourceUrl and targetUrl must include a Shared Access Signature (SAS) token, appended as a query string. The token can be assigned to your container or specific blobs.
- Your source container or blob must designate read and list access.
- Your target container or blob must designate write and list access.
To learn more, see Create SAS tokens.
Build and run the POST request
Before you run the POST request, replace {your-document-translator-endpoint} and {your-key} with the values from your Azure portal Azure Translator instance.
Important
Remember to remove the key from your code when you're done, and never post it publicly. For production, use a secure way of storing and accessing your credentials like Azure Key Vault. For more information, see Azure AI services security.
PowerShell
cmd /c curl "{document-translation-endpoint}/translator/document/batches?api-version={date}" -i -X POST --header "Content-Type: application/json" --header "Ocp-Apim-Subscription-Key: {your-key}" --data "@document-translation.json"
command prompt / terminal
curl "{document-translation-endpoint}/translator/document/batches?api-version={date}" -i -X POST --header "Content-Type: application/json" --header "Ocp-Apim-Subscription-Key: {your-key}" --data "@document-translation.json"
Upon successful completion:
- The translated documents can be found in your target container.
- The successful POST method returns a
202 Acceptedresponse code indicating that the service created the batch request. - The POST request also returns response headers including
Operation-Locationthat provides a value used in subsequent GET requests.
Synchronously translate a single document (POST)
To call the synchronous translation feature via the REST API, you need to include the following headers with each request. Don't worry, we include the headers for you in the sample code.
Note
All cURL flags and command line options are case-sensitive.
| Query parameter | Description | Condition |
|---|---|---|
-X or --request POST |
The -X flag specifies the request method to access the API. | Required |
{endpoint} |
The URL for your Document translation resource endpoint | Required |
targetLanguage |
Specifies the language of the output document. The target language must be one of the supported languages included in the translation scope. | Required |
sourceLanguage |
Specifies the language of the input document. If the sourceLanguage parameter isn't specified, automatic language detection is applied to determine the source language. |
Optional |
-H or --header "Ocp-Apim-Subscription-Key:{KEY} |
Request header that specifies the Document translation resource key authorizing access to the API. | Required |
-F or --form |
The filepath to the document that you want to include with your request. Only one source document is allowed. | Required |
• document=• type={contentType}/fileExtension |
• Path to the file location for your source document. • Content type and file extension. Ex: "document=@C:\Test\test-file.md;type=text/markdown |
Required |
-o or --output |
The filepath to the response results. | Required |
-F or --form |
The filepath to an optional glossary to include with your request. The glossary requires a separate --form flag. |
Optional |
• glossary=• type={contentType}/fileExtension |
• Path to the file location for your optional glossary file. • Content type and file extension. Ex: "glossary=@C:\Test\glossary-file.txt;type=text/plain |
Optional |
✔️ For more information on contentType, see Supported document formats.
Build and run the synchronous POST request
For this project, you need a sample document. You can download our Microsoft Word sample document for this quickstart. The source language is English.
Before you run the POST request, replace
{your-document-translation-endpoint}and{your-key}with the values from your Azure portal Azure Translator instance.Important
Remember to remove the key from your code when you're done, and never post it publicly. For production, use a secure way of storing and accessing your credentials like Azure Key Vault. For more information, see Azure AI services security.
command prompt / terminal
curl -i -X POST "{document-translation-endpoint}/translator/document:translate?targetLanguage={target_language}&api-version={date}" -H "Ocp-Apim-Subscription-Key:{your-key}" -F "document={path-to-your-document-with-file-extension};type={ContentType}/{file-extension}" -F "glossary={path-to-your-glossary-with-file-extension};type={ContentType}/{file-extension}" -o "{path-to-output-file}"PowerShell
cmd /c curl "{document-translation-endpoint}/translator/document:translate?targetLanguage={target_language}&api-version={date}" -i -X POST -H "Ocp-Apim-Subscription-Key: {your-key}" -F "{path-to-your-document-with-file-extension};type=text/{file-extension}" -o "{path-to-output-file}✔️ For more information on
Query parameters, see synchronous document translation.
Upon successful completion:
- The translated document is returned with the response.
- The successful POST method returns a
200 OKresponse code indicating that the service created the request.
That's it, congratulations! You just learned to translate documents using the Azure Translator.