Note
Access to this page requires authorization. You can try signing in or changing directories.
Access to this page requires authorization. You can try changing directories.
It's common to use pipelines to build and deploy images on Azure Kubernetes Service (AKS) clusters. While great for image creation, this process often doesn't account for the stale images left behind and can lead to image bloat on cluster nodes. These images might contain vulnerabilities, which might create security issues. To remove security risks in your clusters, you can clean these unreferenced images. Manually cleaning images can be time intensive. Image Cleaner performs automatic image identification and removal, which mitigates the risk of stale images and reduces the time required to clean them up.
Note
Image Cleaner is a feature based on Eraser. On AKS, the feature name and property name is Image Cleaner, while the relevant Image Cleaner pods' names contain Eraser.
Prerequisites
- An Azure subscription. If you don't have an Azure subscription, you can create a Trial.
- For AKS Standard configuration via Azure CLI, Azure CLI version 2.49.0 or later. Run
az --versionto find your version. If you need to install or upgrade, see Install Azure CLI.
Limitations
Image Cleaner doesn't yet support Windows node pools or AKS virtual nodes.
How Image Cleaner works
When you activate Image Cleaner on your cluster, it deploys a controller manager pod named eraser-controller-manager.
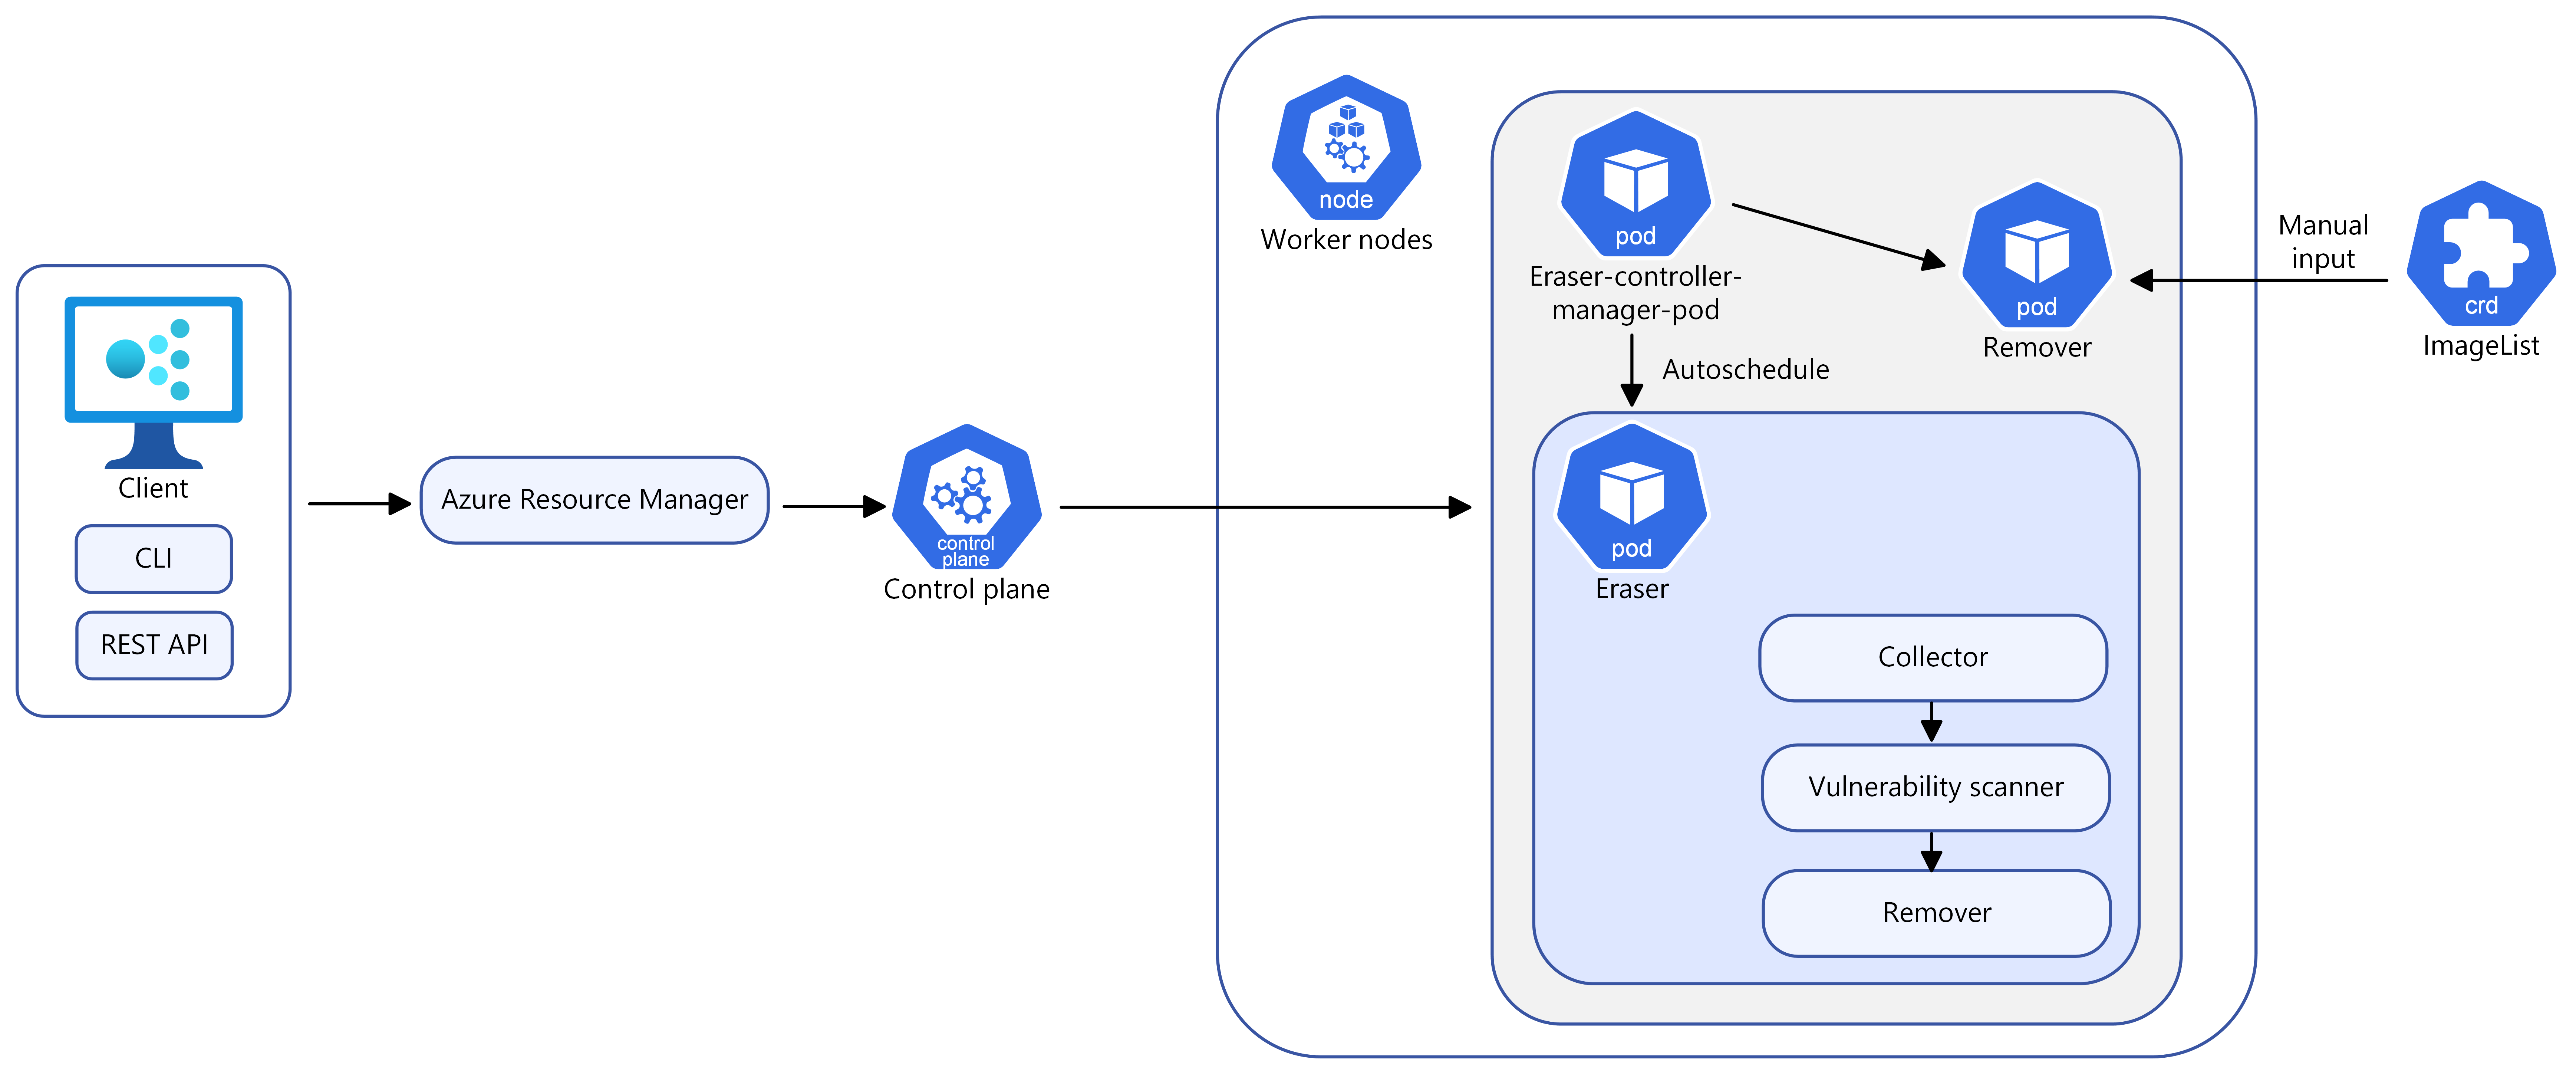
Image Cleaner supports automatic and manual cleanup modes.
Configuration options for AKS Standard
Use these options when configuring Image Cleaner on AKS Standard with Azure CLI.
| Name | Description | Required |
|---|---|---|
--enable-image-cleaner |
Enable Image Cleaner for an AKS cluster | Yes, unless you specify disable |
--disable-image-cleaner |
Disable Image Cleaner for an AKS cluster | Yes, unless you specify enable |
--image-cleaner-interval-hours |
Interval in hours for scheduled runs. Azure CLI default is one week. Minimum is 24 hours. Maximum is three months. | Not required for Azure CLI; required for ARM template or other clients |
Note
If you disable Image Cleaner and later reenable it without explicitly passing configuration, the previous configuration value is reused.
Automatic mode
When you deploy eraser-controller-manager, Image Cleaner automatically performs these actions:
- Starts cleanup and creates
eraser-aks-xxxxxworker pods for each node. - Uses a collector container to collect unused images.
- Uses a trivy-scanner container to scan vulnerabilities with trivy.
- Uses a remover container to remove unused images with vulnerabilities.
- Deletes the worker pod after completion.
- Schedules the next cleanup according to
--image-cleaner-interval-hours.
Manual mode
You can manually trigger the cleanup by defining a CRD object,ImageList. This triggers the eraser-contoller-manager to create eraser-aks-xxxxx worker pods for each node and complete the manual removal process.
Note
After disabling Image Cleaner, the old configuration still exists. This means if you enable the feature again without explicitly passing configuration, the existing value is used instead of the default.
Use Image Cleaner on AKS Standard
AKS Standard: enable on a new cluster
Enable Image Cleaner on a new AKS Standard cluster using the az aks create command with the --enable-image-cleaner parameter.
az aks create \
    --resource-group myResourceGroup \
    --name myManagedCluster \
    --enable-image-cleaner \
    --generate-ssh-keys
AKS Standard: enable on an existing cluster
Enable Image Cleaner on an existing AKS Standard cluster using the az aks update command.
az aks update \
  --resource-group myResourceGroup \
  --name myManagedCluster \
  --enable-image-cleaner
AKS Standard: update interval on a new or existing cluster
Update the Image Cleaner interval on a new or existing AKS Standard cluster using the --image-cleaner-interval-hours parameter.
# Create a new cluster with specifying the interval
az aks create \
    --resource-group myResourceGroup \
    --name myManagedCluster \
    --enable-image-cleaner \
    --image-cleaner-interval-hours 48 \
    --generate-ssh-keys

# Update the interval on an existing cluster
az aks update \
    --resource-group myResourceGroup \
    --name myManagedCluster \
    --enable-image-cleaner \
    --image-cleaner-interval-hours 48
Manually remove images using Image Cleaner
Important
The name must be set to imagelist.
Manually remove an image using the following kubectl apply command. This example removes the docker.io/library/alpine:3.7.3 image if it's unused.
cat <<EOF | kubectl apply -f -
apiVersion: eraser.sh/v1
kind: ImageList
metadata:
  name: imagelist
spec:
  images:
    - docker.io/library/alpine:3.7.3
EOF
The manual cleanup is a one-time operation and is only triggered when a new imagelist is created or changes are made to the existing imagelist. After the image is deleted, the imagelist won't be deleted automatically.
If you need to trigger another manual cleanup, you have to create a new imagelist or make changes to an existing one. If you want to remove the same image again, you need to create a new imagelist.
Delete an existing ImageList and create a new one
Delete the old
imagelistusing thekubectl deletecommand.kubectl delete ImageList imagelistCreate a new
imagelistwith the same image name. The following example uses the same image as the previous example.cat <<EOF | kubectl apply -f - apiVersion: eraser.sh/v1 kind: ImageList metadata: name: imagelist spec: images: - docker.io/library/alpine:3.7.3 EOF
Modify an existing ImageList
Modify the existing imagelist using the kubectl edit command.
kubectl edit ImageList imagelist

# Add a new image to the list
apiVersion: eraser.sh/v1
kind: ImageList
metadata:
  name: imagelist
spec:
  images:
      docker.io/library/python:alpine3.18
When using manual mode, the eraser-aks-xxxxx pod deletes within 10 minutes after work completion.
Image exclusion list
Images specified in the exclusion list aren't removed from the cluster. Image Cleaner supports system and user-defined exclusion lists. It's not supported to edit the system exclusion list.
Check the system exclusion list
Check the system exclusion list using the following kubectl get command.
kubectl get -n kube-system configmap eraser-system-exclusion -o yaml
Create a user-defined exclusion list
Create a sample JSON file to contain excluded images.
cat > sample.json <<EOF
{"excluded": ["excluded-image-name"]}
EOF
Create a
configmapusing the sample JSON file using the followingkubectl createandkubectl labelcommand.kubectl create configmap excluded --from-file=sample.json --namespace=kube-system kubectl label configmap excluded eraser.sh/exclude.list=true -n kube-system
Disable Image Cleaner on AKS Standard
Disable Image Cleaner on an AKS Standard cluster using the az aks update command with the --disable-image-cleaner parameter.
az aks update \
  --resource-group myResourceGroup \
  --name myManagedCluster \
  --disable-image-cleaner
Frequently asked questions (FAQs)
How can I check which version Image Cleaner is using?
kubectl describe configmap -n kube-system eraser-manager-config | grep tag -C 3
Does Image Cleaner support other vulnerability scanners besides trivy-scanner?
No.
Can I specify vulnerability levels for images to clean?
No. The default settings for vulnerability levels include:
LOW,MEDIUM,HIGH, andCRITICAL
You can't customize the default settings.
How to review images were cleaned up by Image Cleaner?
Image logs are stored in the eraser-aks-xxxxx worker pod. When eraser-aks-xxxxx is alive, you can run the following commands to view deletion logs:
kubectl logs -n kube-system <worker-pod-name> -c collector
kubectl logs -n kube-system <worker-pod-name> -c trivy-scanner
kubectl logs -n kube-system <worker-pod-name> -c remover
The eraser-aks-xxxxx pod deletes within 10 minutes after work completion. You can follow these steps to enable the Azure Monitor add-on and use the Container Insights pod log table. After that, historical logs will be stored and you can review them even eraser-aks-xxxxx is deleted.
Ensure Azure Monitor is enabled on your cluster. For detailed steps, see Enable Container Insights on AKS clusters.
By default, logs for the containers running in the
kube-systemnamespace aren't collected. Remove thekube-systemnamespace fromexclude_namespacesin the config map and apply the config map to enable collection of these logs. See Configure Container insights data collection for details.Get the Log Analytics resource ID using the
az aks showcommand.az aks show --resource-group myResourceGroup --name myManagedClusterAfter a few minutes, the command returns JSON-formatted information about the solution, including the workspace resource ID:
"addonProfiles": {
  "omsagent": {
    "config": {
      "logAnalyticsWorkspaceResourceID": "/subscriptions/<WorkspaceSubscription>/resourceGroups/<DefaultWorkspaceRG>/providers/Microsoft.OperationalInsights/workspaces/<defaultWorkspaceName>"
    },
    "enabled": true
  }
}
In the Azure portal, search for the workspace resource ID, and then select Logs.
Copy one of the following queries and paste it into the query window.
Use the following query if your cluster is using the ContainerLogV2 schema. If you're still using
ContainerLog, upgrade to ContainerLogV2.ContainerLogV2 | where PodName startswith "eraser-aks-" and PodNamespace == "kube-system" | project TimeGenerated, PodName, LogMessage, LogSourceIf you want to continue using
ContainerLog, use the following query instead:let startTimestamp = ago(1h); KubePodInventory | where TimeGenerated > startTimestamp | project ContainerID, PodName=Name, Namespace | where PodName startswith "eraser-aks-" and Namespace == "kube-system" | distinct ContainerID, PodName | join ( ContainerLog | where TimeGenerated > startTimestamp ) on ContainerID // at this point before the next pipe, columns from both tables are available to be "projected". Due to both // tables having a "Name" column, we assign an alias as PodName to one column which we actually want | project TimeGenerated, PodName, LogEntry, LogEntrySource | summarize by TimeGenerated, LogEntry | order by TimeGenerated desc ```
Select Run. Any deleted image logs appear in the Results area.