Note
Access to this page requires authorization. You can try signing in or changing directories.
Access to this page requires authorization. You can try changing directories.
This tutorial shows you how to use Azure Functions to connect to resources in an Azure virtual network by using private endpoints. You create a new function app using a new storage account that's locked behind a virtual network by using the Azure portal. The virtual network uses a Service Bus queue trigger.
In this tutorial, you'll:
- Create a function app in the Elastic Premium plan with virtual network integration and private endpoints.
- Create Azure resources, such as the Service Bus
- Lock down your Service Bus behind a private endpoint.
- Deploy a function app that uses both the Service Bus and HTTP triggers.
- Test to see that your function app is secure inside the virtual network.
- Clean up resources.
Create a function app in a Premium plan
You create a C# function app in an Elastic Premium plan, which supports networking capabilities such as virtual network integration on create along with serverless scale. This tutorial uses C# and Windows. Other languages and Linux are also supported.
On the Azure portal menu or the Home page, select Create a resource.
On the New page, select Web > Function App.
On the hosting options page, select Functions Premium.
On the Basics page, use the following table to configure the function app settings.
Setting Suggested value Description Subscription Your subscription Subscription under which this new function app is created. Resource Group myResourceGroup Name for the new resource group where you create your function app. Function App name Globally unique name Name that identifies your new function app. Valid characters are a-z(case insensitive),0-9, and-.Publish Code Choose to publish code files or a Docker container. Runtime stack .NET This tutorial uses .NET. Version 8 (LTS), Isolated worker model This tutorial uses .NET 8.0 running in the isolated worker model. Region Preferred region Choose a region near you or near other services that your functions access. Operating system Windows This tutorial uses Windows but also works for Linux. Plan Functions Premium Hosting plan that defines how resources are allocated to your function app. By default, when you select Premium, a new App Service plan is created. The default Sku and size is EP1, where EP stands for elastic premium. For more information, see the list of Premium SKUs.
When you run JavaScript functions on a Premium plan, choose an instance that has fewer vCPUs. For more information, see Choose single-core Premium plans.On the Storage page, enter the following settings.
Setting Suggested value Description Storage account Globally unique name Create a storage account used by your function app. Storage account names must be between 3 and 24 characters long. They might contain numbers and lowercase letters only. You can also use an existing account that isn't restricted by firewall rules and meets the storage account requirements. When you use Functions with a locked down storage account, you need a v2 storage account. This version is the default storage version created when creating a function app with networking capabilities through the Azure portal. On the Networking page, enter the following settings.
Note
Some of these settings aren't visible until other options are selected.
Setting Suggested value Description Enable public access Off Deny public network access blocks all incoming traffic except that comes from private endpoints. Enable network injection On The ability to configure your application with virtual network integration at creation appears in the portal window after this option is switched to On. Virtual Network Create New Select the Create New field. In the pop-out screen, provide a name for your virtual network and select Ok. Options to restrict inbound and outbound access to your function app on create are displayed. You must explicitly enable virtual network integration in the Outbound access portion of the window to restrict outbound access. Enter the following settings for the Inbound access section. This step creates a private endpoint on your function app.
Tip
To continue interacting with your function app from the Azure portal, you need to add your local computer to the virtual network. If you don't wish to restrict inbound access, skip this step.
Setting Suggested value Description Enable private endpoints On The ability to configure your application with virtual network integration at creation appears in the portal after this option is enabled. Private endpoint name myInboundPrivateEndpointName Name that identifies your new function app private endpoint. Inbound subnet Create New This option creates a new subnet for your inbound private endpoint. Multiple private endpoints might be added to a singular subnet. Provide a Subnet Name. The Subnet Address Block might be left at the default value. Select Ok. To learn more about subnet sizing, see Subnets. DNS Azure Private DNS Zone This value indicates which DNS server your private endpoint uses. In most cases if you're working within Azure, Azure Private DNS Zone is the DNS zone you should use as using Manual for custom DNS zones have increased complexity. Enter the following settings for the Outbound access section. This step integrates your function app with a virtual network on creation. It also exposes options to create private endpoints on your storage account and restrict your storage account from network access on create. When function app is virtual network integrated, all outbound traffic by default goes through the virtual network.
Setting Suggested value Description Enable VNet Integration On This setting integrates your function app with a virtual network on create and direct all outbound traffic through the virtual network. Outbound subnet Create new This setting creates a new subnet for your function app's virtual network integration. A function app can only be virtual network integrated with an empty subnet. Provide a Subnet Name. The Subnet Address Block might be left at the default value. Select Ok. The option to create Storage private endpoints is displayed. To use your function app with virtual networks, you need to join it to a subnet. Enter the following settings for the Storage private endpoint section. This step creates private endpoints for the blob, queue, file, and table endpoints on your storage account on create. This approach effectively integrates your storage account with the virtual network.
Setting Suggested value Description Add storage private endpoint On The ability to configure your application with virtual network integration at creation is displayed in the portal after this option is enabled. Private endpoint name myInboundPrivateEndpointName Name that identifies your storage account private endpoint. Private endpoint subnet Create New This setting creates a new subnet for your inbound private endpoint on the storage account. Multiple private endpoints might be added to a singular subnet. Provide a Subnet Name. The Subnet Address Block might be left at the default value. Select Ok. DNS Azure Private DNS Zone This value indicates which DNS server your private endpoint uses. In most cases if you're working within Azure, Azure Private DNS Zone is the DNS zone you should use as using Manual for custom DNS zones will have increased complexity. On the Monitoring page, enter the following settings.
Setting Suggested value Description Application Insights Default Create an Application Insights resource of the same app name in the nearest supported region. Expand this setting if you need to change the New resource name or store your data in a different Location in an Azure geography. On the Advanced page, enable the following setting.
Setting Suggested value Description System assigned identity On Enables a system-assigned managed identity for the function app, which you use later to connect to Service Bus without connection strings. Select Review + create to review the app configuration selections.
On the Review + create page, review your settings. Then select Create to create and deploy the function app.
In the upper-right corner of the portal, select the Notifications icon and watch for the Deployment succeeded message.
Select Go to resource to view your new function app. You can also select Pin to dashboard. Pinning makes it easier to return to this function app resource from your dashboard.
Keep these considerations in mind when creating and deploying your app:
When you create a Premium plan function app in the portal with a storage account that uses private endpoints, the portal automatically sets the
vnetContentShareEnabledsite property totrue. This property ensures that traffic to the Azure Files content share, used to scale-out a Premium plan app, is routed through the virtual network. For more information, see the vnetContentShareEnabled site property reference. For automated deployments, you must explicitly set this site property in your deployment template. For more information, see Secured deployments.Some deployments might occasionally fail to create the private endpoints in the storage account with the error
StorageAccountOperationInProgress. This failure occurs even though the function app itself gets created successfully. When you encounter such an error, delete the function app and retry the operation. You can instead create the private endpoints on the storage account manually.
Create a Service Bus
Next, you create a Service Bus instance that is used to test the functionality of your function app's network capabilities in this tutorial.
On the Azure portal menu or the Home page, select Create a resource.
On the New page, search for Service Bus. Then select Create.
On the Basics tab, use the following table to configure the Service Bus settings. All other settings can use the default values.
Setting Suggested value Description Subscription Your subscription The subscription in which your resources are created. Resource group myResourceGroup The resource group you created with your function app. Namespace name myServiceBus The name of the Service Bus instance for which the private endpoint is enabled. Location myFunctionRegion The region where you created your function app. Pricing tier Premium Choose this tier to use private endpoints with Azure Service Bus. Select Review + create. After validation finishes, select Create.
Lock down your Service Bus
Create the private endpoint to lock down your Service Bus:
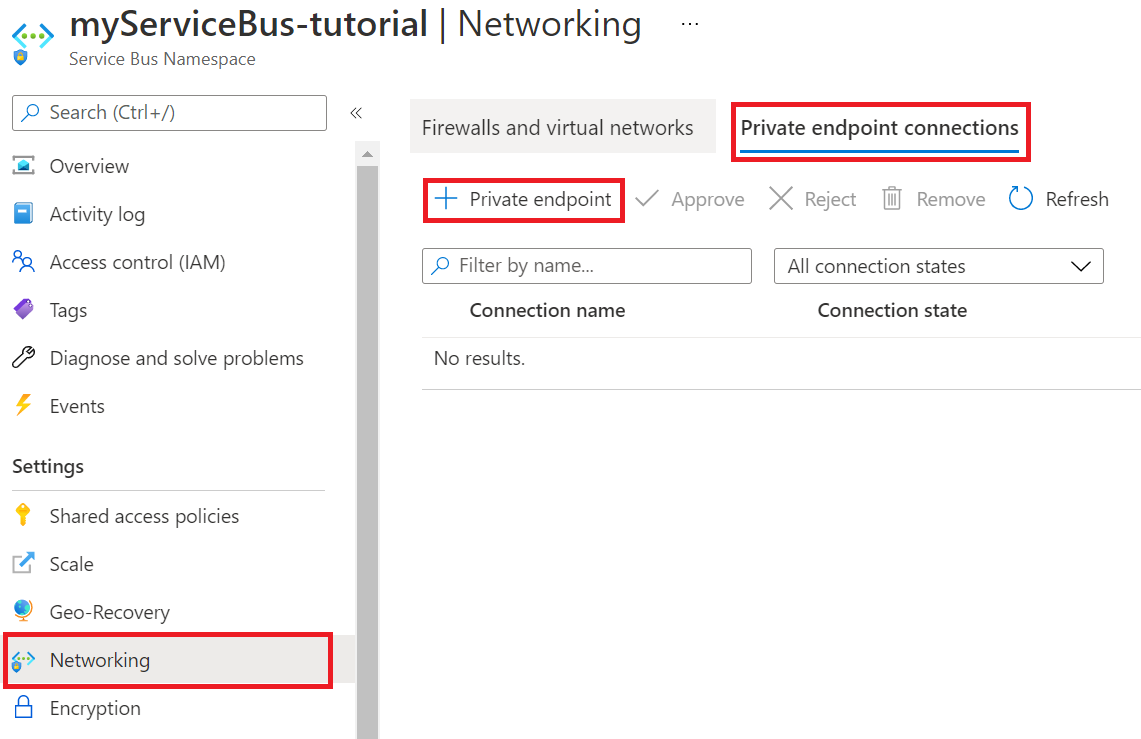
In your new Service Bus, in the menu under Settings, select Networking.
On the Private endpoint connections tab, select Private endpoint.
On the Basics tab, use the private endpoint settings shown in the following table.
Setting Suggested value Description Subscription Your subscription The subscription in which your resources are created. Resource group myResourceGroup The resource group you created with your function app. Name sb-endpoint The name of the private endpoint for the service bus. Region myFunctionRegion The region where you created your storage account. On the Resource tab, use the private endpoint settings shown in the following table.
Setting Suggested value Description Subscription Your subscription The subscription under which your resources are created. Resource type Microsoft.ServiceBus/namespaces The resource type for the Service Bus. Resource myServiceBus The Service Bus you created earlier in the tutorial. Target subresource namespace The private endpoint that is used for the namespace from the Service Bus. On the Virtual Network tab, for the Subnet setting, choose the inbound subnet you created.
Leave DNS and Tags as default, and then select Review + create. After validation finishes, select Create.
After the private endpoint is created, return to the Networking section of your Service Bus namespace and check the Public Access tab.
Ensure Selected networks is selected.
Select + Add existing virtual network to add the recently created virtual network.
On the Add networks tab, use the network settings from the following table:
Setting Suggested value Description Subscription Your subscription The subscription under which your resources are created. Virtual networks myVirtualNet The name of the virtual network to which your function app connects. Subnets functions The name of the subnet to which your function app connects. Select Add your client IP address to give your current client IP access to the namespace.
Note
Allowing your client IP address is necessary to enable the Azure portal to publish messages to the queue later in this tutorial.
Select Enable to enable the service endpoint.
Select Add to add the selected virtual network and subnet to the firewall rules for the Service Bus.
Select Save to save the updated firewall rules.
Resources in the virtual network can now communicate with the Service Bus using the private endpoint.
Create a queue
Create the queue where your Azure Functions Service Bus trigger gets events:
In your Service Bus, in the menu under Entities, select Queues.
Select Queue. For the purposes of this tutorial, provide the name queue as the name of the new queue.
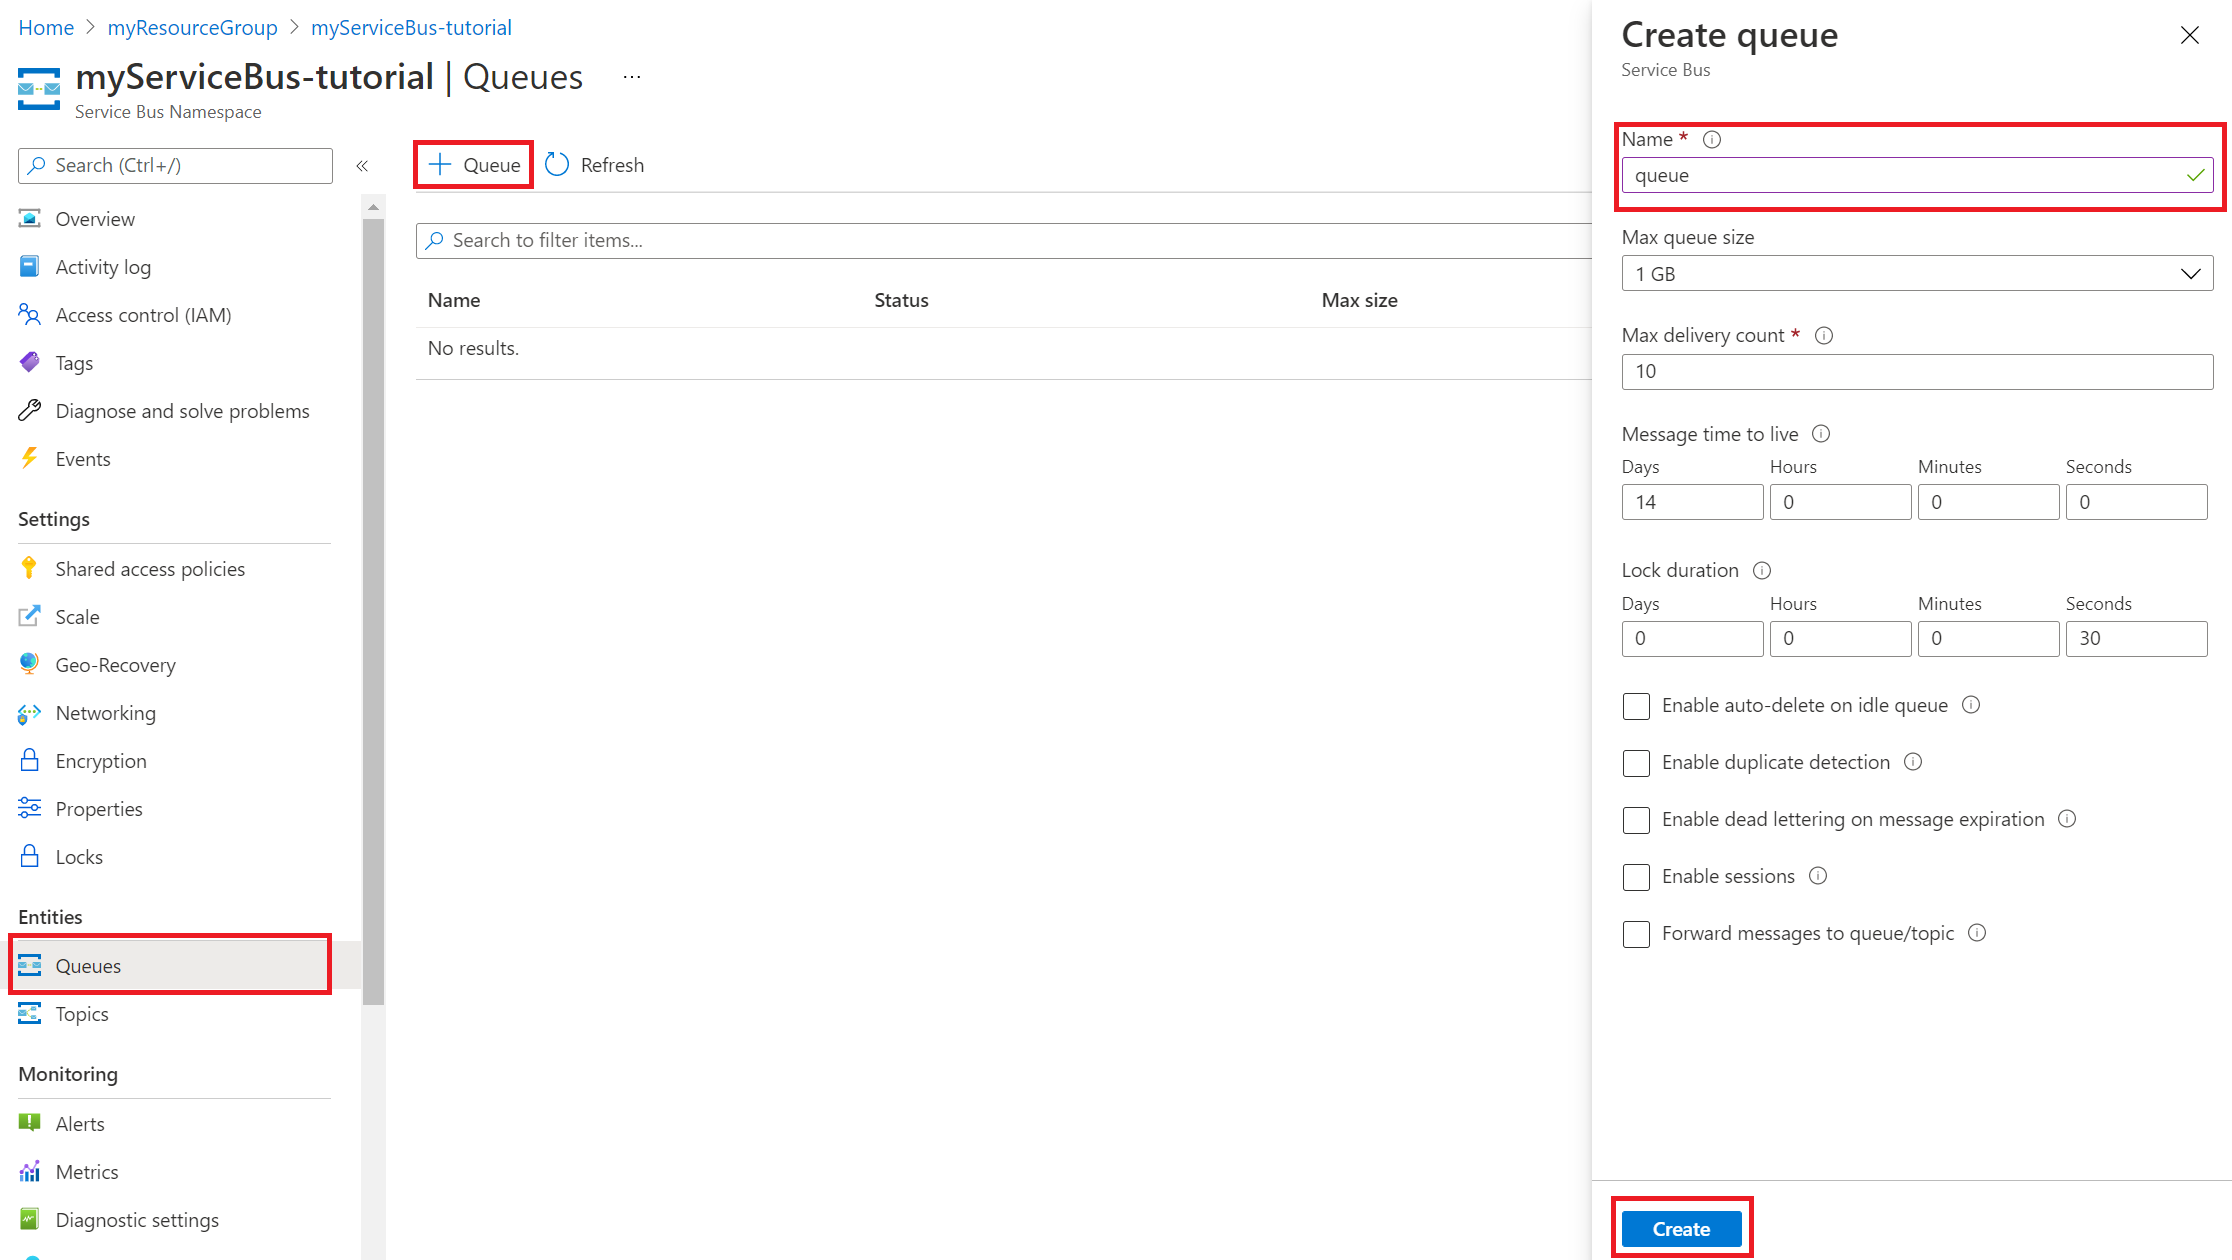
Select Create.
Grant your function app access to Service Bus
Since you enabled a system-assigned managed identity during app creation, you can now use role-based access control (RBAC) to grant the function app access to your Service Bus.
In your Service Bus namespace, select Access control (IAM).
Select Add > Add role assignment.
Search for Azure Service Bus Data Receiver, select the role, and then select Next.
On the Members tab, for Assign access to, select Managed identity.
Select + Select members, find and select the managed identity for your function app, and then select Select.
Select Review + assign to complete the role assignment.
For more information about identity-based connections, see Identity-based connections in the Service Bus binding reference article.
Configure your function app settings
In your function app, in the menu under Settings, select Environment variables.
To connect your function app to the Service Bus using managed identity, you need to add a Service Bus namespace setting. Select + Add to create a new setting named SERVICEBUS_CONNECTION__fullyQualifiedNamespace with a value of <SERVICE_BUS_NAMESPACE>.servicebus.chinacloudapi.cn, replacing <SERVICE_BUS_NAMESPACE> with the name of your Service Bus namespace. When you finish, select Apply.
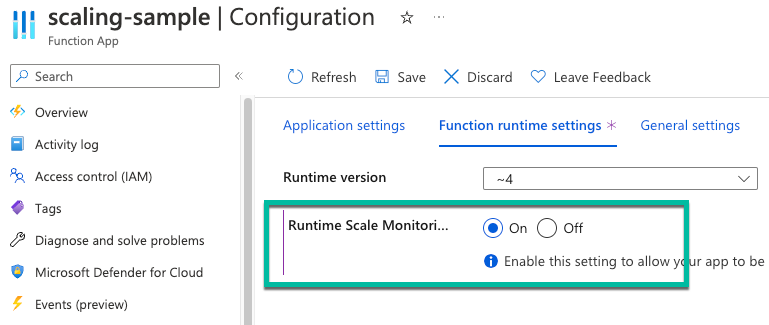
Since you're using an Elastic Premium hosting plan, In the Environment variables view, select the App settings tab. Verify that the FUNCTIONS_WORKER_RUNTIME setting has a value of dotnet-isolated. Then select the Function runtime settings tab. Set Runtime Scale Monitoring to On. Then select Apply. Runtime-driven scaling allows you to connect non-HTTP trigger functions to services that run inside your virtual network.
Note
Runtime scaling isn't needed for function apps hosted in a Dedicated App Service plan.
Deploy a Service Bus trigger and HTTP trigger
Important
Because public access is disabled, the SCM deployment site isn't reachable. You must temporarily re-enable public access so that Deployment Center can deploy your code. For production workloads, deploy from a self-hosted agent deployed into a subnet on the virtual network, or connect your development machine by using a point-to-site VPN. For more information, see Secured virtual networks.
In your function app, in the menu under Settings, select Networking. Set Public network access to Enabled from select virtual networks and IP addresses, and then select Save.
In GitHub, go to the following sample repository. It contains a function app and two functions, an HTTP trigger, and a Service Bus queue trigger.
At the top of the page, select Fork to create a fork of this repository in your own GitHub account or organization.
In your function app, in the menu under Deployment, select Deployment Center. Then select Settings.
On the Settings tab, use the deployment settings shown in the following table.
Setting Suggested value Description Source GitHub You should have created a GitHub repository for the sample code in step 2. Organization myOrganization The organization your repo is checked into. It's usually your account. Repository functions-vnet-tutorial The repository forked from here. Branch main The main branch of the repository you created. Runtime stack .NET The sample code is in C#. Version .NET 8 Isolated The runtime version. Select Save.

Your initial deployment might take a few minutes. When your app is successfully deployed, on the Logs tab, you see a Success (Active) status message. If necessary, refresh the page.
Now that deployment is complete, re-secure your app. In your function app, go to Settings > Networking and set Public network access back to Disabled. Select Save.
Congratulations! You successfully deployed your sample function app.
Test your locked-down function app
Because the function app has public access disabled, you can't invoke the HTTP trigger endpoint from the public internet. Instead, you verify the Service Bus queue trigger by sending a message and monitoring the function execution in Application Insights.
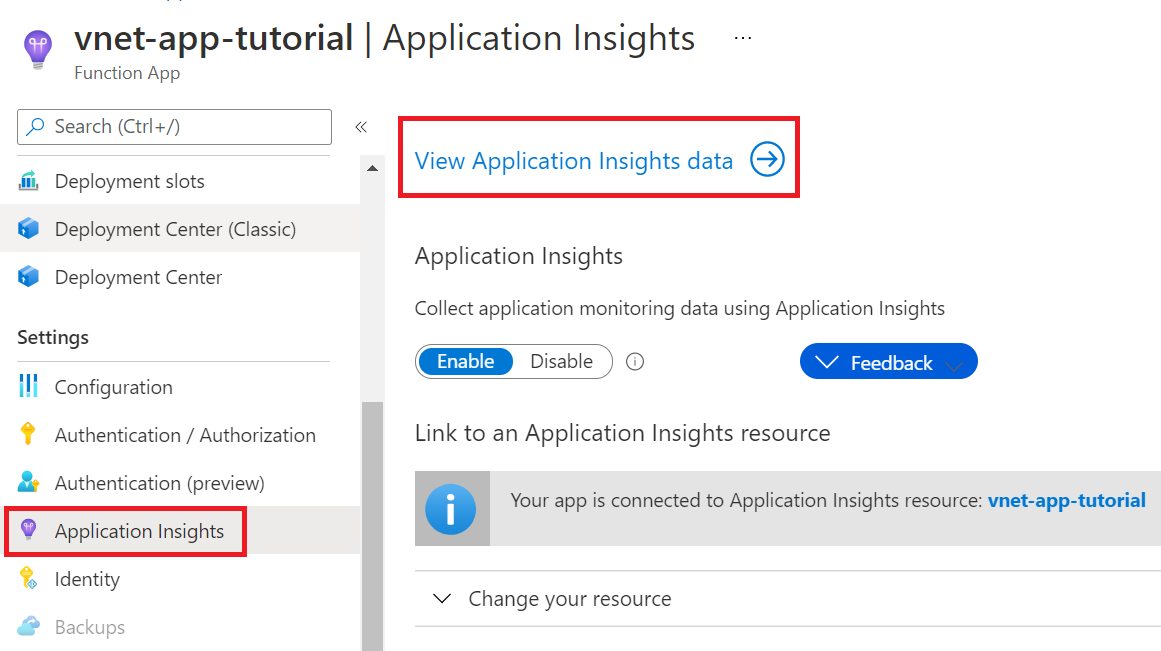
In your function app, in the menu under Monitoring, select Application Insights. Choose Apply, and then select View Application Insights data.
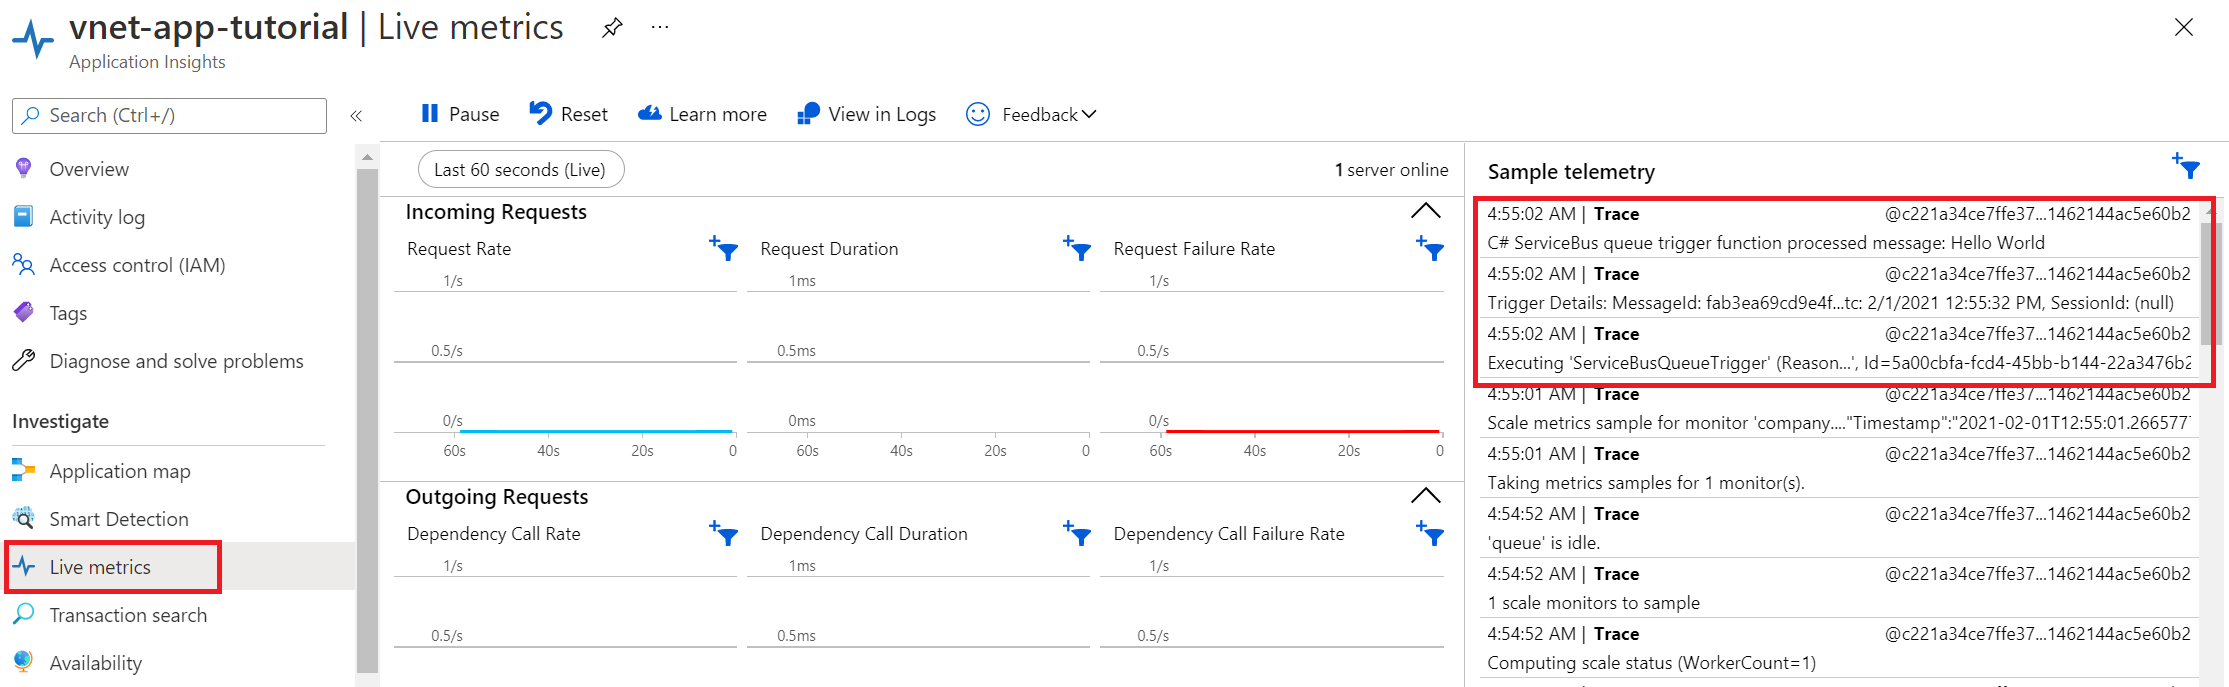
In the menu under Investigate, select Live metrics.
Open a new tab. In your Service Bus, in the menu under Entities, select Queues.
Select your queue.
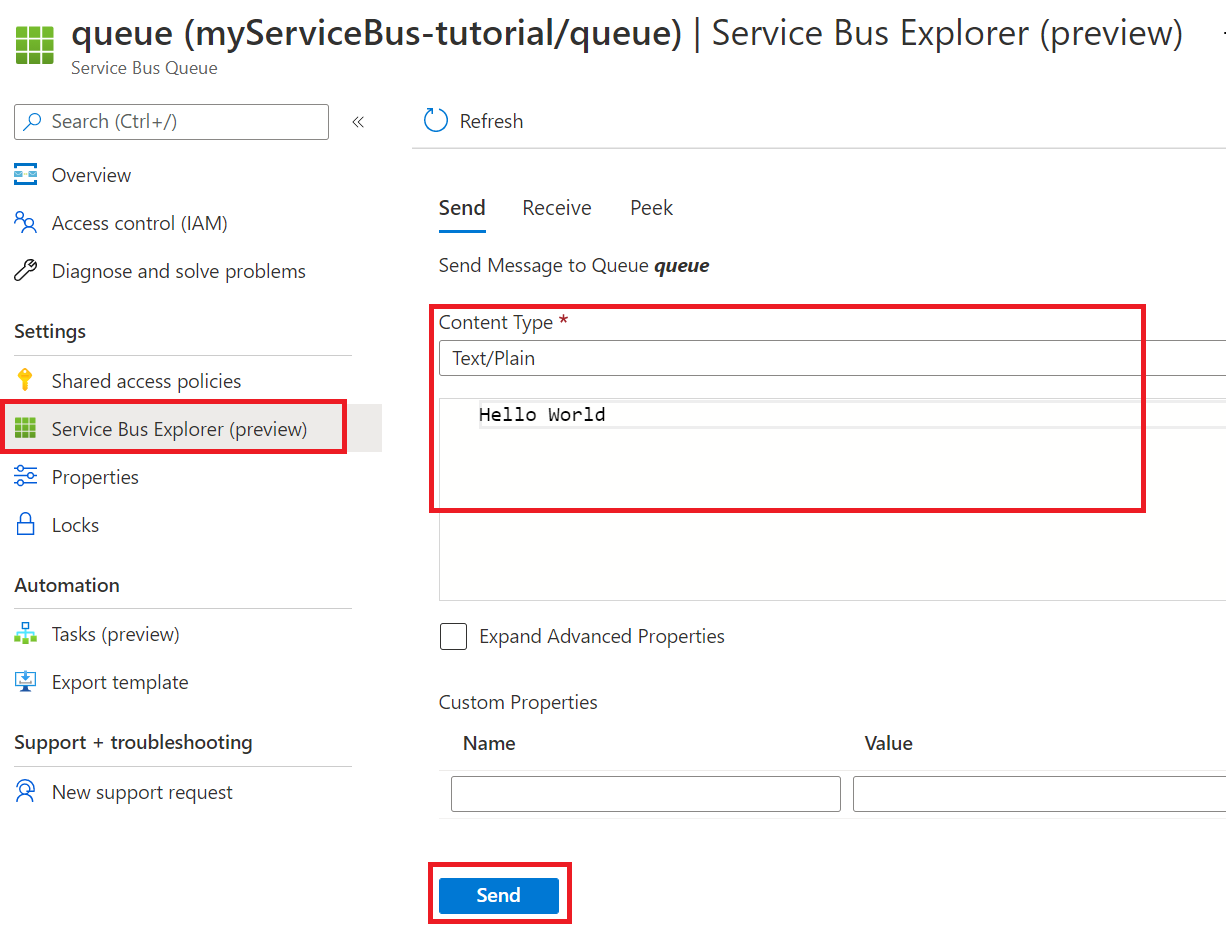
In the menu, select Service Bus Explorer. Select Send messages, and for Content Type choose Text/Plain. Then enter a message.
Select Send to send the message.
On the Live metrics tab, you should see that your Service Bus queue trigger fired. If it hasn't, resend the message from Service Bus Explorer.
Congratulations! You successfully tested your function app setup with private endpoints.
Understand private DNS zones
You used a private endpoint to connect to Azure resources. You're connecting to a private IP address instead of the public endpoint. Existing Azure services are configured to use an existing DNS to connect to the public endpoint. You must override the DNS configuration to connect to the private endpoint.
A private DNS zone is created for each Azure resource that was configured with a private endpoint. A DNS record is created for each private IP address associated with the private endpoint.
The following DNS zones were created in this tutorial:
- privatelink.file.core.chinacloudapi.cn
- privatelink.blob.core.chinacloudapi.cn
- privatelink.servicebus.chinacloudapi.cn
- privatelink.chinacloudsites.cn
Clean up resources
In the preceding steps, you created Azure resources in a resource group. If you don't expect to need these resources in the future, you can delete them by deleting the resource group.
From the Azure portal menu or Home page, select Resource groups. Then, on the Resource groups page, select myResourceGroup.
On the myResourceGroup page, make sure that the listed resources are the ones you want to delete.
Select Delete resource group, type myResourceGroup in the text box to confirm, and then select Delete.
Next steps
In this tutorial, you created a Premium function app, storage account, and Service Bus. You secured all of these resources behind private endpoints.
Use the following links to learn more Azure Functions networking options and private endpoints: