Note
Access to this page requires authorization. You can try signing in or changing directories.
Access to this page requires authorization. You can try changing directories.
Learn how to iterate in your Azure Resource Manager template (ARM template) to create multiple instances of an Azure resource. In this tutorial, you modify a template to create three storage account instances.

This tutorial covers the following tasks:
- Open a Quickstart template
- Edit the template
- Deploy the template
If you don't have an Azure subscription, create a trial subscription before you begin.
Prerequisites
To complete this article, you need Visual Studio Code
Open a Quickstart template
Azure Quickstart Templates is a repository for ARM templates. Instead of creating a template from scratch, you can find a sample template and customize it. The template used in this quickstart is called Create a standard storage account. The template defines an Azure Storage account resource.
From Visual Studio Code, select File > Open File.
In File name, paste the following URL:
https://raw.githubusercontent.com/Azure/azure-quickstart-templates/master/quickstarts/microsoft.storage/storage-account-create/azuredeploy.jsonSelect Open to open the file.
There's a
Microsoft.Storage/storageAccountsresource defined in the template.To save the file, select File > Save As. Save the file as azuredeploy.json to your local computer.
Edit the template
The existing template creates one storage account. You customize the template to create three storage accounts.
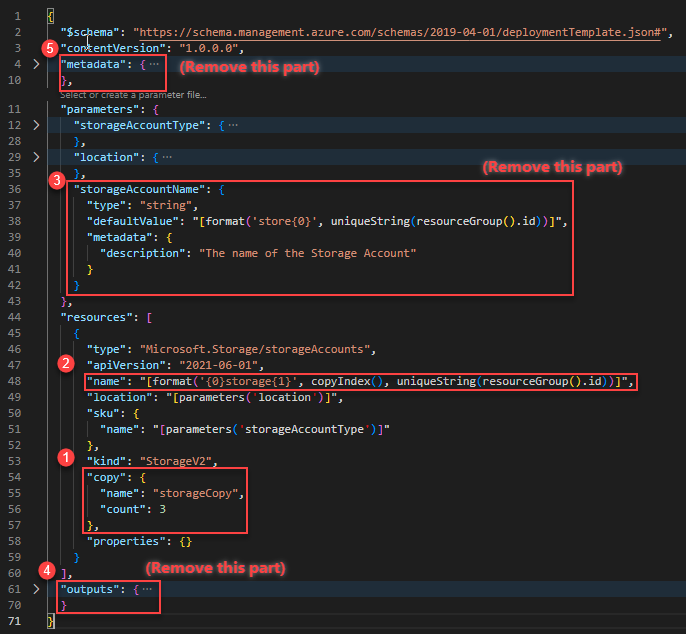
From Visual Studio Code, make the following four changes:

Add a
copyelement to the storage account resource definition. In thecopyelement, specify the number of iterations and a variable for this loop. The count value must be a positive integer and can't exceed 800."copy": { "name": "storageCopy", "count": 3 },The
copyIndex()function returns the current iteration in the loop. Use the index as the name prefix.copyIndex()is zero-based. To offset the index value, you can pass a value in thecopyIndex()function. For example,copyIndex(1)."name": "[format('{0}storage{1}', copyIndex(), uniqueString(resourceGroup().id))]",Delete the
storageAccountNameparameter definition, because it's not used anymore.Delete the
outputselement. It's no longer needed.Delete the
metadataelement.
The completed template looks like:
{
"$schema": "https://schema.management.azure.com/schemas/2019-04-01/deploymentTemplate.json#",
"contentVersion": "1.0.0.0",
"parameters": {
"storageAccountType": {
"type": "string",
"defaultValue": "Standard_LRS",
"allowedValues": [
"Premium_LRS",
"Premium_ZRS",
"Standard_GRS",
"Standard_GZRS",
"Standard_LRS",
"Standard_RAGRS",
"Standard_RAGZRS"
],
"metadata": {
"description": "Storage Account type"
}
},
"location": {
"type": "string",
"defaultValue": "[resourceGroup().location]",
"metadata": {
"description": "Location for the storage account."
}
}
},
"resources": [
{
"type": "Microsoft.Storage/storageAccounts",
"apiVersion": "2025-06-01",
"name": "[format('{0}storage{1}', copyIndex(), uniqueString(resourceGroup().id))]",
"location": "[parameters('location')]",
"sku": {
"name": "[parameters('storageAccountType')]"
},
"kind": "StorageV2",
"copy": {
  "name": "storageCopy",
  "count": 3
},
"properties": {}
}
]
}
Save the changes.
For more information about creating multiple instances, see Resource iteration in ARM templates
Deploy the template
Check the file you saved in the previous section.
From the local Shell, run the following commands. Select the tab to show the PowerShell code or the CLI code.
echo "Enter a project name that is used to generate resource group name:" &&
read projectName &&
echo "Enter the location (i.e. chinaeast):" &&
read location &&
resourceGroupName="${projectName}rg" &&
az group create --name $resourceGroupName --location "$location" &&
az deployment group create --resource-group $resourceGroupName --template-file "$HOME/azuredeploy.json"
After a successful template deployment, you can display the three storage accounts created in the specified resource group. Compare the storage account names with the name definition in the template.
echo "Enter a project name that is used to generate resource group name:" &&
read projectName &&
resourceGroupName="${projectName}rg" &&
az storage account list --resource-group $resourceGroupName &&
echo "Press [ENTER] to continue ..."
Clean up resources
When the Azure resources are no longer needed, clean up the resources you deployed by deleting the resource group.
- From the Azure portal, select Resource group from the left menu.
- Enter the resource group name in the Filter by name field.
- Select the resource group name. You shall see a total of three resources in the resource group.
- Select Delete resource group from the top menu.
Next steps
In this tutorial, you learned how to create multiple storage account instances. In the next tutorial, you develop a template with multiple resources and multiple resource types. Some of the resources have dependent resources.