Note
Access to this page requires authorization. You can try signing in or changing directories.
Access to this page requires authorization. You can try changing directories.
Learn how to create an Azure Resource Manager template (ARM template) to deploy multiple resources and configure the deployment order. After you create the template, you deploy the template using Azure local Shell from your local computer.
In this tutorial, you create a storage account, a virtual machine, a virtual network, and some other dependent resources. Some of the resources cannot be deployed until another resource exists. For example, you can't create the virtual machine until its storage account and network interface exist. You define this relationship by making one resource as dependent on the other resources. Resource Manager evaluates the dependencies between resources, and deploys them in their dependent order. When resources aren't dependent on each other, Resource Manager deploys them in parallel. For more information, see Define the order for deploying resources in ARM templates.
This tutorial covers the following tasks:
- Open a Quickstart template
- Explore the template
- Deploy the template
If you don't have an Azure subscription, create a trial subscription before you begin.
Prerequisites
To complete this article, you need:
To increase security, use a generated password for the virtual machine administrator account. You can use Azure local Shell to run the following command in PowerShell or CLI:
openssl rand -base64 32To learn more, run
man openssl randto open the manual page.Azure Key Vault is designed to safeguard cryptographic keys and other secrets. For more information, see Tutorial: Integrate Azure Key Vault in ARM template deployment. We also recommend you update your password every three months.
Open a Quickstart template
Azure Quickstart Templates is a repository for ARM templates. Instead of creating a template from scratch, you can find a sample template and customize it. The template used in this tutorial is called Deploy a simple Windows VM.
From Visual Studio Code, select File > Open File.
In File name, paste the following URL:
https://raw.githubusercontent.com/Azure/azure-quickstart-templates/master/quickstarts/microsoft.compute/vm-simple-windows/azuredeploy.jsonSelect Open to open the file.
Select File > Save As to save a copy of the file to your local computer with the name azuredeploy.json.
Explore the template
When you explore the template in this section, try to answer these questions:
- How many Azure resources are defined in this template?
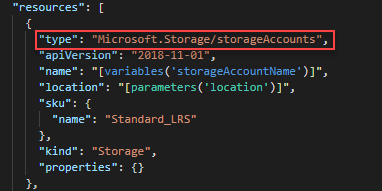
- One of the resources is an Azure storage account. Does the definition look like the one used in the last tutorial?
- Can you find the template references for the resources defined in this template?
- Can you find the dependencies of the resources?
From Visual Studio Code, collapse the elements until you only see the first-level elements and the second-level elements inside
resources: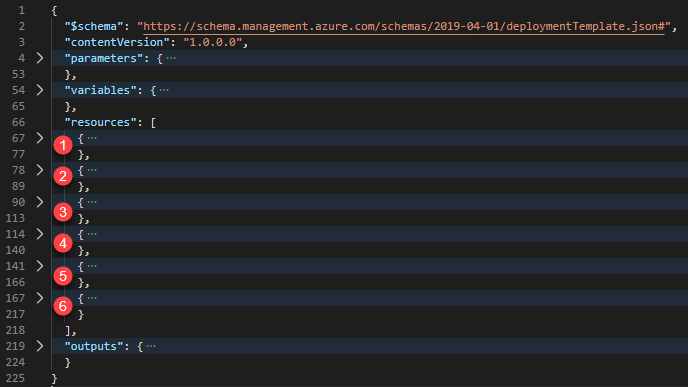
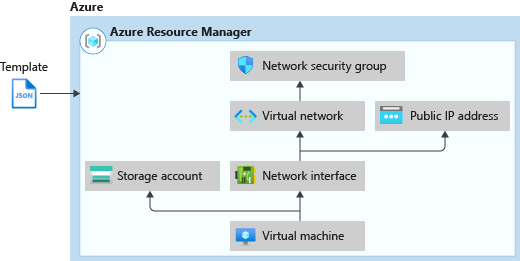
There are six resources defined by the template:
Microsoft.Storage/storageAccounts.Microsoft.Network/publicIPAddresses.Microsoft.Network/networkSecurityGroups.Microsoft.Network/virtualNetworks.Microsoft.Network/networkInterfaces.Microsoft.Compute/virtualMachines.
It's helpful to review the template reference before customizing a template.
Expand the first resource. It is a storage account.
Expand the second resource. The resource type is
Microsoft.Network/publicIPAddresses.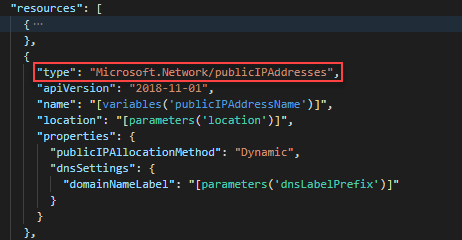
Expand the third resource. The resource type is
Microsoft.Network/networkSecurityGroups.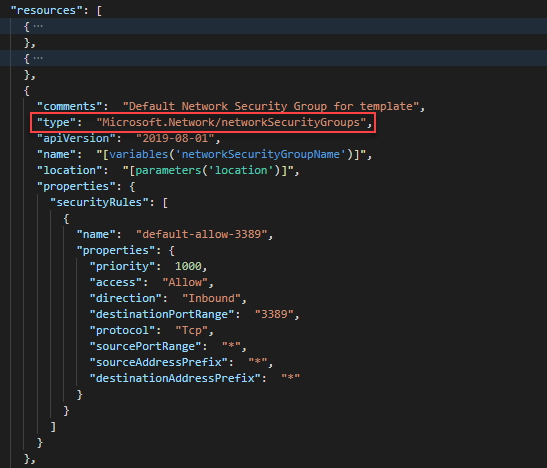
Expand the fourth resource. The resource type is
Microsoft.Network/virtualNetworks: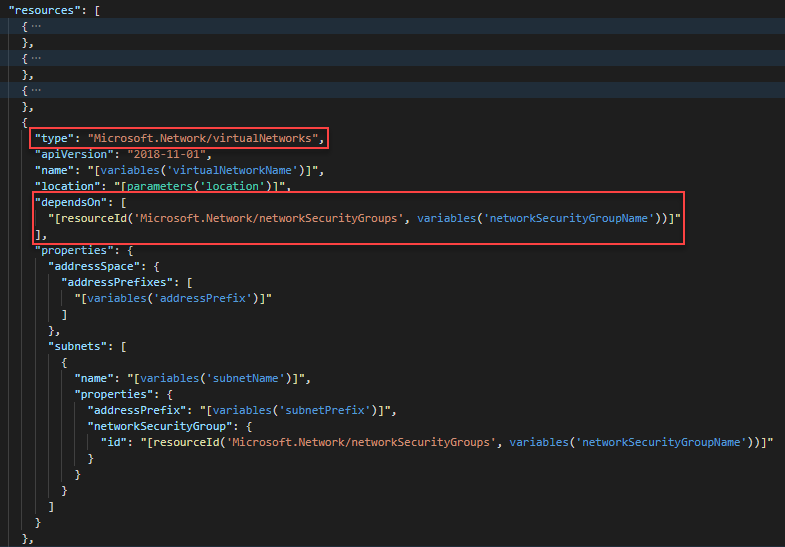
The
dependsOnelement enables you to define one resource as a dependent on one or more resources. This resource depends on one other resource:Microsoft.Network/networkSecurityGroups
Expand the fifth resource. The resource type is
Microsoft.Network/networkInterfaces. The resource depends on two other resources:Microsoft.Network/publicIPAddressesMicrosoft.Network/virtualNetworks
Expand the sixth resource. This resource is a virtual machine. It depends on two other resources:
Microsoft.Storage/storageAccountsMicrosoft.Network/networkInterfaces
The following diagram illustrates the resources and the dependency information for this template:
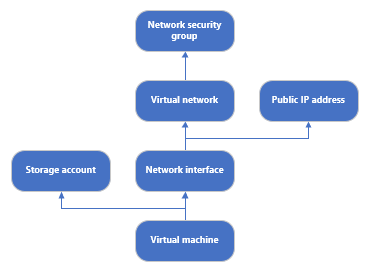
By specifying the dependencies, Resource Manager efficiently deploys the solution. It deploys the storage account, public IP address, and virtual network in parallel because they have no dependencies. After the public IP address and virtual network are deployed, the network interface is created. When all other resources are deployed, Resource Manager deploys the virtual machine.
Deploy the template
Check and verify the template you saved earlier in the tutorial. The file name is azuredeploy.json.
To deploy the template, run the following PowerShell script.
echo "Enter a project name that is used to generate resource group name:" && read projectName && echo "Enter the location (i.e. chinaeast2):" && read location && echo "Enter the virtual machine admin username:" && read adminUsername && echo "Enter the DNS label prefix:" && read dnsLabelPrefix && resourceGroupName="${projectName}rg" && az group create --name $resourceGroupName --location $location && az deployment group create --resource-group $resourceGroupName --template-file "$HOME/azuredeploy.json" --parameters adminUsername=$adminUsername dnsLabelPrefix=$dnsLabelPrefixRDP to the virtual machine to verify that the virtual machine was created successfully.
Clean up resources
When you no longer need the Azure resources, clean up the resources you deployed by deleting the resource group.
- From the Azure portal, select Resource group from the left menu.
- Enter the resource group name in the Filter by name field.
- Select the resource group name. You see a total of six resources in the resource group.
- Select Delete resource group from the top menu.
Next steps
In this tutorial, you developed and deployed a template to create a virtual machine, a virtual network, and the dependent resources. To learn how to use deployment scripts to perform pre/post deployment operations, see: