Note
Access to this page requires authorization. You can try signing in or changing directories.
Access to this page requires authorization. You can try changing directories.
Applies to: ![]() SQL Server on Azure VM
SQL Server on Azure VM
Automated Backup automatically configures Managed Backup to Azure for all existing and new databases on an Azure VM running SQL Server 2014 Standard or Enterprise. This enables you to configure regular database backups that utilize durable Azure Blob storage. Automated Backup depends on the SQL Server infrastructure as a service (IaaS) Agent Extension.
Prerequisites
To use Automated Backups for your SQL Server on Azure VM, you need:
- A SQL Server on Azure VMs registered with the SQL IaaS Agent extension.
- Windows Server 2012 or later.
- SQL Server 2014, Standard, or Enterprise. For later SQL Server versions, see Automated Backup for SQL Server 2016 and later.
- Database configuration:
- Target user databases must use the full recovery model. System databases don't have to use the full recovery model. However, if you require log backups to be taken for
modelormsdb, you must use the full recovery model. For more information about the impact of the full recovery model on backups, see Backup under the full recovery model. - The SQL Server VM has been registered with the SQL IaaS Agent extension and the automated backup feature is enabled. Since automated backup relies on the extension, automated backup is only supported on target databases from the default instance, or a single named instance. If there's no default instance, and multiple named instances, the SQL IaaS Agent extension fails, and automated backup won't work.
- Target user databases must use the full recovery model. System databases don't have to use the full recovery model. However, if you require log backups to be taken for
Settings
The following table describes the options that can be configured for Automated Backup. The actual configuration steps vary depending on whether you use the Azure portal or Azure Windows PowerShell commands. Note that Automated backup uses backup compression by default and you can't disable it.
| Setting | Range (Default) | Description |
|---|---|---|
| Automated Backup | Enable/Disable (Disabled) | Enables or disables Automated Backup for an Azure VM running SQL Server 2014 Standard or Enterprise. |
| Retention Period | 1-90 days (90 days) | The number of days to retain a backup. |
| Storage Account | Azure storage account | An Azure storage account to use for storing Automated Backup files in blob storage. A container is created at this location to store all backup files. The backup file naming convention includes the date, time, and machine name. |
| Encryption | Enable/Disable (Disabled) | Enables or disables backup encryption. When backup encryption is enabled, the certificates used to restore the backup are located in the specified storage account in the same automaticbackup container using the same naming convention. If the password changes, a new certificate is generated with that password, but the old certificate remains to restore prior backups. |
| Password | Password text | A password for encryption keys. This is only required if encryption is enabled. In order to restore an encrypted backup, you must have the correct password and related certificate that was used at the time the backup was taken. |
Configure new VMs
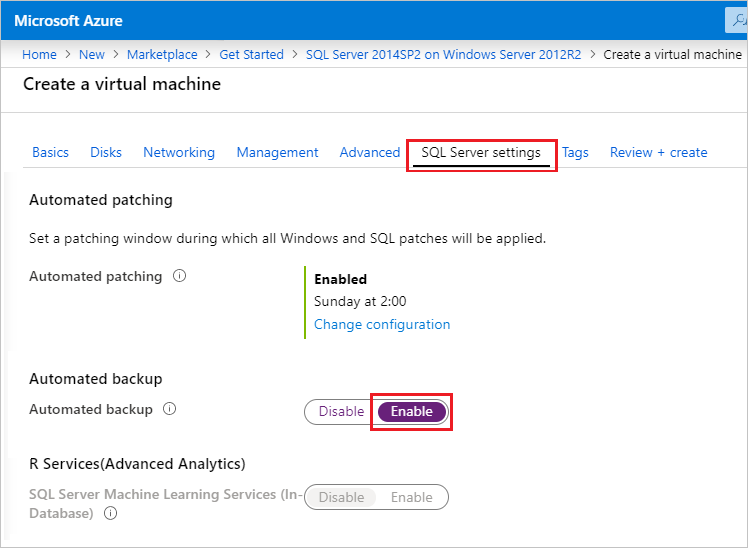
Use the Azure portal to configure Automated Backup when you create a new SQL Server 2014 virtual machine in the Resource Manager deployment model.
On the SQL Server settings tab, scroll down to Automated backup and select Enable. The following Azure portal screenshot shows the SQL Automated Backup settings.
Configure existing VMs
For existing SQL Server VMs, you can enable and disable automated backups, change the retention period, specify the storage account, and enable encryption from the Azure portal.
Navigate to the SQL virtual machines resource for your SQL Server 2014 virtual machine and then select Backups.

When finished, select the Apply button on the bottom of the Backups page to save your changes.
If you're enabling Automated Backup for the first time, Azure configures the SQL Server IaaS Agent in the background. During this time, the Azure portal might not show that Automated Backup is configured. Wait several minutes for the agent to be installed and configured. After that, the Azure portal will reflect the new settings.
Note
You can also configure Automated Backup using a template. For more information, see Azure quickstart template for Automated Backup.
Configure with PowerShell
You can use PowerShell to configure Automated Backup. Before you begin, you must:
- Download and install the latest Azure PowerShell.
- Open Windows PowerShell and associate it with your account with the Connect-AzAccount -Environment AzureChinaCloud command.
Note
This article uses the Azure Az PowerShell module, which is the recommended PowerShell module for interacting with Azure. To get started with the Az PowerShell module, see Install Azure PowerShell. To learn how to migrate to the Az PowerShell module, see Migrate Azure PowerShell from AzureRM to Az.
Verify current settings
If you enabled automated backup during provisioning, you can use PowerShell to check your current configuration. Run the Get-AzVMSqlServerExtension command and examine the AutoBackupSettings property:
$vmname = "yourvmname"
$resourcegroupname = "yourresourcegroupname"

(Get-AzVMSqlServerExtension -VMName $vmname -ResourceGroupName $resourcegroupname).AutoBackupSettings
You should get output similar to the following:
Enable                      : False
EnableEncryption            : False
RetentionPeriod             : -1
StorageUrl                  : NOTSET
StorageAccessKey            :
Password                    :
BackupSystemDbs             : False
BackupScheduleType          :
FullBackupFrequency         :
FullBackupStartTime         :
FullBackupWindowHours       :
LogBackupFrequency          :
If your output shows that Enable is set to False, then you have to enable automated backup. The good news is that you enable and configure Automated Backup in the same way. See the next section for this information.
Note
If you check the settings immediately after making a change, it is possible that you will get back the old configuration values. Wait a few minutes and check the settings again to make sure that your changes were applied.
Configure Automated Backup
You can use PowerShell to enable Automated Backup as well as to modify its configuration and behavior at any time.
First, select or create a storage account for the backup files. The following script selects a storage account or creates it if it doesn't exist.
$vmname = "yourvmname"
$resourcegroupname = "yourresourcegroupname"
$storage_accountname = "yourstorageaccount"
$storage_url = "https://yourstorageaccount.blob.core.chinacloudapi.cn/"

$storage = Get-AzStorageAccount -ResourceGroupName $resourcegroupname `
    -Name $storage_accountname -ErrorAction SilentlyContinue
If (-Not $storage)
    { $storage = New-AzStorageAccount -ResourceGroupName $resourcegroupname `
    -Name $storage_accountname -SkuName Standard_GRS -Location $region }
Note
Automated Backup does not support storing backups in premium storage, but it can take backups from VM disks which use Premium Storage.
If you want to use a custom container in the storage account for the backups, use the following script to check for the container or create it if it doesn't exist.
$storage_container = "backupcontainer"

New-AzStorageContainer -Name $storage_container -Context $storage.Context

if (!(Get-AzStorageAccount -StorageAccountName $storage_accountname -ResourceGroupName $resourcegroupname | Get-AzStorageContainer | Where-Object { $_.Name -eq $storage_container })){ `
        New-AzStorageContainer -Name $storage_container -Context $storage.Context `
} `
 else `
{ `
        Write-Warning "Container $storage_container already exists." `
}
Next, use the following script to get the Access key for the storage account:
$accesskey = (Get-AzStorageAccountKey -ResourceGroupName $resourcegroupname -Name $storage_accountname)[0].value
Then use the Update-AzSqlVM command to enable and configure the Automated Backup settings to store backups in the Azure storage account. In this example, the backups are set to be retained for 10 days.
Update-AzSqlVM -ResourceGroupName $resourcegroupname -Name $vmname -AutoBackupSettingEnable `
-AutoBackupSettingStorageAccessKey $accesskey `
-AutoBackupSettingStorageAccountUrl $storage_url `
-AutoBackupSettingRetentionPeriod 10 `
-AutoBackupSettingStorageContainerName $storage_container
It could take several minutes to install and configure the SQL Server IaaS Agent.
Note
There are other settings for Update-AzSqlVM* that apply only to SQL Server 2016 and Automated Backup. SQL Server 2014 does not support the following settings: -AutoBackupSettingBackupSystemDb, -AutoBackupSettingBackupScheduleType, -AutoBackupSettingFullBackupFrequency, -AutoBackupSettingFullBackupStartTime, -AutoBackupSettingFullBackupWindowHour, and -AutoBackupSettingLogBackupFrequency. If you attempt to configure these settings on a SQL Server 2014 virtual machine, there is no error, but the settings do not get applied. If you want to use these settings on a SQL Server 2016 virtual machine, see Automated Backup for SQL Server 2016 Azure virtual machines.
To enable encryption, modify the previous script to pass the -AutoBackupSettingEnableEncryption parameter along with a password (secure string) for the -AutoBackupSettingPassword parameter. The following script enables the Automated Backup settings in the previous example and adds encryption.
$password = "r@ndom Va1ue"
$encryptionpassword = $password | ConvertTo-SecureString -AsPlainText -Force

Update-AzSqlVM -ResourceGroupName $resourcegroupname -Name $vmname -AutoBackupSettingEnable `
-AutoBackupSettingStorageAccessKey $accesskey `
-AutoBackupSettingStorageAccountUrl $storage_url `
-AutoBackupSettingRetentionPeriod 10 `
-AutoBackupSettingEnableEncryption `
-AutoBackupSettingPassword $encryptionpassword `
-AutoBackupSettingStorageContainerName $storage_container
To confirm your settings are applied, verify the Automated Backup configuration.
Disable Automated Backup
To disable Automated Backup, run the same script with the -AutoBackupSettingEnable parameter set to $false in the Update-AzSqlVM command. By setting the value to $false the feature is disabled. As with installation, it can take several minutes to disable Automated Backup.
Update-AzSqlVM -ResourceGroupName $resourcegroupname -Name $vmname -AutoBackupSettingEnable:$false
Example script
The following script provides a set of variables that you can customize to enable and configure Automated Backup for your VM. In your case, you might need to customize the script based on your requirements. For example, you would have to make changes if you wanted to disable the backup of system databases or enable encryption.
$vmname = "yourvmname"
$resourcegroupname = "yourresourcegroupname"
$region = "Azure region name such as China East 2"
$storage_accountname = "yourstorageaccount"
$storage_url = "https://yourstorageaccount.blob.core.chinacloudapi.cn/"
$retentionperiod = 10

# ResourceGroupName is the resource group which is hosting the VM where you are deploying the SQL Server IaaS Extension

Set-AzVMSqlServerExtension -VMName $vmname `
    -ResourceGroupName $resourcegroupname -Name "SQLIaasExtension" `
    -Version "2.0" -Location $region

# Creates/use a storage account to store the backups

$storage = Get-AzStorageAccount -ResourceGroupName $resourcegroupname `
    -Name $storage_accountname -ErrorAction SilentlyContinue
If (-Not $storage)
    { $storage = New-AzStorageAccount -ResourceGroupName $resourcegroupname `
    -Name $storage_accountname -SkuName Standard_GRS -Location $region }

# Creates/uses a custom storage account container

$storage_container = "yourbackupcontainer"

if (!(Get-AzStorageAccount -StorageAccountName $storage_accountname -ResourceGroupName $resourcegroupname | Get-AzStorageContainer | Where-Object { $_.Name -eq $storage_container })){ `
        New-AzStorageContainer -Name $storage_container -Context $storage.Context `
} `
 else `
{ `
        Write-Warning "Container $storage_container already exists." `
}

# Get storage account access key
$accesskey = (Get-AzStorageAccountKey -ResourceGroupName $resourcegroupname  -Name $storage_accountname)[0].value

# Configure Automated Backup settings

Update-AzSqlVM -ResourceGroupName $resourcegroupname -Name $vmname -AutoBackupSettingEnable `
-AutoBackupSettingStorageAccessKey $accesskey `
-AutoBackupSettingStorageAccountUrl $storage_url `
-AutoBackupSettingRetentionPeriod $retentionperiod `
-AutoBackupSettingStorageContainerName $storage_container
Backup with encryption certificates
If you decide to encrypt your backups, an encryption certificate will be generated and saved in the same storage account as the backups. In this scenario, you'll also need to enter a password which will be used to protect the encryption certificates used for encrypting and decrypting your backups. This allows you to not worry about your backups beyond the configuration of this feature, and also ensures you can trust that your backups are secure.
When backup encryption is enabled, we strongly recommend that you ascertain whether the encryption certificate has been successfully created and uploaded to ensure restorability of your databases. You can do so by creating a database right away and checking the encryption certificates and data were backed up to the newly created container properly. This shows that everything is configured correctly and no anomalies took place.
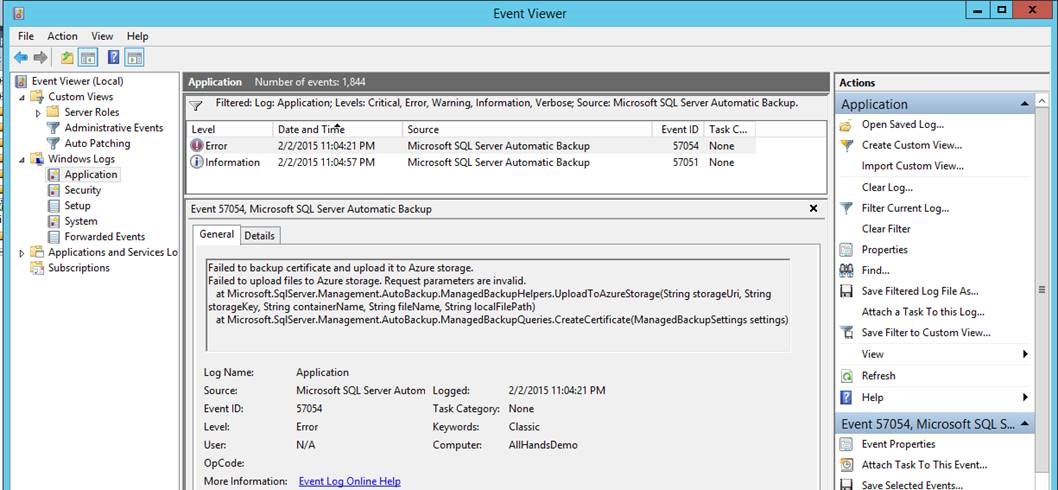
If the certificate failed to upload for some reason, you can use the certificate manager to export the certificate and save it. You don't want to save it on the same VM, however, as this doesn't ensure you have access to the certificate when the VM is down. To know if the certificate was backed up properly after changing or creating the Automated Backup configuration, you can check the event logs in the VM, and if it failed you'll see this error message:
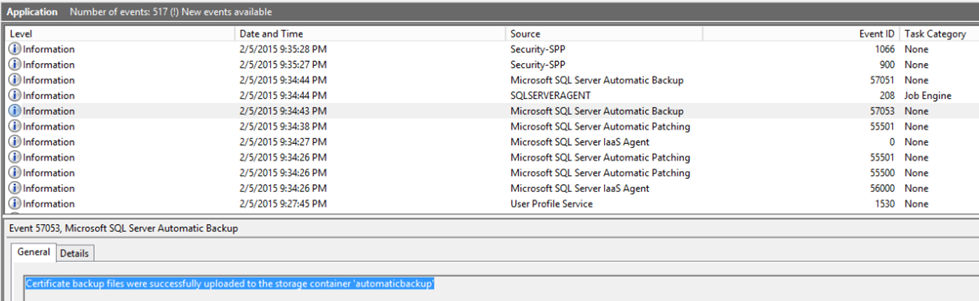
If the certificates were backed up correctly, you'll see this message in the Event Logs:
As a general practice, it's recommended to check on the health of your backups from time to time. In order to be able to restore your backups, you should do the following:
Confirm that your encryption certificates have been backed up and you remember your password. If you don't do this, you won't be able to decrypt and restore your backups. If for some reason your certificates weren't properly backed up, you can accomplish this manually by executing the following T-SQL query:
BACKUP MASTER KEY TO FILE = <file_path> ENCRYPTION BY PASSWORD = <password>
BACKUP CERTIFICATE [AutoBackup_Certificate] TO FILE = <file_path> WITH PRIVATE KEY (FILE = <file_path>, ENCRYPTION BY PASSWORD = <password>)
Confirm that your backup files are uploaded with at least 1 full backup. Because mistakes happen, you should be sure you always have at least one full backup before deleting your VM, or in case your VM gets corrupted, so you know you can still access your data. You should make sure the backup in storage is safe and recoverable before deleting your VM's data disks.
Monitoring
To monitor Automated Backup on SQL Server 2014, you have one option. Because Automated Backup uses the SQL Server Managed Backup feature, the same monitoring techniques apply to both.
You can poll the status by calling msdb.smart_admin.sp_get_backup_diagnostics. Or query the msdb.smart_admin.fn_get_health_status table valued function.
Note
The schema for Managed Backup in SQL Server 2014 is msdb.smart_admin. In SQL Server 2016 this changed to msdb.managed_backup, and the reference topics use this newer schema. But for SQL Server 2014, you must continue to use the smart_admin schema for all Managed Backup objects.
Next steps
Automated Backup configures Managed Backup on Azure VMs. So it's important to review the documentation for Managed Backup on SQL Server 2014.
You can find additional backup and restore guidance for SQL Server on Azure VMs in the following article: Backup and restore for SQL Server on Azure virtual machines.
For information about other available automation tasks, see SQL Server IaaS Agent Extension.
For more information about running SQL Server on Azure VMs, see SQL Server on Azure virtual machines overview.