Note
Access to this page requires authorization. You can try signing in or changing directories.
Access to this page requires authorization. You can try changing directories.
Applies to: ![]() SQL Server on Azure VM
SQL Server on Azure VM
Automated Backup automatically configures Managed Backup to Azure for all existing and new databases on SQL Server on Azure VMs starting with SQL Server 2016 or later Standard, Enterprise, or Developer editions. This feature enables you to configure regular database backups that utilize durable Azure Blob Storage.
Prerequisites
To use Automated Backups for your SQL Server on Azure VM, you need:
- A SQL Server on Azure VMs registered with the SQL IaaS Agent extension.
- Windows Server 2012 R2 or later.
- SQL Server 2016 and later. For SQL Server 2014, see Automated Backup for SQL Server 2014.
- The following Database configuration:
- Target user databases must use the full recovery model. System databases don't have to use the full recovery model. However, if you require log backups to be taken for
modelormsdb, you must use the full recovery model. For more information about the impact of the full recovery model on backups, see Backup under the full recovery model. - The SQL Server VM must have the Automated Backup feature enabled. Since Automated Backup relies on the extension, Automated Backup is only supported on target databases from the default instance, or a single named instance. If there's no default instance, and multiple named instances, the SQL IaaS Agent extension fails and Automated Backup won't work.
- If you're running automated backups on a secondary Always On availability group replica, the replica must be Readable for the backups to succeed.
- Target user databases must use the full recovery model. System databases don't have to use the full recovery model. However, if you require log backups to be taken for
Settings
The following table describes the options that can be configured for Automated Backup. The actual configuration steps vary depending on whether you use the Azure portal or Azure Windows PowerShell commands. Automated Backup uses backup compression by default and it can't be disabled.
Basic Settings
| Setting | Range (Default) | Description |
|---|---|---|
| Automated Backup | Enable/Disable (Disabled) | Enables or disables Automated Backup for an Azure VM running SQL Server 2016 or later Developer, Standard, or Enterprise. |
| Retention Period | 1-90 days (90 days) | The number of days the service retains backup metadata in msdb. After the retention period expires for a backup, the metadata is deleted from msdb, but files aren't deleted from the storage container. You can use a lifecycle management policy for your storage account to balance backup retention with cost management according to your business needs. |
| Storage Account | Azure storage account | An Azure storage account to use for storing Automated Backup files in blob storage. A container is created at this location to store all backup files. The backup file naming convention includes the date, time, and database GUID. |
| Encryption | Enable/Disable (Disabled) | Enables or disables backup encryption. When backup encryption is enabled, the certificates used to restore the backup are located in the specified storage account in the same automaticbackup container using the same naming convention. If the password changes, a new certificate is generated with that password, but the old certificate remains to restore prior backups. |
| Password | Password text | A password for encryption keys. This password is only required if encryption is enabled. In order to restore an encrypted backup, you must have the correct password and related certificate that was used at the time the backup was taken. |
Advanced Settings
| Setting | Range (Default) | Description |
|---|---|---|
| System Database Backups | Enable/Disable (Disabled) | When enabled, this feature also backs up the system databases: master, msdb, and model. For the msdb and model databases, verify that they are in the full recovery model if you want log backups to be taken. Log backups are never taken for master, and no backups are taken for tempdb. |
| Backup Schedule | Manual/Automated (Automated) | By default, the backup schedule is automatically determined based on log growth. A manual backup schedule allows the user to specify the time window for backups. In this case, backups only take place at the specified frequency and during the specified time window of a given day. |
| Full backup frequency | Daily/Weekly | Frequency of full backups. In both cases, full backups begin during the next scheduled time window. When weekly is selected, backups could span multiple days until all databases are successfully backed up. |
| Full backup start time | 00:00 - 23:00 (01:00) | Start time of a given day during which full backups can take place. |
| Full backup time window | 1 - 23 hours (1 hour) | Duration of the time window of a given day during which full backups can take place. |
| Log backup frequency | 5 - 60 minutes (60 minutes) | Frequency of log backups. |
Note
The Automated Backup schedule takes backups based on log growth. Using Automated Backups when your databases are in simple recovery mode isn't recommended.
Understand full backup frequency
It's important to understand the difference between daily and weekly full backups. Consider the following two example scenarios.
Scenario 1: Weekly backups
You have a SQL Server VM that contains several large databases.
On Monday, you enable Automated Backup with the following settings:
- Backup schedule: Manual
- Full backup frequency: Weekly
- Full backup start time: 01:00
- Full backup time window: 1 hour
These settings mean that the next available backup window is Tuesday at 1 AM for 1 hour. At that time, Automated Backup begins backing up your databases one at a time. In this scenario, your databases are large enough that full backups complete for the first couple databases. However, after one hour not all of the databases are backed up.
When this happens, Automated Backup begins backing up the remaining databases the next day, Wednesday at 1 AM for one hour. If not all databases are backed up in that time, it tries again the next day at the same time. This continues until all databases are successfully backed up.
After it reaches Tuesday again, Automated Backup begins backing up all databases again.
This scenario shows that Automated Backup only operates within the specified time window, and each database is backed up once per week. It also shows that backups can span multiple days when it's not possible to complete all backups in a single day.
Scenario 2: Daily backups
You have a SQL Server VM that contains several large databases.
On Monday, you enable Automated Backup with the following settings:
- Backup schedule: Manual
- Full backup frequency: Daily
- Full backup start time: 22:00
- Full backup time window: 6 hours
These settings mean that the next available backup window is Monday at 10 PM for 6 hours. At that time, Automated Backup begins backing up your databases one at a time.
Then, on Tuesday at 10 for 6 hours, full backups of all databases start again.
Important
Backups happen sequentially during each interval. For instances with a large number of databases, schedule your backup interval with enough time to accommodate all backups. If backups can't complete within the given interval, some backups could be skipped, and your time between backups for a single database might be higher than the configured backup interval time. This situation could negatively impact your restore point objective (RPO).
Configure new VMs
Use the Azure portal to configure Automated Backup when you create a new SQL Server 2016 or later machine in the Resource Manager deployment model.
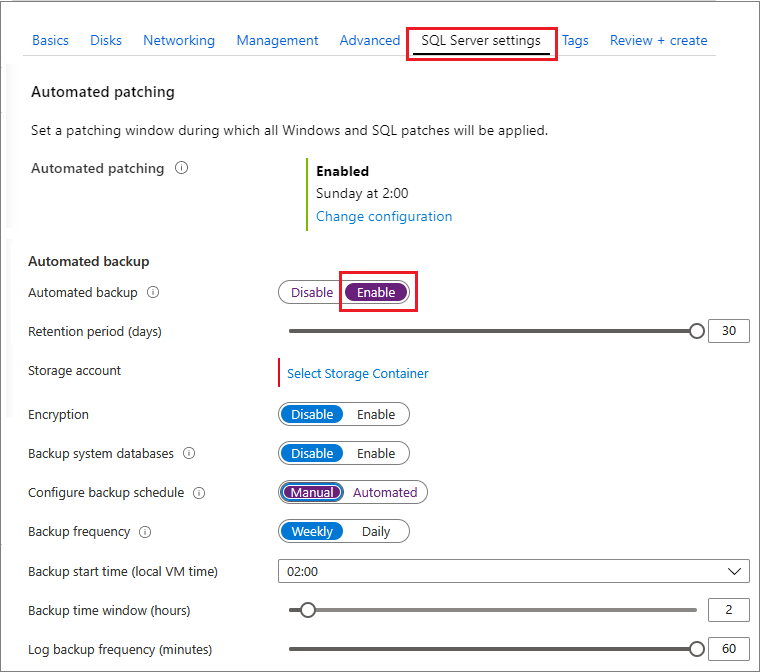
In the SQL Server settings tab, select Enable under Automated Backup. When you enable Automated Backup, you can configure the following settings:
- Retention period for backups (up to 90 days)
- Storage account, and storage container, to use for backups
- Encryption option and password for backups
- Backup system databases
- Configure backup schedule
To encrypt the backup, select Enable. Then specify the Password. Azure creates a certificate to encrypt the backups and uses the specified password to protect that certificate.
Choose Select Storage Container to specify the container where you want to store your backups.
By default the schedule is set automatically, but you can create your own schedule by selecting Manual, which allows you to configure the backup frequency, backup time window, and the log backup frequency in minutes.
The following Azure portal screenshot shows the Automated Backup settings when you create a new SQL Server VM:
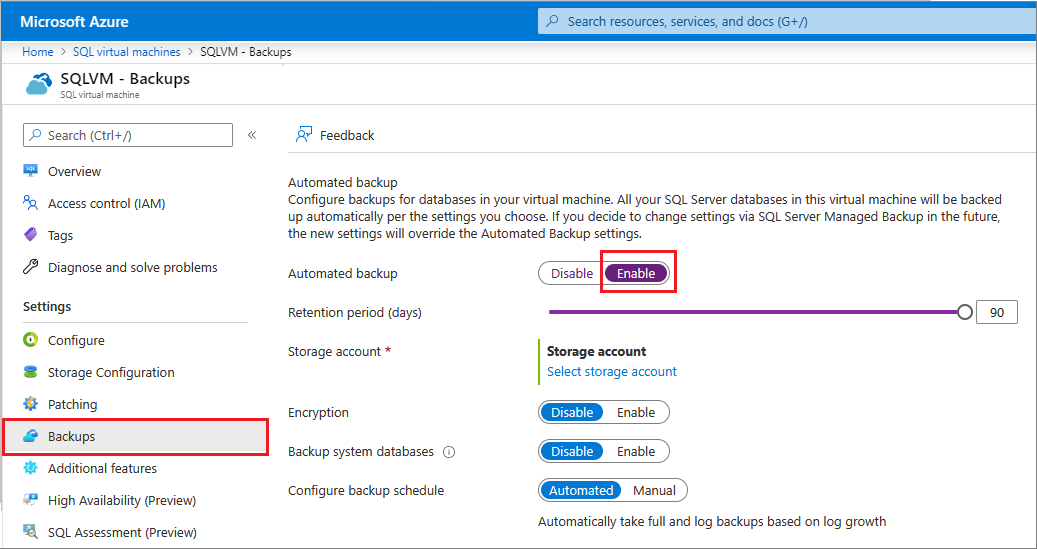
Configure existing VMs
For existing SQL Server virtual machines, go to the SQL virtual machines resource and then select Backups to configure your Automated Backups.
Select Enable on the Automated Backup tile to configure your Automated Backup settings:

On the Backups page, select Enable to turn on Automated Backup. You can configure the retention period (up to 90 days), the container for the storage account where you want to store your backups, the encryption, and the backup schedule. By default, the schedule is automated. Configure the settings as needed:
If you want to set your own backup schedule, choose Manual and configure the backup frequency, whether or not you want system databases backed up, and the transaction log backup interval in minutes.
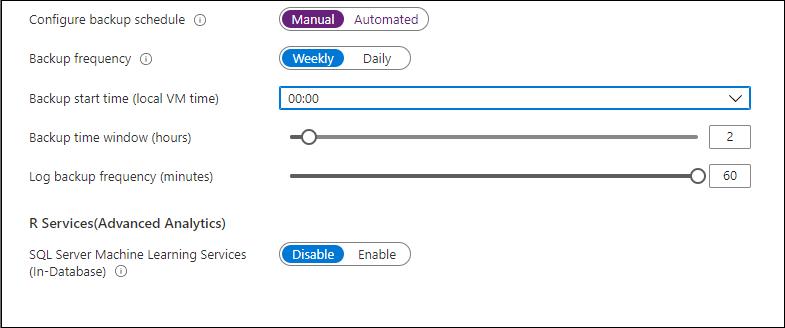
When finished, select the Apply button on the bottom of the Backups settings page to save your changes.
If you're enabling Automated Backup for the first time, Azure configures the SQL Server IaaS Agent in the background. During this time, the Azure portal might not show that Automated Backup is configured. Wait several minutes for the agent to be installed, configured. After that, the Azure portal will reflect the new settings.
If you only see Azure Backup as the backup type, then Disable Azure Backup by deleting the associated Azure Vault, and then choose Automated Backup to use Automated Backup instead.
Configure with PowerShell
You can use PowerShell to configure Automated Backup. Before you begin, you must:
- Download and install the latest Azure PowerShell.
- Open Windows PowerShell and associate it with your account with the Connect-AzAccount -Environment AzureChinaCloud command.
Install the SQL Server IaaS Extension
If you provisioned a SQL Server virtual machine from the Azure portal, the SQL Server IaaS Agent extension should already be installed. You can determine whether it's installed for your VM by calling Get-AzVM command and examining the Extensions property.
$vmname = "yourvmname"
$resourcegroupname = "yourresourcegroupname"

(Get-AzVM -Name $vmname -ResourceGroupName $resourcegroupname).Extensions
If the SQL Server IaaS Agent extension is installed, you should see it listed as SqlIaaSAgent or SQLIaaSExtension. ProvisioningState for the extension should also show "Succeeded."
If it isn't installed or provisioning failed, you can install it with the Set-AzVMSqlServerExtension command. In addition to the VM name and resource group, you must also specify the region ($region) that your VM is located in.
$region = "China East 2"
Set-AzVMSqlServerExtension -VMName $vmname `
    -ResourceGroupName $resourcegroupname -Name "SQLIaasExtension" `
    -Version "2.0" -Location $region
Verify current settings
If you enabled Automated Backup during provisioning, you can use PowerShell to check your current configuration. Run the Get-AzVMSqlServerExtension command and examine the AutoBackupSettings property:
(Get-AzVMSqlServerExtension -VMName $vmname -ResourceGroupName $resourcegroupname).AutoBackupSettings
You should get output similar to the following example:
Enable                      : True
EnableEncryption            : False
RetentionPeriod             : 30
StorageUrl                  : https://test.blob.core.chinacloudapi.cn/
StorageAccessKey            :
Password                    :
BackupSystemDbs             : False
BackupScheduleType          : Manual
FullBackupFrequency         : WEEKLY
FullBackupStartTime         : 2
FullBackupWindowHours       : 2
LogBackupFrequency          : 60
If your output shows that Enable is set to False, then you have to enable Automated Backup. The good news is that you enable and configure Automated Backup in the same way. See the next section for this information.
Note
If you check the settings immediately after making a change, it's possible that you'll get back the old configuration values. Wait a few minutes and check the settings again to make sure that your changes were applied.
Configure Automated Backup
You can use PowerShell to enable Automated Backup and to modify its configuration and behavior at any time.
First, select, or create a storage account for the backup files. The following script selects a storage account or creates it if it doesn't exist.
$vmname = "yourvmname"
$resourcegroupname = "yourresourcegroupname"
$storage_accountname = "yourstorageaccount"
$storage_url = "https://yourstorageaccount.blob.core.chinacloudapi.cn/"

$storage = Get-AzStorageAccount -ResourceGroupName $resourcegroupname `
    -Name $storage_accountname -ErrorAction SilentlyContinue
If (-Not $storage)
    { $storage = New-AzStorageAccount -ResourceGroupName $resourcegroupname `
    -Name $storage_accountname -SkuName Standard_GRS -Location $region }
Note
Automated Backup doesn't support storing backups in premium storage, but it can take backups from VM disks that use Premium Storage.
If you want to use a custom container in the storage account for the backups, use the following script to check for the container or create it if it doesn't exist.
$storage_container = "backupcontainer"

New-AzStorageContainer -Name $storage_container -Context $storage.Context

if (!(Get-AzStorageAccount -StorageAccountName $storage_accountname -ResourceGroupName $resourcegroupname | Get-AzStorageContainer | Where-Object { $_.Name -eq $storage_container })){ `
    New-AzStorageContainer -Name $storage_container -Context $storage.Context `
} `
else `
{ `
    Write-Warning "Container $storage_container already exists." `
}
Next, use the following script to get the Access key for the storage account:
$accesskey = (Get-AzStorageAccountKey -ResourceGroupName $resourcegroupname -Name $storage_accountname)[0].value
Then use the Update-AzSqlVM command to enable and configure the Automated Backup settings to store backups in the Azure storage account. In this example, the backups are set to be retained for 10 days. System database backups are enabled. Full backups are scheduled for every Saturday (weekly) with a time window starting at 20:00 for two hours. Log backups are scheduled for every 30 minutes.
Update-AzSqlVM -ResourceGroupName $resourcegroupname -Name $vmname -AutoBackupSettingEnable `
-AutoBackupSettingBackupScheduleType Manual `
-AutoBackupSettingFullBackupFrequency Weekly `
-AutoBackupSettingDaysOfWeek Saturday `
-AutoBackupSettingFullBackupStartTime 20 `
-AutoBackupSettingFullBackupWindowHour 2 `
-AutoBackupSettingStorageAccessKey $accesskey `
-AutoBackupSettingStorageAccountUrl $storage_url `
-AutoBackupSettingRetentionPeriod 10 `
-AutoBackupSettingLogBackupFrequency 30 `
-AutoBackupSettingStorageContainerName $storage_container `
-AutoBackupSettingBackupSystemDb
It could take several minutes to install and configure the SQL Server IaaS Agent.
To enable encryption, modify the previous script to pass the -AutoBackupSettingEnableEncryption parameter along with a password (secure string) for the -AutoBackupSettingPassword parameter. The following script enables the Automated Backup settings in the previous example and adds encryption.
$password = "<secure password>"
$encryptionpassword = $password | ConvertTo-SecureString -AsPlainText -Force

Update-AzSqlVM -ResourceGroupName $resourcegroupname -Name $vmname -AutoBackupSettingEnable `
-AutoBackupSettingBackupScheduleType Manual `
-AutoBackupSettingFullBackupFrequency Weekly `
-AutoBackupSettingDaysOfWeek Saturday `
-AutoBackupSettingFullBackupStartTime 20 `
-AutoBackupSettingFullBackupWindowHour 2 `
-AutoBackupSettingStorageAccessKey $accesskey `
-AutoBackupSettingStorageAccountUrl $storage_url `
-AutoBackupSettingRetentionPeriod 10 `
-AutoBackupSettingLogBackupFrequency 30 `
-AutoBackupSettingEnableEncryption `
-AutoBackupSettingPassword $encryptionpassword `
-AutoBackupSettingStorageContainerName $storage_container `
-AutoBackupSettingBackupSystemDb
To confirm your settings are applied, verify the Automated Backup configuration.
Disable Automated Backup
To disable Automated Backup, run the same script with the -AutoBackupSettingEnable parameter set to $false in the Update-AzSqlVM command. By setting the value to $false the feature is disabled. As with installation, it can take several minutes to disable Automated Backup.
Update-AzSqlVM -ResourceGroupName $resourcegroupname -Name $vmname -AutoBackupSettingEnable:$false
Example script
The following script provides a set of variables that you can customize to enable and configure Automated Backup for your VM. In your case, you might need to customize the script based on your requirements. For example, you would have to make changes if you wanted to disable the backup of system databases or enable encryption.
$vmname = "yourvmname"
$resourcegroupname = "yourresourcegroupname"
$region = "Azure region name such as China East 2"
$storage_accountname = "yourstorageaccount"
$storage_url = "https://yourstorageaccount.blob.core.chinacloudapi.cn/"
$retentionperiod = 10
$backupscheduletype = "Manual"
$fullbackupfrequency = "Weekly"
$fullbackupdayofweek = "Saturday"
$fullbackupstarthour = "20"
$fullbackupwindow = "2"
$logbackupfrequency = "30"

# ResourceGroupName is the resource group which is hosting the VM where you are deploying the SQL Server IaaS Extension

Set-AzVMSqlServerExtension -VMName $vmname `
    -ResourceGroupName $resourcegroupname -Name "SQLIaasExtension" `
    -Version "2.0" -Location $region

# Creates/use a storage account to store the backups

$storage = Get-AzStorageAccount -ResourceGroupName $resourcegroupname `
    -Name $storage_accountname -ErrorAction SilentlyContinue
If (-Not $storage)
    { $storage = New-AzStorageAccount -ResourceGroupName $resourcegroupname `
    -Name $storage_accountname -SkuName Standard_GRS -Location $region }

# Creates/uses a custom storage account container

$storage_container = "yourbackupcontainer"

if (!(Get-AzStorageAccount -StorageAccountName $storage_accountname -ResourceGroupName $resourcegroupname | Get-AzStorageContainer | Where-Object { $_.Name -eq $storage_container })){ `
    New-AzStorageContainer -Name $storage_container -Context $storage.Context `
} `
else `
{ `
    Write-Warning "Container $storage_container already exists." `
}

# Get storage account access key
$accesskey = (Get-AzStorageAccountKey -ResourceGroupName $resourcegroupname  -Name $storage_accountname)[0].value

# Configure Automated Backup settings

Update-AzSqlVM -ResourceGroupName $resourcegroupname -Name $vmname -AutoBackupSettingEnable `
-AutoBackupSettingBackupScheduleType $backupscheduletype `
-AutoBackupSettingFullBackupFrequency $fullbackupfrequency `
-AutoBackupSettingDaysOfWeek $fullbackupdayofweek `
-AutoBackupSettingFullBackupStartTime $fullbackupstarthour `
-AutoBackupSettingFullBackupWindowHour $fullbackupwindow `
-AutoBackupSettingStorageAccessKey $accesskey `
-AutoBackupSettingStorageAccountUrl $storage_url `
-AutoBackupSettingRetentionPeriod $retentionperiod `
-AutoBackupSettingLogBackupFrequency $logbackupfrequency `
-AutoBackupSettingStorageContainerName $storage_container `
-AutoBackupSettingBackupSystemDb
Backup with encryption certificates
If you decide to encrypt your backups, an encryption certificate is generated and saved in the same storage account as the backups. In this scenario, you also need to enter a password, which is used to protect the encryption certificates used for encrypting and decrypting your backups. This encryption allows you to not worry about your backups beyond the configuration of this feature, and also ensures you can trust that your backups are secure.
When backup encryption is enabled, we strongly recommend that you ascertain whether the encryption certificate was successfully created and uploaded to ensure restorability of your databases. You can do so by creating a database right away and checking that the encryption certificates and data were backed up to the newly created container properly. This test shows you that everything was configured correctly and no anomalies took place.
If the certificate failed to upload for some reason, you can use the certificate manager to export the certificate and save it. To ensure you have access to the certificate when the VM is down, save the certificate on a different VM. To know if the certificate was backed up properly after changing or creating the Automated Backup configuration, check the event logs in the VM. If it failed, you see this error message in the event log:
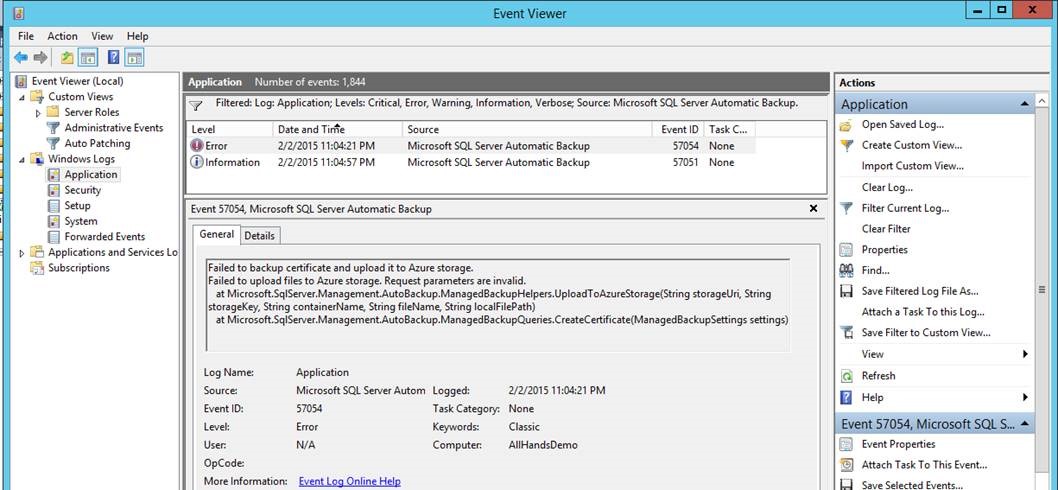
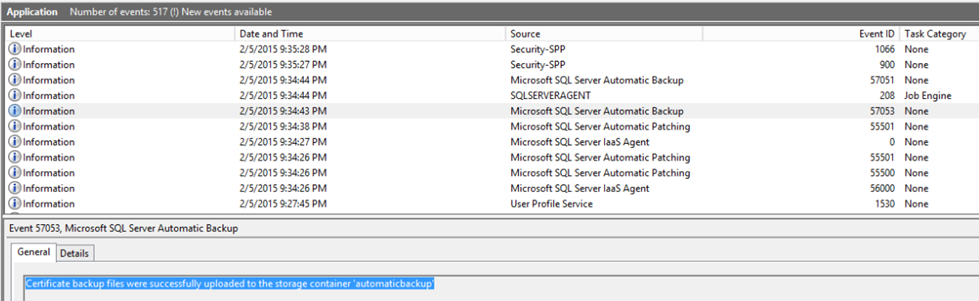
If the certificates were backed up correctly, this message appears in the event logs:
As a general practice, it's recommended that you check on the health of your backups from time to time. In order to be able to restore your backups, you should make the following checks:
Confirm that your encryption certificates have been backed up and you remember your password. If you don't take this step, you won't be able to decrypt and restore your backups. If for some reason your certificates weren't properly backed up, you can accomplish this task manually by executing the following T-SQL query:
BACKUP MASTER KEY TO FILE = <file_path> ENCRYPTION BY PASSWORD = <password>
BACKUP CERTIFICATE [AutoBackup_Certificate] TO FILE = <file_path> WITH PRIVATE KEY (FILE = <file_path>, ENCRYPTION BY PASSWORD = <password>)
Confirm that your backup files are uploaded with at least one full backup. Because mistakes happen, you should be sure you always have at least one full backup before deleting your VM, or in case your VM gets corrupted, so you know you can still access your data. You should make sure the backup in storage is safe and recoverable before deleting your VM's data disks.
Monitor backups
To monitor Automated Backup on SQL Server 2016 and later, you have one option. Because Automated Backup uses the SQL Server Managed Backup feature, the same monitoring techniques apply to both.
You can poll the status by calling msdb.managed_backup.sp_get_backup_diagnostics. Or query the msdb.managed_backup.fn_get_health_status table-valued function.
Known issues
Consider these known issues when working with the Automated Backup feature.
Can't enable Automated Backup in the Azure portal
The following table lists the possible solutions if you're having issues enabling Automated Backup from the Azure portal:
| Symptom | Solution |
|---|---|
| Enabling Automated Backups will fail if your IaaS extension is in a failed state | Repair the SQL IaaS Agent extension if it's in a failed state. |
| Enabling Automated Backup fails if you have hundreds of databases | This is a known limitation with the SQL IaaS Agent extension. To work around this issue, you can enable Managed Backup directly instead of using the SQL IaaS Agent extension to configure Automated Backup. |
| Enabling Automated Backup fails due to metadata issues | Stop the SQL IaaS Agent service. Run the T-SQL command: use msdb exec autoadmin_metadata_delete. Start the SQL IaaS Agent service and try to re-enable Automated Backup from the Azure portal. |
| Enabling Automated Backups for FCI | Back ups using private endpoints are unsupported. Use the full storage account URI for your backup. |
| Backup Multiple SQL instances using Automated Backup | Automated Backup currently only supports one SQL Server instance. If you have multiple named instances, and the default instance, Automated Backup works with the default instance. If you have multiple named instances and no default instance, turning on Automated Backup will fail. |
| Automated Backup can't be enabled due to account and permissions | Check the following: - The SQL Server Agent is running. - The NT Service\SqlIaaSExtensionQuery account has proper permissions for the Automated Backup feature both within SQL Server, and also for the SQL virtual machines resource in the Azure portal. - The SA account hasn't been renamed, though disabling the account is acceptable. |
| Automated Backup fails for SQL 2016 + | Allow Blob Public Access is enabled on the storage Account. This solution provides a temporary workaround to a known issue. |
| The account being accessed does not have sufficient permissions to execute this operation | This error occurs when the user lacks sufficient permissions to the storage account or container, or you select the default $logs container for backup storage. To resolve this issue, create a new container in your storage account and use that container for your backups instead of the default $logs container. |
Common issues with Automated or Managed Backups
The following table lists possible errors and solutions when working with Automated Backups:
| Symptom | Solution |
|---|---|
| Automated/Managed Backup fails due to connectivity to storage account/Timeout errors | Check that the Network Security Group (NSG) for the virtual network, and the Windows Firewall aren't blocking outbound connections from the virtual machine (VM) to the storage account on port 443. |
| Automated/Managed Backup fails due to Memory/IO Pressure | See if you can increase the Max Server memory and/or resize the disk/VM if you're running out of IO/VM limits. If you're using an availability group, consider offloading your backups to the secondary replica. |
| Automated Backup fails after Server Rename | If you rename your machine hostname, you need to also rename the hostname inside SQL Server. |
| Error: The operation failed because of an internal error. The argument must not be empty string.\r\nParameter name: sas Token Please retry later | This is likely caused by the SQL Server Agent service not having correct impersonation permissions. Change the SQL Server Agent service to use a different account to fix this issue. |
| Error: SQL Server Managed Backup to Microsoft Azure cannot configure the default backup settings for the SQLServer instance because the container URL was invalid. It is also possible that your SAS credential is invalid | You might see this error if you have a large number of databases. Use Managed backup instead of Automated Backup. |
| Automated Backup job failed after VM Restart | Check that the SQL Agent service is up and running. |
| Managed backup fails intermittently/Error:Execution timeout Expired | This is a known issue fixed in CU18 for SQL Server 2019 and KB4040376 for SQL Server 2014-2017. |
| Error: The remote server returned an error: (403) Forbidden | Repair the SQL IaaS Agent extension. |
| Error 3202: Write on Storage account failed 13 (The data is invalid) | Remove the immutable blob policy on the storage container and make sure the storage account is using, at minimum, TLS 1.0. |
| Error 3063: Write to backup block blob device. Device has reached its limit of allowed blocks. | This can happen if you're running automated backups from a secondary Always On availability group replica that has the Readable configuration set to NO. For automated backups to work on a secondary replica, the replica must be readable. |
| Unable to schedule a backup for a particular day | If you're using Automated backups for SQL Server 2014, this issue is expected. You can configure a backup schedule starting with SQL Server 2016. |
| 403 forbidden error when connecting to the remote server | To resolve this error: - Check network security: Make sure that the network security group (NSG) allows traffic on the necessary ports, particularly port 443 for HTTPS. - Verify IP addresses: Ensure the IP addresses of the VMs that need access to the storage account are added to the allowed list for the storage account. - Review DNS settings: Confirm that the DNS settings are correctly configured to resolve the storage account name. |
Disabling Automated Backup or Managed Backup fails
The following table lists the possible solutions if you're having issues disabling Automated Backup from the Azure portal:
| Symptom | Solution |
|---|---|
| Disabling Auto backups fails if your SQL IaaS Agent extension is in a failed state | Repair the SQL IaaS Agent extension if it's in a failed state. |
| Disabling Automated Backup fails due to metadata issues | Stop the SQL IaaS Agent service. Run the T-SQL command: use msdb exec autoadmin_metadata_delete. Start SQL Iaas Agent service and try to disable Automated Backup from Azure portal. |
| Automated Backup can't be disabled due to account and permissions | Check the following: - The SQL Server Agent is running. - The NT Service\SqlIaaSExtensionQuery account has proper permissions for the Automated Backup feature both within SQL Server, and also for the SQL virtual machines resource in the Azure portal. - The SA account hasn't been renamed, though disabling the account is acceptable. |
I want to find out what service/application is taking SQL Server backups
- In SQL Server Management Studio (SSMS) Object Explorer, right-click the database > Select Reports > Standard Reports > Backup and Restore Events. In the report, you can expand the Successful Backup Operations section to see the backup history.
- If you see multiple backups on Azure or to a virtual device, check if you're using Azure Backup to back up individual SQL databases or taking a virtual machine snapshot to a virtual device, which uses the
NT Authority/SYSTEMaccount. If you're not, check the Windows Services console (services.msc) to identify any third-party applications that might be taking backups.