Note
Access to this page requires authorization. You can try signing in or changing directories.
Access to this page requires authorization. You can try changing directories.
APPLIES TO: SDK v4
For an overview of how the Bot Framework handles this kind of authentication, see User authentication.
This article covers how to:
- Create an Azure Bot resource.
- Create the Microsoft Entra ID identity provider and use federated credentials flow.
- Register the Microsoft Entra ID identity provider with the bot for user authentication using federated credential flow.
- Prepare the bot code.
Once you finish this article, you have a bot that can respond to a few simple tasks.
Important
The Bot Framework SDK and Bot Framework Emulator have been archived on GitHub. The project is no longer updated or maintained. Support tickets for the Bot Framework SDK will no longer be serviced as of December 31, 2025.
To build agents with your choice of AI services, orchestration, and knowledge, consider using the Microsoft 365 Agents SDK. The Agents SDK has language support for C#, JavaScript or Python. You can learn more about the Agents SDK at aka.ms/agents. If you have an existing bot built with the Bot Framework SDK, you can update your bot to the Agents SDK. Review the core changes and updates at Bot Framework SDK to Agents SDK migration guidance.
If you're looking for a SaaS-based agent platform, consider Microsoft Copilot Studio.
Prerequisites
Knowledge of bot basics, managing state, the dialogs library, and how to implement sequential conversation flow, and how to reuse dialogs.
Knowledge of Azure and OAuth 2.0 development.
Visual Studio 2017 or later for .NET.
Node.js for JavaScript.
Python 3.8+ for Python.
One of the samples listed.
Sample BotBuilder version Demonstrates Authentication in C# v4 OAuthCard support To run the samples referenced in this article, you need:
- A Microsoft Entra ID application with which to register a bot resource in Azure. This application allows the bot to access an external secured resource, such as Microsoft Graph. It also allows the user to communicate with the bot via several channels such as Web Chat.
- A separate Microsoft Entra ID application to function as the identity provider. This application provides the credentials needed to establish an OAuth connection between the bot and the secured resource. Notice that this article uses Active Directory as an identity provider. Many other providers are also supported.
Important
Whenever you register a bot in Azure, it gets assigned an Microsoft Entra ID application. However, this application secures channel-to-bot access. You need an additional Microsoft Entra ID application for each external secured resource you want the bot to access on behalf of the user.
Create the Azure Bot resource
Create the Azure Bot resource, which allows you to register your bot with the Azure AI Bot Service.
Tip
New Web App Bot and Bot Channels Registration resources can't be created; however, any such existing resources that are configured and deployed will continue to work. Bots created from a VSIX or Yeoman template from SDK version 4.14.1.2 or later contain ARM templates that will generate an Azure Bot resource.
Go to the Azure portal.
In the right pane, select Create a resource.
In the search box enter
bot, then press Enter.Select the Azure Bot card.
Select Create.
Enter values in the required fields and review and update settings.
Provide information under Project details. Select whether your bot has global or local data residency. For more information, see Regionalization in Azure AI Bot Service.
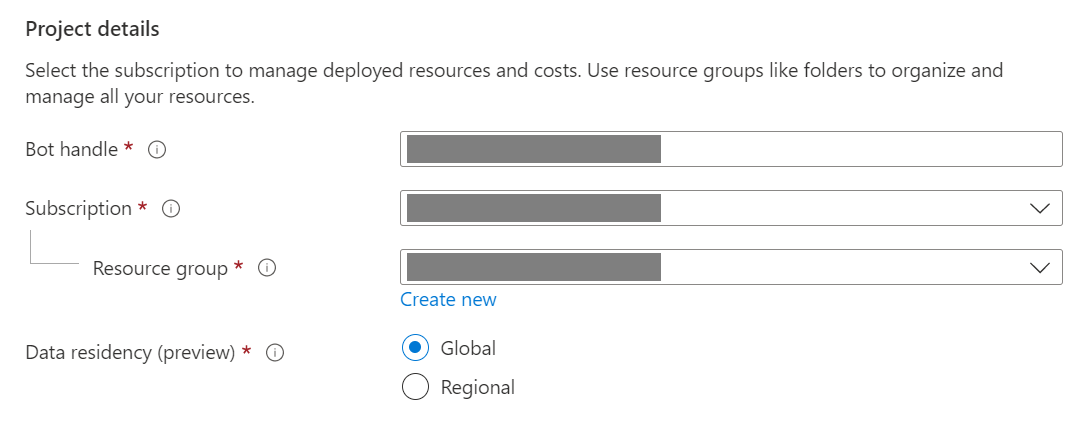
Provide information under Microsoft App ID. Select how your bot identity is managed in Azure and whether to create a new identity or use an existing one.

Select Review + create.
If the validation passes, select Create.
Once the deployment completes, select Go to resource. You should see the bot and related resources listed in the resource group you selected.
If you don't already have the Bot Framework SDK, select Download from GitHub to learn how to consume the packages for your preferred language.

You're now ready to build your bot with the Bot Framework SDK.
Create a User Assigned Managed Identity
Create the User Assigned Managed Identity resource, which allows you to set up an identity that is used as a trust mechanism to obtain access tokens from the Microsoft Entra application.
Go to the Azure portal.
In the right pane, select Create a resource.
In the search box enter
Managed Identities, then press Enter.Select the User Assigned Managed Identity card.
Select Create.
Enter values in the required fields and review and update settings.
Provide information under Project details. Select whether your identity has global or local data residency.

Select Review + create.
If the validation passes, select Create.
Once the deployment completes, select Go to resource. You should see the managed identity and related resources listed in the resource group you selected.
To create a new Federated Credentials
The owner of the bot's App Service resource can add a new trust:
Go to the Azure Bot resource blade for your bot.
Go to the bot's Configuration blade.
Select Manage, next to Microsoft App ID, to go to the Certificates + secrets blade for the app service.
On the Certificates + secrets blade, select the Federated Credentials tab and Add Credentials (+).

On Add Credentials page, Choose the Federated credential scenario to Customer Managed Keys

Enter values in the required fields and review and update settings
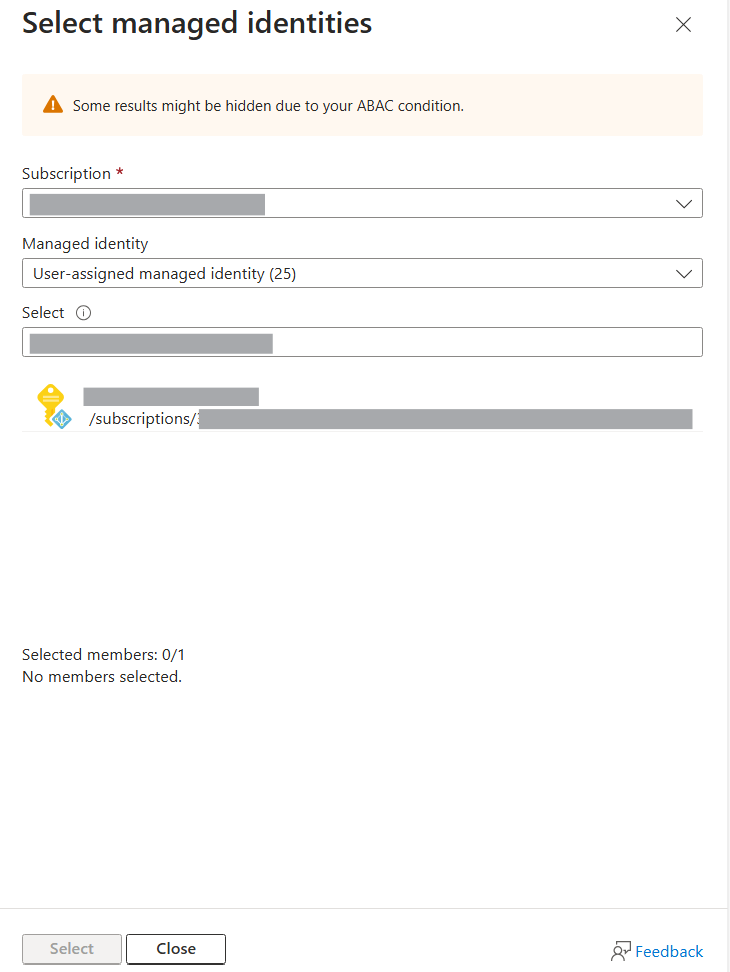
Provide information under Select a managed identity.
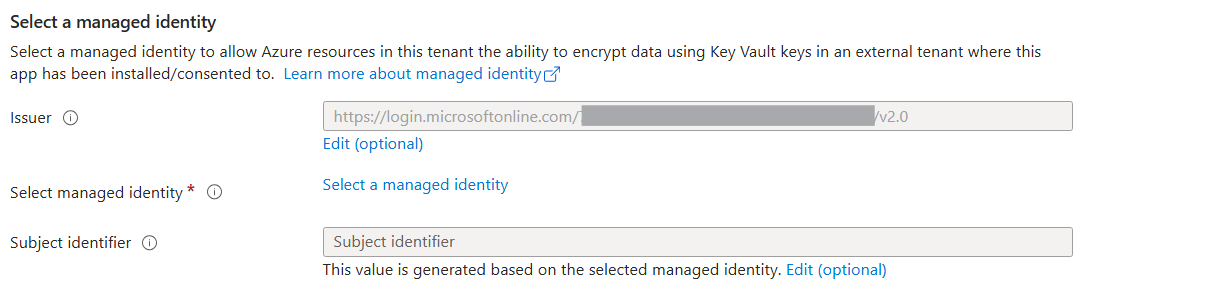
On the Select a managed identity blade:
Select your subscription.
For User assigned managed identities, select the managed identity created earlier.
Select Select to use this identity for your bot.
Provide information under Credential details.

Select Add to add the credential.
To update your Bot
Note
The Bot Framework SDK version 4.22.8 or later supports the use of Federated credentials.
Upgrade the Bot Framework SDK version to 4.22.8 or later.
To enable the Federated Credential for your bot, add the following code to your Startup.cs file:
services.AddSingleton<ServiceClientCredentialsFactory>(new FederatedServiceClientCredentialsFactory(
    Configuration["MicrosoftAppId"],
    Configuration["MicrosoftAppClientId"],
    Configuration["MicrosoftAppTenantId"]));
Follow these steps to include identity information in your bot's configuration file. The specific file and steps might vary depending on the programming language you're using to create the bot.
Important
The Java version of the Bot Framework SDK only supports multi-tenant bots. The C#, JavaScript, and Python versions support all three application types for managing the bot's identity.
Language File name Notes C# appsettings.json Supports all three application types for managing your bot's identity. JavaScript .env Supports all three application types for managing your bot's identity. Java application.properties Only supports multitenant bots. Python config.py Supports all three application types for managing your bot's identity.
The identity information you need to add depends on the bot's application type. Provide the following values in your configuration file.
| Property | Value |
|---|---|
MicrosoftAppType |
SingleTenant/MultiTenant |
MicrosoftAppId |
The bot's app ID. |
MicrosoftAppClientId |
The User Managed Identity password. |
MicrosoftAppTenantId |
The bot's app tenant ID. |
To get your app or tenant ID
To get your bot's app or tenant ID:
Go to the Azure Bot resource blade for your bot.
Go to the bot's Configuration blade.
From this blade, you can copy the bot's Microsoft App ID or App Tenant ID.
To update your app service
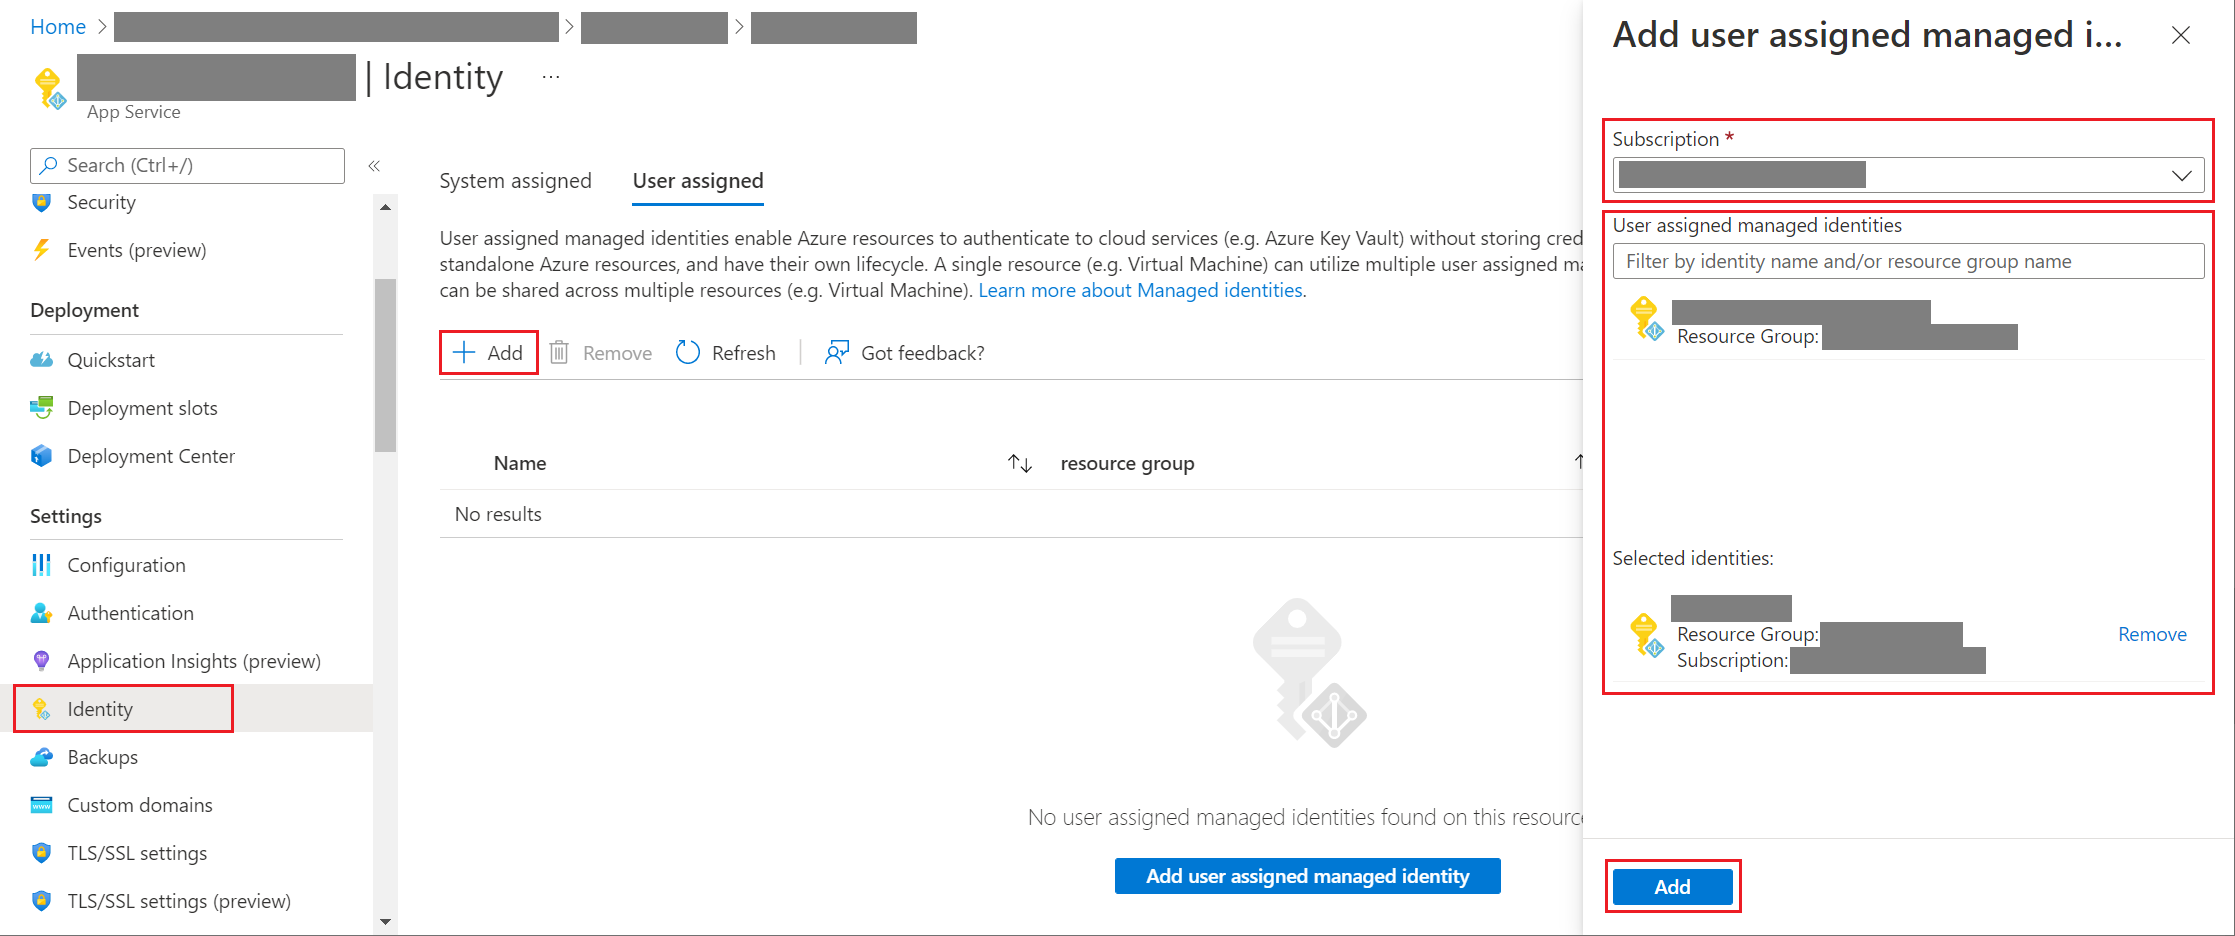
If your bot uses an existing App Service resource (web app) and is a single or multitenant application, you might need to update its app service.
Go to the App Service blade for your bot's web app.
Under Settings, select Identity.
On the Identity blade, select the User assigned tab and Add (+).
On the Add user assigned managed identity blade:
Select your subscription.
For User assigned managed identities, select the managed identity created earlier.
Select Add to use this identity for your bot.
Microsoft Entra ID identity service
The Microsoft Entra ID is a cloud identity service that allows you to build applications that securely sign in users using industry standard protocols like OAuth 2.0.
- Microsoft identity platform (v2.0). Also known as the Microsoft Entra ID endpoint, which is an evolution of the Azure AD platform (v1.0).It lets you build applications that sign in to all Microsoft identity providers and obtain tokens to call Microsoft APIs, like Microsoft Graph, or other developer-built APIs. For more information, see the Microsoft identity platform (v2.0) overview.
For complete information, see Microsoft identity platform (formerly Microsoft Entra ID for developers).
Create the Microsoft Entra ID identity provider
This section shows how to create a Microsoft Entra ID identity provider that uses OAuth 2.0 to authenticate the bot. You can use Microsoft Entra ID endpoints.
Tip
You'll need to create and register the Microsoft Entra ID application in a tenant in which you can consent to delegate permissions requested by an application.
Open the Microsoft Entra ID panel in the Azure portal.
If you aren't in the correct tenant, select Switch directory to switch to the correct tenant. (For information on how to create a tenant, see Access the portal and create a tenant.)
Open the App registrations panel.
In the App registrations panel, select New registration.
Fill in the required fields and create the app registration.
Name your application.
Select the Supported account types for your application. (Any of these options work with this sample.)
For the Redirect URI, select Web and set the URL to one of the supported OAuth redirect URLs.
Select Register.
- Once created, Azure displays the Overview page for the app.
- Record the Application (client) ID value. You use this value later as the client ID when you create the connection string and register the Microsoft Entra ID provider with the bot registration.
- Record the Directory (tenant) ID value. You use this value to register this provider application with your bot.
In the navigation pane, select Certificates & secrets to create a secret for your application.
Under Federated Credentials, select Add Credentials.
On Add Credentials page, Choose the Federated credential scenario to Other Issuer
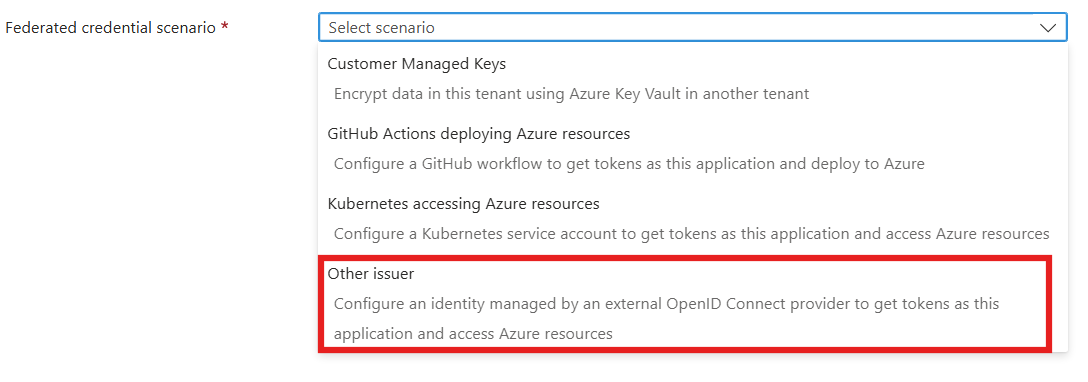
Enter values in the required fields and review and update settings
Provide information under Connect your account.

Issuer :
https://login.partner.microsoftonline.cn/{customer-tenant-ID}/v2.0Subject Identifier : /eid1/c/pub/t/{base64 encoded customer tenant ID}/a/{base64 encoded first-party app client ID}/{unique-identifier-for-projected-identity}
- The following table contains Base64url encoded byte-array representation of supported first-party application IDs. Use this value which represents our first-party app.
Encoded Value Description 9ExAW52n_ky4ZiS_jhpJIQ Base64url encoded of Bot Service Token Store ND1y8_Vv60yhSNmdzSUR_A Base64url encoded of Bot Framework Dev Portal - The following sample code assists you in converting your tenant ID to a Base64url encoded byte-array representation. Please use the value that corresponds to the tenant of your application
Audience : api://AzureADTokenExchange (Use Cloud specific values)
Unique-identifier-for-projected-identity : The token has the same value specified as the Unique Identifier in the OAuth Connection Setting.
Provide information under Credential details.
Select Add to add the credential.
In the navigation pane, select API permissions to open the API permissions panel. It's a best practice to explicitly set the API permissions for the app.
Select Add a permission to show the Request API permissions pane.
For this sample, select Microsoft APIs and Microsoft Graph.
Choose Delegated permissions and make sure the permissions you need are selected. This sample requires theses permissions.
Note
Any permission marked as ADMIN CONSENT REQUIRED will require both a user and a tenant admin to login, so for your bot tend to stay away from these.
- openid
- profile
- Mail.Read
- Mail.Send
- User.Read
- User.ReadBasic.All
Select Add permissions. (The first time a user accesses this app through the bot, they need to grant consent.)
You now have a Microsoft Entra ID application configured.
Note
You'll assign the Application (client) ID, when you create the connection string and register the identity provider with the bot registration. See next section.
Register the Microsoft Entra ID identity provider with the bot
The next step is to register your identity provider with your bot.
Note
Single Tenant Entra Application is only support for AAD v2 with Federated Credentials service provider. Support for multi-tenant apps will be added in future.
Open your bot's Azure Bot resource page in the Azure portal.
Select Settings.
Under OAuth Connection Settings near the bottom of the page, select Add Setting.
Fill in the form as follows:
Name. Enter a name for your connection. You use it in your bot code.
Service Provider. Select AAD v2 with Federated Credentials to display service provider specific fields.
Client id. Enter the application (client) ID you recorded for your Microsoft Entra ID identity provider(Only Single Tenant Supported).
Unique Identifier. Enter the unique identifier you recorded for your Microsoft Entra ID identity provider while creating federated credentials.
Token Exchange URL. Leave it blank because it's used for SSO in Microsoft Entra ID only.
Tenant ID. Enter the directory (tenant) ID that you recorded earlier for your Microsoft Entra ID app or common depending on the supported account types selected when you created the Azure DD app. To decide which value to assign, follow these criteria:
- When creating the Microsoft Entra ID app, if you selected Accounts in this organizational directory only (Microsoft only - Single tenant), enter the tenant ID you recorded earlier for the Microsoft Entra ID app.
- However, if you selected Accounts in any organizational directory (Any Microsoft Entra ID directory - Multi tenant and personal Microsoft accounts e.g. Xbox, Outlook.com) or Accounts in any organizational directory(Microsoft Entra ID directory - Multi tenant), enter
commoninstead of a tenant ID. Otherwise, the Microsoft Entra ID app verifies through the tenant whose ID was selected and exclude personal Microsoft accounts.
This is the tenant associated with the users who can be authenticated. For more information, see Tenancy in Microsoft Entra ID.
For Scopes, enter the names of the permission you chose from the application registration. For testing purposes, you can just enter:
openid profile.Note
For Microsoft Entra ID, Scopes field takes a case-sensitive, space-separated list of values.
Select Save.
Test your connection
Select on the connection entry to open the connection you created.
Select Test Connection at the top of the Service Provider Connection Setting pane.
The first time, this should open a new browser tab listing the permissions your app is requesting and prompt you to accept.
Select Accept.
This should then redirect you to a Test Connection to <your-connection-name> Succeeded page.
You can now use this connection name in your bot code to retrieve user tokens.
Prepare the bot code
You need your bot's app ID and password to complete this process.
Clone from the GitHub repository the sample you want to work with: Bot authentication.
Update appsettings.json:
- Set
ConnectionNameto the name of the OAuth connection setting you added to your bot. - Set
MicrosoftAppIdandMicrosoftAppClientIdto your bot's app ID and app secret.
{
  "MicrosoftAppType": "",
  "MicrosoftAppId": "",
  "MicrosoftAppClientId": "",
  "MicrosoftAppTenantId": "",
}
To use OAuth in bot with data-residency in public cloud, you must add the following configurations in your appsettings
"ToChannelFromBotOAuthScope": "https://api.botframework.azure.cn", "ToChannelFromBotLoginUrlTemplate": "https://api.botframework.azure.cn", "PublicAzureChannel": "https://api.botframework.azure.cn", "ToBotFromChannelOpenIdMetadataUrl": "https://login.botframework.azure.cn/v1/.well-known/openidconfiguration", "ToBotFromEmulatorOpenIdMetadataUrl": "https://login.partner.microsoftonline.cn/common/v2.0/.well-known/openid-configuration", "ToBotFromChannelTokenIssuer": "https://api.botframework.azure.cn", "ToChannelFromBotLoginUrl": "https://login.partner.microsoftonline.cn/botframework.com",- Set
Update Startup.cs:
To use OAuth in non-public Azure clouds, like the government cloud, you must add the following code in the Startup.cs file.
string uri = "<uri-to-use>";
MicrosoftAppCredentials.TrustServiceUrl(uri);
OAuthClientConfig.OAuthEndpoint = uri;
Where <uri-to-use> is one of the following URIs:
URI Description https://api.botframework.azure.cnFor Azure operated by 21Vianet-cloud bots without data residency.
Note
You could now publish the bot code to your Azure subscription (right-select on the project and choose Publish), but it's not necessary for this article. You would need to set up a publishing configuration that uses the application and hosting plan that you used when configuration the bot in the Azure portal.
Testing
After you configured the authentication mechanism, you can perform the actual bot sample testing.
Note
You may be asked to enter a magic code, because the way the bot sample is implemented. This magic code is part of the RFC#7636 and is there to add an extra security element. By removing the magic code, there's an increased security risk. This can be mitigated using Direct Line with enhanced authentication enabled. For more information, see Bot Framework enhanced authentication.
Authentication example
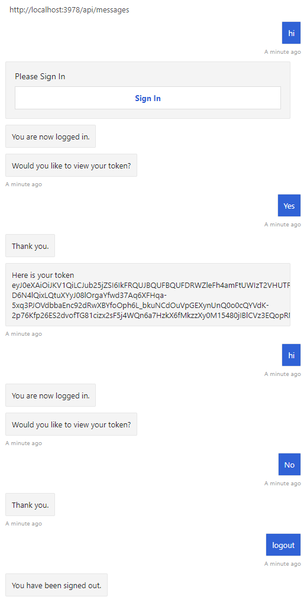
In the Bot authentication sample, the dialog is designed to retrieve the user token after the user is logged in.
Additional information
When a user asks the bot to do something that requires the bot to have the user logged in, the bot can use an OAuthPrompt to initiate retrieving a token for a given connection. The OAuthPrompt creates a token retrieval flow that consists of:
Checking to see if the Azure AI Bot Service already has a token for the current user and connection. If there's a token, the token is returned.
If Azure AI Bot Service doesn't have a cached token, an
OAuthCardis created which is a sign-in button the user can select on.After the user selects on the
OAuthCardsign-in button, Azure AI Bot Service will either send the bot the user's token directly or present the user with a six-digit authentication code to enter in the chat window.If the user is presented with an authentication code, the bot then exchanges this authentication code for the user's token.
The following sections describe how the sample implements some common authentication tasks.
Use an OAuth prompt to sign the user in and get a token
Dialogs\MainDialog.cs
Add an OAuth prompt to MainDialog in its constructor. Here, the value for the connection name was retrieved from the appsettings.json file.
AddDialog(new OAuthPrompt(
    nameof(OAuthPrompt),
    new OAuthPromptSettings
    {
        ConnectionName = ConnectionName,
        Text = "Please Sign In",
        Title = "Sign In",
        Timeout = 300000, // User has 5 minutes to login (1000 * 60 * 5)
    }));
Within a dialog step, use BeginDialogAsync to start the OAuth prompt, which asks the user to sign in.
- If the user is already signed in, a token response event is generated without prompting the user. Otherwise, the user is prompted to sign in. After the user attempts to sign in, the Azure AI Bot Service sends the token response event.
return await stepContext.BeginDialogAsync(nameof(OAuthPrompt), null, cancellationToken);
Within the following dialog step, check for the presence of a token in the result from the previous step. If it's not null, the user successfully signed in.
// Get the token from the previous step. Note that we could also have gotten the
// token directly from the prompt itself. There is an example of this in the next method.
var tokenResponse = (TokenResponse)stepContext.Result;
Wait for a TokenResponseEvent
When you start an OAuth prompt, it waits for a token response event, from which it retrieves the user's token.
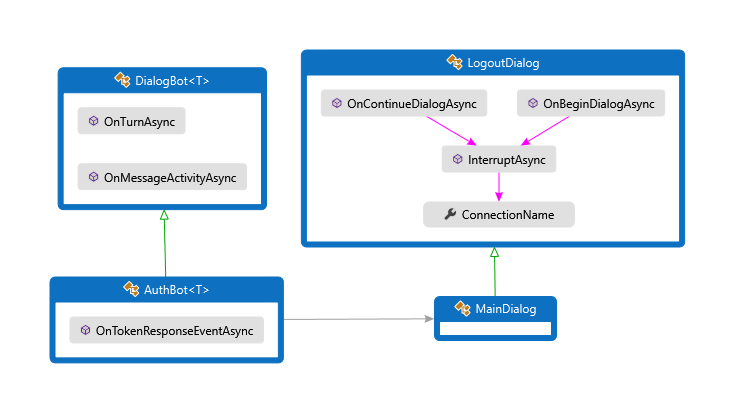
Bots\AuthBot.cs
AuthBot derives from ActivityHandler and explicitly handles token response event activities. Here, we continue the active dialog, which allows the OAuth prompt to process the event and retrieve the token.
protected override async Task OnTokenResponseEventAsync(ITurnContext<IEventActivity> turnContext, CancellationToken cancellationToken)
{
    Logger.LogInformation("Running dialog with Token Response Event Activity.");

    // Run the Dialog with the new Token Response Event Activity.
    await Dialog.RunAsync(turnContext, ConversationState.CreateProperty<DialogState>(nameof(DialogState)), cancellationToken);
}
Log the user out
It's best practice to let users explicitly sign out, instead of relying on the connection to time out.
Dialogs\LogoutDialog.cs
private async Task<DialogTurnResult> InterruptAsync(DialogContext innerDc, CancellationToken cancellationToken = default(CancellationToken))
{
    if (innerDc.Context.Activity.Type == ActivityTypes.Message)
    {
        var text = innerDc.Context.Activity.Text.ToLowerInvariant();

        if (text == "logout")
        {
            // The UserTokenClient encapsulates the authentication processes.
            var userTokenClient = innerDc.Context.TurnState.Get<UserTokenClient>();
            await userTokenClient.SignOutUserAsync(innerDc.Context.Activity.From.Id, ConnectionName, innerDc.Context.Activity.ChannelId, cancellationToken).ConfigureAwait(false);

            await innerDc.Context.SendActivityAsync(MessageFactory.Text("You have been signed out."), cancellationToken);
            return await innerDc.CancelAllDialogsAsync(cancellationToken);
        }
    }

    return null;
}
Further reading
- Bot Framework other resources includes links for more support.
- The Bot Framework SDK repo has more information about repos, samples, tools, and specs associated with the Bot Builder SDK.