Note
Access to this page requires authorization. You can try signing in or changing directories.
Access to this page requires authorization. You can try changing directories.
Applies to: Azure Logic Apps (Standard)
In Standard logic app workflows, the following built-in, service provider-based connectors are stateless, by default:
- Azure Service Bus
- SAP
- IBM MQ
To run these connector operations in stateful mode, you must enable this capability. This how-to guide shows how to enable stateful mode for these connectors.
Prerequisites
An Azure account and subscription. If you don't have a subscription, sign up for a trial Azure subscription.
The Standard logic app resource where you plan to create the workflow that uses the stateful mode-enabled connector operations. If you don't have this resource, create your Standard logic app resource now.
An Azure virtual network with a subnet to integrate with your logic app. If you don't have these items, see the following documentation:
Enable stateful mode in the Azure portal
If you use network security groups in your virtual network, stateful mode requires that you open ports 20,000 to 30,000.
In the Azure portal, open the Standard logic app resource where you want to enable stateful mode for these connector operations.
To enable virtual network integration for your logic app, and add your logic app to the previously created subnet, follow these steps:
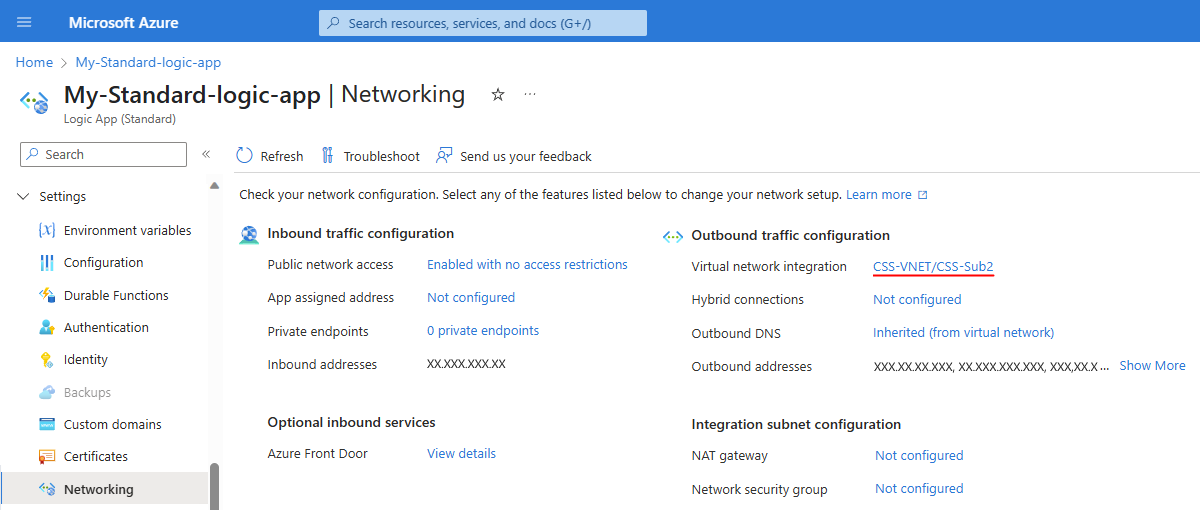
On the logic app menu resource, under Settings, select Networking.
In the Outbound traffic configuration section, next to Virtual network integration, select Not configured > Add virtual network integration.
On the Add virtual network integration pane that opens, select your Azure subscription and your virtual network.
From the Subnet list, select the subnet where you want to add your logic app.
When you're done, select Connect, and return to the Networking page.
The Virtual network integration property is now set to the selected virtual network and subnet, for example:

For general information about enabling virtual network integration with your app, see Enable virtual network integration in Azure App Service.
Next, update your logic app's underlying website configuration (<logic-app-name>.chinacloudsites.cn) by using either of the following tools:
Update website configuration for logic app
After you enable virtual network integration for your logic app, you must update your logic app's underlying website configuration (<logic-app-name>.chinacloudsites.cn) by using one the following methods:
- Azure portal (bearer token not required)
- Azure Resource Management API (bearer token required)
- Azure PowerShell (bearer token not required)
Azure portal
To configure virtual network private ports using the Azure portal, follow these steps:
In the Azure portal, find and open your Standard logic app resource.
On the logic app menu, under Settings, select Configuration.
On the Configuration page, select General settings.

Under Platform settings, in the VNet Private Ports box, enter the ports that you want to use.

Azure Resource Management API
To complete this task with the Azure Resource Management API - Update By Id, review the following requirements, syntax, and parameter values.
Requirements
OAuth authorization and the bearer token are required. To get the bearer token, follow these steps
While you're signed in to the Azure portal, open your web browser's developer tools (F12).
Get the token by sending any management request, for example, by saving a workflow in your Standard logic app.
Syntax
Updates a resource by using the specified resource ID:
PATCH https://management.chinacloudapi.cn/<resource-ID>?api-version=2021-04-01
Parameter values
| Element | Value |
|---|---|
| HTTP request method | PATCH |
| <resource-ID> | subscriptions/<Azure-subscription-ID>/resourcegroups/<resource-group>/providers/Microsoft.Web/sites/<website-name>/config/web |
| <Azure-subscription-ID> | The ID for your Azure subscription |
| <resource-group> | The resource group that contains your logic app resource, which is My-Standard-RG in this example |
| <website-name> | The name for your logic app resource, which is mystandardlogicapp in this example |
| HTTP request body | {"properties": {"vnetPrivatePortsCount": "2"}} |
Example
https://management.chinacloudapi.cn/subscriptions/<Azure-subscription-ID>/resourcegroups/My-Standard-RG/providers/Microsoft.Web/sites/mystandardlogicapp/config/web?api-version=2021-02-01
Azure PowerShell
To complete this task with Azure PowerShell, review the following requirements, syntax, and values. This method doesn't require that you manually get the bearer token.
Syntax
Set-AzContext -Subscription <Azure-subscription-ID>
$webConfig = Get-AzResource -ResourceId <resource-ID>
$webConfig.Properties.vnetPrivatePortsCount = 2
$webConfig | Set-AzResource -ResourceId <resource-ID>
For more information, see the following documentation:
Parameter values
| Element | Value |
|---|---|
| <Azure-subscription-ID> | The ID for your Azure subscription |
| <resource-ID> | subscriptions/<Azure-subscription-ID>/resourcegroups/<resource-group>/providers/Microsoft.Web/sites/<website-name>/config/web |
| <resource-group> | The resource group that contains your logic app resource, which is My-Standard-RG in this example |
| <website-name> | The name for your logic app resource, which is mystandardlogicapp in this example |
Example
https://management.chinacloudapi.cn/subscriptions/<Azure-subscription-ID>/resourcegroups/My-Standard-RG/providers/Microsoft.Web/sites/mystandardlogicapp/config/web?api-version=2021-02-01
Troubleshoot errors
Error: Reserved instance count is invalid
If you get an error that says Reserved instance count is invalid, use the following workaround:
$webConfig.Properties.preWarmedInstanceCount = $webConfig.Properties.reservedInstanceCount
$webConfig.Properties.reservedInstanceCount = $null
$webConfig | Set-AzResource -ResourceId <resource-ID>
Error example:
Set-AzResource :
{
   "Code":"BadRequest",
   "Message":"siteConfig.ReservedInstanceCount is invalid. Please use the new property siteConfig.PreWarmedInstanceCount.",
   "Target": null,
   "Details":
   [
      {
         "Message":"siteConfig.ReservedInstanceCount is invalid. Please use the new property siteConfig.PreWarmedInstanceCount."
      },
      {
         "Code":"BadRequest"
      },
      {
         "ErrorEntity":
         {
            "ExtendedCode":"51021",
            "MessageTemplate":"{0} is invalid. {1}",
            "Parameters":
            [
               "siteConfig.ReservedInstanceCount", "Please use the new property siteConfig.PreWarmedInstanceCount."
            ],
            "Code":"BadRequest",
            "Message":"siteConfig.ReservedInstanceCount is invalid. Please use the new property siteConfig.PreWarmedInstanceCount."
         }
      }
   ],
   "Innererror": null
}
Prevent context loss during resource scale-in events
Resource scale-in events might cause the loss of context for built-in connectors with stateful mode enabled. To prevent this potential loss before such events can happen, fix the number of instances available for your logic app resource. This way, no scale-in events can happen to cause this potential context loss.
Note
For logic apps that doesn't use the App Service Environment v3 hosting option, Azure Logic Apps waits up to 5 minutes before taking down a virtual machine during scale-in events. Built-in connectors might experience issues. For example, Azure Service Bus can't complete messages during platform upgrades.
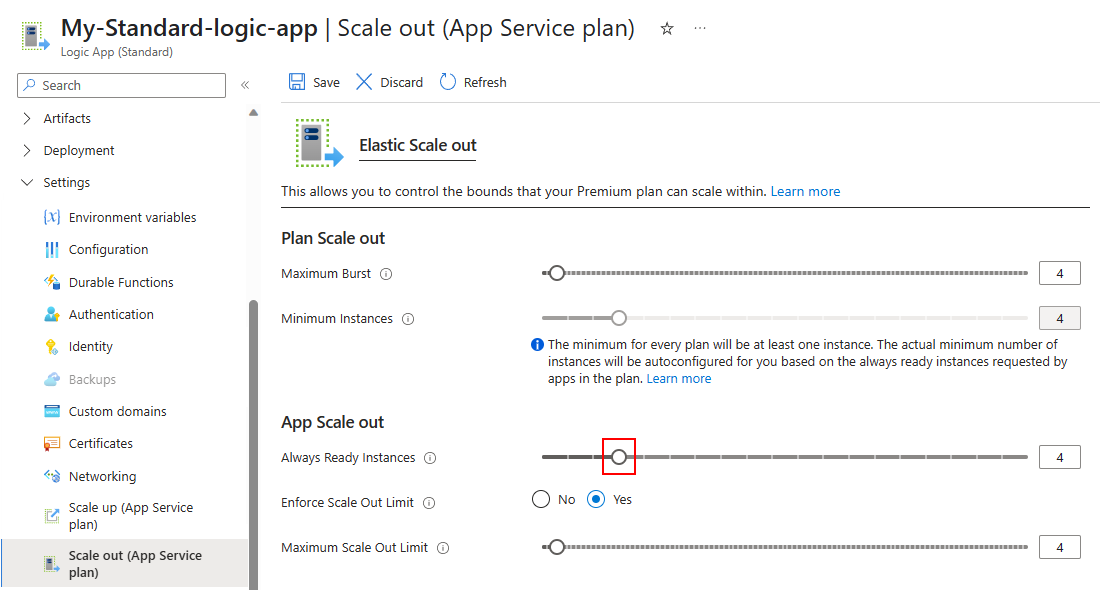
On your logic app resource menu, under Settings, select Scale out (App Service plan).
On the Scale out (App Service plan) page, in the App Scale out section, follow these steps:
Set Enforce Scale Out Limit to Yes, which shows the Maximum Scale Out Limit property.
Set Always Ready Instances to the same number as Maximum Scale Out Limit and Maximum Burst, which appears in the Plan Scale out section, for example:

When you're done, on the Scale out toolbar, select Save.