Note
Access to this page requires authorization. You can try signing in or changing directories.
Access to this page requires authorization. You can try changing directories.
Applies to: Azure Logic Apps (Consumption + Standard)
This guide shows how to access service bus resources in Azure Service Bus from automation and integration workflows in Azure Logic Apps by using the Service Bus connector. You can have service bus events trigger your workflow or run actions that interact with service bus items, for example:
- Monitor when messages arrive (auto-complete) or are received (peek-lock) in queues, topics, and topic subscriptions.
- Send messages.
- Create and delete topic subscriptions.
- Manage messages in queues and topic subscriptions, for example, get, get deferred, complete, defer, abandon, and dead-letter.
- Renew locks on messages and sessions in queues and topic subscriptions.
- Close sessions in queues and topics.
You can use triggers and actions that get responses from Azure Service Bus and then make the output available to other actions in your workflows.
Connector technical reference
The Service Bus connector has different versions, based on logic app workflow type and host environment.
| Logic app | Environment | Connector version |
|---|---|---|
| Consumption | Multitenant Azure Logic Apps | Managed connector, which appears in the connector gallery under Runtime > Shared. Note: Service Bus managed connector triggers follow the long-polling trigger pattern, which means that the trigger periodically checks for messages in the queue or topic subscription. For more information, see: - Service Bus managed connector reference - Managed connectors in Azure Logic Apps |
| Standard | Single-tenant Azure Logic Apps, App Service Environment v3 (Windows plans only), and hybrid deployment | Managed connector, which appears in the connector gallery under Runtime > Shared, and built-in connector, which appears in the connector gallery under Runtime > Built-in and is service provider based. Note: Service Bus managed connector triggers follow the long-polling trigger pattern, which means that the trigger periodically checks for messages in the queue or topic subscription. Service Bus built-in connector non-session triggers follow a continuous-polling trigger pattern that the connector fully manages. In this pattern, the trigger constantly checks for messages in the queue or topic subscription. Session triggers follow the long-polling trigger pattern, but the Azure Functions setting named clientRetryOptions:tryTimeout governs their configuration. The built-in connector generally provides better performance, capabilities, pricing, and so on. For more information, see: - Service Bus managed connector reference - Service Bus built-in connector operations - Built-in connectors in Azure Logic Apps |
Prerequisites
An Azure account and subscription. Get a trial Azure account.
A Service Bus namespace and messaging entity, such as a queue.
For more information, see:
The logic app resource and workflow where you want to access the Service Bus namespace and messaging entity.
To start your workflow with a Service Bus trigger, create a blank workflow. To use a Service Bus action in your workflow, start your workflow with any trigger that best suits your scenario.
If your logic app resource uses a managed identity to authenticate access to your Service Bus namespace and messaging entity, assign the necessary role permissions at the corresponding levels. For example, to access a queue, the managed identity requires a role with the necessary permissions for that queue.
Each logic app resource can use only one managed identity, even if the logic app workflow accesses different messaging entities.
Each managed identity that accesses a queue or topic subscription needs to use its own Service Bus API connection.
Each Service Bus operation that exchanges messages with different messaging entities and requires different permissions needs to use its own Service Bus API connection.
For more information about managed identities, see Authenticate access to Azure resources with managed identities in Azure Logic Apps.
By default, Service Bus built-in connector operations are stateless. To run these operations in stateful mode, see Enable stateful mode for stateless built-in connectors.
Considerations for Azure Service Bus operations
Infinite loops
Important
Make sure your workflow doesn't create an infinite loop when you use a trigger and action with the same connector type to work with the same entity, such as a message queue or topic subscription. This loop results in a workflow that never completes.
Limit on saved sessions in connector cache
For each Service Bus messaging entity, such as a subscription or topic, the Service Bus connector can save up to 1,500 unique sessions at a time in the connector cache. If the session count exceeds this limit, the connector cache removes old sessions. For more information, see Message sessions.
Send correlated messages in order
When you need to send related messages in a specific order, create a workflow by using the Service Bus connector and the sequential convoy pattern. Correlated messages have a property that defines the relationship between those messages, such as the ID for the session in Azure Service Bus.
When you create a Consumption logic app workflow, you can select the Correlated in-order delivery using service bus sessions template, which implements the sequential convoy pattern. For more information, see Send related messages in order.
Large message support
Large message support is available only for Standard workflows when you use the Service Bus built-in connector operations. For example, you can receive and handle large messages by using the built-in triggers and actions respectively.
For the Service Bus managed connector, the maximum message size is limited to 1 MB, even when you use a premium tier Service Bus namespace.
Increase timeout for receiving and sending messages
In Standard workflows that use the Service Bus built-in operations, you can increase the timeout for receiving and sending messages. For example, to increase the timeout for receiving a message, change the setting in the following code example in the Azure Functions extension:
{
   "version": "2.0",
   "extensionBundle": {
      "id": "Microsoft.Azure.Functions.ExtensionBundle.Workflows",
      "version": "[1.*, 2.0.0)"
   },
   "extensions": {
      "serviceBus": {
         "batchOptions": {
            "operationTimeout": "00:15:00"
         }
      }
   }
}
To increase the timeout for sending a message, add the ServiceProviders.ServiceBus.MessageSenderOperationTimeout app setting.
Service Bus managed connector triggers
For the Service Bus managed connector, all triggers use the long polling pattern. This trigger type processes all the messages and then waits 30 seconds for more messages to appear in the queue or topic subscription. If no messages appear in 30 seconds, the trigger run is skipped. Otherwise, the trigger continues reading messages until the queue or topic subscription is empty. The next trigger poll is based on the recurrence interval specified in the trigger's properties.
Some triggers, such as the When one or more messages arrive in a queue (auto-complete) trigger, can return one or more messages. When these triggers fire, they return between one and the number of messages that's specified by the trigger's Maximum message count property.
Note
The auto-complete trigger automatically completes a message, but completion happens only at the next call to Service Bus. This behavior can affect your workflow design. For example, avoid changing the concurrency on the auto-complete trigger because this change might result in duplicate messages if your workflow enters a throttled state. Changing the concurrency control creates the following conditions:
- Throttled triggers are skipped with the
WorkflowRunInProgresscode. - The completion operation doesn't run.
- The next trigger run occurs after the polling interval.
You need to set the service bus lock duration to a value that's longer than the polling interval. However, despite this setting, the message still might not complete if your workflow remains in a throttled state at next polling interval.
If you must change the concurrency on a Service Bus auto-complete trigger, don't make this change before you initially save your workflow. Create and save your workflow first before you edit the trigger to change the concurrency.
Service Bus built-in connector triggers
For the Service Bus built-in connector, non-session triggers follow a continuous-polling trigger pattern, which the connector fully manages. In this pattern, the trigger constantly checks for messages in the queue or topic subscription. By contrast, session triggers follow the long-polling trigger pattern. The Azure Functions setting, clientRetryOptions:tryTimeout, governs their configuration. The Azure Functions host extension, defined in your logic app's host.json file, and the trigger settings defined in your logic app's workflow, which you set up through the designer or code view, share configuration settings for the Service Bus built-in trigger. This section covers both settings locations. Note the following details about Service Bus triggers:
Some built-in triggers, such as the When messages are available in a queue trigger, can return one or more messages. When these triggers fire, they return between one and the number of messages.
The built-in trigger named When messages are available in a queue (V1) doesn't support the parameter named Maximum message batch size. If you use this parameter, you need to use the V2 version instead. To use a trigger where the parameter isn't supported, you can control the number of messages received by adding the
maxMessageBatchSizeparameter to the trigger definition in the host.json file. To find this file, see Edit host and app settings for Standard logic apps."extensions": { "serviceBus": { "maxMessageBatchSize": 25 } }You can enable concurrency on a Service Bus trigger, either through the designer or in code, for example:
"runtimeConfiguration": {
   "concurrency": {
        "runs": 50
    }
}
If you set up concurrency by using a batch, keep the number of concurrent runs larger than the overall batch size. That way, read messages don't go into a waiting state and are always picked up when they're read. In some cases, the trigger can have up to twice the batch size.
If you enable concurrency on the trigger named When messages are available in a queue (V1), and you send 100 or more messages to the queue, the trigger routes all messages to the dead-letter queue.
If you enable concurrency, the limit for debatching or Split on behavior is reduced to 100 items. This behavior is true for all triggers, not just the Service Bus trigger. Make sure the specified batch size is less than this limit on any trigger where you enable concurrency.
If you enable concurrency, by default, a 30-second delay exists between batch reads. This delay slows down the trigger to achieve the following goals:
Reduce the number of storage calls sent to check the number of runs on which to apply concurrency.
Mimic the behavior of the Service Bus managed connector trigger, which has a 30-second long poll when no messages are found.
Although you can change this delay, make sure that you carefully test any changes to the default value:
"workflow": {
    "settings": {
       "Runtime.ServiceProviders.FunctionTriggers.DynamicListenerEnableDisableInterval": "00:00:30"
    }
}
Some scenarios exist where the trigger can exceed the concurrency settings. Rather than fail these runs, Azure Logic Apps queues them in a waiting state until they can be started. The
maximumWaitingRunssetting controls the number of runs allowed in the waiting state:"runtimeConfiguration": { "concurrency": { "runs": 100, "maximumWaitingRuns": 50 } }With the Service Bus trigger, make sure that you carefully test these changes so that runs don't wait longer than the message lock timeout. For more information about the default values, see Concurrency and de-batching limits here.
Step 1: Check access to Service Bus namespace
To confirm that your logic app resource has permissions to access your Service Bus namespace, follow these steps:
In the Azure portal, open your Service Bus namespace.
On the namespace sidebar, under Settings, select Shared access policies. Under Claims, check that you have Manage permissions for that namespace.

Step 2: Get connection authentication requirements
When you add a Service Bus trigger or action for the first time, you're prompted for connection information, including the connection authentication type. Based on your logic app workflow type, Service Bus connector version, and selected authentication type, you need the items described in the following sections.
Managed connector authentication (Consumption and Standard workflows)
| Authentication type | Required information |
|---|---|
| Access Key | The connection string for your Service Bus namespace. For more information, see Get connection string for Service Bus namespace. |
| Microsoft Entra integrated | The endpoint URL for your Service Bus namespace. For more information, see Get endpoint URL for Service Bus namespace. |
| Logic Apps Managed Identity | The endpoint URL for your Service Bus namespace. For more information, see Get endpoint URL for Service Bus namespace. |
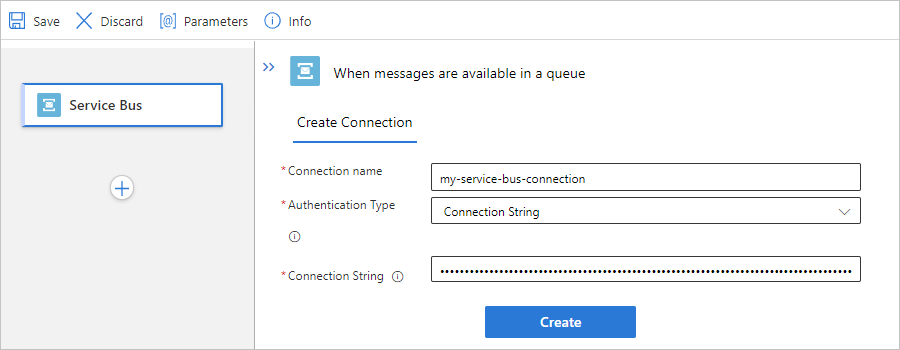
Built-in connector authentication (Standard workflows only)
| Authentication type | Required information |
|---|---|
| Connection String | The connection string for your Service Bus namespace. For more information, see Get connection string for Service Bus namespace. |
| Active Directory OAuth | The fully qualified name for your Service Bus namespace, for example, <your-Service-Bus-namespace>.servicebus.chinacloudapi.cn. For more information, see Get fully qualified name for Service Bus namespace. For the other property values, see OAuth with Microsoft Entra ID. |
| Managed identity | The fully qualified name for your Service Bus namespace, for example, <your-Service-Bus-namespace>.servicebus.chinacloudapi.cn. For more information, see Get fully qualified name for Service Bus namespace. |
Get connection string for Service Bus namespace
To create a connection when you add a Service Bus trigger or action, you need the connection string for your Service Bus namespace. The connection string starts with the sb:// prefix.
In the Azure portal, open your Service Bus namespace.
On the namespace sidebar, under Settings, select Shared access policies.
On the Shared access policies pane, select RootManageSharedAccessKey.
Next to the primary or secondary connection string, select the copy button.
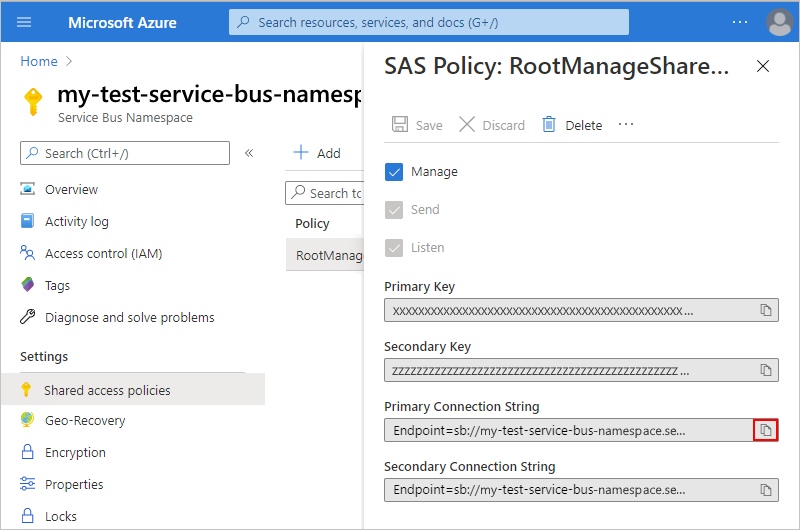
Note
To confirm that the string is for the namespace, not a specific messaging entity, search the connection string for the
EntityPathparameter. If you find this parameter, the connection string is for a specific entity, and isn't the correct string to use with your workflow.Save the connection string for later use.
Get endpoint URL for Service Bus namespace
If you use the Service Bus managed connector, you need this endpoint URL if you select either authentication type for Microsoft Entra integrated or Logic Apps Managed Identity. The endpoint URL starts with the sb:// prefix.
In the Azure portal, open your Service Bus namespace.
On the namespace sidebar, expand Settings, and then select Properties.
Under Essentials, next to Id, copy and save the endpoint URL for later use.
Get fully qualified name for Service Bus namespace
In the Azure portal, open your Service Bus namespace.
On the namespace sidebar, select Overview.
On the Overview page, expand Essentials, and find the Host name property.
Copy and save the fully qualified name, which looks like <your-Service-Bus-namespace>.servicebus.chinacloudapi.cn, for later use.
Step 3: Option 1 - Add a Service Bus trigger
The following steps use the Azure portal, but by using the corresponding Azure Logic Apps extension, you can use Visual Studio Code to create logic app workflows:
- Consumption workflows: Create Consumption logic app workflows with Visual Studio Code
- Standard workflows: Create Standard logic app workflows with Visual Studio Code
In the Azure portal, open your Consumption logic app resource. Open the blank workflow in the designer.
In the designer, follow the general steps to add the Azure Service Bus trigger you want for your scenario.
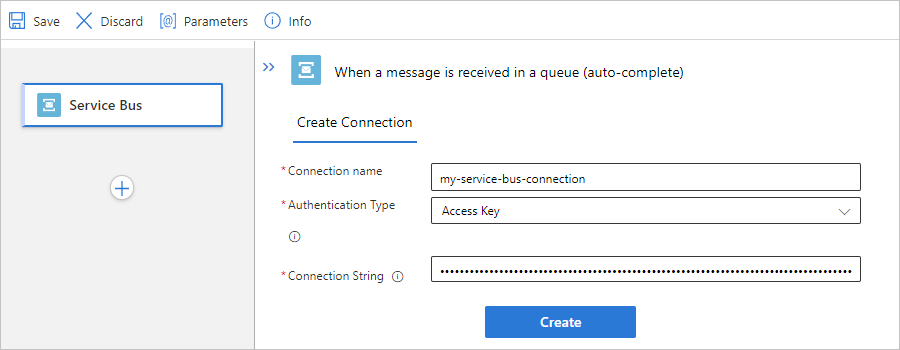
This example uses the trigger named When a message is received in a queue (auto-complete).
Provide the following connection information:
Parameter Required Description Connection Name Yes A name for your connection. Authentication Type Yes The authentication type to use for accessing your Service Bus namespace. For more information, see Managed connector authentication. Connection String Yes The connection string that you copied and saved earlier. For example, the following connection uses an access key for authentication and provides the connection string for a Service Bus namespace:
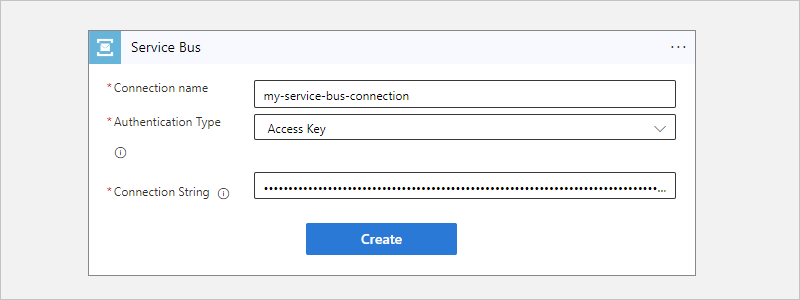
When you finish, select Create new.
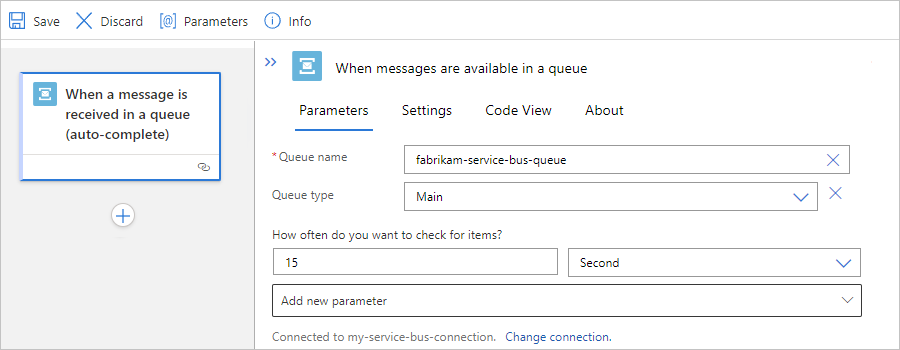
In the trigger information pane, provide the necessary information, for example:
Parameter Required Description Queue name Yes The selected queue to access Queue type No The type for the selected queue How often do you want to check for items? Yes The polling interval and frequency to check the queue for items 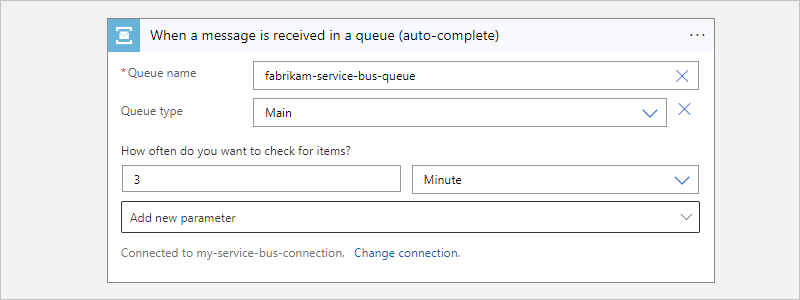
Add any actions that your workflow needs.
For example, you can add an action that sends an email when a new message arrives. When your trigger checks your queue and finds a new message, your workflow runs your selected actions for the new message.
When you finish, save your workflow. On the designer toolbar, select Save.
Step 3: Option 2 - Add a Service Bus action
The following steps use the Azure portal, but by using the appropriate Azure Logic Apps extension, you can use Visual Studio Code to build logic app workflows:
- Consumption workflows: Create Consumption logic app workflows with Visual Studio Code
- Standard workflows: Create Standard logic app workflows with Visual Studio Code
In the Azure portal, open your Consumption logic app resource. Open your workflow in the designer.
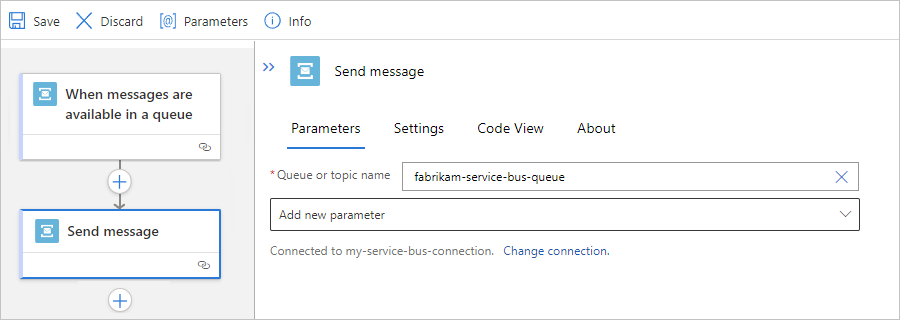
In the designer, follow the general steps to add the Azure Service Bus action you want for your scenario.
This example uses the action named Send message.
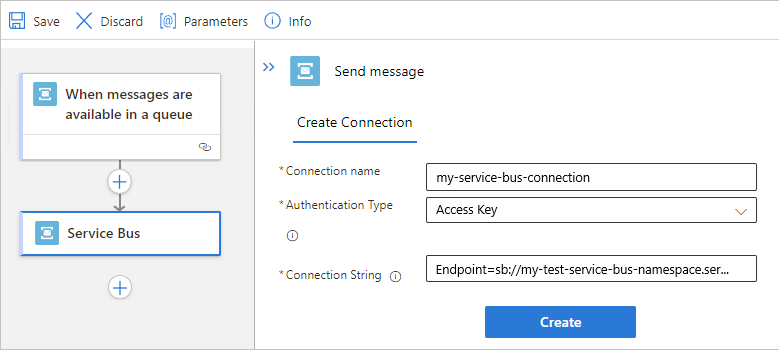
In the connection information pane, provide the following information:
Parameter Required Description Connection Name Yes A name for your connection. Authentication Type Yes The authentication type to use for accessing your Service Bus namespace. For more information, see Managed connector authentication. Connection String Yes The connection string that you copied and saved earlier. For example, this connection uses access key authentication and provides the connection string for a Service Bus namespace:
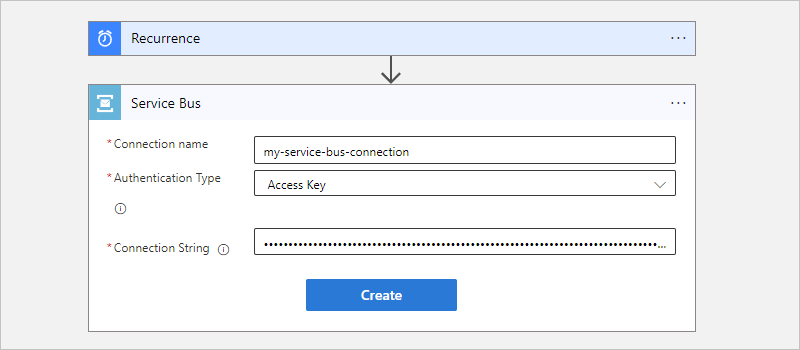
When you finish, select Create new.
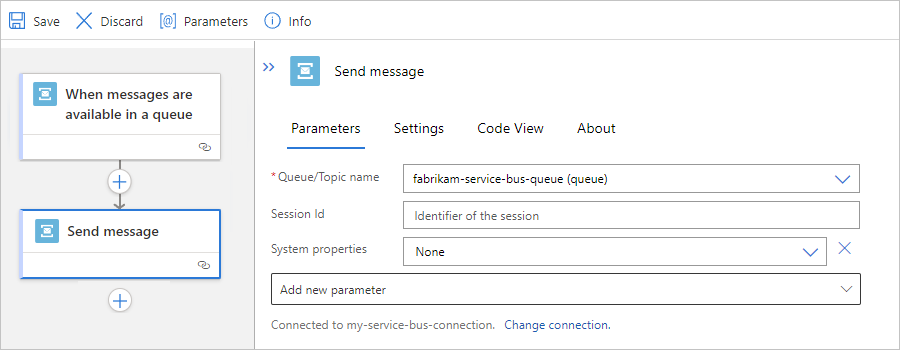
In the action information pane, provide the necessary information, for example:
Parameter Required Description Queue/Topic name Yes The selected queue or topic destination for sending the message. Session Id No The session ID if sending the message to a session-aware queue or topic. System properties No - None
- Run Details: Add metadata property information about the run as custom properties in the message.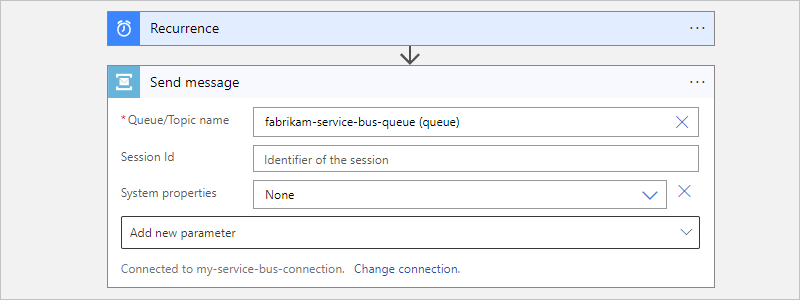
To add any other available properties to the action, open the Advanced parameters list, and select the properties that you want.
Add any other actions that your workflow needs.
For example, you can add an action that sends an email to confirm that your message was sent.
When you finish, save your workflow. On the designer toolbar, select Save.

Service Bus built-in connector app settings
In a Standard logic app resource, the Service Bus built-in connector includes app settings that control various thresholds. For example, these settings control the timeouts for sending messages and the number of message senders per processor core in the message pool. For more information, see Reference for app settings - local.settings.json.
Read messages from dead-letter queues by using Service Bus built-in triggers
In Standard workflows, to read a message from a dead-letter queue in a queue or a topic subscription, follow these steps by using the specified triggers:
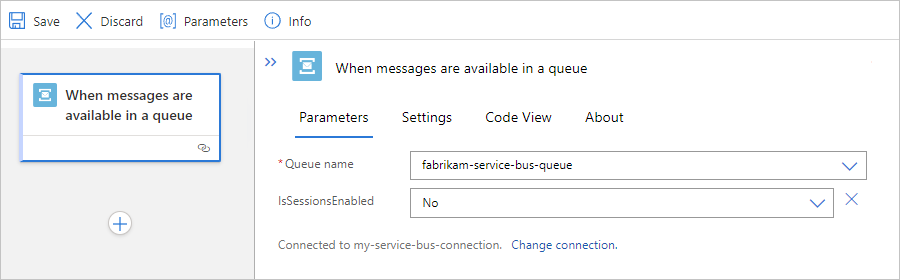
In your blank workflow, based on your scenario, add the Service Bus built-in connector trigger named When messages are available in a queue or When a message are available in a topic subscription (peek-lock).
In the trigger, set the following parameter values to specify your queue or topic subscription's default dead-letter queue, which you can access like any other queue:
When messages are available in a queue trigger: Set the Queue name parameter to
queuename/$deadletterqueue.When a message are available in a topic subscription (peek-lock) trigger: Set the Topic name parameter to
topicname/Subscriptions/subscriptionname/$deadletterqueue.
For more information, see Service Bus dead-letter queues overview.
Troubleshoot problems
Delays in updates to your workflow taking effect
If a Service Bus trigger's polling interval is small, such as 10 seconds, updates to your workflow might not take effect for up to 10 minutes. To work around this problem, disable the logic app resource, make the changes, and then re-enable the logic app resource.
No session available or another receiver locked it
Occasionally, operations such as completing a message or renewing a session produce the following error in the managed connector:
{
  "status": 400,
  "error": {
    "message": "No session available to complete the message with the lock token 'ce440818-f26f-4a04-aca8-555555555555'."
  }
}
Occasionally, a session-based trigger might fail with the following error in the managed connector:
{
  "status": 400,
  "error": {
    "message": "Communication with the Service Bus namespace 'xxxx' and 'yyyy' entity failed. The requested session 'zzzz' cannot be accepted. It may be locked by another receiver."
  }
}
Occasionally, operations such as completing a message or renewing a session produce the following error in the built-in connector:
{
  "code": "ServiceProviderActionFailed",
  "message": "The service provider action failed with error code 'ServiceOperationFailed' and error message 'The Service Bus session was not found to perform operation 'getMessagesFromQueueSession' on session id '11115555'.'."
}
The Service Bus connector uses in-memory cache to support all operations associated with the sessions. The Service Bus message receiver is cached in the memory of the role instance (virtual machine) that receives the messages. To process all requests, all calls for the connection get routed to this same role instance. This behavior is required because all the Service Bus operations in a session require the same receiver that receives the messages for a specific session.
Due to reasons such as an infrastructure update, connector deployment, and so on, the possibility exists for requests to not get routed to the same role instance. If this event happens, requests fail for one of the following reasons:
The receiver that performs the operations in the session isn't available in the role instance that serves the request.
The new role instance tries to obtain the session, which either timed out in the old role instance or wasn't closed.
This behavior can happen in both the managed connector and the built-in connector. When the error happens, the message is still preserved in the service bus. The next trigger or workflow run tries to process the message again. As long as this error happens only occasionally, the error is expected.