Note
Access to this page requires authorization. You can try signing in or changing directories.
Access to this page requires authorization. You can try changing directories.
APPLIES TO:
![]() MongoDB
MongoDB
Important
Are you looking for a database solution for high-scale scenarios with a 99.999% availability service level agreement (SLA), instant autoscale, and automatic failover across multiple regions? Consider Azure Cosmos DB for NoSQL.
Important
Please read this entire guide before carrying out your migration steps.
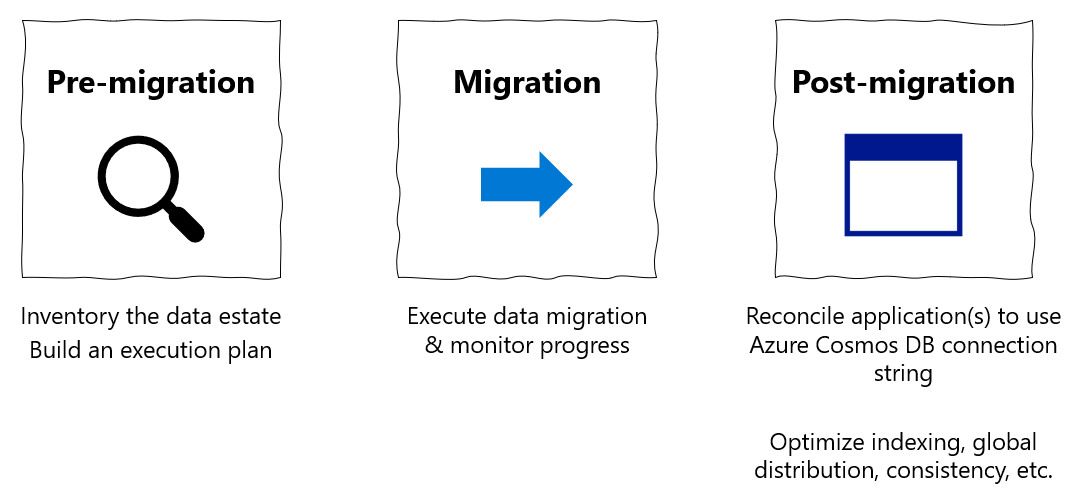
This MongoDB migration guide is part of series on MongoDB migration. The critical MongoDB migration steps are pre-migration, migration, and post-migration, as shown below.
Overview of data migration using MongoDB native tools
You can use MongoDB native tools to perform an offline (one-time) migration of databases from an on-premises or cloud instance of MongoDB to Azure Cosmos DB's API for MongoDB.
In this tutorial, you learn how to:
- Choose the appropriate MongoDB native tool for your use-case
- Run the migration.
- Monitor the migration.
- Verify that migration was successful.
In this tutorial, you migrate a dataset in MongoDB hosted in an Azure Virtual Machine to Azure Cosmos DB's API for MongoDB by using MongoDB native tools. The MongoDB native tools are a set of binaries that facilitate data manipulation on an existing MongoDB instance. Since Azure Cosmos DB exposes an API for MongoDB, the MongoDB native tools are able to insert data into Azure Cosmos DB. The focus of this doc is on migrating data out of a MongoDB instance using mongoexport/mongoimport or mongodump/mongorestore. Since the native tools connect to MongoDB using connection strings, you can run the tools anywhere, however we recommend running these tools within the same network as the MongoDB instance to avoid firewall issues.
The MongoDB native tools can move data only as fast as the host hardware allows; the native tools can be the simplest solution for small datasets where total migration time is not a concern. MongoDB Spark connector, Azure Data Migration Service (DMS), or Azure Data Factory (ADF) can be better alternatives if you need a scalable migration pipeline.
If you don't have a MongoDB source set up already, see the article Install and configure MongoDB on a Windows VM in Azure.
Prerequisites
To complete this tutorial, you need to:
- Complete the pre-migration steps such as estimating throughput, choosing a partition key, and the indexing policy.
- Create an Azure Cosmos DB for MongoDB account.
- Log into your MongoDB instance
- Download and install the MongoDB native tools from this link.
- Ensure that your MongoDB native tools version matches your existing MongoDB instance.
- If your MongoDB instance has a different version than Azure Cosmos DB for MongoDB, then install both MongoDB native tool versions and use the appropriate tool version for MongoDB and Azure Cosmos DB for MongoDB, respectively.
- Add a user with
readWritepermissions, unless one already exists. Later in this tutorial, provide this username/password to the mongoexport and mongodump tools.
- Download and install the MongoDB native tools from this link.
Configure Azure Cosmos DB Server Side Retries
Customers migrating from MongoDB to Azure Cosmos DB benefit from resource governance capabilities, which guarantee the ability to fully utilize your provisioned RU/s of throughput. Azure Cosmos DB may throttle a given request in the course of migration if that request exceeds the container provisioned RU/s; then that request needs to be retried. The round-trip time involved in the network hop between the migration tool and Azure Cosmos DB impacts the overall response time of that request; furthermore MongoDB native tools may not handle retries. The Server Side Retry feature of Azure Cosmos DB allows the service to intercept throttle error codes and retry with much lower round-trip time, dramatically improving request response times. From the perspective of MongoDB native tools, the need to handle retries is minimized, which will positively impact your experience during migration.
You can find the Server Side Retry capability in the Features blade of the Azure Cosmos DB portal
And if it is Disabled, then we recommend you enable it.
Choose the proper MongoDB native tool
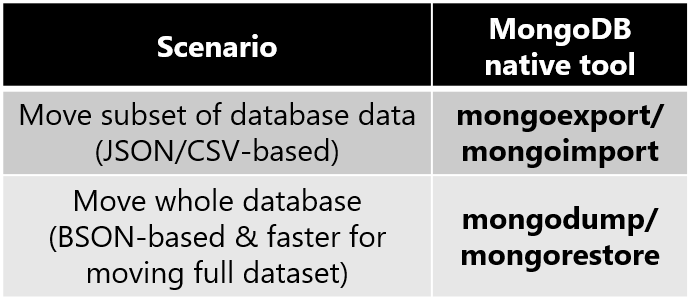
- mongoexport/mongoimport is the best pair of migration tools for migrating a subset of your MongoDB database.
- mongoexport exports your existing data to a human-readable JSON or CSV file. mongoexport takes an argument specifying the subset of your existing data to export.
- mongoimport opens a JSON or CSV file and inserts the content into the target database instance (Azure Cosmos DB in this case.).
- Note that JSON and CSV are not a compact formats; you may incur excess network charges as mongoimport sends data to Azure Cosmos DB.
- mongodump/mongorestore is the best pair of migration tools for migrating your entire MongoDB database. The compact BSON format will make more efficient use of network resources as the data is inserted into Azure Cosmos DB.
- mongodump exports your existing data as a BSON file.
- mongorestore imports your BSON file dump into Azure Cosmos DB.
- As an aside - if you simply have a small JSON file that you want to import into Azure Cosmos DB for MongoDB, the mongoimport tool is a quick solution for ingesting the data.
Collect the Azure Cosmos DB for MongoDB credentials
Azure Cosmos DB for MongoDB provides compatible access credentials which MongoDB native tools can utilize. You will need to have these access credentials on-hand in order to migrate data into Azure Cosmos DB for MongoDB. To find these credentials:
Open the Azure portal
Navigate to your Azure Cosmos DB for MongoDB account
In the left nav, select the Connection String blade, and you should see a display similar to the below:
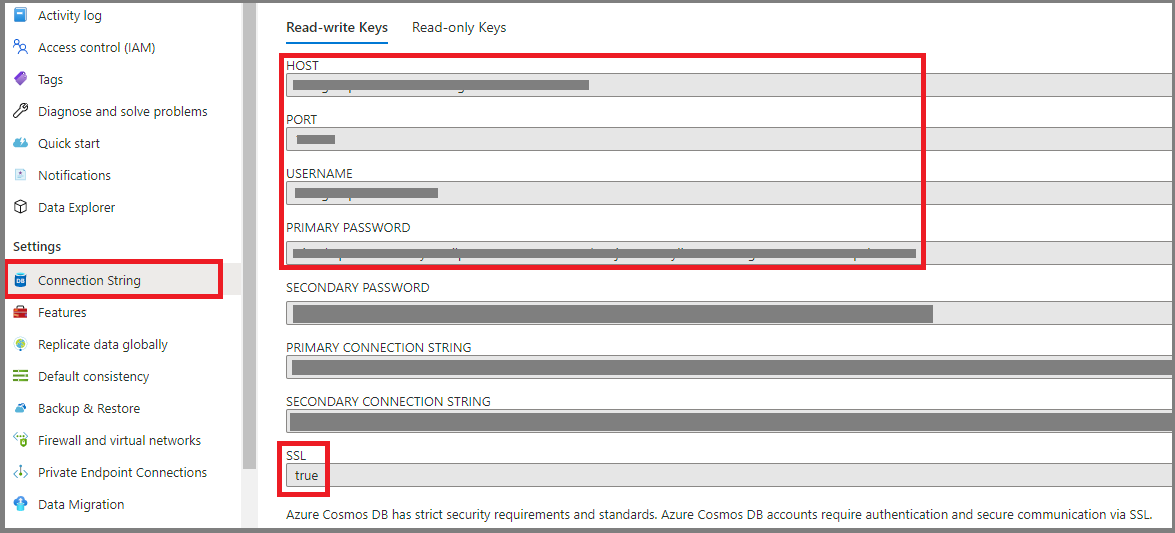
- HOST - the Azure Cosmos DB endpoint functions as a MongoDB hostname
- PORT - when MongoDB native tools connect to Azure Cosmos DB, you must specify this port explicitly
- USERNAME - the prefix of the Azure Cosmos DB endpoint domain name functions as the MongoDB username
- PASSWORD - the Azure Cosmos DB master key functions as the MongoDB password
- Additionally, note the SSL field which is
true- the MongoDB native tool must enable SSL when writing data into Azure Cosmos DB
Perform the migration
- Choose which database(s) and collection(s) you would like to migrate. In this example, we are migrating the query collection in the edx database from MongoDB to Azure Cosmos DB.
The rest of this section will guide you through using the pair of tools you selected in the previous section.
mongoexport/mongoimport
To export the data from the source MongoDB instance, open a terminal on the MongoDB instance machine. If it is a Linux machine, type
mongoexport --host HOST:PORT --authenticationDatabase admin -u USERNAME -p PASSWORD --db edx --collection query --out edx.jsonOn windows, the executable will be
mongoexport.exe. HOST, PORT, USERNAME, and PASSWORD should be filled in based on the properties of your existing MongoDB database instance.You may also choose to export only a subset of the MongoDB dataset. One way to do this is by adding an additional filter argument:
mongoexport --host HOST:PORT --authenticationDatabase admin -u USERNAME -p PASSWORD --db edx --collection query --out edx.json --query '{"field1":"value1"}'Only documents which match the filter
{"field1":"value1"}will be exported.Once you execute the call, you should see that an
edx.jsonfile is produced: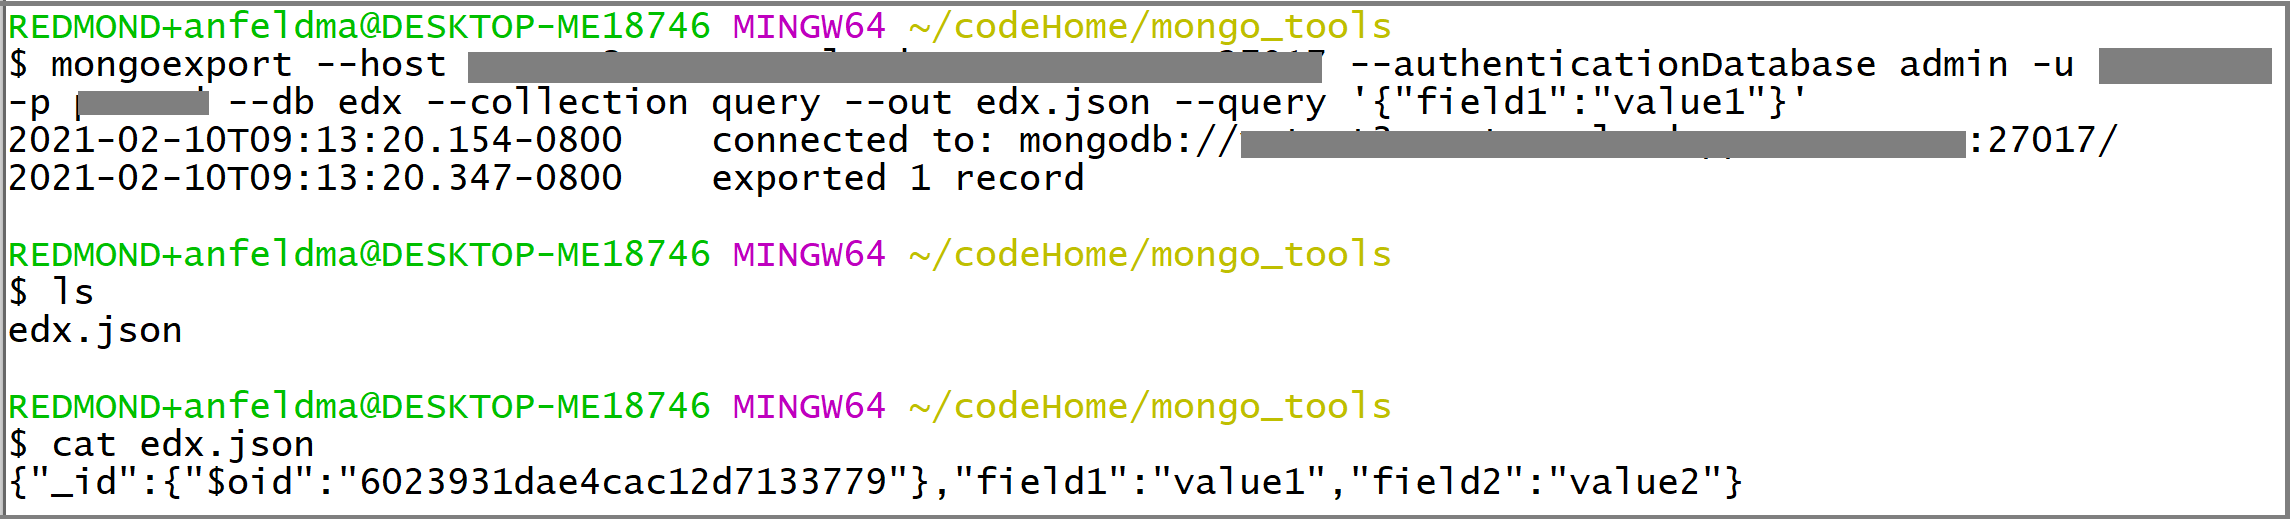
You can use the same terminal to import
edx.jsoninto Azure Cosmos DB. If you are runningmongoimporton a Linux machine, typemongoimport --host HOST:PORT -u USERNAME -p PASSWORD --db edx --collection importedQuery --ssl --type json --writeConcern="{w:0}" --file edx.jsonOn Windows, the executable will be
mongoimport.exe. HOST, PORT, USERNAME, and PASSWORD should be filled in based on the Azure Cosmos DB credentials you collected earlier.Monitor the terminal output from mongoimport. You should see that it prints lines of text to the terminal containing updates on the migration status:

Finally, examine Azure Cosmos DB to validate that migration was successful. Open the Azure Cosmos DB portal and navigate to Data Explorer. You should see (1) that an edx database with an importedQuery collection has been created, and (2) if you exported only a subset of data, importedQuery should contain only docs matching the desired subset of the data. In the example below, only one doc matched the filter
{"field1":"value1"}:
mongodump/mongorestore
To create a BSON data dump of your MongoDB instance, open a terminal on the MongoDB instance machine. If it is a Linux machine, type
mongodump --host HOST:PORT --authenticationDatabase admin -u USERNAME -p PASSWORD --db edx --collection query --ssl --out edx-dumpHOST, PORT, USERNAME, and PASSWORD should be filled in based on the properties of your existing MongoDB database instance. You should see that an
edx-dumpdirectory is produced and that the directory structure ofedx-dumpreproduces the resource hierarchy (database and collection structure) of your source MongoDB instance. Each collection is represented by a BSON file: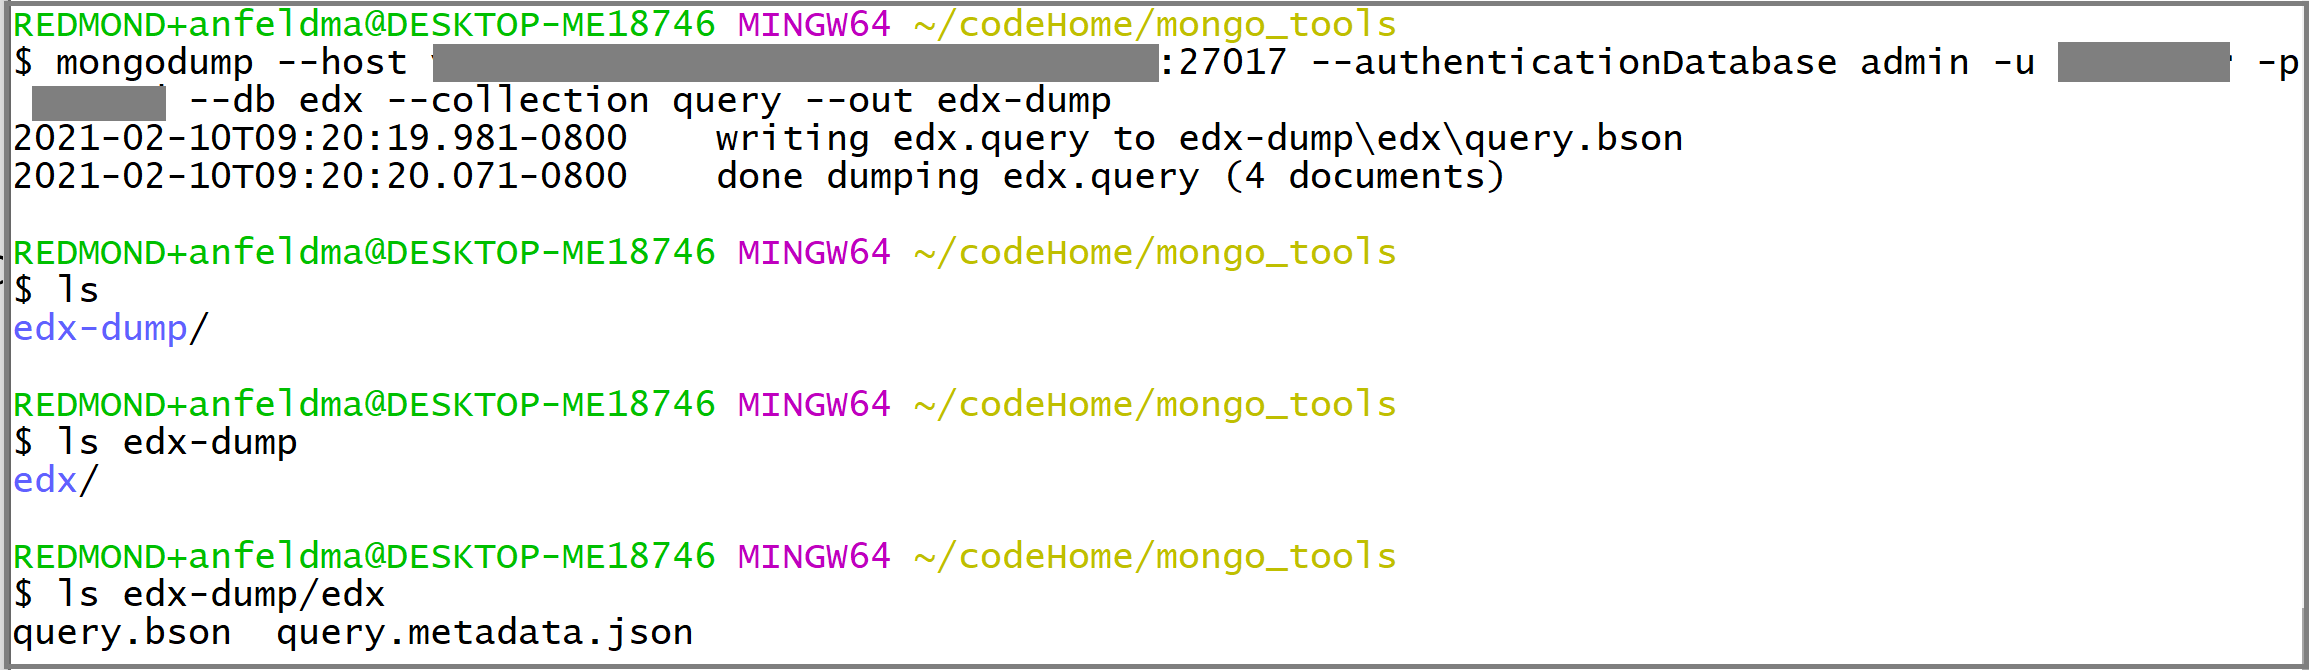
You can use the same terminal to restore the contents of
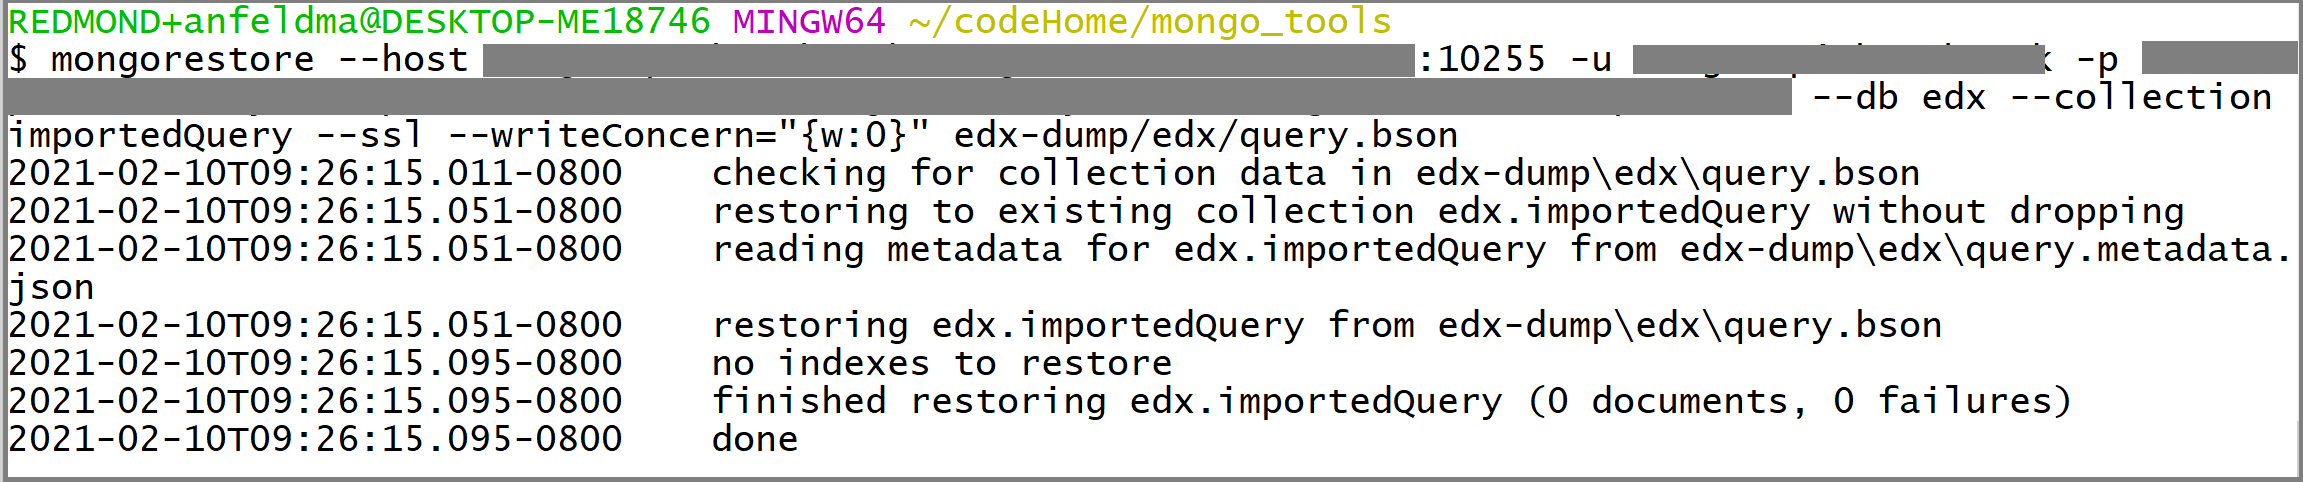
edx-dumpinto Azure Cosmos DB. If you are runningmongorestoreon a Linux machine, typemongorestore --host HOST:PORT --authenticationDatabase admin -u USERNAME -p PASSWORD --db edx --collection importedQuery --writeConcern="{w:0}" --ssl edx-dump/edx/query.bsonOn Windows, the executable will be
mongorestore.exe. HOST, PORT, USERNAME, and PASSWORD should be filled in based on the Azure Cosmos DB credentials you collected earlier.Monitor the terminal output from mongorestore. You should see that it prints lines to the terminal updating on the migration status:
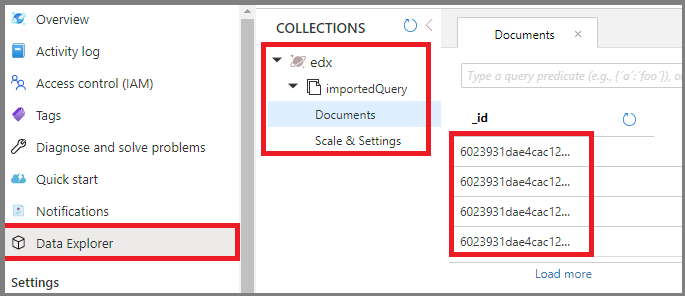
Finally, examine Azure Cosmos DB to validate that migration was successful. Open the Azure Cosmos DB portal and navigate to Data Explorer. You should see (1) that an edx database with an importedQuery collection has been created, and (2) importedQuery should contain the entire dataset from the source collection:
Post-migration optimization
After you migrate the data stored in MongoDB database to Azure Cosmos DB’s API for MongoDB, you can connect to Azure Cosmos DB and manage the data. You can also perform other post-migration optimization steps such as optimizing the indexing policy, update the default consistency level, or configure multiple-regional distribution for your Azure Cosmos DB account. For more information, see the Post-migration optimization article.
Additional resources
- Azure Cosmos DB service information
- MongoDB database tools documentation
- Trying to do capacity planning for a migration to Azure Cosmos DB?
- If all you know is the number of vcores and servers in your existing database cluster, read about estimating request units using vCores or vCPUs
- If you know typical request rates for your current database workload, read about estimating request units using Azure Cosmos DB capacity planner
Next steps
- Review migration guidance for additional scenarios in the Azure Database Migration Guide.