Azure Data Explorer encrypts all data in a storage account at rest. By default, it uses Microsoft-managed keys for encryption. If you want more control over the encryption keys, you can provide customer-managed keys for data encryption.
You must store customer-managed keys in an Azure Key Vault. You can create your own keys and store them in a key vault, or you can use an Azure Key Vault API to generate keys. The Azure Data Explorer cluster and the key vault must be in the same region, but they can be in different subscriptions. For a detailed explanation of customer-managed keys, see customer-managed keys with Azure Key Vault.
This article shows you how to configure customer-managed keys.
For code samples based on previous SDK versions, see the archived article.
To configure customer-managed keys with Azure Data Explorer, you must set two properties on the key vault: Soft Delete and Do Not Purge. These properties aren't enabled by default. To enable these properties, perform Enabling soft-delete and Enabling Purge Protection in PowerShell or Azure CLI on a new or existing key vault. Azure Data Explorer supports RSA and RSA-HSM keys of size 2048, 3072, and 4096. To use RSA-HSM keys, use the C#, Azure CLI, PowerShell, or ARM Template methods described in this article. For more information about keys, see Key Vault keys.
Note
For information about the limitations of using customer managed keys on leader and follower clusters, see Limitations.
Assign a managed identity to the cluster
To enable customer-managed keys for your cluster, first assign either a system-assigned or user-assigned managed identity to the cluster. Use this managed identity to grant the cluster permissions to access the key vault. To configure managed identities, see managed identities.
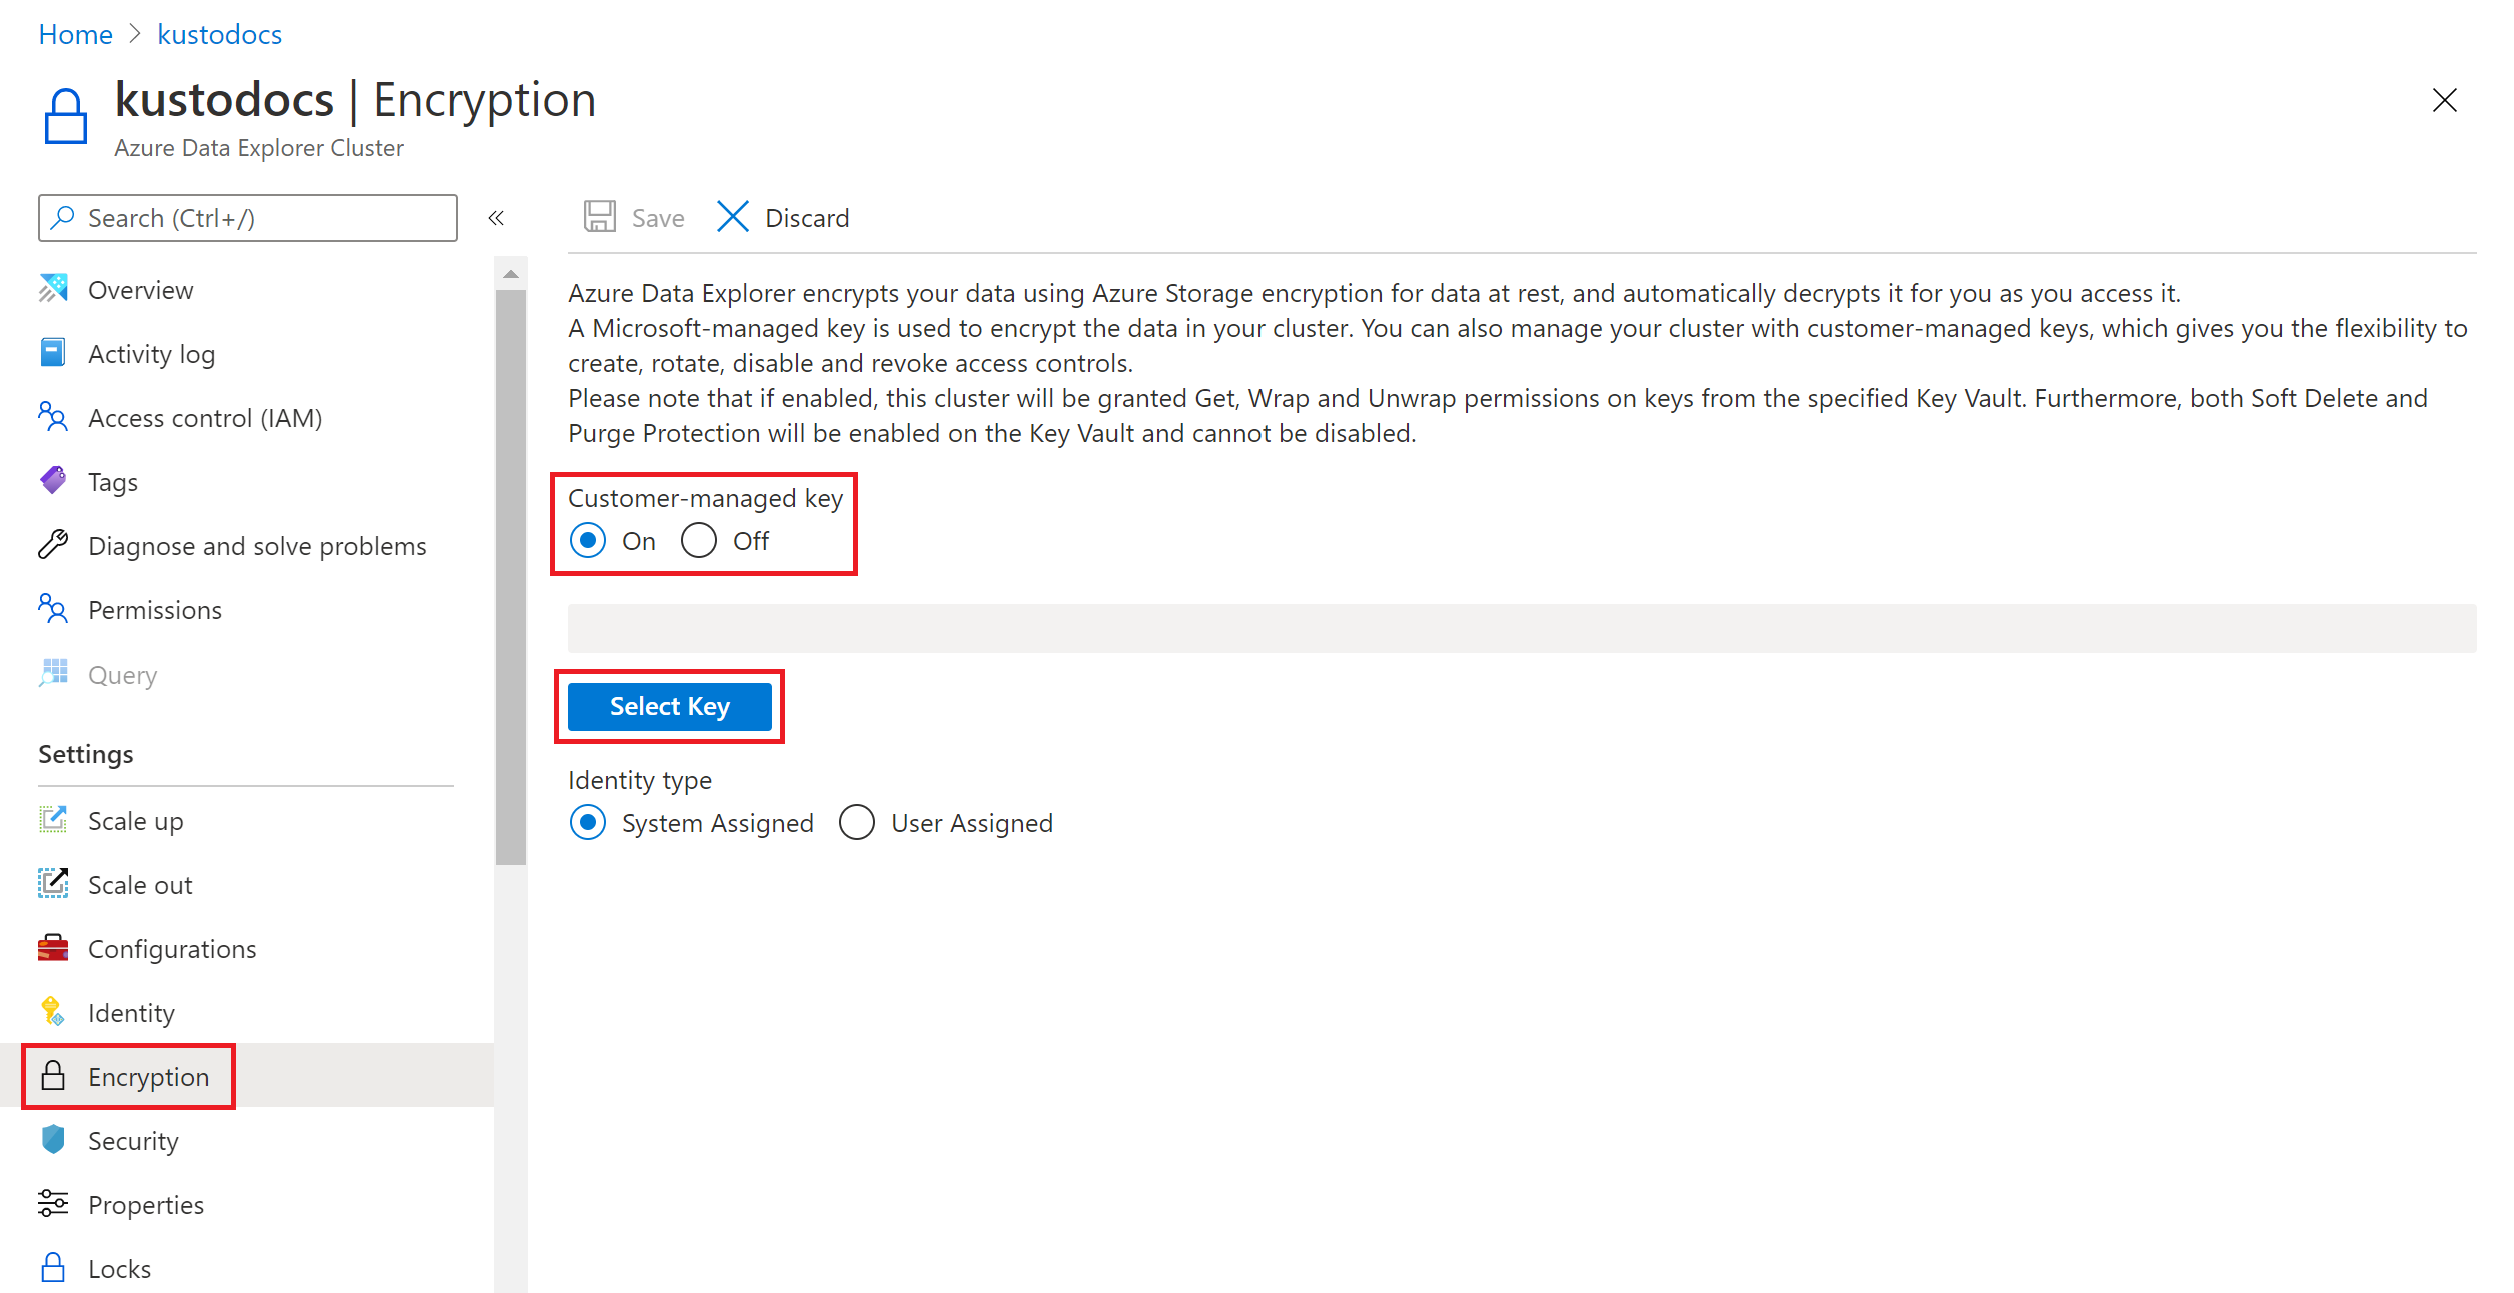
Enable encryption by using customer-managed keys
The following steps explain how to enable customer-managed keys encryption by using the Azure portal. By default, Azure Data Explorer encryption uses Microsoft-managed keys. Configure your Azure Data Explorer cluster to use customer-managed keys and specify the key to associate with the cluster.
In the Azure portal, go to your Azure Data Explorer cluster resource.
Select Settings > Encryption in the left pane of the portal.
In the Encryption pane, select On for the Customer-managed key setting.
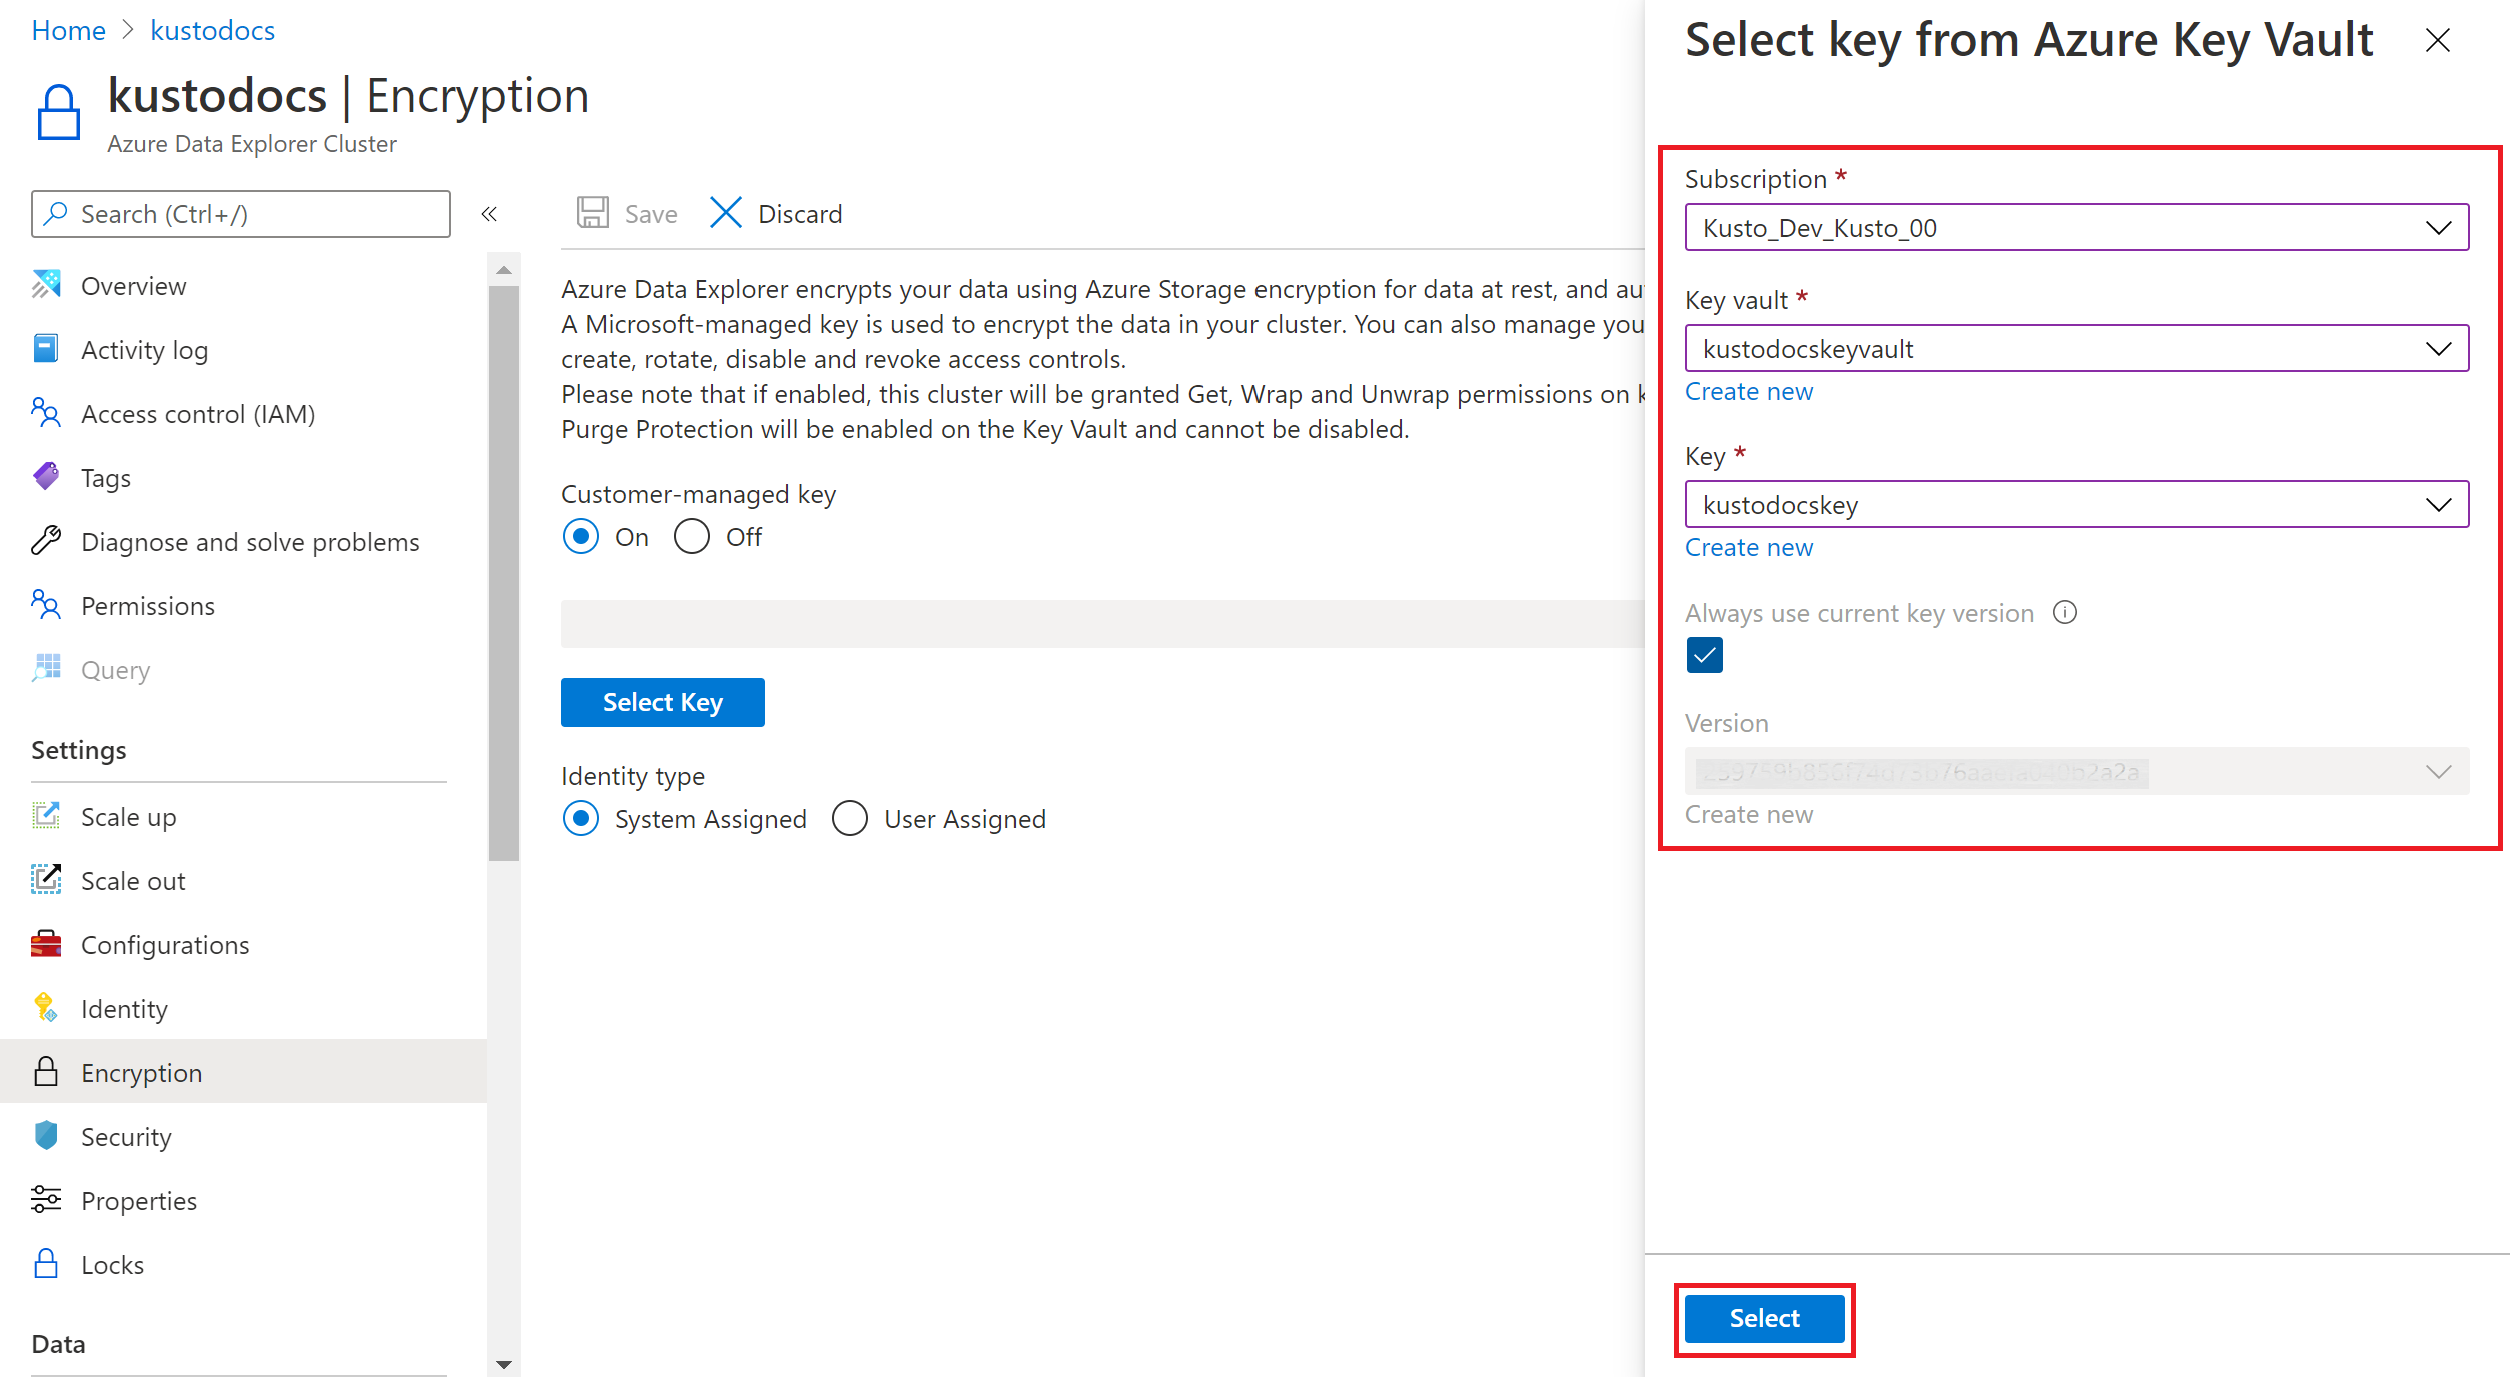
Select Select Key.
In the Select key from Azure Key Vault window, select an existing Key vault from the dropdown list. If you select Create new to create a new Key Vault, you're routed to the Create Key Vault screen.
Select Key.
Version:
- To ensure that this key always uses the latest key version, select the Always use current key version checkbox.
- Otherwise, select Version.
Select Select.
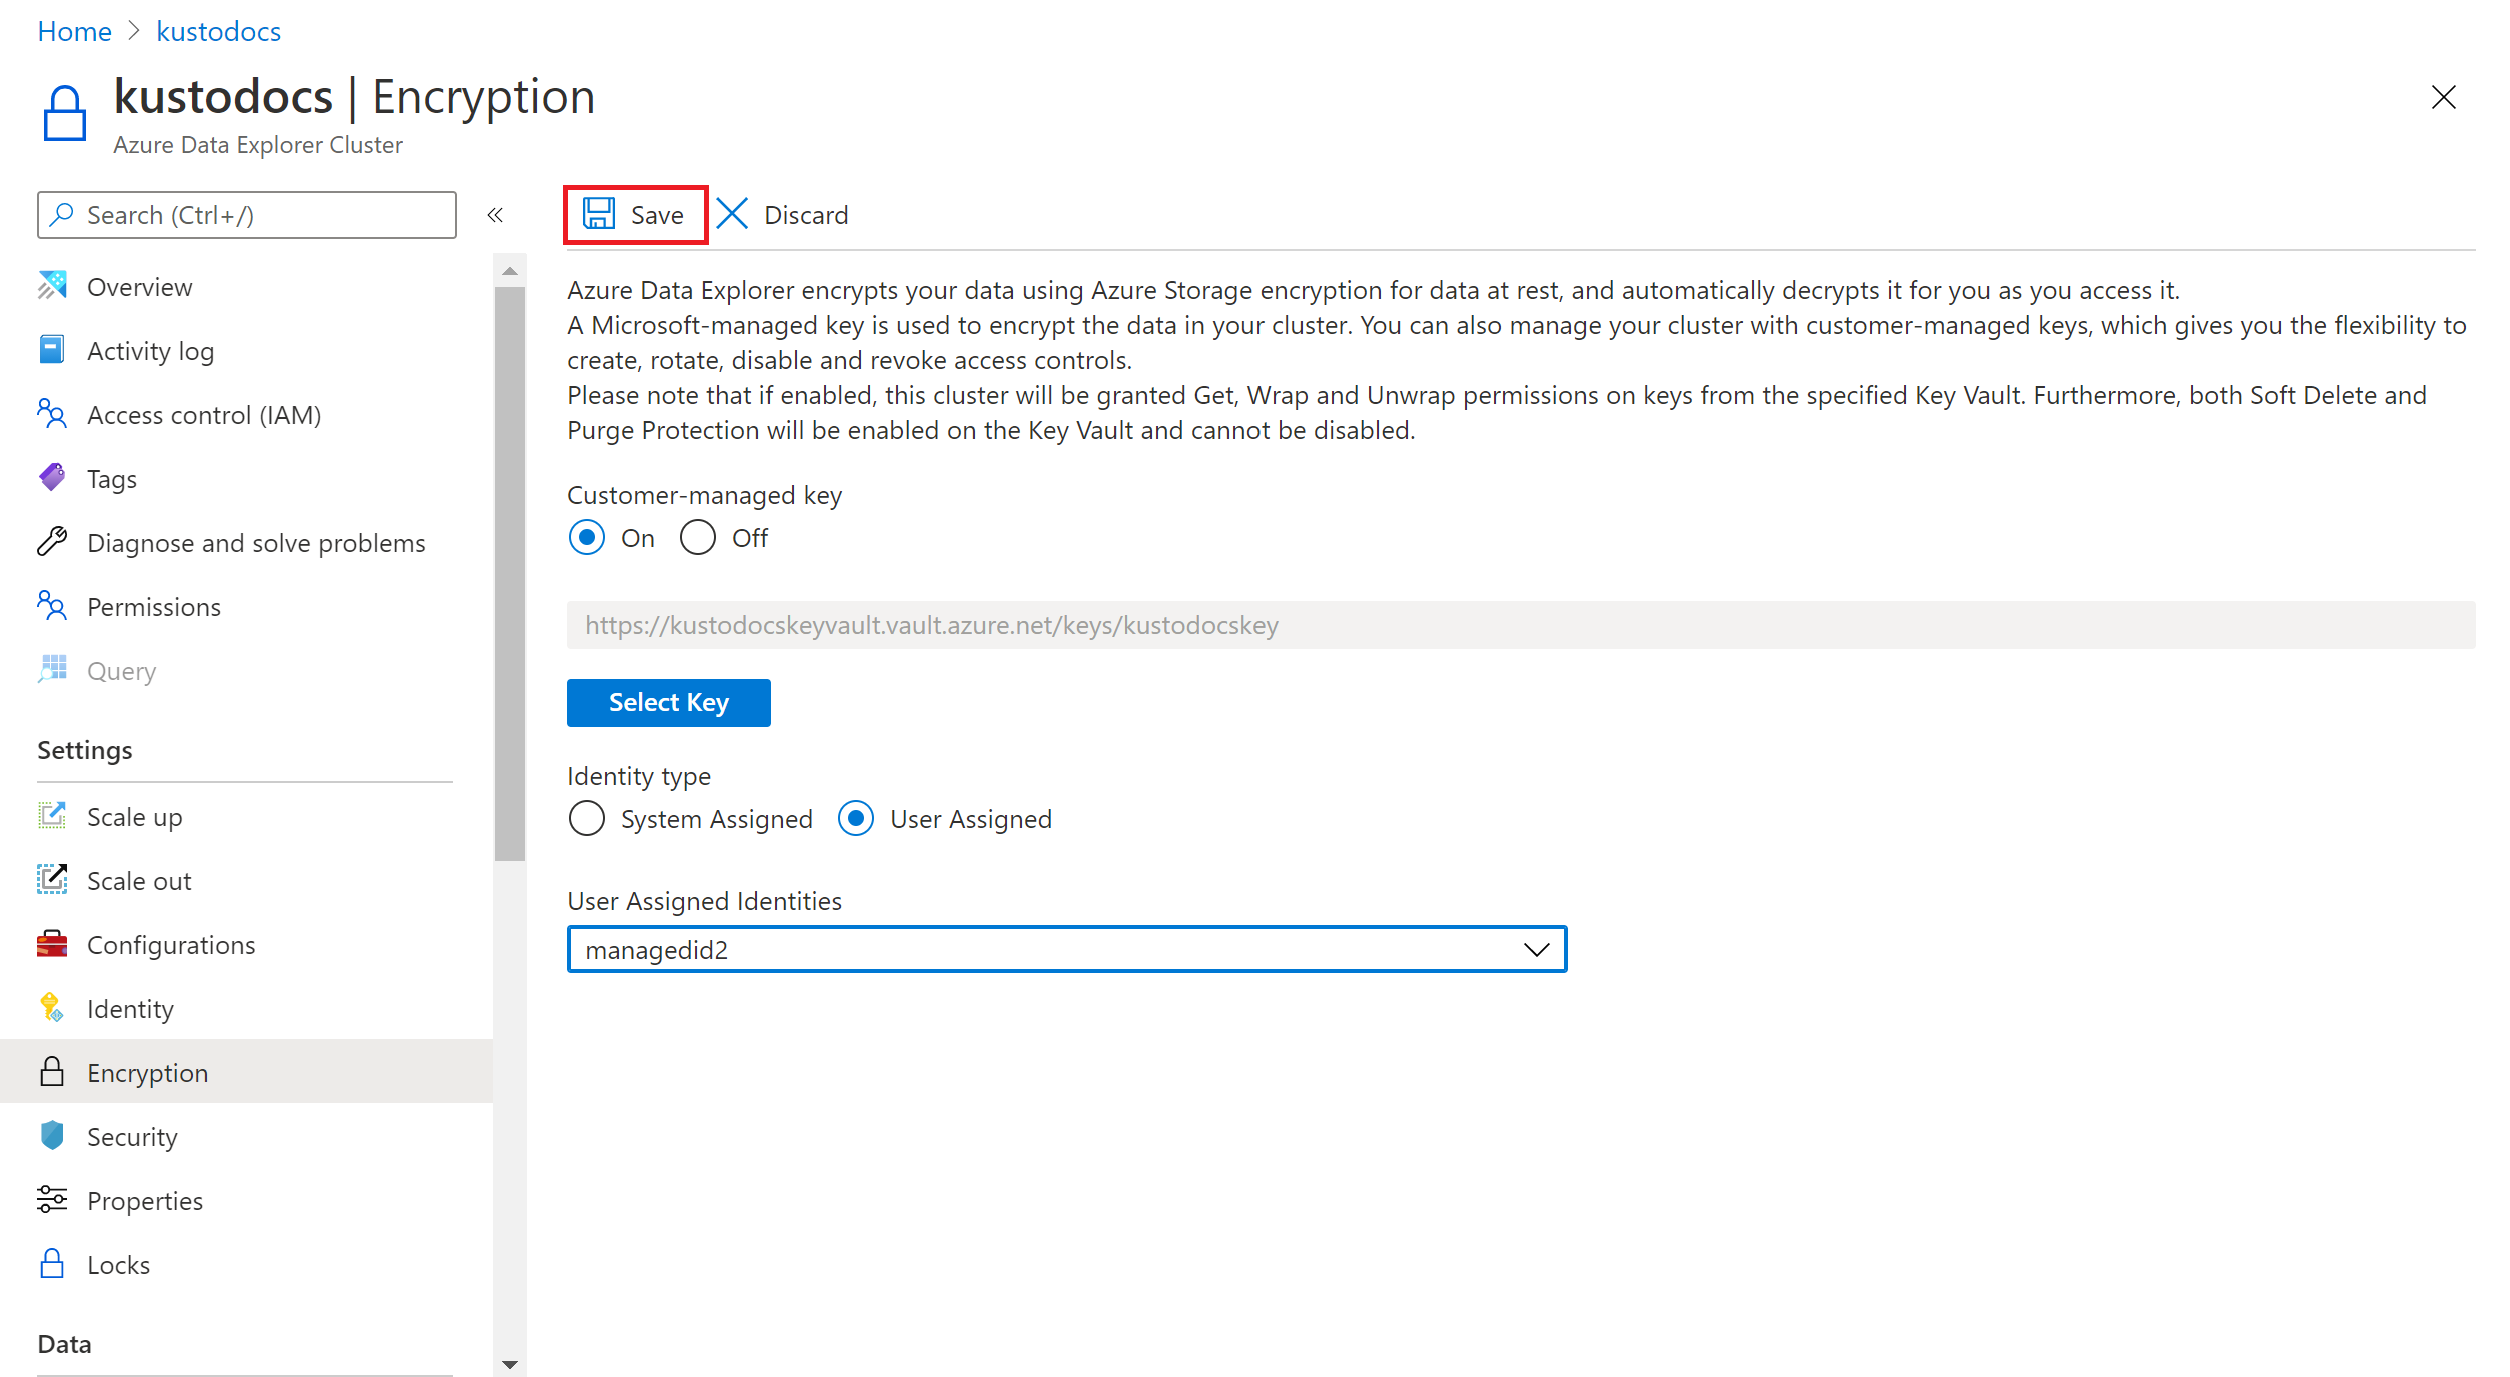
Under Identity type, select System Assigned or User Assigned.
If you select User Assigned, pick a user assigned identity from the dropdown.

In the Encryption pane that now contains your key, select Save. When CMK creation succeeds, you see a success message in Notifications.
If you select system assigned identity when enabling customer-managed keys for your Azure Data Explorer cluster, you create a system assigned identity for the cluster if one doesn't exist. In addition, you provide the required get, wrapKey, and unwrapKey permissions to your Azure Data Explorer cluster on the selected Key Vault and get the Key Vault properties.
Note
Select Off to remove the customer-managed key after it exists.
The following sections explain how to configure customer-managed keys encryption by using the Azure Data Explorer C# client.
Install packages
Authentication
To run the examples in this article, create a Microsoft Entra application and service principal that can access resources. You can add role assignment at the subscription scope and get the required Microsoft Entra Directory (tenant) ID, Application ID, and Application Secret.
The following code snippet demonstrates how to use the Microsoft Authentication Library (MSAL) to acquire a Microsoft Entra application token to access your cluster. For the flow to succeed, the application must be registered with Microsoft Entra ID and you must have the credentials for application authentication, such as a Microsoft Entra ID-issued application key or a Microsoft Entra registered X.509v2 certificate.
By default, Azure Data Explorer encryption uses Microsoft-managed keys. Configure your Azure Data Explorer cluster to use customer-managed keys and specify the key to associate with the cluster.
Update your cluster by using the following code:
var tenantId = "xxxxxxxx-xxxxx-xxxx-xxxx-xxxxxxxxx"; // Azure AD Directory (tenant) ID
var clientId = "xxxxxxxx-xxxxx-xxxx-xxxx-xxxxxxxxx"; // Application ID
var clientSecret = "PlaceholderClientSecret"; // Application secret
var subscriptionId = "xxxxxxxx-xxxxx-xxxx-xxxx-xxxxxxxxx";
var credentials = new ClientSecretCredential(tenantId, clientId, clientSecret);
var resourceManagementClient = new ArmClient(credentials, subscriptionId);
var resourceGroupName = "testrg";
var clusterName = "mykustocluster";
var subscription = await resourceManagementClient.GetDefaultSubscriptionAsync();
var resourceGroup = (await subscription.GetResourceGroupAsync(resourceGroupName)).Value;
var clusters = resourceGroup.GetKustoClusters();
var cluster = (await clusters.GetAsync(clusterName)).Value;
var clusterPatch = new KustoClusterPatch(cluster.Data.Location)
{
    KeyVaultProperties = new KustoKeyVaultProperties
    {
        KeyName = "<keyName>",
        KeyVersion = "<keyVersion>", // Optional, leave as NULL for the latest version of the key.
        KeyVaultUri = new Uri("https://<keyVaultName>.vault.azure.cn/"),
        UserIdentity = "/subscriptions/<identitySubscriptionId>/resourcegroups/<identityResourceGroupName>/providers/Microsoft.ManagedIdentity/userAssignedIdentities/<identityName>" // Use NULL if you want to use system assigned identity.
    }
};
await cluster.UpdateAsync(WaitUntil.Completed, clusterPatch);
Run the following command to check if you updated your cluster successfully:
var clusterData = (await resourceGroup.GetKustoClusterAsync(clusterName)).Value.Data;
If the result contains ProvisioningState with the Succeeded value, you updated your cluster successfully.
The following steps explain how to enable customer-managed keys encryption by using the Azure CLI. By default, Azure Data Explorer encryption uses Microsoft-managed keys. Configure your Azure Data Explorer cluster to use customer-managed keys and specify the key to associate with the cluster.
Run the following command to sign in to Azure:
az login
Set the subscription where your cluster is registered. Replace MyAzureSub with the name of the Azure subscription that you want to use.
az account set --subscription MyAzureSub
Run the following command to set the new key with the cluster's system assigned identity:
az kusto cluster update --cluster-name "mytestcluster" --resource-group "mytestrg" --key-vault-properties key-name="<key-name>" key-version="<key-version>" key-vault-uri="<key-vault-uri>"
Alternatively, set the new key by using a user assigned identity:
az kusto cluster update --cluster-name "mytestcluster" --resource-group "mytestrg" --key-vault-properties key-name="<key-name>" key-version="<key-version>" key-vault-uri="<key-vault-uri>" key-user-identity="<user-identity-resource-id>"
Run the following command and check the keyVaultProperties property to verify the cluster updated successfully.
az kusto cluster show --cluster-name "mytestcluster" --resource-group "mytestrg"
The following steps explain how to enable customer-managed keys encryption by using PowerShell. By default, Azure Data Explorer encryption uses Microsoft-managed keys. Configure your Azure Data Explorer cluster to use customer-managed keys and specify the key to associate with the cluster.
Run the following command to sign in to Azure:
Connect-AzAccount -Environment AzureChinaCloud
Set the subscription where your cluster is registered.
Set-AzContext -SubscriptionId "xxxxxxxx-xxxx-xxxx-xxxx-xxxxxxxxxxxx"
Run the following command to set the new key by using a system assigned identity.
Update-AzKustoCluster -ResourceGroupName "mytestrg" -Name "mytestcluster" -KeyVaultPropertyKeyName "<key-name>" -KeyVaultPropertyKeyVaultUri "<key-vault-uri>" -KeyVaultPropertyKeyVersion "<key-version>"
Alternatively, set the new key by using a user assigned identity.
Update-AzKustoCluster -ResourceGroupName "mytestrg" -Name "mytestcluster" -KeyVaultPropertyKeyName "<key-name>" -KeyVaultPropertyKeyVaultUri "<key-vault-uri>" -KeyVaultPropertyKeyVersion "<key-version>" -KeyVaultPropertyUserIdentity "user-assigned-identity-resource-id"
Run the following command and check the KeyVaultProperty... properties to verify the cluster updated successfully.
Get-AzKustoCluster -Name "mytestcluster" -ResourceGroupName "mytestrg" | Format-List
The following steps explain how to configure customer-managed keys by using Azure Resource Manager templates. By default, Azure Data Explorer encryption uses Microsoft-managed keys. In this step, configure your Azure Data Explorer cluster to use customer-managed keys and specify the key to associate with the cluster.
If you'd like to use a system assigned identity to access the key vault, leave userIdentity empty. Otherwise, set the identity's resource ID.
You can deploy the Azure Resource Manager template by using the Azure portal or by using PowerShell.
{
  "$schema": "https://schema.management.azure.com/schemas/2015-01-01/deploymentTemplate.json#",
  "contentVersion": "1.0.0.0",
  "parameters": {
    "clusterName": {
      "type": "string",
      "defaultValue": "[concat('kusto', uniqueString(resourceGroup().id))]",
      "metadata": {
        "description": "Name of the cluster to create"
      }
    },
    "location": {
      "type": "string",
      "defaultValue": "[resourceGroup().location]",
      "metadata": {
        "description": "Location for all resources."
      }
    }
  },
  "variables": {},
  "resources": [
    {
      "name": "[parameters('clusterName')]",
      "type": "Microsoft.Kusto/clusters",
      "sku": {
        "name": "Standard_D13_v2",
        "tier": "Standard",
        "capacity": 2
      },
      "apiVersion": "2019-09-07",
      "location": "[parameters('location')]",
      "properties": {
        "keyVaultProperties": {
          "keyVaultUri": "<keyVaultUri>",
          "keyName": "<keyName>",
          "keyVersion": "<keyVersion>",
          "userIdentity": "<userIdentity>"
        }
      }
    }
  ]
}
Update the key version
When you create a new version of a key, you need to update the cluster to use the new version. First, call Get-AzKeyVaultKey to get the latest version of the key. Then update the cluster's key vault properties to use the new version of the key, as shown in Enable encryption by using customer-managed keys.
Related content