Note
Access to this page requires authorization. You can try signing in or changing directories.
Access to this page requires authorization. You can try changing directories.
As an administrator, you can lock your cluster to prevent accidental deletion of data. The lock overrides any user permissions set by using Azure Data Explorer role-based access control.
In the Azure portal, you can set Delete or Read-only locks that prevent either deletions or modifications. The following table describes the permissions that each lock provides:
| Lock level | Description |
|---|---|
| Delete | Authorized users can read and modify a cluster, but they can't delete it. |
| Read-only | Authorized users can read a cluster, but they can't delete or update it. Applying this lock is similar to restricting all authorized users to the permissions that the Reader role provides. |
This article describes how to lock and unlock your cluster by using the Azure portal. For more information about locking Azure resources by using the portal, see Lock your resources to protect your infrastructure. For information about how to lock your cluster programmatically, see Management Locks - Create Or Update At Resource Level.
Important
We recommend applying a lock to your cluster to protect against both accidental deletion and infrastructure-as-code scenarios. If you use tools like Terraform to manage your cluster infrastructure, a read-only lock is essential. Terraform may delete and recreate your cluster when it detects changes to read-only properties, resulting in complete data loss. An ARM lock prevents this destructive behavior.
Lock your cluster in the Azure portal
Sign in to the Azure portal.
Go to your Azure Data Explorer cluster.
In the left-hand menu, under Settings, select Locks.
Select Add.
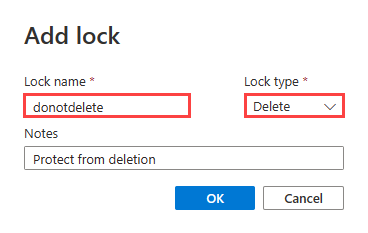
Enter a name and lock level for the lock. Optionally, add notes that describe the lock.
Unlock your cluster in the Azure portal
To delete a lock, select the Delete button in the row where the lock appears.
