Note
Access to this page requires authorization. You can try signing in or changing directories.
Access to this page requires authorization. You can try changing directories.
APPLIES TO:  Azure Data Factory
  Azure Synapse Analytics
This quickstart describes how to use Bicep to create an Azure data factory. The pipeline you create in this data factory copies data from one folder to another folder in an Azure blob storage. For a tutorial on how to transform data using Azure Data Factory, see Tutorial: Transform data using Spark.
Bicep is a domain-specific language (DSL) that uses declarative syntax to deploy Azure resources. It provides concise syntax, reliable type safety, and support for code reuse. Bicep offers the best authoring experience for your infrastructure-as-code solutions in Azure.
Note
This article doesn't provide a detailed introduction of the Data Factory service. For an introduction to the Azure Data Factory service, see Introduction to Azure Data Factory.
Prerequisites
Azure subscription
If you don't have an Azure subscription, create a trial account before you begin.
Review the Bicep file
The Bicep file used in this quickstart is from Azure Quickstart Templates.
@description('Data Factory Name')
param dataFactoryName string = 'datafactory${uniqueString(resourceGroup().id)}'

@description('Location of the data factory.')
param location string = resourceGroup().location

@description('Name of the Azure storage account that contains the input/output data.')
param storageAccountName string = 'storage${uniqueString(resourceGroup().id)}'

@description('Name of the blob container in the Azure Storage account.')
param blobContainerName string = 'blob${uniqueString(resourceGroup().id)}'

var dataFactoryLinkedServiceName = 'ArmtemplateStorageLinkedService'
var dataFactoryDataSetInName = 'ArmtemplateTestDatasetIn'
var dataFactoryDataSetOutName = 'ArmtemplateTestDatasetOut'
var pipelineName = 'ArmtemplateSampleCopyPipeline'

resource storageAccount 'Microsoft.Storage/storageAccounts@2021-08-01' = {
  name: storageAccountName
  location: location
  sku: {
    name: 'Standard_LRS'
  }
  kind: 'StorageV2'
}

resource blobContainer 'Microsoft.Storage/storageAccounts/blobServices/containers@2021-08-01' = {
  name: '${storageAccount.name}/default/${blobContainerName}'
}

resource dataFactory 'Microsoft.DataFactory/factories@2018-06-01' = {
  name: dataFactoryName
  location: location
  identity: {
    type: 'SystemAssigned'
  }
}

resource dataFactoryLinkedService 'Microsoft.DataFactory/factories/linkedservices@2018-06-01' = {
  parent: dataFactory
  name: dataFactoryLinkedServiceName
  properties: {
    type: 'AzureBlobStorage'
    typeProperties: {
      connectionString: 'DefaultEndpointsProtocol=https;AccountName=${storageAccount.name};AccountKey=${storageAccount.listKeys().keys[0].value};EndpointSuffix=core.chinacloudapi.cn'
    }
  }
}

resource dataFactoryDataSetIn 'Microsoft.DataFactory/factories/datasets@2018-06-01' = {
  parent: dataFactory
  name: dataFactoryDataSetInName
  properties: {
    linkedServiceName: {
      referenceName: dataFactoryLinkedService.name
      type: 'LinkedServiceReference'
    }
    type: 'Binary'
    typeProperties: {
      location: {
        type: 'AzureBlobStorageLocation'
        container: blobContainerName
        folderPath: 'input'
        fileName: 'emp.txt'
      }
    }
  }
}

resource dataFactoryDataSetOut 'Microsoft.DataFactory/factories/datasets@2018-06-01' = {
  parent: dataFactory
  name: dataFactoryDataSetOutName
  properties: {
    linkedServiceName: {
      referenceName: dataFactoryLinkedService.name
      type: 'LinkedServiceReference'
    }
    type: 'Binary'
    typeProperties: {
      location: {
        type: 'AzureBlobStorageLocation'
        container: blobContainerName
        folderPath: 'output'
      }
    }
  }
}

resource dataFactoryPipeline 'Microsoft.DataFactory/factories/pipelines@2018-06-01' = {
  parent: dataFactory
  name: pipelineName
  properties: {
    activities: [
      any({
        name: 'MyCopyActivity'
        type: 'Copy'
        policy: {
          timeout: '7.00:00:00'
          retry: 0
          retryIntervalInSeconds: 30
          secureOutput: false
          secureInput: false
        }
        typeProperties: {
          source: {
            type: 'BinarySource'
            storeSettings: {
              type: 'AzureBlobStorageReadSettings'
              recursive: true
            }
          }
          sink: {
            type: 'BinarySink'
            storeSettings: {
              type: 'AzureBlobStorageWriterSettings'
            }
          }
          enableStaging: false
        }
        inputs: [
          {
            referenceName: dataFactoryDataSetIn.name
            type: 'DatasetReference'
          }
        ]
        outputs: [
          {
            referenceName: dataFactoryDataSetOut.name
            type: 'DatasetReference'
          }
        ]
      })
    ]
  }
}
There are several Azure resources defined in the Bicep file:
- Microsoft.Storage/storageAccounts: Defines a storage account.
- Microsoft.DataFactory/factories: Create an Azure Data Factory.
- Microsoft.DataFactory/factories/linkedServices: Create an Azure Data Factory linked service.
- Microsoft.DataFactory/factories/datasets: Create an Azure Data Factory dataset.
- Microsoft.DataFactory/factories/pipelines: Create an Azure Data Factory pipeline.
Create a file
Open a text editor such as Notepad, and create a file named emp.txt with the following content:
John, Doe
Jane, Doe
Save the file locally. You'll use it later in the quickstart.
Deploy the Bicep file
Save the Bicep file from Azure Quickstart Templates as main.bicep to your local computer.
Deploy the Bicep file using either Azure CLI or Azure PowerShell.
az group create --name exampleRG --location chinaeast2 az deployment group create --resource-group exampleRG --template-file main.bicepWhen the deployment finishes, you should see a message indicating the deployment succeeded.
Review deployed resources
Use the Azure CLI or Azure PowerShell to list the deployed resources in the resource group.
az resource list --resource-group exampleRG
You can also use the Azure portal to review the deployed resources.
- Sign in to the Azure portal.
- Navigate to your resource group.
- You'll see your resources listed. Select each resource to see an overview.
Upload a file
Use the Azure portal to upload the emp.txt file.
Navigate to your resource group and select the storage account created. Then, select the Containers tab on the left panel.
On the Containers page, select the blob container created. The name is in the format - blob<uniqueid>.
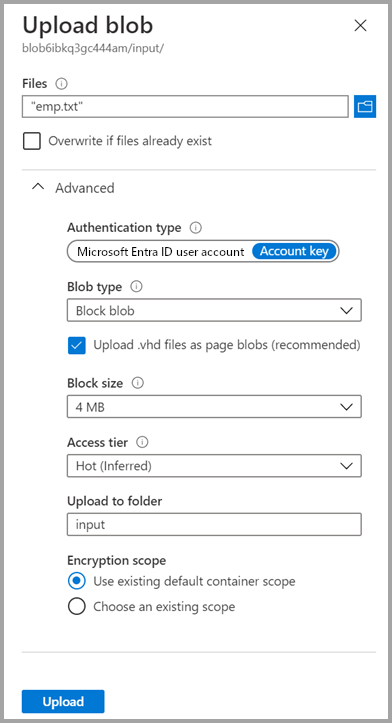
Select Upload, and then select the Files box icon in the right pane. Navigate to and select the emp.txt file that you created earlier.
Expand the Advanced heading.
In the Upload to folder box, enter input.
Select the Upload button. You should see the emp.txt file and the status of the upload in the list.
Select the Close icon (an X) to close the Upload blob page.
Keep the container page open because you can use it to verify the output at the end of this quickstart.
Start trigger
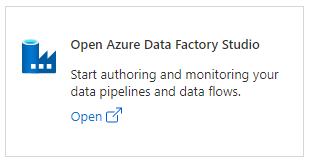
Navigate to the resource group page, and select the data factory you created.
Select Open on the Open Azure Data Factory Studio tile.
Select the Author tab
 .
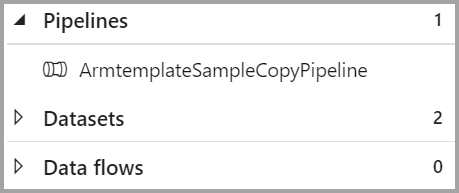
.Select the pipeline created: ArmtemplateSampleCopyPipeline.
Select Add Trigger > Trigger Now.

In the right pane under Pipeline run, select OK.
Monitor the pipeline
Select the Monitor tab.

You see the activity runs associated with the pipeline run. In this quickstart, the pipeline only has one activity of type Copy. You should see a run for that activity.

Verify the output file
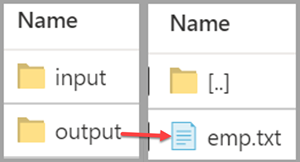
The pipeline automatically creates an output folder in the blob container. It then copies the emp.txt file from the input folder to the output folder.
On the Containers page in the Azure portal, select Refresh to see the output folder.
Select output in the folder list.
Confirm that the emp.txt is copied to the output folder.
Clean up resources
When no longer needed, use the Azure CLI or Azure PowerShell to delete the resource group and all of its resources.
az group delete --name exampleRG
You can also use the Azure portal to delete the resource group.
- In the Azure portal, navigate to your resource group.
- Select Delete resource group.
- A tab will appear. Enter the resource group name and select Delete.
Related content
In this quickstart, you created an Azure Data Factory using Bicep and validated the deployment. To learn more about Azure Data Factory and Bicep, continue on to the articles below.
- Azure Data Factory documentation
- Learn more about Bicep