Note
Access to this page requires authorization. You can try signing in or changing directories.
Access to this page requires authorization. You can try changing directories.
Azure Event Hubs is a fully managed, real-time data streaming platform that can ingest millions of events per second with low latency. As a native Azure service with built-in Apache Kafka compatibility, Event Hubs enables you to run existing Kafka workloads without code changes or cluster management overhead.
Organizations use Event Hubs to build data pipelines for IoT telemetry, application logging, clickstream analytics, financial transaction processing, and other scenarios that require high-throughput, reliable event ingestion. Event Hubs integrates with Azure analytics services to enable real-time insights and long-term data retention.
At a glance
| Attribute | Details |
|---|---|
| Service type | Fully managed event streaming platform (PaaS) |
| Protocols supported | Apache Kafka, AMQP 1.0, HTTPS |
| Data retention | Up to 7 days (Standard), 90 days (Premium) |
| Pricing tiers | Standard, Premium |
| SLA | Up to 99.99% |
Why choose Azure Event Hubs?
- Zero infrastructure management: Fully managed service with automatic patching, scaling, and monitoring. No clusters to provision or maintain.
- Enterprise-grade reliability: Up to 99.99% SLA with availability zone support for business continuity.
- Kafka without the complexity: Run Kafka workloads with better cost efficiency and no operational overhead. No separate Kafka clusters required.
- Seamless Azure integration: Native integration with Stream Analytics, Azure Functions, Data Explorer, and many other Azure services.
- Flexible pricing: Choose from consumption-based capacity models. Scale from megabytes to terabytes based on demand.

When to use Event Hubs
Event Hubs is designed for high-throughput, low-latency event streaming scenarios. Consider Event Hubs when you need to:
| Scenario | Description |
|---|---|
| Real-time analytics | Process streaming data to generate immediate insights, dashboards, and alerts |
| IoT telemetry ingestion | Collect device data from millions of IoT sensors, vehicles, or industrial equipment |
| Application logging | Centralize logs from distributed applications for monitoring and troubleshooting |
| Clickstream analytics | Analyze user behavior patterns across web and mobile applications |
| Financial transactions | Process high-volume trading data, fraud detection signals, and payment events |
| Event sourcing | Implement event-driven architectures with durable, ordered event storage |
Choosing between Azure messaging services
Azure offers multiple messaging services. Use this guidance to select the right service:
| Service | Best for | Message pattern |
|---|---|---|
| Event Hubs | High-throughput event streaming, telemetry, log aggregation | Many producers, multiple consumers, time-ordered events |
| Service Bus | Enterprise messaging with transactions, sessions, dead-lettering | Point-to-point or pub/sub with delivery guarantees |
| Event Grid | Reactive event-driven architectures, serverless triggers | Push-based event routing with filtering |
For detailed guidance, see Choose between Azure messaging services.
How it works
Event Hubs provides a unified streaming platform with time-based retention, decoupling event producers from consumers. Both can perform large-scale data ingestion and processing through multiple protocols.
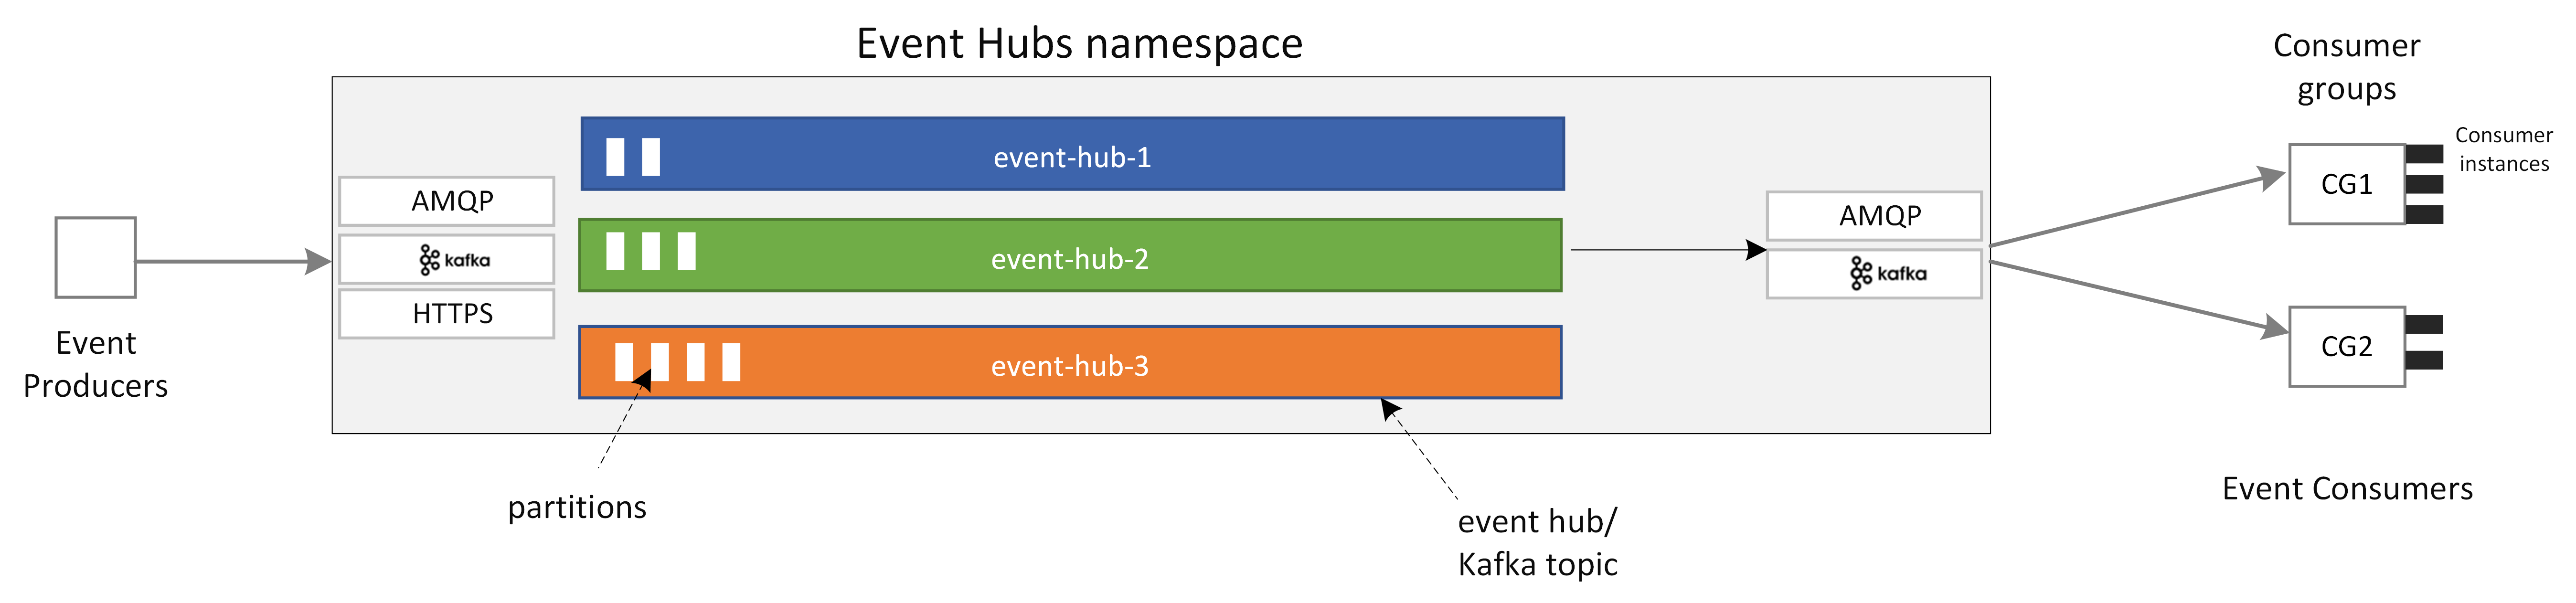
Core components
| Component | Description |
|---|---|
| Producer applications | Applications that send events to Event Hubs using Event Hubs SDKs, Kafka producer clients, or HTTPS |
| Namespace | Management container for one or more event hubs. Handles streaming capacity, network security, and geo-disaster recovery at the namespace level |
| Event hub / Kafka topic | An append-only distributed log that organizes events. Contains one or more partitions for parallel processing |
| Partitions | Ordered sequences of events used to scale throughput. Think of partitions as lanes on a freeway—more partitions enable higher throughput |
| Consumer applications | Applications that read events by tracking their position (offset) in each partition. Can use Event Hubs SDKs or Kafka consumer clients |
| Consumer group | A logical view of the event hub that enables multiple consumer applications to read the same stream independently, each maintaining its own position |
Event flow
- Ingest: Producer applications send events to an event hub. Events are assigned to partitions based on partition key or round-robin distribution.
- Store: Events are durably stored with configurable retention (1-90 days depending on tier). The Capture feature can also write events to long-term storage.
- Process: Consumer applications read events from partitions using consumer groups. Each consumer tracks its offset using checkpointing for reliable processing.
For a detailed explanation, see Event Hubs features.
Key capabilities
Core platform features
Apache Kafka compatibility
Event Hubs is a multi-protocol event streaming engine that natively supports Apache Kafka, AMQP 1.0, and HTTPS. You can bring Kafka workloads to Event Hubs without code changes, cluster management, or third-party Kafka services.
Event Hubs is built as a cloud-native broker engine, delivering better performance and cost efficiency than self-managed Kafka clusters. For more information, see Azure Event Hubs for Apache Kafka.
Flexible scaling
Start with data streams in megabytes and grow to gigabytes or terabytes. The auto-inflate feature automatically scales throughput units to meet demand.
Data management
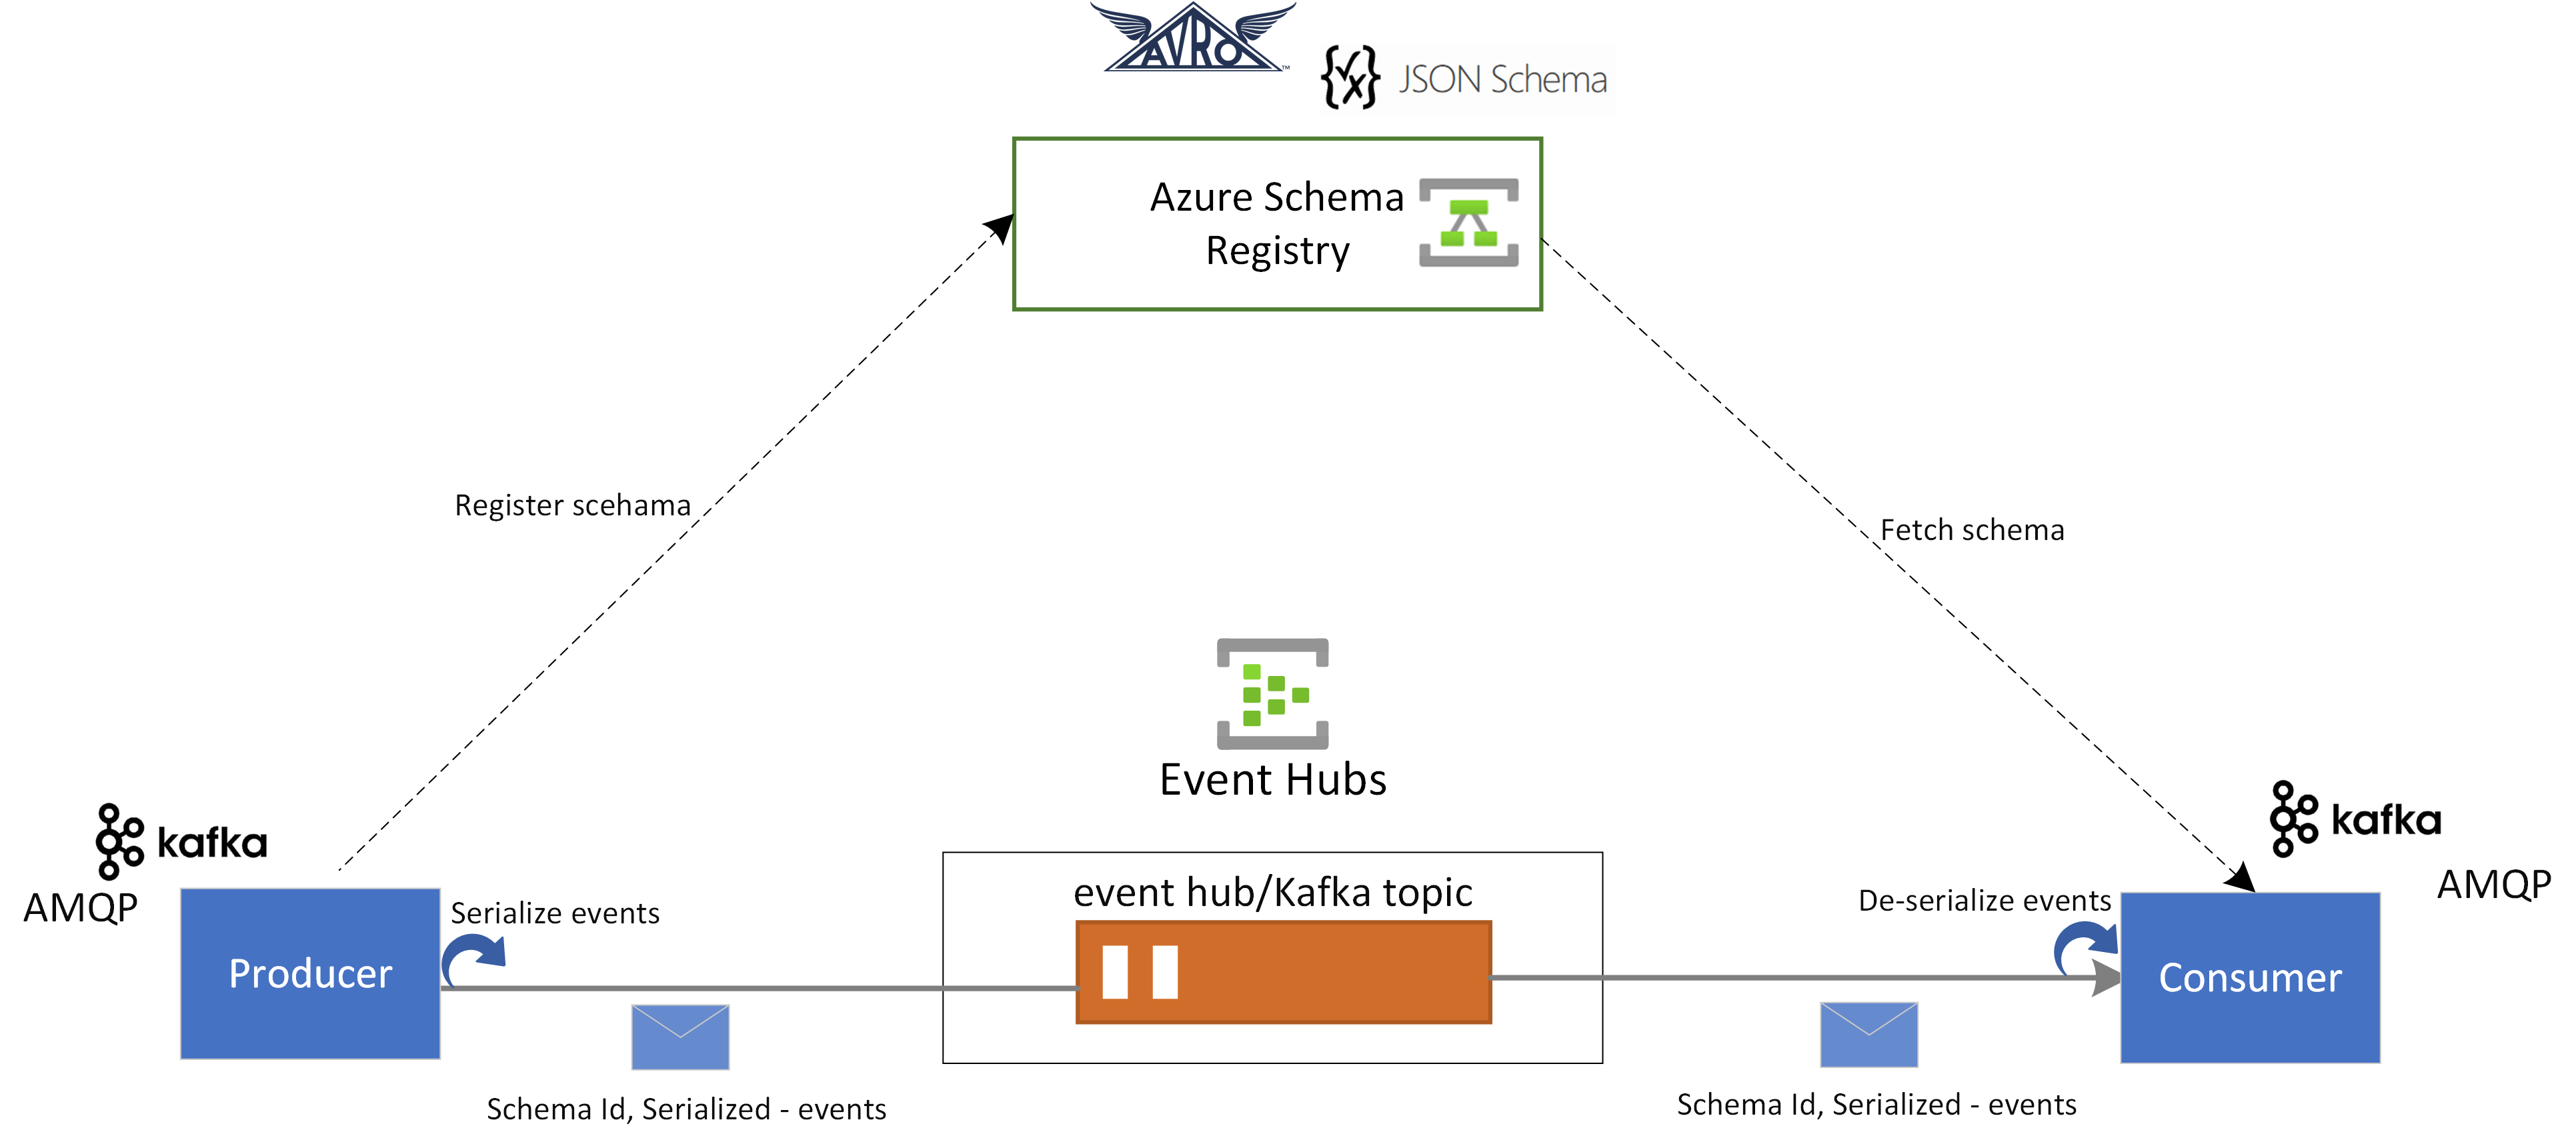
Schema Registry
Azure Schema Registry provides a centralized repository for managing schemas of event streaming applications. It ensures data compatibility and consistency across producers and consumers, supports schema evolution, and integrates with Kafka applications using Avro and JSON schemas.
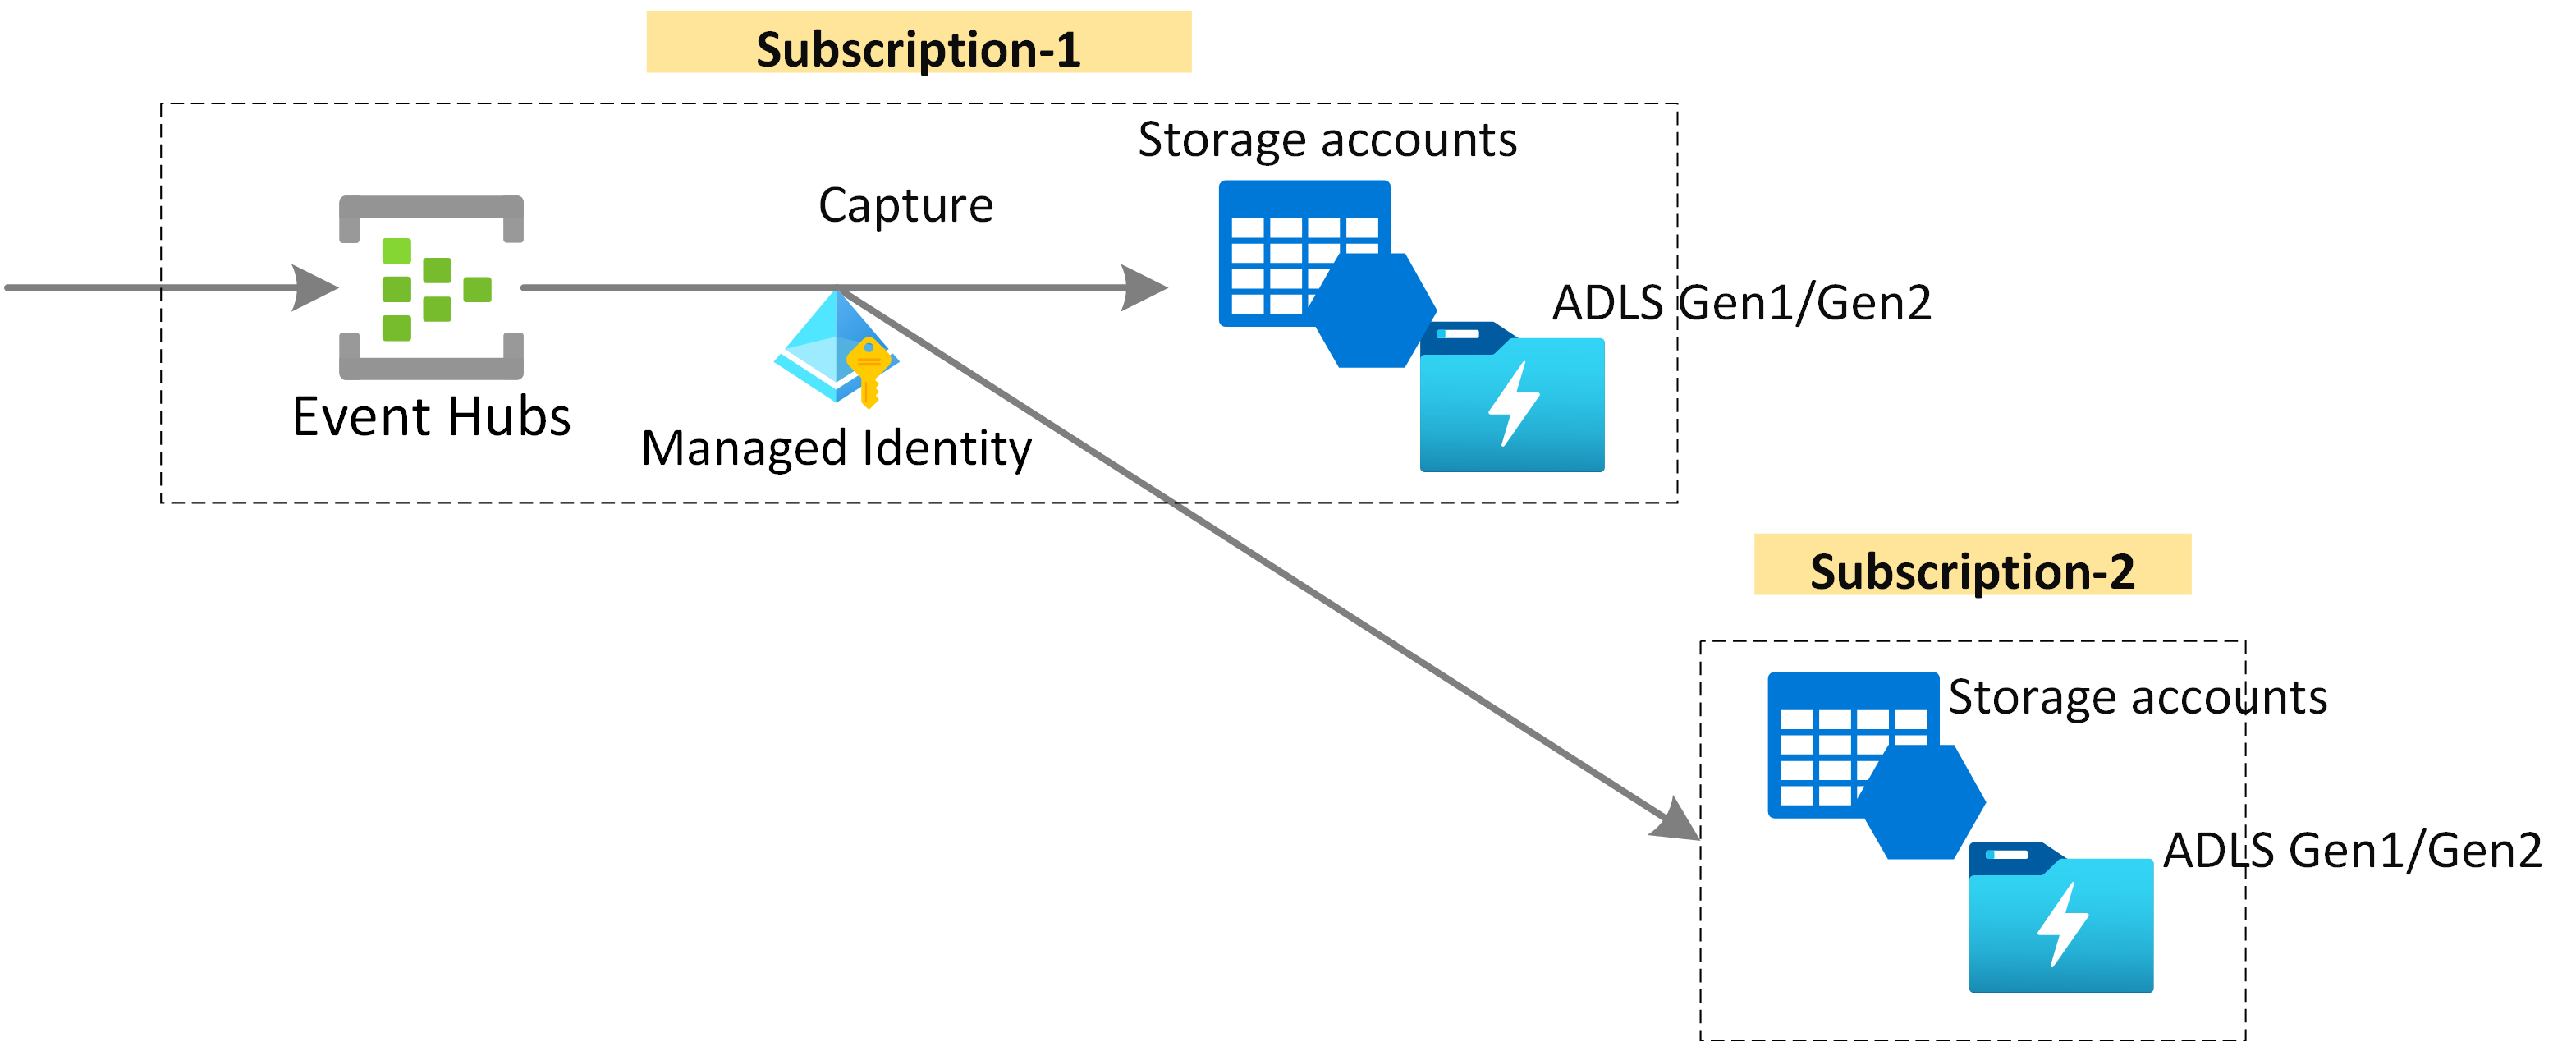
Capture
Capture your streaming data in near real time to Azure Blob Storage or Azure Data Lake Storage for long-term retention or batch analytics. Capture runs automatically on the same stream used for real-time processing.
Azure integrations
Stream Analytics integration
Event Hubs integrates with Azure Stream Analytics for real-time stream processing. Use the built-in no-code editor with drag-and-drop functionality, or write SQL-based queries for complex transformations.

Azure Data Explorer integration
Azure Data Explorer delivers high-performance analytics on large volumes of streaming data. Integrate Event Hubs with Data Explorer for near real-time analytics and exploration.
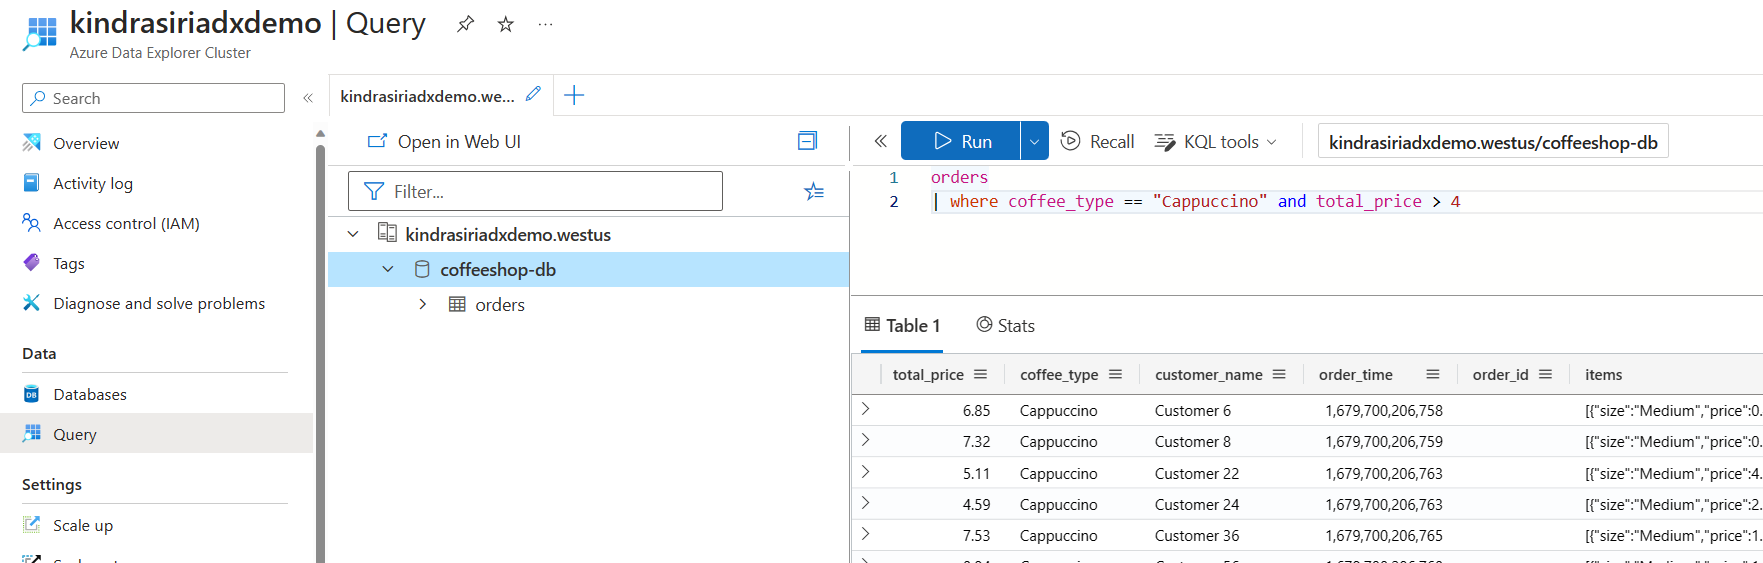
For more information, see Ingest data from Event Hubs into Azure Data Explorer.
Azure Functions and serverless
Event Hubs integrates with Azure Functions for serverless event processing. The ecosystem also supports Azure Spring Apps, Kafka Connectors, Apache Spark, and Apache Flink.
Local development
The Event Hubs emulator provides a local development experience for developing and testing code against the service in isolation, free from cloud dependencies.
Client libraries
Event Hubs provides client libraries for .NET, Java, Python, JavaScript, and Go. These SDKs support both AMQP and Kafka protocols, enabling you to choose the best fit for your application.
Monitoring
Monitor Event Hubs using Azure Monitor metrics, diagnostic logs, and alerts. Track throughput, latency, errors, and consumer lag to ensure optimal performance.
Security and compliance
Event Hubs provides enterprise-grade security features:
| Feature | Description |
|---|---|
| Authentication | Microsoft Entra ID with role-based access control (RBAC), Shared Access Signatures, or Managed Identities |
| Network security | Private Link for private connectivity, VNet service endpoints, and IP firewall rules |
| Encryption | Data encrypted at rest with Microsoft-managed or customer-managed keys, TLS 1.2 for data in transit |
For more information, see Event Hubs security baseline.
High availability and disaster recovery
Event Hubs provides multiple layers of reliability:
- Availability zones: Zone-redundant deployments distribute replicas across zones within a region (Premium tiers)
- Geo-disaster recovery: Geo-DR enables failover to a secondary region with metadata synchronization
- SLA guarantees: Up to 99.99% availability depending on tier and configuration
Pricing tiers
For current pricing and detailed feature comparison, see Event Hubs pricing and quotas and limits.