Note
Access to this page requires authorization. You can try signing in or changing directories.
Access to this page requires authorization. You can try changing directories.
Enterprise Security Package (ESP) for Azure HDInsight gives you access to Microsoft Entra ID-based authentication, multiuser support, and role-based access control for your Apache Hadoop clusters in Azure. HDInsight ESP clusters enable organizations that adhere to strict corporate security policies to process sensitive data securely.
This guide shows how to create an ESP-enabled Azure HDInsight cluster. It also shows how to create a Windows IaaS VM on which Microsoft Entra ID and Domain Name System (DNS) are enabled. Use this guide to configure the necessary resources to allow on-premises users to sign in to an ESP-enabled HDInsight cluster.
The server you create will act as a replacement for your actual on-premises environment. You'll use it for the setup and configuration steps. Later you'll repeat the steps in your own environment.
This guide will also help you create a hybrid identity environment by using password hash sync with Microsoft Entra ID. The guide complements Use ESP in HDInsight.
Before you use this process in your own environment:
- Set up Microsoft Entra ID and DNS.
- Enable Microsoft Entra ID.
- Sync on-premises user accounts to Microsoft Entra ID.
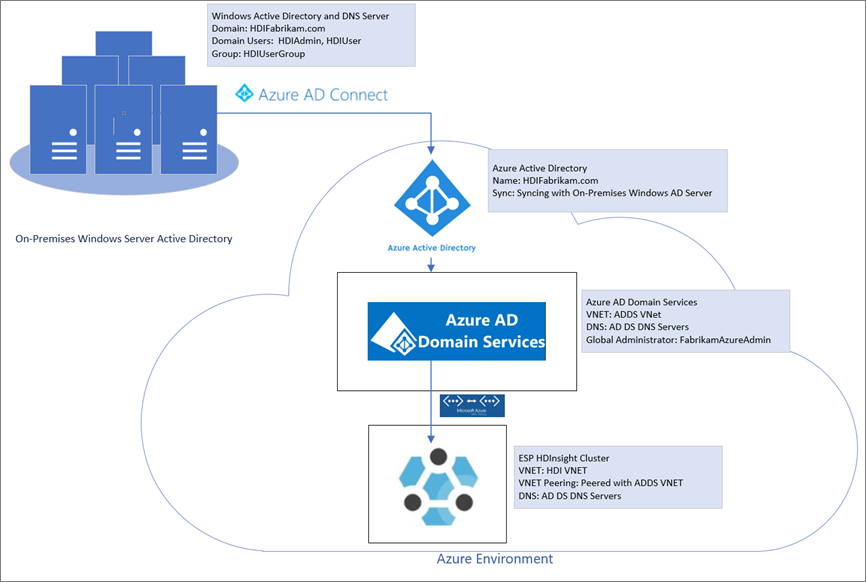
Create an on-premises environment
In this section, you'll use an Azure Quickstart deployment template to create new VMs, configure DNS, and add a new Microsoft Entra ID forest.
Go to the Quickstart deployment template to Create an Azure VM with a new Microsoft Entra ID forest.
Select Deploy to Azure.
Sign in to your Azure subscription.
On the Create an Azure VM with a new AD Forest page, provide the following information:
Property Value Subscription Select the subscription where you want to deploy the resources. Resource group Select Create new, and enter the name OnPremADVRGLocation Select a location. Admin Username HDIFabrikamAdminAdmin Password Enter a password. Domain Name HDIFabrikam.comDns Prefix hdifabrikamLeave the remaining default values.
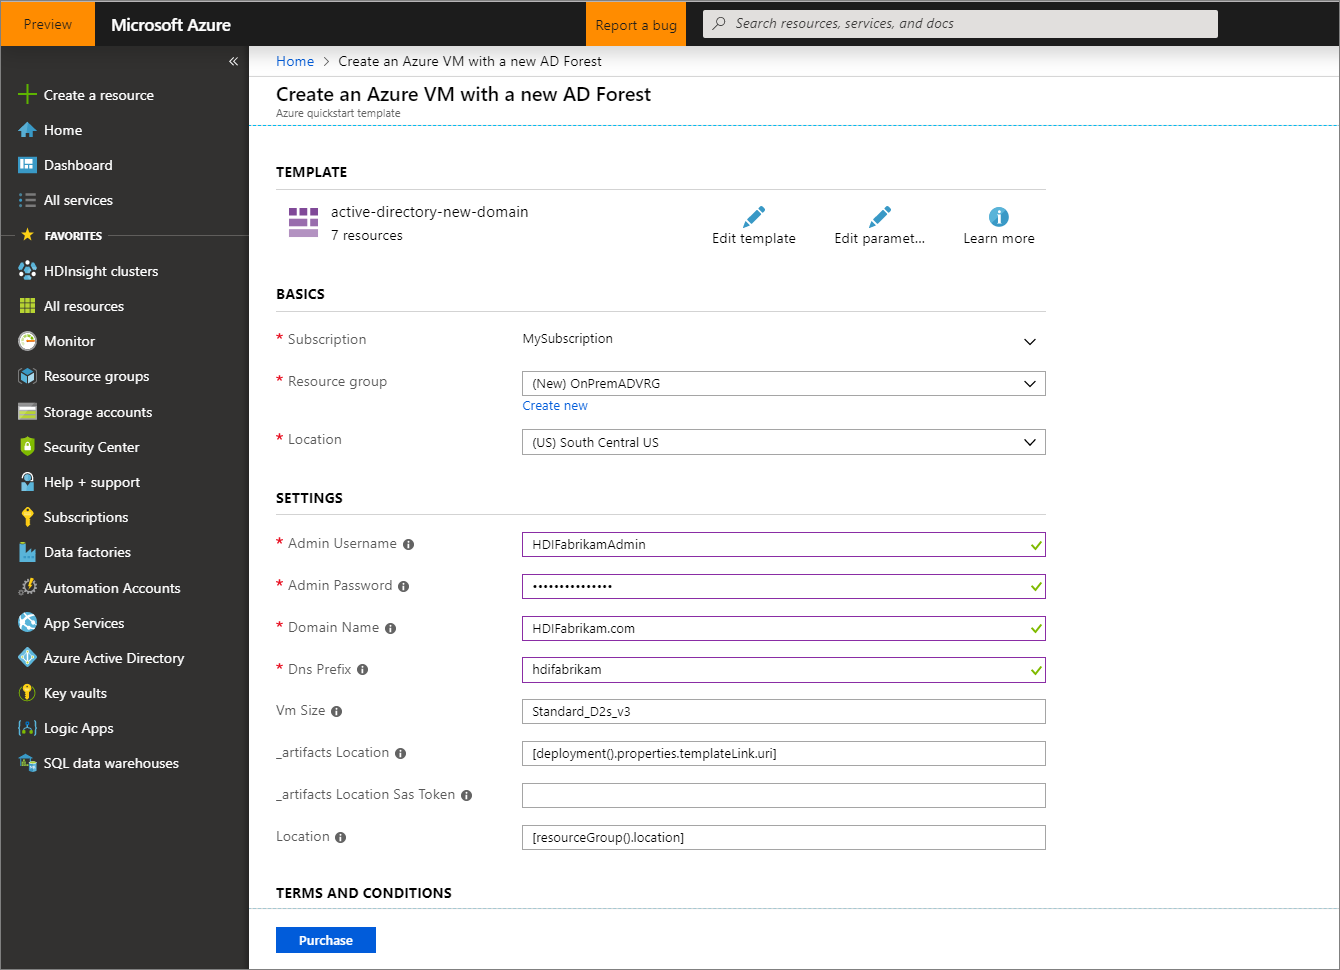
Review the Terms and Conditions, and then select I agree to the terms and conditions stated above.
Select Purchase, and monitor the deployment and wait for it to complete. The deployment takes about 30 minutes to complete.
Configure users and groups for cluster access
In this section, you'll create the users that will have access to the HDInsight cluster by the end of this guide.
Connect to the domain controller by using Remote Desktop.
- From the Azure portal, navigate to Resource groups > OnPremADVRG > adVM > Connect.
- From the IP address drop-down list, select the public IP address.
- Select Download RDP File, and then open the file.
- Use
HDIFabrikam\HDIFabrikamAdminas the user name. - Enter the password that you chose for the admin account.
- Select OK.
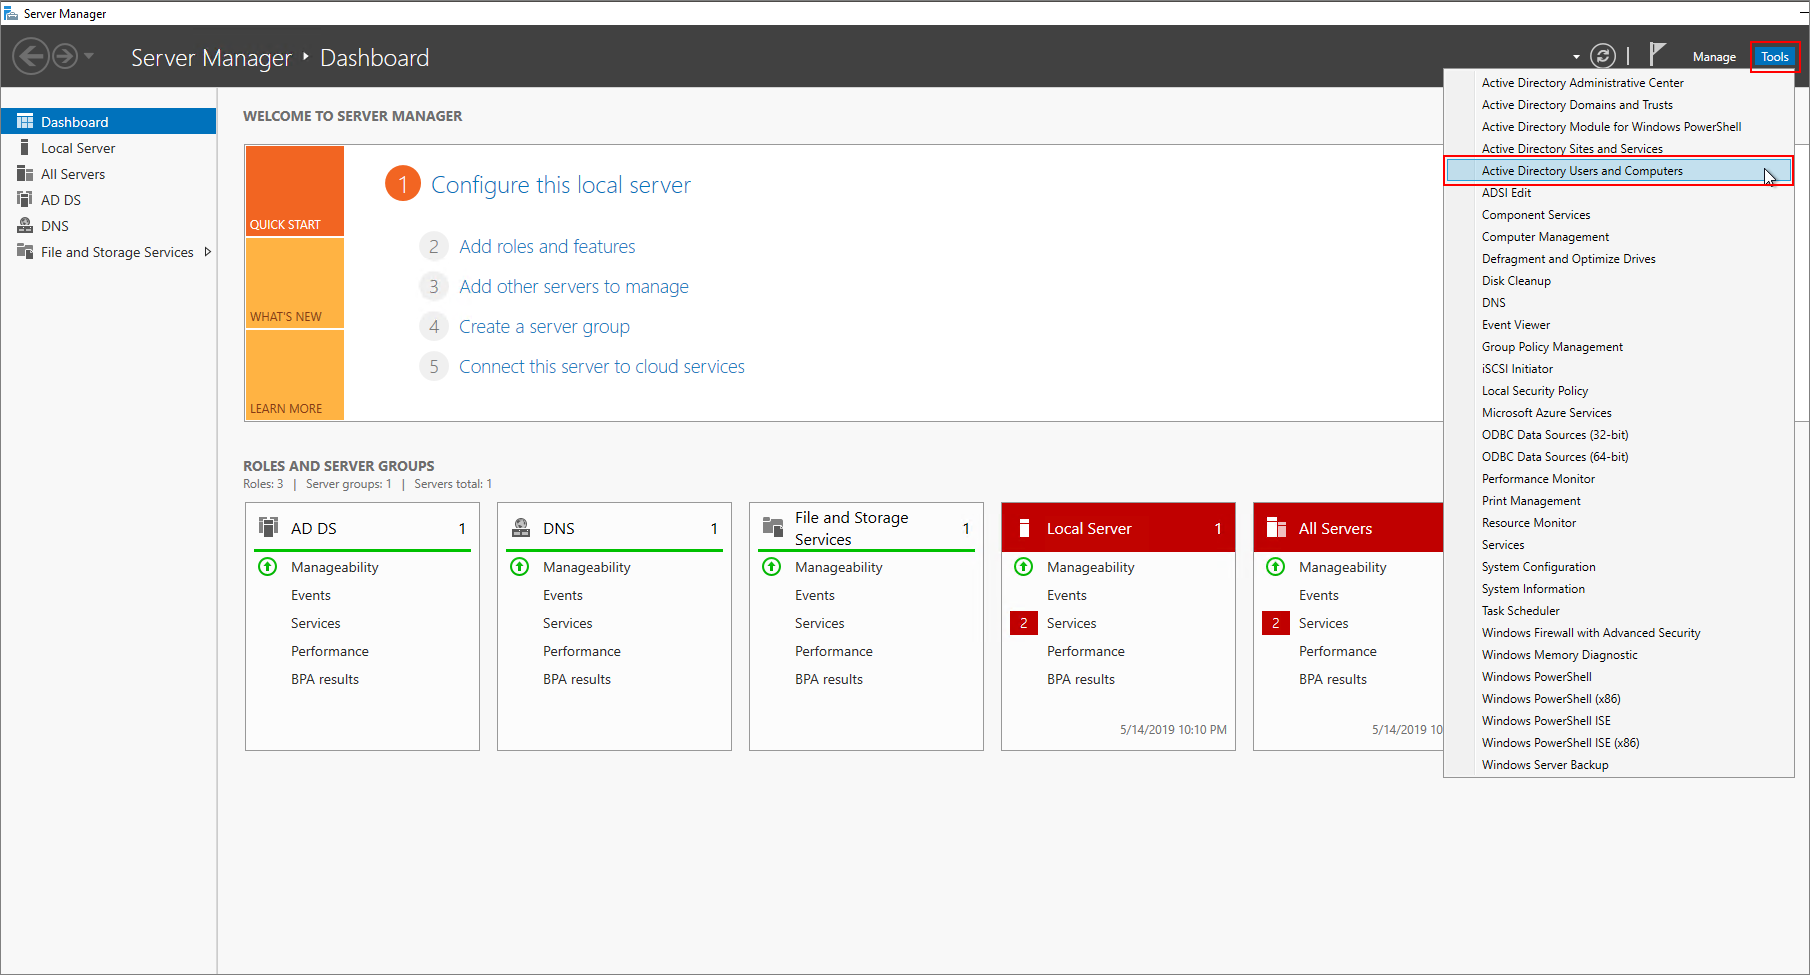
From the domain controller Server Manager dashboard, navigate to Tools > Microsoft Entra ID Users and Computers.
Create two new users: HDIAdmin and HDIUser. These two users will sign in to HDInsight clusters.
From the Microsoft Entra ID Users and Computers page, right-click
HDIFabrikam.com, and then navigate to New > User.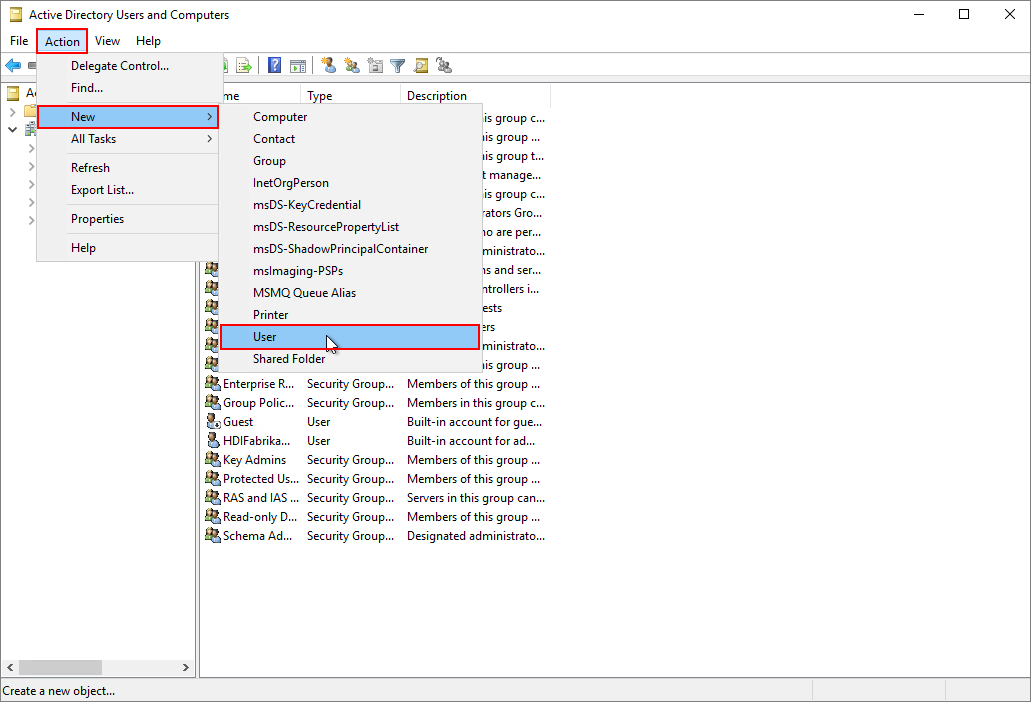
On the New Object - User page, enter
HDIUserfor First name and User logon name. The other fields will autopopulate. Then select Next.
In the pop-up window that appears, enter a password for the new account. Select Password never expires, and then OK at the pop-up message.
Select Next, and then Finish to create the new account.
Repeat the above steps to create the user
HDIAdmin.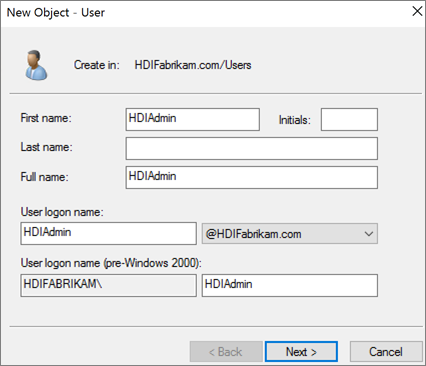
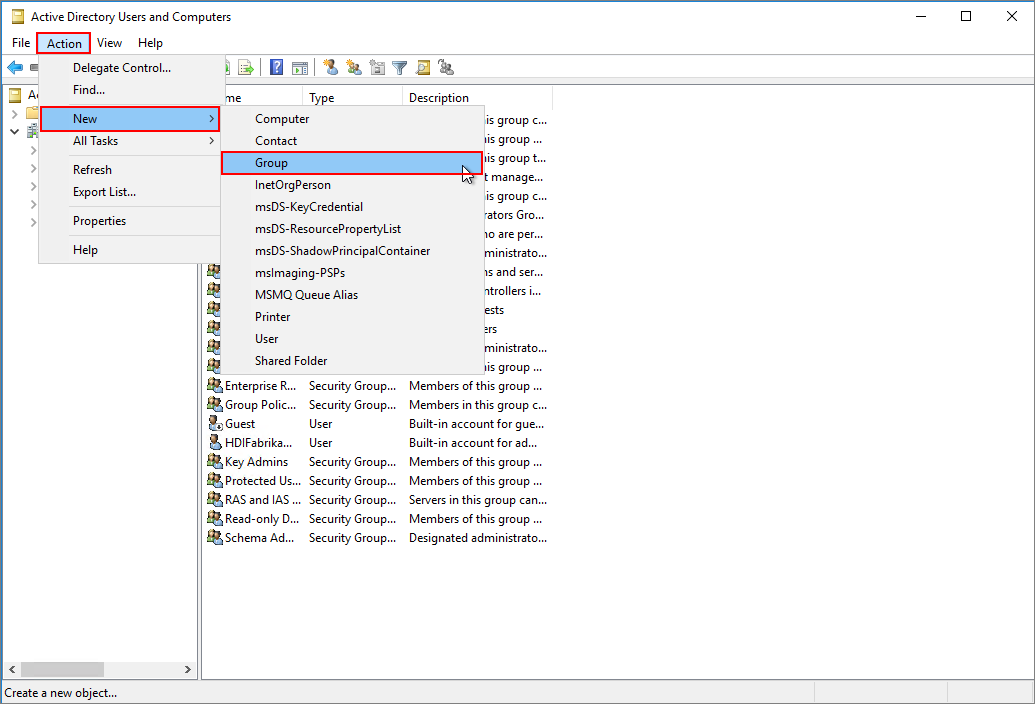
Create a security group.
From Microsoft Entra ID Users and Computers, right-click
HDIFabrikam.com, and then navigate to New > Group.Enter
HDIUserGroupin the Group name text box.Select OK.

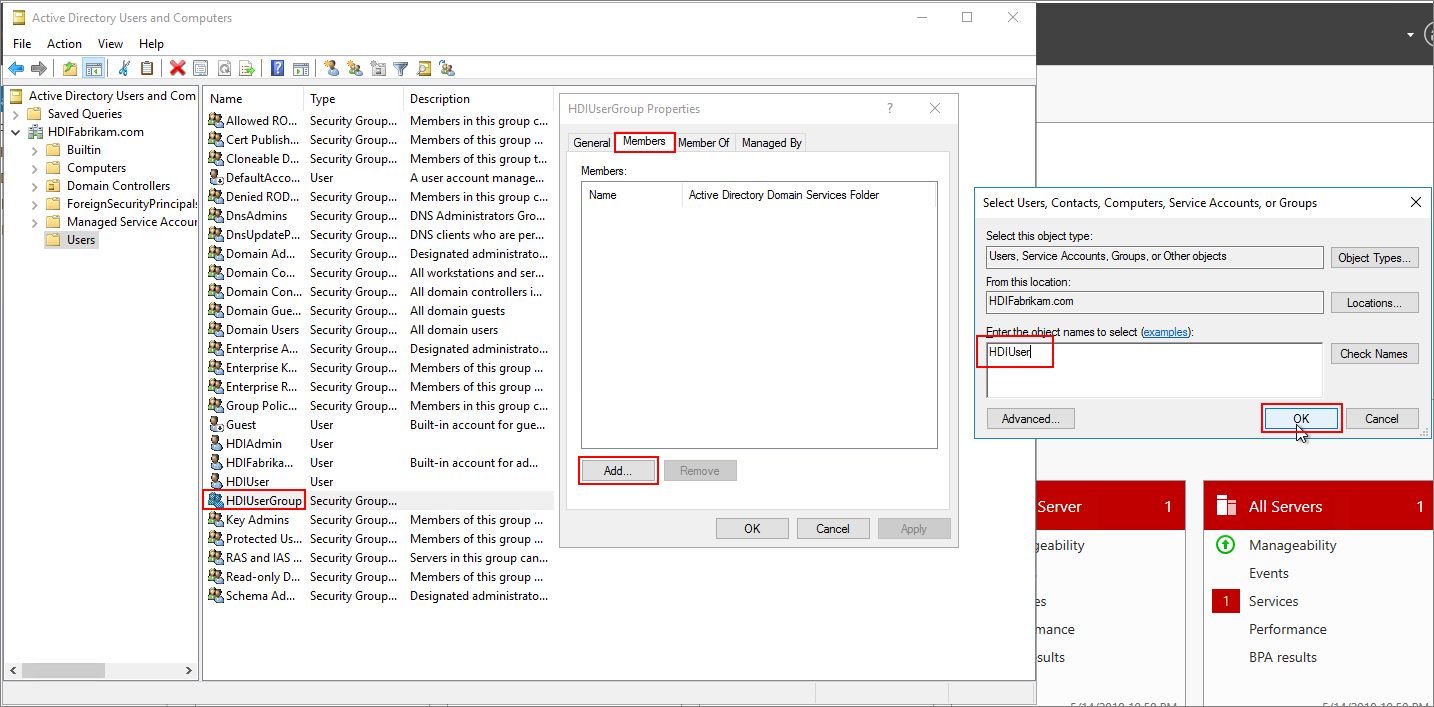
Add members to HDIUserGroup.
Right-click HDIUser and select Add to a group....
In the Enter the object names to select text box, enter
HDIUserGroup. Then select OK, and OK again at the pop-up.Repeat the previous steps for the HDIAdmin account.
You've now created your Microsoft Entra ID environment. You've added two users and a user group that can access the HDInsight cluster.
The users will be synchronized with Microsoft Entra ID.
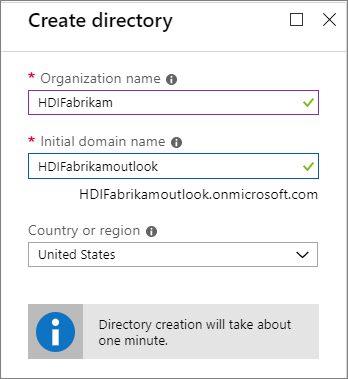
Create a Microsoft Entra directory
Sign in to the Azure portal.
Select Create a resource and type
directory. Select Microsoft Entra ID > Create.Under Organization name, enter
HDIFabrikam.Under Initial domain name, enter
HDIFabrikamoutlook.Select Create.
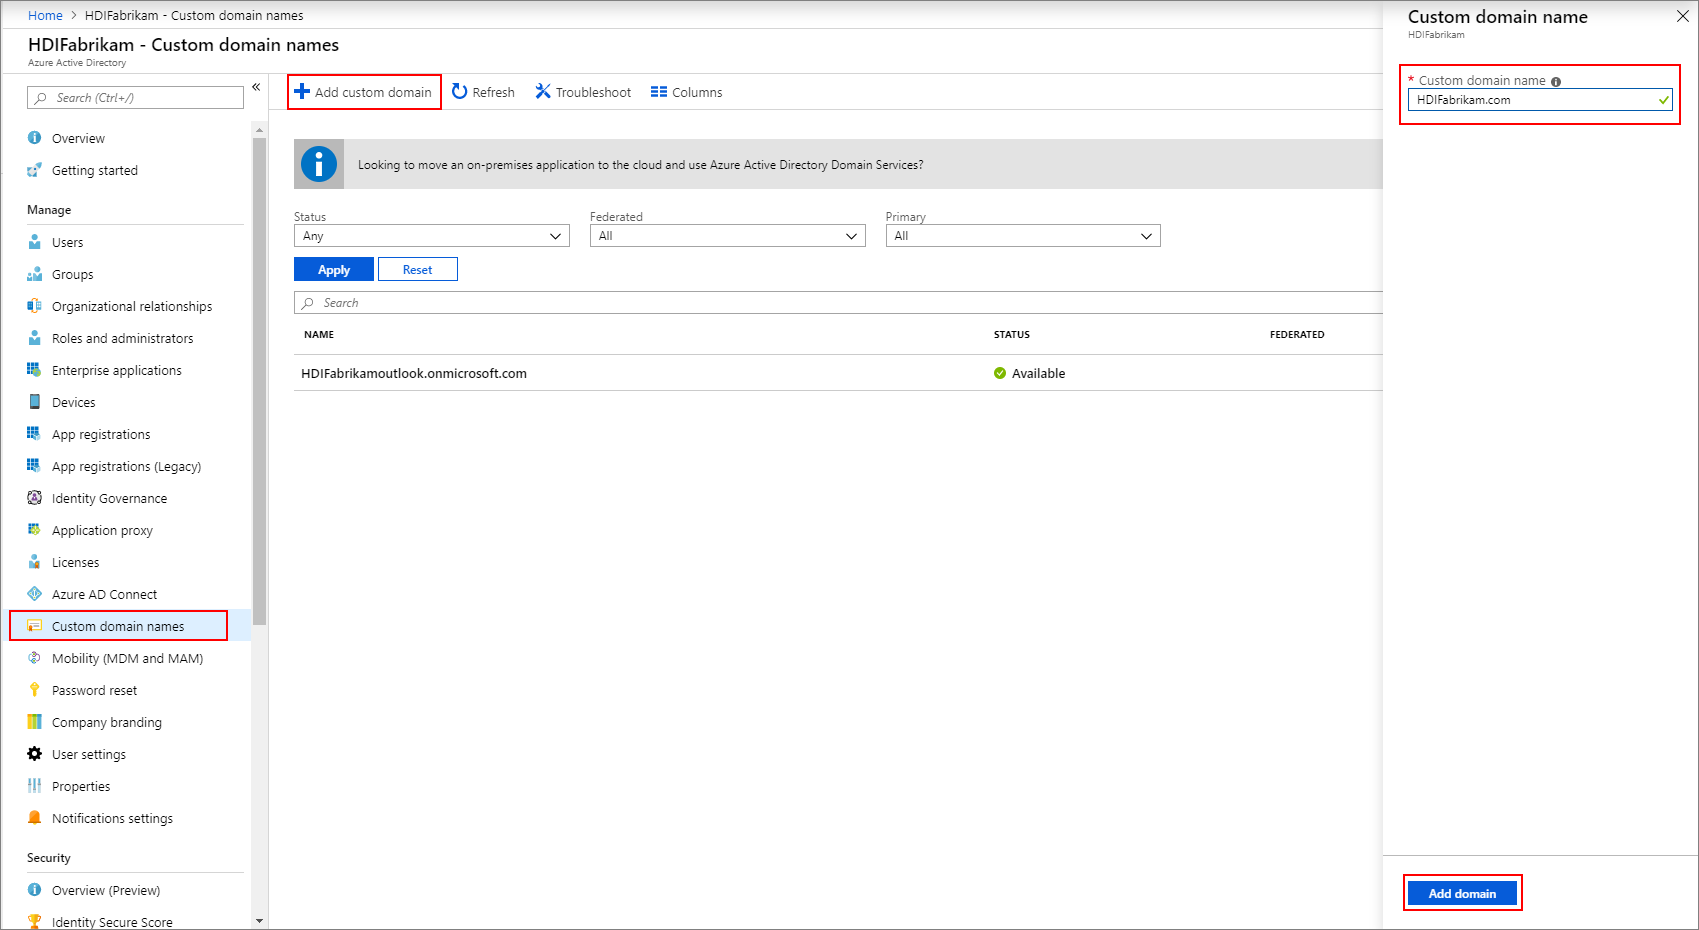
Create a custom domain
From your new Microsoft Entra ID, under Manage, select Custom domain names.
Select + Add custom domain.
Under Custom domain name, enter
HDIFabrikam.com, and then select Add domain.Then complete Add your DNS information to the domain registrar.
Create a group
- From your new Microsoft Entra ID, under Manage, select Groups.
- Select + New group.
- In the group name text box, enter
AAD DC Administrators. - Select Create.
Configure your Microsoft Entra tenant
Now you'll configure your Microsoft Entra tenant so that you can synchronize users and groups from the on-premises Microsoft Entra ID instance to the cloud.
Create a Microsoft Entra ID tenant administrator.
Sign in to the Azure portal and select your Microsoft Entra tenant, HDIFabrikam.
Navigate to Manage > Users > New user.
Enter the following details for the new user:
Identity
Property Description User name Enter fabrikamazureadminin the text box. From the domain name drop-down list, selecthdifabrikam.comName Enter fabrikamazureadmin.Password
- Select Let me create the password.
- Enter a secure password of your choice.
Groups and roles
Select 0 groups selected.
Select
AAD DCAdministrators, and then Select.
Select User.
Select Administrator, and then Select.
Select Create.
Then have the new user sign in to the Azure portal where it will be prompted to change the password. You'll need to do this before configuring Microsoft Entra Connect.
Sync on-premises users to Microsoft Entra ID
Configure Microsoft Entra Connect
From the domain controller, download Microsoft Entra Connect.
Open the executable file that you downloaded, and agree to the license terms. Select Continue.
Select Use express settings.
On the Connect to Microsoft Entra ID page, enter the username and password of the administrator for Microsoft Entra ID. Use the username
fabrikamazureadmin@hdifabrikam.comthat you created when you configured your Active Directory tenant. Then select Next.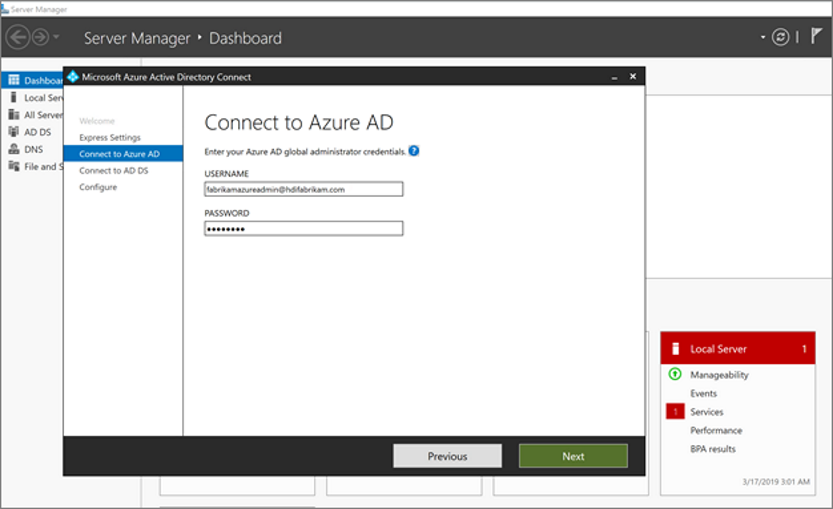
On the Connect to Microsoft Entra ID Domain Services page, enter the username and password for an enterprise admin account. Use the username
HDIFabrikam\HDIFabrikamAdminand its password that you created earlier. Then select Next.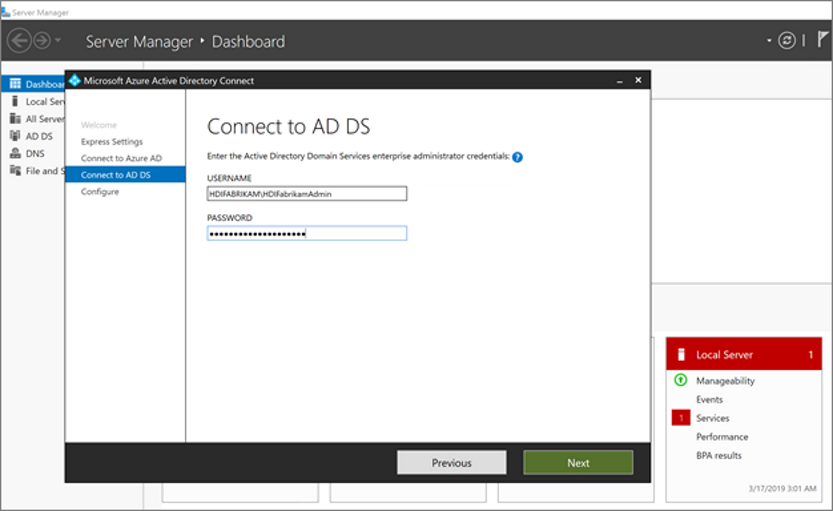
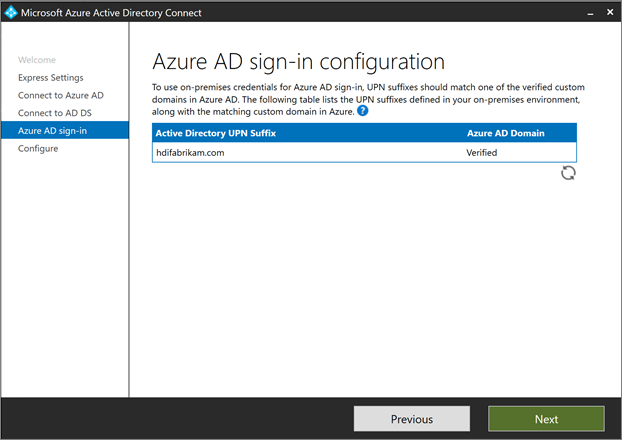
On the Microsoft Entra sign-in configuration page, select Next.
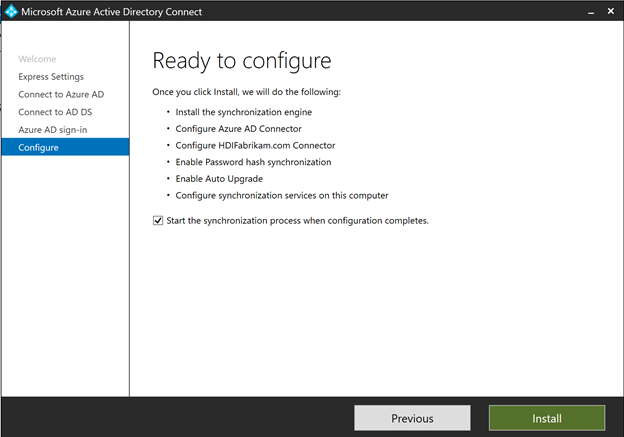
On the Ready to configure page, select Install.
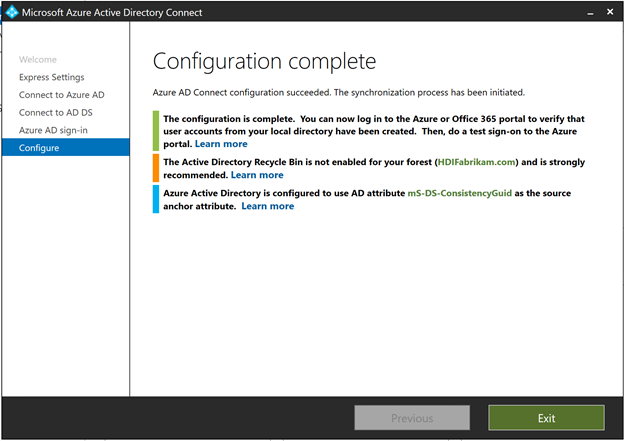
On the Configuration complete page, select Exit.
After the sync completes, confirm that the users you created on the IaaS directory are synced to Microsoft Entra ID.
- Sign in to the Azure portal.
- Select Microsoft Entra ID > HDIFabrikam > Users.
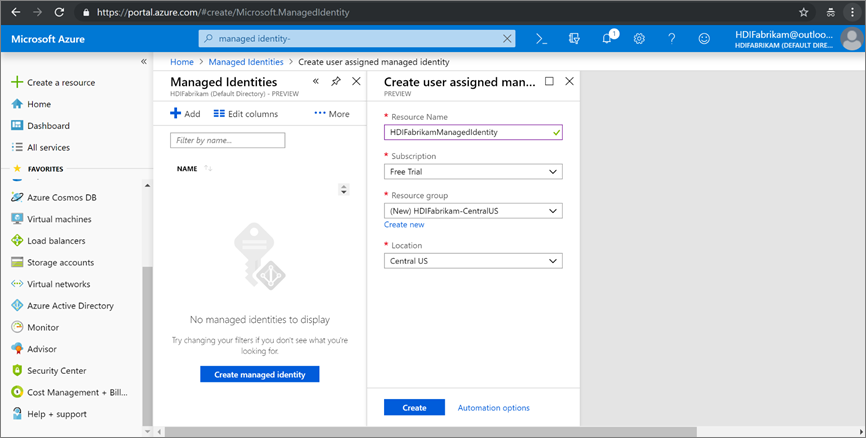
Create a user-assigned managed identity
Create a user-assigned managed identity that you can use to configure Microsoft Entra Domain Services. For more information, see Create, list, delete, or assign a role to a user-assigned managed identity by using the Azure portal.
- Sign in to the Azure portal.
- Select Create a resource and type
managed identity. Select User Assigned Managed Identity > Create. - For the Resource Name, enter
HDIFabrikamManagedIdentity. - Select your subscription.
- Under Resource group, select Create new and enter
HDIFabrikam-chinanorth3. - Under Location, select China North 3.
- Select Create.
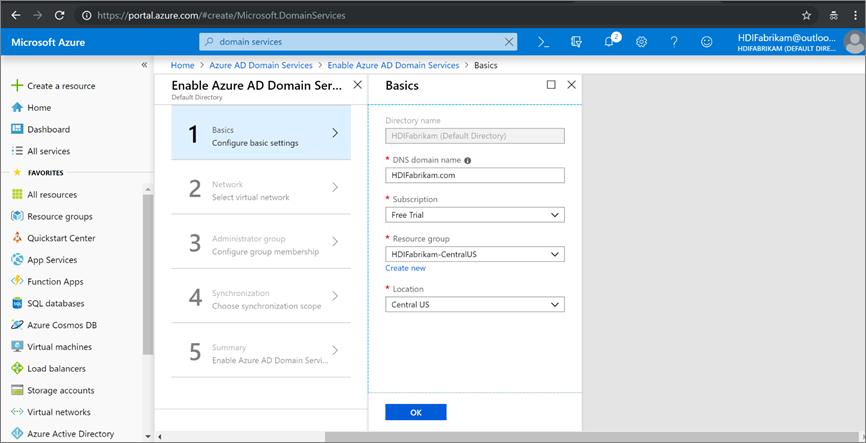
Enable Microsoft Entra Domain Services
Follow these steps to enable Microsoft Entra Domain Services. For more information, see Enable Microsoft Entra Domain Services by using the Azure portal.
Create a virtual network to host Microsoft Entra Domain Services. Run the following PowerShell code.
# Sign in to your Azure subscription
$sub = Get-AzSubscription -ErrorAction SilentlyContinue
if(-not($sub))
{
    Connect-AzAccount -Environment AzureChinaCloud
}

# If you have multiple subscriptions, set the one to use
# Select-AzSubscription -SubscriptionId "<SUBSCRIPTIONID>"

$virtualNetwork = New-AzVirtualNetwork -ResourceGroupName 'HDIFabrikam-chinanorth3' -Location 'China North 3' -Name 'HDIFabrikam-AADDSVNET' -AddressPrefix 10.1.0.0/16
$subnetConfig = Add-AzVirtualNetworkSubnetConfig -Name 'AADDS-subnet' -AddressPrefix 10.1.0.0/24 -VirtualNetwork $virtualNetwork
$virtualNetwork | Set-AzVirtualNetwork
Sign in to the Azure portal.
Select Create resource, enter
Domain services, and select Microsoft Entra Domain Services > Create.On the Basics page:
Under Directory name, select the Microsoft Entra directory you created: HDIFabrikam.
For DNS domain name, enter HDIFabrikam.com.
Select your subscription.
Specify the resource group HDIFabrikam-chinanorth3. For Location, select China North 3.
On the Network page, select the network (HDIFabrikam-VNET) and the subnet (AADDS-subnet) that you created by using the PowerShell script. Or choose Create new to create a virtual network now.

On the Administrator group page, you should see a notification that a group named
AAD DCAdministrators has already been created to administer this group. You can modify the membership of this group if you want to, but in this case you don't need to change it. Select OK.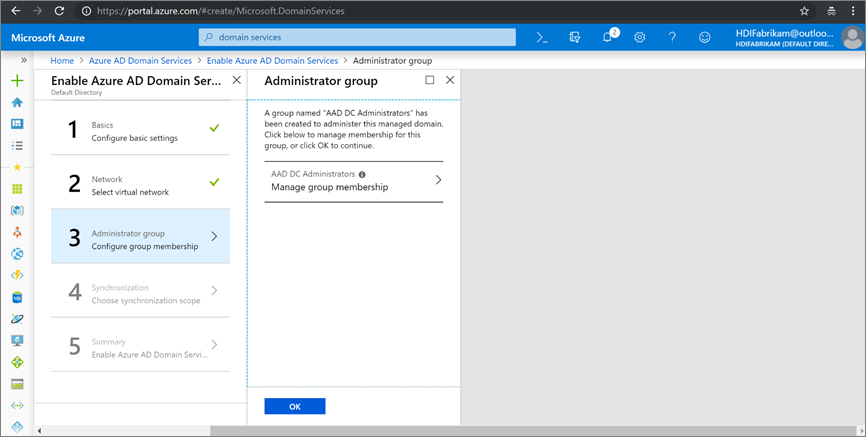
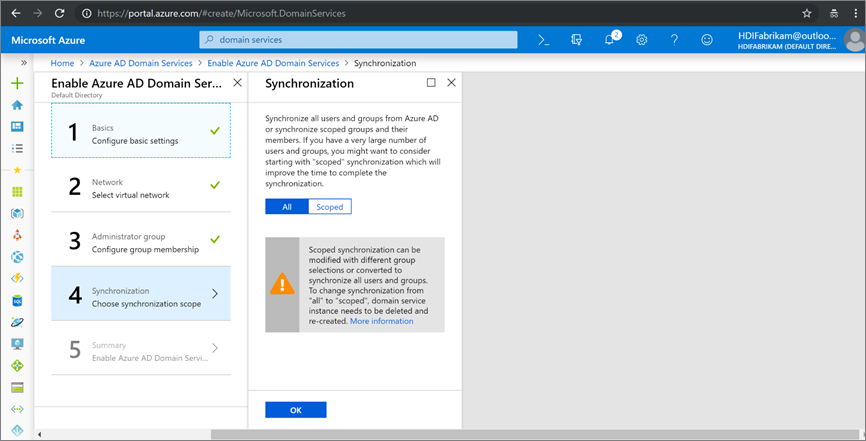
On the Synchronization page, enable complete synchronization by selecting All > OK.
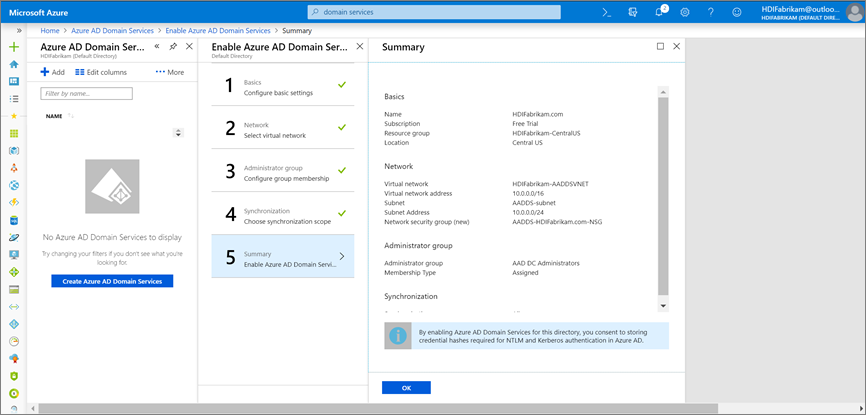
On the Summary page, verify the details for Microsoft Entra Domain Services and select OK.
After you enable Microsoft Entra Domain Services, a local DNS server runs on the Microsoft Entra VMs.
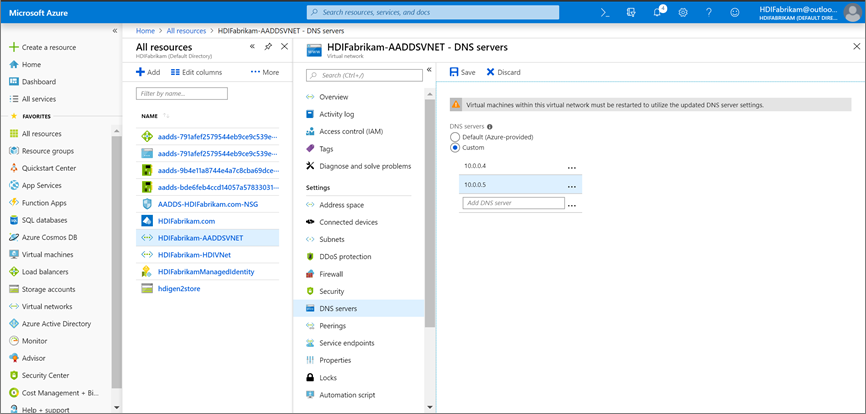
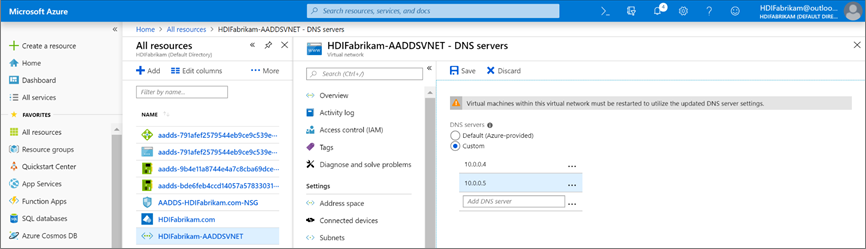
Configure your Microsoft Entra Domain Services virtual network
Use the following steps to configure your Microsoft Entra Domain Services virtual network (HDIFabrikam-AADDSVNET) to use your custom DNS servers.
Locate the IP addresses of your custom DNS servers.
- Select the
HDIFabrikam.comMicrosoft Entra Domain Services resource. - Under Manage, select Properties.
- Find the IP addresses under IP address on virtual network.
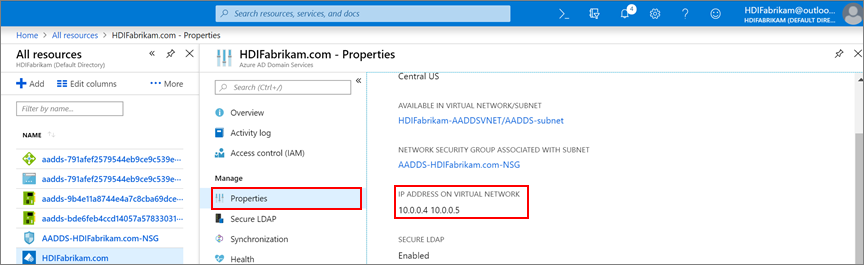
- Select the
Configure HDIFabrikam-AADDSVNET to use custom IP addresses 10.0.0.4 and 10.0.0.5.
- Under Settings, select DNS Servers.
- Select Custom.
- In the text box, enter the first IP address (10.0.0.4).
- Select Save.
- Repeat the steps to add the other IP address (10.0.0.5).
In our scenario, we configured Microsoft Entra Domain Services to use IP addresses 10.0.0.4 and 10.0.0.5, setting the same IP address on the Microsoft Entra Domain Services virtual network:
Securing LDAP traffic
Lightweight Directory Access Protocol (LDAP) is used to read from and write to Microsoft Entra ID. You can make LDAP traffic confidential and secure by using Secure Sockets Layer (SSL) or Transport Layer Security (TLS) technology. You can enable LDAP over SSL (LDAPS) by installing a properly formatted certificate.
For more information about secure LDAP, see Configure LDAPS for a Microsoft Entra Domain Services managed domain.
In this section, you create a self-signed certificate, download the certificate, and configure LDAPS for the HDIFabrikam Microsoft Entra Domain Services managed domain.
The following script creates a certificate for HDIFabrikam. The certificate is saved in the LocalMachine path.
$lifetime = Get-Date
New-SelfSignedCertificate -Subject hdifabrikam.com `
-NotAfter $lifetime.AddDays(365) -KeyUsage DigitalSignature, KeyEncipherment `
-Type SSLServerAuthentication -DnsName *.hdifabrikam.com, hdifabrikam.com
Note
Any utility or application that creates a valid Public Key Cryptography Standards (PKCS) #10 request can be used to form the TLS/SSL certificate request.
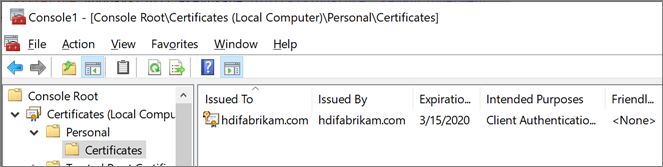
Verify that the certificate is installed in the computer's Personal store:
Start Microsoft Management Console (MMC).
Add the Certificates snap-in that manages certificates on the local computer.
Expand Certificates (Local Computer) > Personal > Certificates. A new certificate should exist in the Personal store. This certificate is issued to the fully qualified host name.
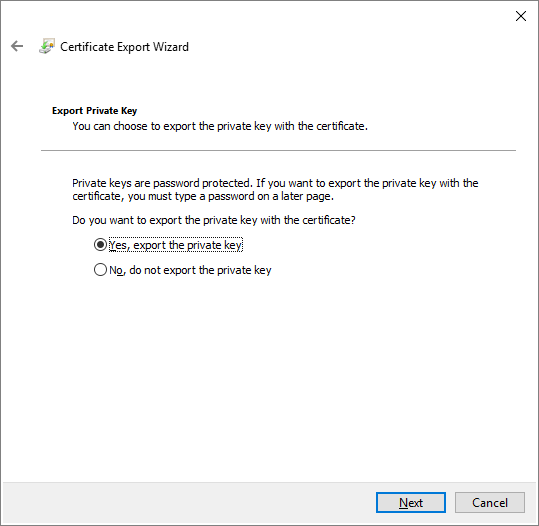
In pane on the right, right-click the certificate that you created. Point to All Tasks, and then select Export.
On the Export Private Key page, select Yes, export the private key. The computer where the key will be imported needs the private key to read the encrypted messages.
On the Export File Format page, leave the default settings, and then select Next.
On the Password page, type a password for the private key. For Encryption, select TripleDES-SHA1. Then select Next.
On the File to Export page, type the path and the name for the exported certificate file, and then select Next. The file name has to have a .pfx extension. This file is configured in the Azure portal to establish a secure connection.
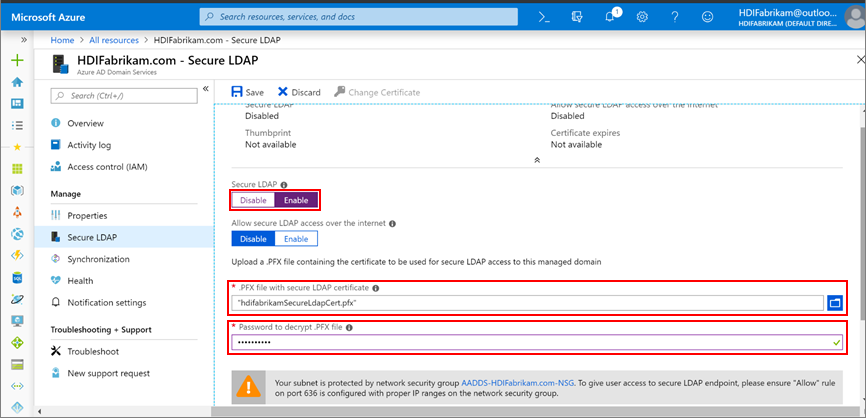
Enable LDAPS for a Microsoft Entra Domain Services managed domain.
- From the Azure portal, select the domain
HDIFabrikam.com. - Under Manage, select Secure LDAP.
- On the Secure LDAP page, under Secure LDAP, select Enable.
- Browse for the .pfx certificate file that you exported on your computer.
- Enter the certificate password.
- From the Azure portal, select the domain
Now that you've enabled LDAPS, make sure it's reachable by enabling port 636.
In the HDIFabrikam-chinanorth3 resource group, select the network security group AADDS-HDIFabrikam.com-NSG.
Under Settings, select Inbound security rules > Add.
On the Add inbound security rule page, enter the following properties, and select Add:
Property Value Source Any Source port ranges * Destination Any Destination port range 636 Protocol Any Action Allow Priority <Desired number> Name Port_LDAP_636 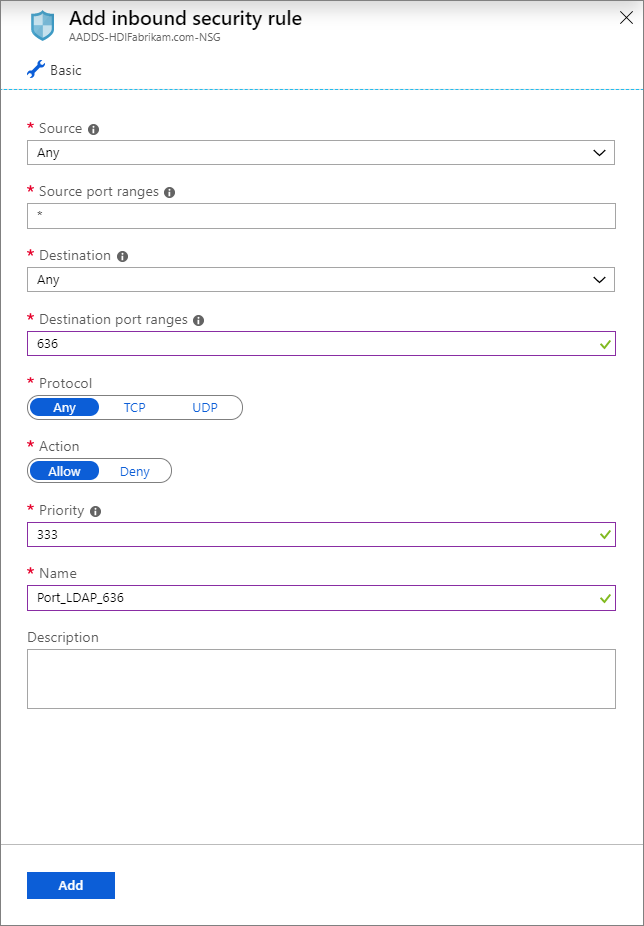
HDIFabrikamManagedIdentity is the user-assigned managed identity. The HDInsight Domain Services Contributor role is enabled for the managed identity that will allow this identity to read, create, modify, and delete domain services operations.

Create an ESP-enabled HDInsight cluster
This step requires the following prerequisites:
Create a new resource group HDIFabrikam-chinanorth3 in the location China North 3.
Create a virtual network that will host the ESP-enabled HDInsight cluster.
$virtualNetwork = New-AzVirtualNetwork -ResourceGroupName 'HDIFabrikam-chinanorth3' -Location 'China North 3' -Name 'HDIFabrikam-HDIVNet' -AddressPrefix 10.1.0.0/16
$subnetConfig = Add-AzVirtualNetworkSubnetConfig -Name 'SparkSubnet' -AddressPrefix 10.1.0.0/24 -VirtualNetwork $virtualNetwork
$virtualNetwork | Set-AzVirtualNetwork
Create a peer relationship between the virtual network that hosts Microsoft Entra Domain Services (
HDIFabrikam-AADDSVNET) and the virtual network that will host the ESP-enabled HDInsight cluster (HDIFabrikam-HDIVNet). Use the following PowerShell code to peer the two virtual networks.Add-AzVirtualNetworkPeering -Name 'HDIVNet-AADDSVNet' -RemoteVirtualNetworkId (Get-AzVirtualNetwork -ResourceGroupName 'HDIFabrikam-chinanorth3').Id -VirtualNetwork (Get-AzVirtualNetwork -ResourceGroupName 'HDIFabrikam-chinanorth3') Add-AzVirtualNetworkPeering -Name 'AADDSVNet-HDIVNet' -RemoteVirtualNetworkId (Get-AzVirtualNetwork -ResourceGroupName 'HDIFabrikam-chinanorth3').Id -VirtualNetwork (Get-AzVirtualNetwork -ResourceGroupName 'HDIFabrikam-chinanorth3')Create a new Azure Data Lake Storage Gen2 account called Hdigen2store. Configure the account with the user-managed identity HDIFabrikamManagedIdentity. For more information, see Use Azure Data Lake Storage Gen2 with Azure HDInsight clusters.
Set up custom DNS on the HDIFabrikam-AADDSVNET virtual network.
Go to the Azure portal > Resource groups > OnPremADVRG > HDIFabrikam-AADDSVNET > DNS servers.
Select Custom and enter 10.0.0.4 and 10.0.0.5.
Select Save.
Create a new ESP-enabled HDInsight Spark cluster.
Select Custom (size, settings, apps).
Enter details for Basics (section 1). Ensure that the Cluster type is Spark 2.3 (HDI 3.6). Ensure that the Resource group is HDIFabrikam-chinanorth3.
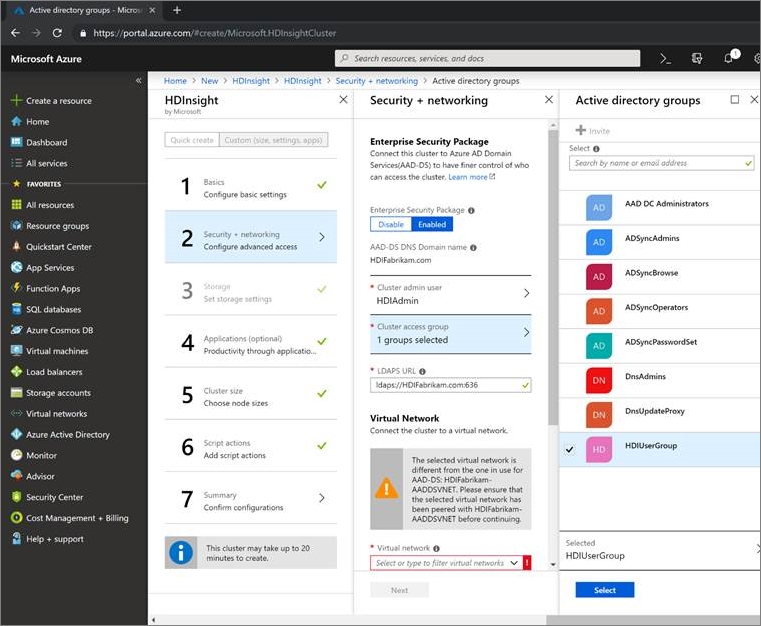
For Security + networking (section 2), fill in the following details:
Under Enterprise Security Package, select Enabled.
Select Cluster admin user and select the HDIAdmin account that you created as the on-premises admin user. Click Select.
Select Cluster access group > HDIUserGroup. Any user that you add to this group in the future will be able to access HDInsight clusters.
Complete the other steps of the cluster configuration and verify the details on the Cluster summary. Select Create.
Sign in to the Ambari UI for the newly created cluster at
https://CLUSTERNAME.azurehdinsight.cn. Use your admin usernamehdiadmin@hdifabrikam.comand its password.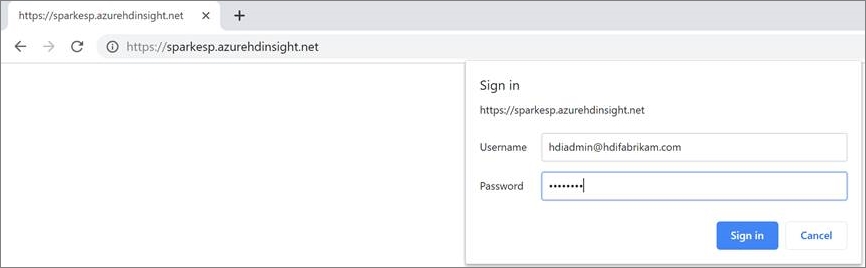
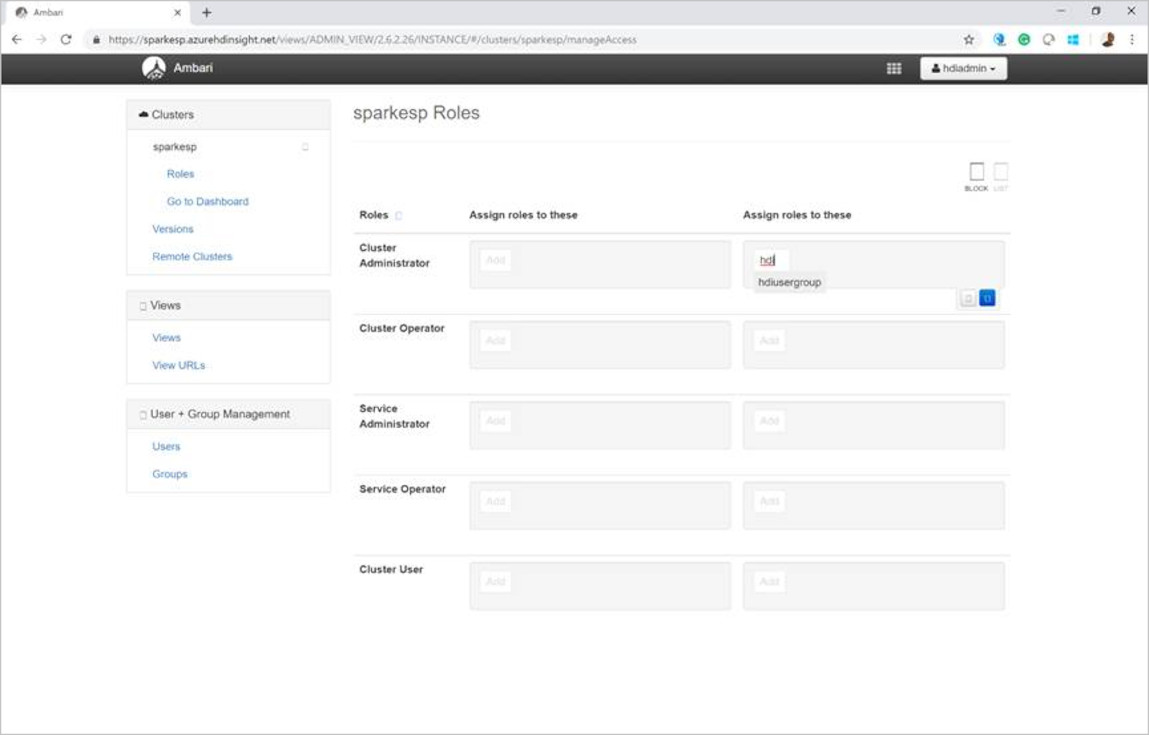
From the cluster dashboard, select Roles.
On the Roles page, under Assign roles to these, next to the Cluster Administrator role, enter the group hdiusergroup.
Open your Secure Shell (SSH) client and sign in to the cluster. Use the hdiuser that you created in the on-premises Microsoft Entra ID instance.
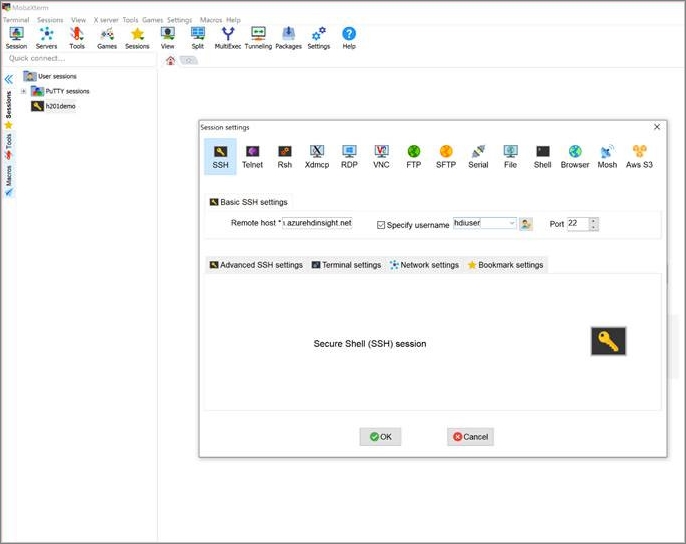
If you can sign in with this account, you've configured your ESP cluster correctly to sync with your on-premises Microsoft Entra ID instance.