Note
Access to this page requires authorization. You can try signing in or changing directories.
Access to this page requires authorization. You can try changing directories.
Applies to: Azure Information Protection
Relevant for: Azure Information Protection classic client for Windows
Note
To provide a unified and streamlined customer experience, we are sunsetting the Azure Information Protection classic client and Label Management in the Azure Portal as of March 31, 2021. No further support is provided for the classic client, and maintenance versions will no longer be released.
- The classic client will be fully retired, and will stop functioning, on March 31, 2022.
- As of March 18, 2022, we are also sunsetting the AIP audit log and analytics, with a full retirement date of September 31, 2022.
The content in this article is provided to support customers with extended support only. For more information, see Removed and retired services.
To deploy the AIP classic client, open a support ticket to get download access.
Tip
If are using a different labeling client to the classic client, see the Microsoft 365 Compliance documentation for equivalent instructions to this tutorial.
In this tutorial, you learn how to:
- Configure policy settings
- Create a new label
- Configure the label for visual markings, recommended classification, and protection
- See your settings and labels in action
As a result of this configuration, users see a default label applied when they create a new document or email. However, they are prompted to apply the new label when credit card information is detected. When the new label is applied, the content is reclassified and protected, with a corresponding footer and watermark.
You can finish this tutorial in about 15 minutes.
To complete this tutorial, you need:
A subscription that includes Azure Information Protection Plan 2.
If you don't have a subscription that includes Azure Information Protection Plan 2, you can create an account for your organization.
The Azure Information Protection pane is added to the Azure portal, the protection service is activated, and you have one or more labels published in the Azure Information Protection global policy.
These steps are covered in the Quickstart: Add Azure Information Protection to the Azure portal and view the policy.
The Azure Information Protection classic client installed on your Windows computer (minimum of Windows 7 with Service Pack 1).
You're signed in to Office apps from one of the following categories:
Office apps, for the versions listed in the table of supported versions for Microsoft 365 Apps by update channel, from Microsoft 365 Apps for Business or Microsoft 365 Business Premium, when the user is assigned a license for Azure Rights Management (also known as Azure Information Protection for Office 365)
Microsoft 365 Apps for Enterprise
Office Professional Plus 2019.
Office Professional Plus 2016.
Office Professional Plus 2013 with Service Pack 1.
Office Professional Plus 2010 with Service Pack 2.
Tip
For a full list of prerequisites to use Azure Information Protection, see Requirements for Azure Information Protection.
Let's get started. Continue with Edit the Azure Information Protection policy.
Using the Azure portal, we'll first change a couple of policy settings, and then create a new label.
Note
Azure Information Protection is not currently supported on Microsoft Azure operated by 21Vianet portal. You can achieve the same functionality using the Azure Information Protection PowerShell commands.
Open a new browser window and sign in to the Azure portal as a global admin. Then navigate to Azure Information Protection.
For example, in the search box for resources, services, and docs: Start typing Information and select Azure Information Protection.
If you are not the global admin, use the following link for alternative roles: Signing in to the Azure portal
Select Classifications > Policies > Global to open the Policy: Global pane.
Locate the policy settings after the labels, in the Configure settings to display and apply on Information Protection end users section.
Make a note of how the settings are currently configured. Specifically, the settings Select the default label and Users must provide justification to set a lower classification label, remove a label, or remove protection. For example:
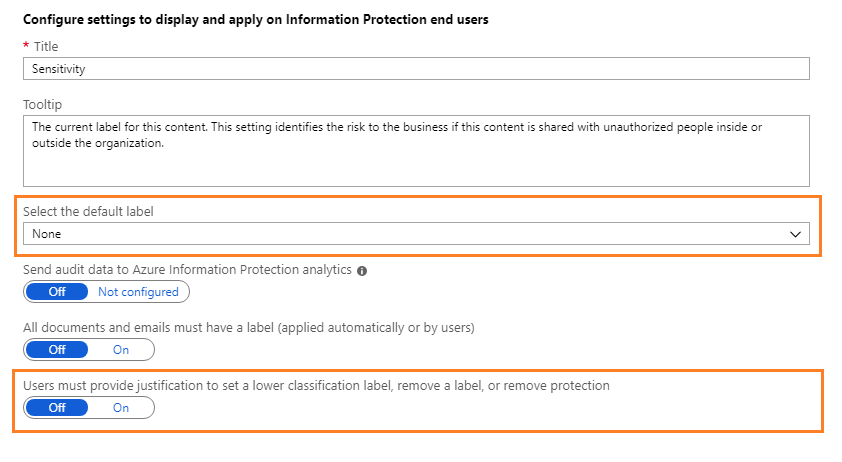
We'll use these policy settings later in the tutorial when you will see them in action.
For Select the default label, select one of the labels, such as General.
The General label is one of the default labels that Azure Information Protection can create for you. This step is covered in the Create and publish labels section from the quickstart to add Azure Information Protection to the Azure portal.
For Users must provide justification to set a lower classification label, remove a label, or remove protection, set this option to On if it is not already.
In addition, make sure that Display the Information Protection bar in Office apps is set to On.
Select Save on this Policy: Global pane, and if you're prompted to confirm your action, select OK. Close this pane.
We'll now create a new sublabel for Confidential.
From the Classifications > Labels menu option: Right-click the Confidential label, and select Add a sub-label.
If you don't have a label named Confidential, you can select another label or you can create a new label instead and still follow the tutorial with minor differences.
On the Sub-label pane, specify the label name of Finance and add the following description: Confidential data that contains financial information that is restricted to employees only.
This text describes how the selected label is intended to be used and it's visible to users as a tooltip, to help them decide which label to select.
For Set permissions for documents and emails containing this label, select Protect, which automatically opens the Protection pane by selecting the Protection option for you:

On the Protection pane, make sure that Azure (cloud key) is selected. This option uses the Azure Rights Management service to protect documents and emails. Also make sure that the Set Permissions option is selected. Then select Add permissions.
On the Add permissions pane, select Add <organization name> - All members. For example, if your organization name is VanArsdel Ltd, you see the following option to select:

This option automatically selects all the users in your organization who can be granted permissions. However, you can see from the other options that you could browse and search for groups or users from your tenant. Or, when you select the Enter details option, you can specify individual email addresses or even all users from another organization.
For the permissions, select Reviewer from the preset options. You see how this permission level automatically grants some permissions listed but not all permissions:
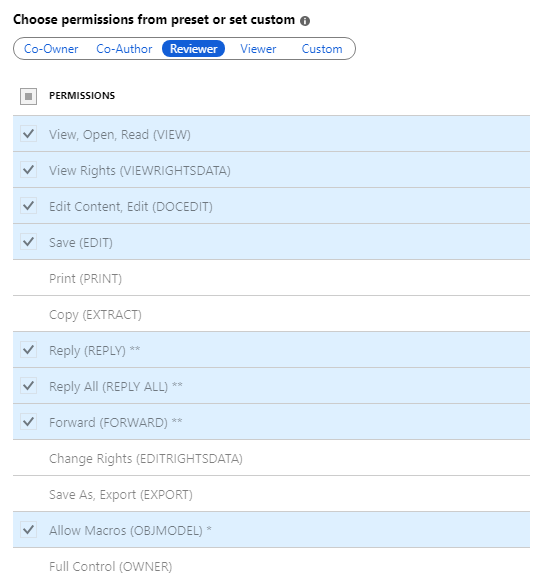
You can select different permission levels or specify individual usage rights by using the Custom option. But for this tutorial, keep the Reviewer option. You can experiment with different permissions later and read how they restrict what the specified users can do with the protected document or email.
Click OK to close this Add permissions pane, and you see how the Protection pane is updated to reflect your configuration. For example:

If you select Add permissions, this action opens the Add permissions pane again, so that you can add more users and grant them different permissions. For example, grant just view access for a specific group. But for this tutorial, we'll keep with one set of permissions for all users.
Review and keep the defaults for content expiration and offline access, and then click OK to save and close this Protection pane.
Back on the Sub-label pane, locate the Set visual marking section:
For the Documents with this label have a footer setting, click On, and then for the Text box, type Classified as Confidential.
For the Documents with this label have a watermark setting, click On, and then for the Text box, type your organization name. For example, VanArsdel, Ltd
Although you can change the appearance for these visual markers, we'll leave these settings at the defaults for now.
Locate the section Configure conditions for automatically applying this label:
Click Add a new condition and then, on the Condition pane, select the following:
a. Choose the type of condition: Keep the default of Information Types.
b. For Choose an industry: Keep the default of All.
c. In the Select information types search box: Type credit card number. Then, from the search results, select Credit Card Number.
d. Minimum number of occurrences: Keep the default of 1.
e. Count occurrences with unique values only: Keep the default of Off.
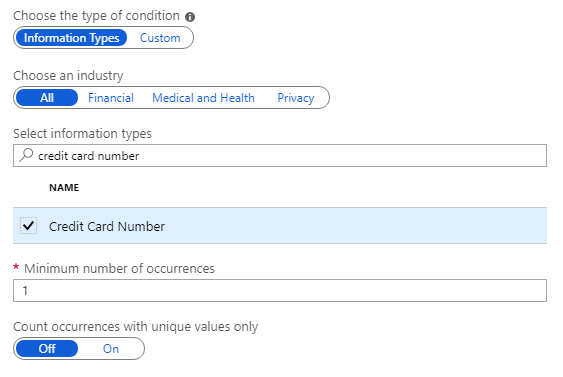
Click Save to return to the Sub-label pane.
On the Sub-label pane, you see that Credit Card Number is displayed as the CONDITION NAME, with 1 OCCURRENCES:

For Select how this label is applied: Keep the default of Recommended, and don't change the default policy tip.
In the Add notes for administrator use box, type For testing purposes only.
Click Save on this Sub-label pane. If you're prompted to confirm, click OK. The new label is created and saved, but not yet added to a policy.
From the Classifications > Policies menu option: Select Global again, and then select the Add or remove labels link after the labels.
From the Policy: Add or remove labels pane, select the label that you've just created, the sublabel named Finance, and click OK.
On the Policy: Global pane, you now see your new sublabel in your global policy, which is configured for visual markings and protection. For example:
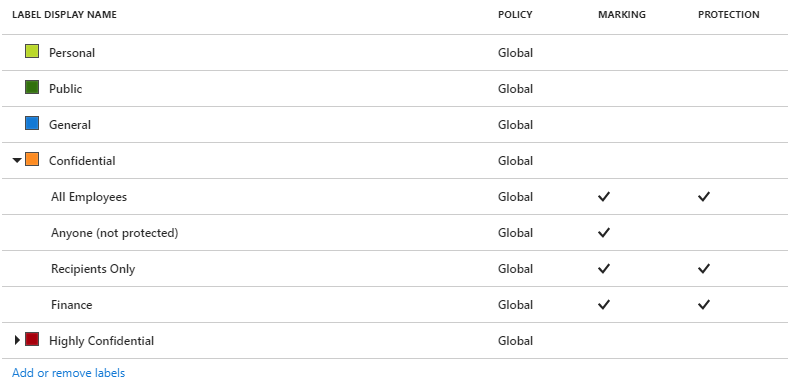
You also see that the settings are configured for the default label and justification:

Click Save on this Policy: Global pane. If you're prompted to confirm this action, click OK.
You can either close the Azure portal, or leave it open to try additional configuration options after you've finished this tutorial.
You're ready to try out the results of your changes.
The policy changes you made and the new label you created applies to Word, Excel, PowerPoint, and Outlook. But for this tutorial, we'll use Word to see them in action.
Open a new document in Word. Because the Azure Information Protection client is installed, you see the following:

On the Home tab, a Protection group, with a button named Protect.
Click Protect > Help and Feedback, and in the Microsoft Azure Information Protection dialog box, confirm your client status. It should display Connected as and your user name. In addition, you should also see a recent time and date for the last connection and when the Information Protection policy was downloaded. Verify that your displayed user name is correct for your tenant.
A new bar under the ribbon; the Information Protection bar. It displays the title of Sensitivity, and the labels that we saw in the Azure portal.
On the Information Protection bar, select the last label and you see how sublabels display:

Select one of these sublabels, and you see how the other labels no longer display on the bar now that you've selected a label for this document. The Sensitivity value changes to show the label and sublabel name, with a corresponding change in label color. For example:

On the Information Protection bar, click the Edit Label icon next to the currently selected label value:

This action displays the available labels again.
Now select the first label, Personal. Because you've selected a label that's a lower classification than the previously selected label for this document, you're prompted to justify why you're lowering the classification level:
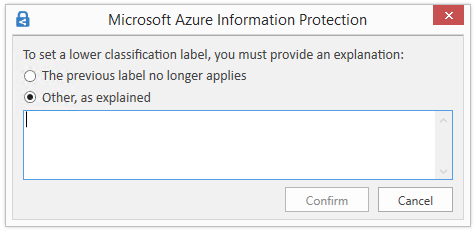
Select The previous label no longer applies, and click Confirm. The Sensitivity value changes to Personal and the other labels are hidden again.
On the Information Protection bar, click the Edit Label icon again. But instead of choosing one of the labels, click the Delete Label icon:

This time when you're prompted, type "This document doesn't need classifying", and click Confirm.
You see the Sensitivity value display Not set, which is what users see initially for new documents if you don't set a default label as a policy setting.
In the Word document, type a valid credit card number, for example: 4242-4242-4242-4242.
Save the document locally, with any file name.
You now see a prompt to apply the label that you configured for protection when credit card numbers are detected. If we didn't agree with the recommendation, our policy setting lets us reject it, by selecting Dismiss. Giving a recommendation but letting a user override it helps to reduce false positives when you're using automatic classification. For this tutorial, click Change now.
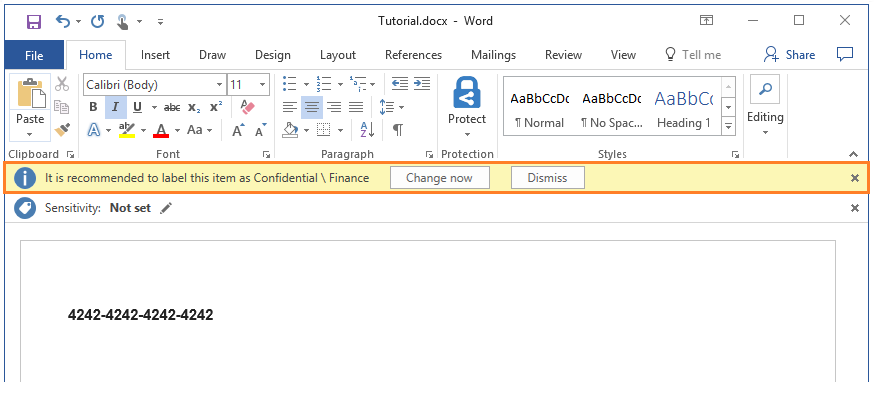
In addition to the document now showing that our configured label is applied (for example, Confidential \ Finance), you immediately see the watermark of your organization name across the page, and the footer of Classified as Confidential is also applied.
The document is also protected with the permissions that you specified for this label. You can confirm that the document is protected by clicking the File tab and view the information for Protect Document. You see that the document is protected by Confidential \ Finance and the label description.
Because of the protection configuration of the label, only employees can open the document and some actions are restricted for them. For example, because they don't have the Print and the Copy and extract content permissions, they can't print the document or copy from it. Such restrictions help to prevent data loss. As the owner of the document, you can print it and copy from it. However, if you email the document to another user in your organization, they cannot do these actions.
You can now close this document.
Do the following if you don't want to keep the changes that you made in this tutorial:
Select Classifications > Policies > Global to open the Policy: Global pane.
Return the policy settings to their original values that you took a note of, and then select Save.
From the Classifications > Label menu option: On the Azure Information Protection - Label pane, select the context menu (...) for the Finance label you created.
Select Delete this label and if you're asked to confirm, select OK.
Restart Word to download these changes.
For more information about editing the Azure Information Protection policy, see Configuring Azure Information Protection policy.
For more information about where the labeling activity is logged, see Usage logging for the Azure Information Protection client.