Note
Access to this page requires authorization. You can try signing in or changing directories.
Access to this page requires authorization. You can try changing directories.
Applies to: Azure Information Protection
Relevant for: Azure Information Protection classic client for Windows
Note
To provide a unified and streamlined customer experience, we are sunsetting the Azure Information Protection classic client and Label Management in the Azure Portal as of March 31, 2021. No further support is provided for the classic client, and maintenance versions will no longer be released.
- The classic client will be fully retired, and will stop functioning, on March 31, 2022.
- As of March 18, 2022, we are also sunsetting the AIP audit log and analytics, with a full retirement date of September 31, 2022.
The content in this article is provided to support customers with extended support only. For more information, see Removed and retired services.
In this quickstart, you'll add Azure Information Protection to the Azure portal, confirm the protection service is activated, create default labels if you don't already have labels, and view the policy settings for the Azure Information Protection classic client.
Time required: You can finish this quickstart in less than 10 minutes.
Prerequisites
Note
Azure Information Protection is not currently supported on Microsoft Azure operated by 21Vianet portal. You can achieve the same functionality using the Azure Information Protection PowerShell commands.
To complete this quickstart, you need:
- Access to your Azure portal account.
- A subscription that includes Azure Information Protection.
For a full list of prerequisites to use Azure Information Protection, see Requirements for Azure Information Protection.
Add Azure Information Protection to the Azure portal
Even if you have a subscription that includes Azure Information Protection, AIP is not automatically available in the Azure portal.
Perform the following steps to add AIP to the Azure portal:
Sign in to the Azure portal by using the global admin account for your tenant.
If you are not the global admin, use the following link for alternative roles: Signing in to the Azure portal
Select + Create a resource. From the search box for the Marketplace, type and then select Azure Information Protection. On the Azure Information Protection page, select Create, and then Create again.

Tip
If this is the first time you're performing this step, you'll see a Pin to dashboard
 icon next to the pane name. Select to create a tile on your dashboard so that you can navigate directly here next time.
Confirm that the protection service is activated
The protection service is now automatically activated for new customers. Confirm that it's activated now or later, as follows:
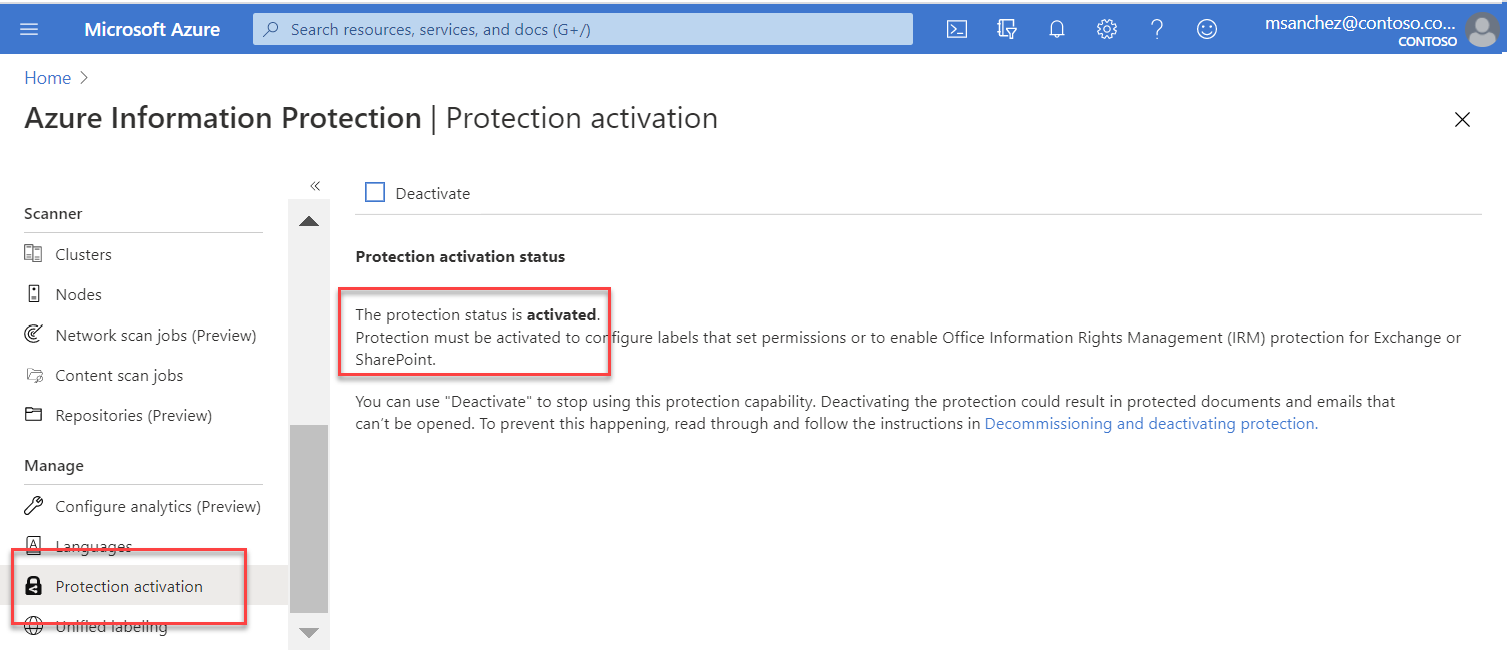
On the Azure Information Protection pane, select Manage > Protection activation.
Confirm whether protection is activated for your tenant. For example:

If protection is not activated at any point, any you need to activate it, select Activate
 . When activation is complete, the information bar displays Activation finished successfully.
Create and publish labels
Your organization might already have labels because they were automatically created for your tenant, or because you have sensitivity labels in the Microsoft 365 Compliance center. Let's take a look:
Under Classifications, select Labels.
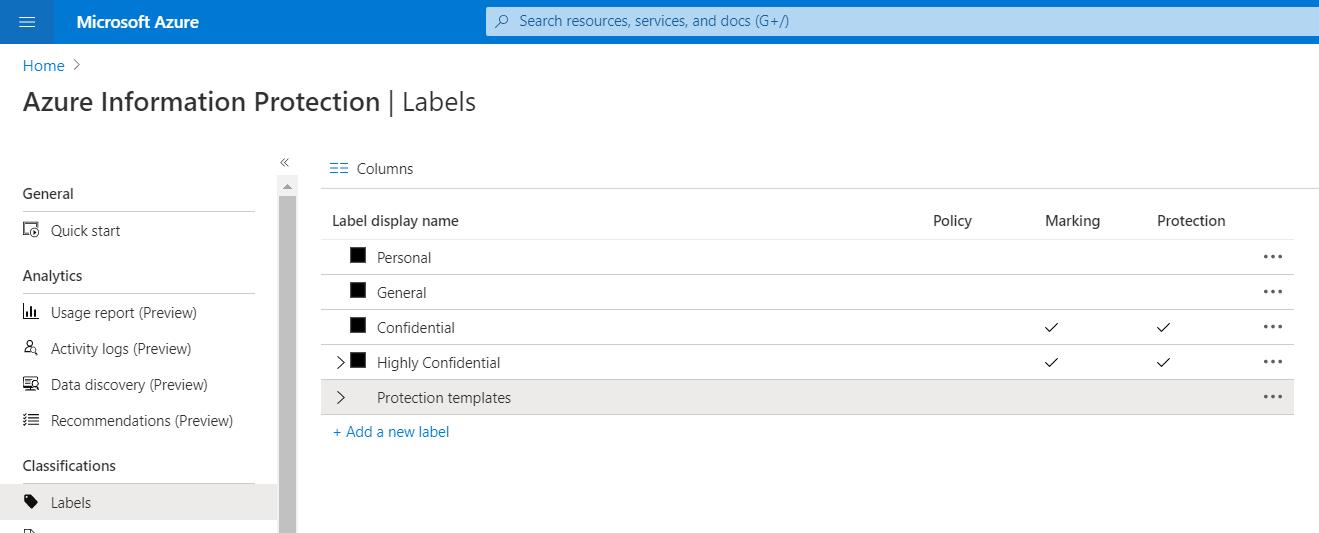
You might already have default labels created. The following image shows the labels that are created by default with Azure Information Protection:

If you don't see the default labels, or any labels:
If you don't see the default labels, or any labels, select Generate default labels to create them for use in the classic client.
If you don't see the Generate default labels button above the grid, under Manage, select Unified labeling. If the Unified labeling status is Not activated, select Activate, and then return to the Classification > Labels pane.
Note
For the unified labeling client, labels are managed in Microsoft M365. For more information, see Restrict access to content by using encryption in sensitivity labels.
Publish your labels in the Azure portal to make them available for the Azure Information Protection classic client:
Open the Global policy. Under Classifications, select Policies > Global.
Select Add or remove labels.
From the Policy: Add or remove labels pane, select all the labels, and then select OK.
Back on the Policy: Global pane, select the Save
 button.
At the prompt, click OK to publish your changes.
View your labels
Now you can familiarize yourself with your labels.
If you still have the Global policy open, click the X at the top-right to close the pane. Under Classifications, select Labels.
The default Azure Information Protection classification labels are:
- Personal
- General
- Confidential
- Highly Confidential
By default, some labels already have visual markings configured. These visual markings might be a footer, header, and/or watermark. Other labels also have protection configured.
Select a label and browse around to see the detailed configuration for that label.
Tip
Expand the Highly Confidential label to see an example of how a classification can have subcategories.
View your policy settings
The first time you connect to the Azure Information Protection service from the Azure portal, default policy settings used by the Azure Information Protection client are always created for you.
Classic client. For the classic client, both labels and policy settings are downloaded to the client in the Azure Information Protection policy.
Unified labeling client. For the unified labeling client, only labels are downloaded to the client. Policy settings are downloaded from the Microsoft 365 compliance center, which admins can used to edit labels and labe policies instead of the Azure portal.
For more information, see Learn about sensitivity labels in the Microsoft 365 documentation.
Classic client instructions:
To view the default Azure Information Protection policy settings for the classic client:
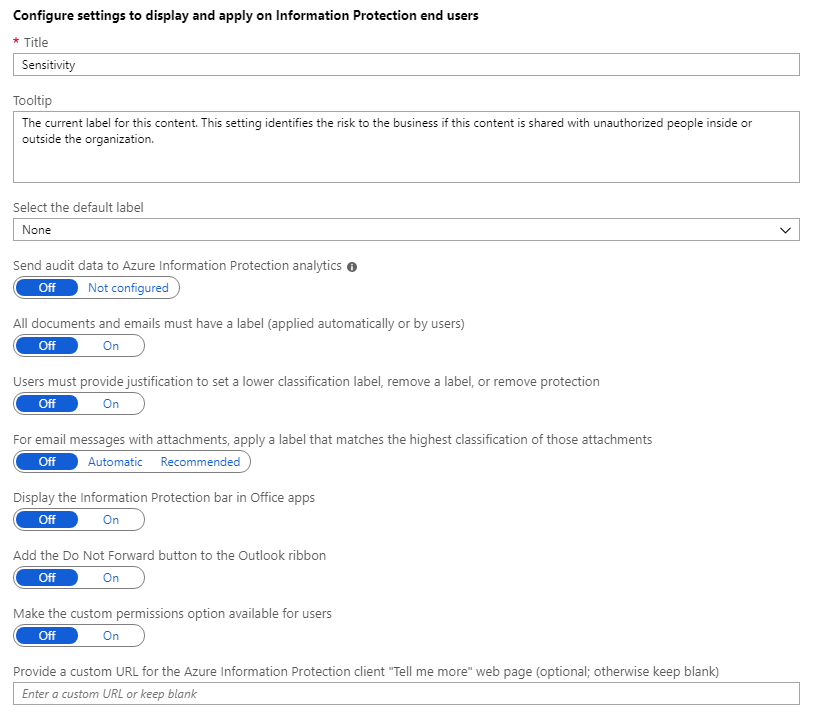
Under Classifications, select Policies > Global to display the default Azure Information Protection policy settings that are created for your tenant.
The policy settings are displayed after the labels, in the Configure settings to display and apply on Information Protection end users section. For example, there is no default label set, documents and emails are not required to have a label, and users do not have to provide justification when they change labels:

You can now close any panes in the portal that you have opened.
Next steps
Your next steps will differ, depending on whether you have the classic or unified labeling client. Not sure of the difference between these clients? See this FAQ.
If you are using the classic client:
You might find the following tutorial helpful as your next step: Edit the policy and create a new label for Azure Information Protection.
Alternatively, for detailed instructions for configuring all aspects of the Azure Information Protection policy, see Configuring the Azure Information Protection policy.
If you are using the unified labeling client:
See Learn about sensitivity labels from the Microsoft 365 Compliance documentation.