Note
Access to this page requires authorization. You can try signing in or changing directories.
Access to this page requires authorization. You can try changing directories.
In this quickstart, you will learn how to create and run a Trusted Platform Module (TPM) device simulator on a Windows development machine. You will connect this simulated device to an IoT hub using a Device Provisioning Service instance. Sample code from the Azure IoT C SDK will be used to help enroll the device with a Device Provisioning Service instance and simulate a boot sequence for the device.
If you're unfamiliar with the process of autoprovisioning, review the provisioning overview. Also, make sure you've completed the steps in Set up IoT Hub Device Provisioning Service with the Azure portal before continuing with this quickstart.
The Azure IoT Device Provisioning Service supports two types of enrollments:
- Enrollment groups: Used to enroll multiple related devices.
- Individual Enrollments: Used to enroll a single device.
This article will demonstrate individual enrollments.
If you don't have an Azure subscription, create a trial account before you begin.
Prerequisites
The following prerequisites are for a Windows development environment. For Linux or macOS, see the appropriate section in Prepare your development environment in the SDK documentation.
Visual Studio 2019 with the 'Desktop development with C++' workload enabled. Visual Studio 2015 and Visual Studio 2017 are also supported.
Latest version of Git installed.
Prepare a development environment for the Azure IoT C SDK
In this section, you will prepare a development environment used to build the Azure IoT C SDK and the TPM device simulator sample.
Download the CMake build system.
It is important that the Visual Studio prerequisites (Visual Studio and the 'Desktop development with C++' workload) are installed on your machine, before starting the
CMakeinstallation. Once the prerequisites are in place, and the download is verified, install the CMake build system.Find the tag name for the latest release of the SDK.
Open a command prompt or Git Bash shell. Run the following commands to clone the latest release of the Azure IoT C SDK GitHub repository. Use the tag you found in the previous step as the value for the
-bparameter:git clone -b <release-tag> https://github.com/Azure/azure-iot-sdk-c.git cd azure-iot-sdk-c git submodule update --initYou should expect this operation to take several minutes to complete.
Create a
cmakesubdirectory in the root directory of the git repository, and navigate to that folder. Run the following commands from theazure-iot-sdk-cdirectory:mkdir cmake cd cmake
Build the SDK and run the TPM device simulator
In this section, you will build the Azure IoT C SDK, which includes the TPM device simulator sample code. This sample provides a TPM attestation mechanism via Shared Access Signature (SAS) Token authentication.
From the
cmakesubdirectory you created in the azure-iot-sdk-c git repository, run the following command to build the sample. A Visual Studio solution for the simulated device will also be generated by this build command.cmake -Duse_prov_client:BOOL=ON -Duse_tpm_simulator:BOOL=ON ..If
cmakedoes not find your C++ compiler, you might get build errors while running the above command. If that happens, try running this command in the Visual Studio command prompt.Once the build succeeds, the last few output lines will look similar to the following output:
$ cmake -Duse_prov_client:BOOL=ON -Duse_tpm_simulator:BOOL=ON ..
-- Building for: Visual Studio 15 2017
-- Selecting Windows SDK version 10.0.16299.0 to target Windows 10.0.17134.
-- The C compiler identification is MSVC 19.12.25835.0
-- The CXX compiler identification is MSVC 19.12.25835.0

...

-- Configuring done
-- Generating done
-- Build files have been written to: E:/IoT Testing/azure-iot-sdk-c/cmake
Navigate to the root folder of the git repository you cloned, and run the TPM simulator using the path shown below. This simulator listens over a socket on ports 2321 and 2322. Do not close this command window; you will need to keep this simulator running until the end of this quickstart.
If you are in the cmake folder, then run the following commands:
cd ..
.\provisioning_client\deps\utpm\tools\tpm_simulator\Simulator.exe
You will not see any output from the simulator. Let it continue to run simulating a TPM device.
Read cryptographic keys from the TPM device
In this section, you will build and execute a sample that will read the endorsement key and registration ID from the TPM simulator you left running, and listening over ports 2321 and 2322. These values will be used for device enrollment with your Device Provisioning Service instance.
Launch Visual Studio and open the new solution file named
azure_iot_sdks.sln. This solution file is located in thecmakefolder you previously created in the root of the azure-iot-sdk-c git repository.On the Visual Studio menu, select Build > Build Solution to build all projects in the solution.
In Visual Studio's Solution Explorer window, navigate to the Provision_Tools folder. Right-click the tpm_device_provision project and select Set as Startup Project.
On the Visual Studio menu, select Debug > Start without debugging to run the solution. The app reads and displays a Registration ID and an Endorsement key. Note or copy these values. They will be used in the next section for device enrollment.
Create a device enrollment entry in the portal
Sign in to the Azure portal, select the All resources button on the left-hand menu and open your Device Provisioning service.
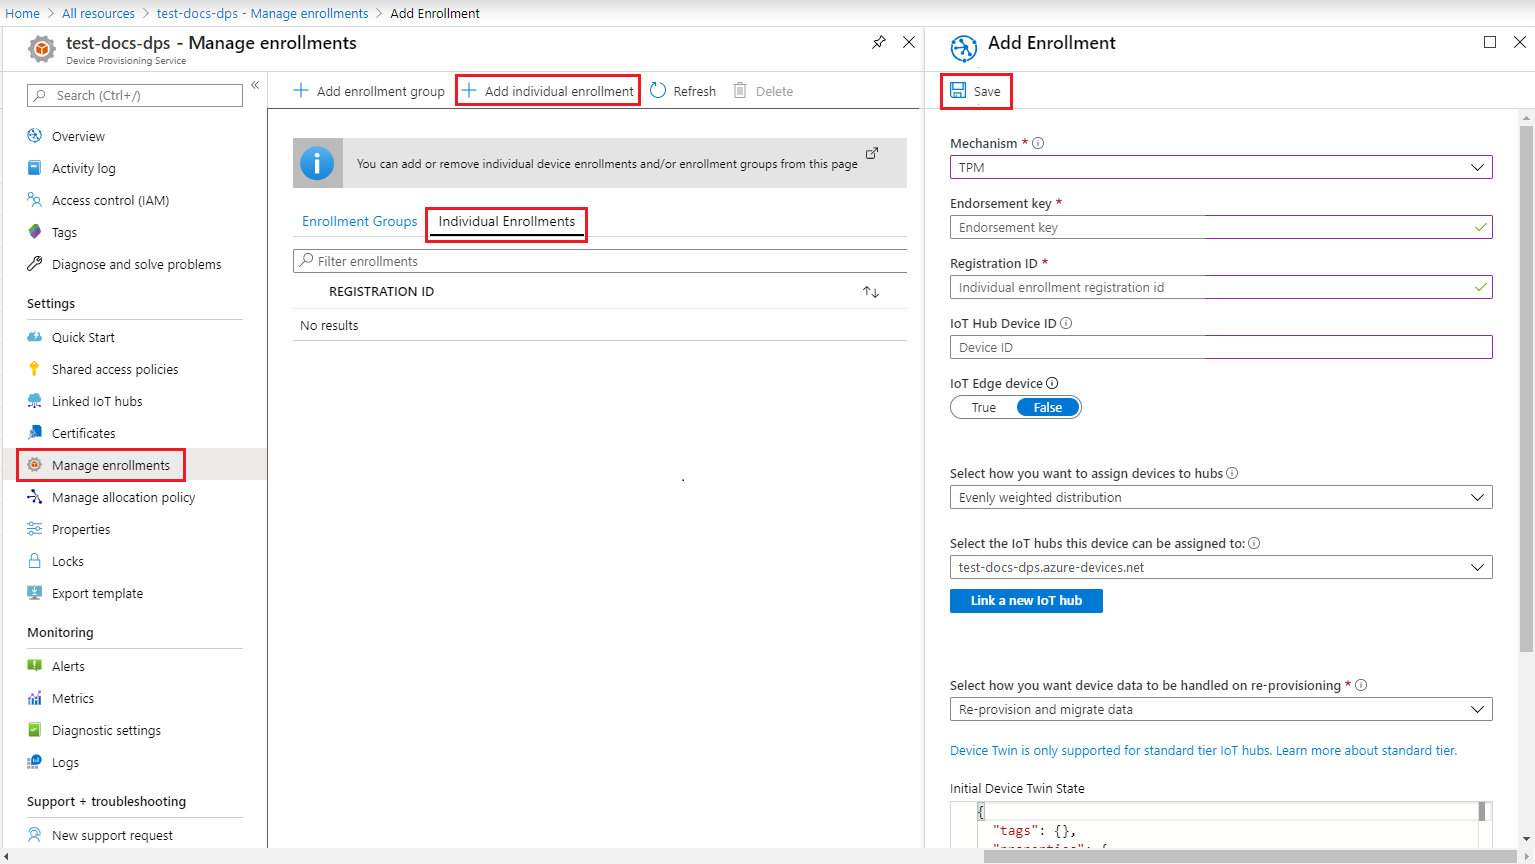
Select the Manage enrollments tab, and then select the Add individual enrollment button at the top.
In the Add Enrollment panel, enter the following information:
Select TPM as the identity attestation Mechanism.
Enter the Registration ID and Endorsement key for your TPM device from the values you noted previously.
Select an IoT hub linked with your provisioning service.
Optionally, you may provide the following information:
- Enter a unique Device ID (you can use the suggested test-docs-device or provide your own). Make sure to avoid sensitive data while naming your device. If you choose not to provide one, the registration ID will be used to identify the device instead.
- Update the Initial device twin state with the desired initial configuration for the device.
Once complete, press the Save button.

On successful enrollment, the Registration ID of your device will appear in the list under the Individual Enrollments tab.
Simulate first boot sequence for the device
In this section, you will configure sample code to use the Advanced Message Queuing Protocol (AMQP) to send the device's boot sequence to your Device Provisioning Service instance. This boot sequence will cause the device to be recognized and assigned to an IoT hub linked to the Device Provisioning Service instance.
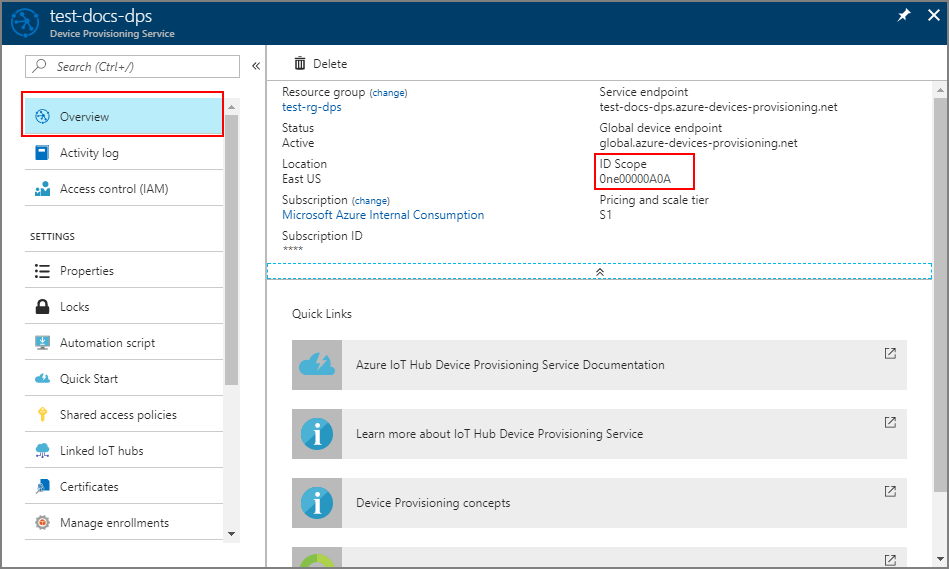
In the Azure portal, select the Overview tab for your Device Provisioning service and copy the ID Scope value.

In Visual Studio's Solution Explorer window, navigate to the Provision_Samples folder. Expand the sample project named prov_dev_client_sample. Expand Source Files, and open prov_dev_client_sample.c.
Near the top of the file, find the
#definestatements for each device protocol as shown below. Make sure onlySAMPLE_AMQPis uncommented.Currently, the MQTT protocol is not supported for TPM Individual Enrollment.
//
// The protocol you wish to use should be uncommented
//
//#define SAMPLE_MQTT
//#define SAMPLE_MQTT_OVER_WEBSOCKETS
#define SAMPLE_AMQP
//#define SAMPLE_AMQP_OVER_WEBSOCKETS
//#define SAMPLE_HTTP
Find the
id_scopeconstant, and replace the value with your ID Scope value that you copied earlier.static const char* id_scope = "0ne00002193";Find the definition for the
main()function in the same file. Make sure thehsm_typevariable is set toSECURE_DEVICE_TYPE_TPMinstead ofSECURE_DEVICE_TYPE_X509as shown below.SECURE_DEVICE_TYPE hsm_type; hsm_type = SECURE_DEVICE_TYPE_TPM; //hsm_type = SECURE_DEVICE_TYPE_X509;Right-click the prov_dev_client_sample project and select Set as Startup Project.
On the Visual Studio menu, select Debug > Start without debugging to run the solution. In the prompt to rebuild the project, select Yes, to rebuild the project before running.
The following output is an example of the provisioning device client sample successfully booting up, and connecting to a Device Provisioning Service instance to get IoT hub information and registering:
Provisioning API Version: 1.2.7
Provisioning Status: PROV_DEVICE_REG_STATUS_CONNECTED

Registering... Press enter key to interrupt.

Provisioning Status: PROV_DEVICE_REG_STATUS_CONNECTED
Provisioning Status: PROV_DEVICE_REG_STATUS_ASSIGNING
Provisioning Status: PROV_DEVICE_REG_STATUS_ASSIGNING

Registration Information received from service:
test-docs-hub.azure-devices.cn, deviceId: test-docs-device
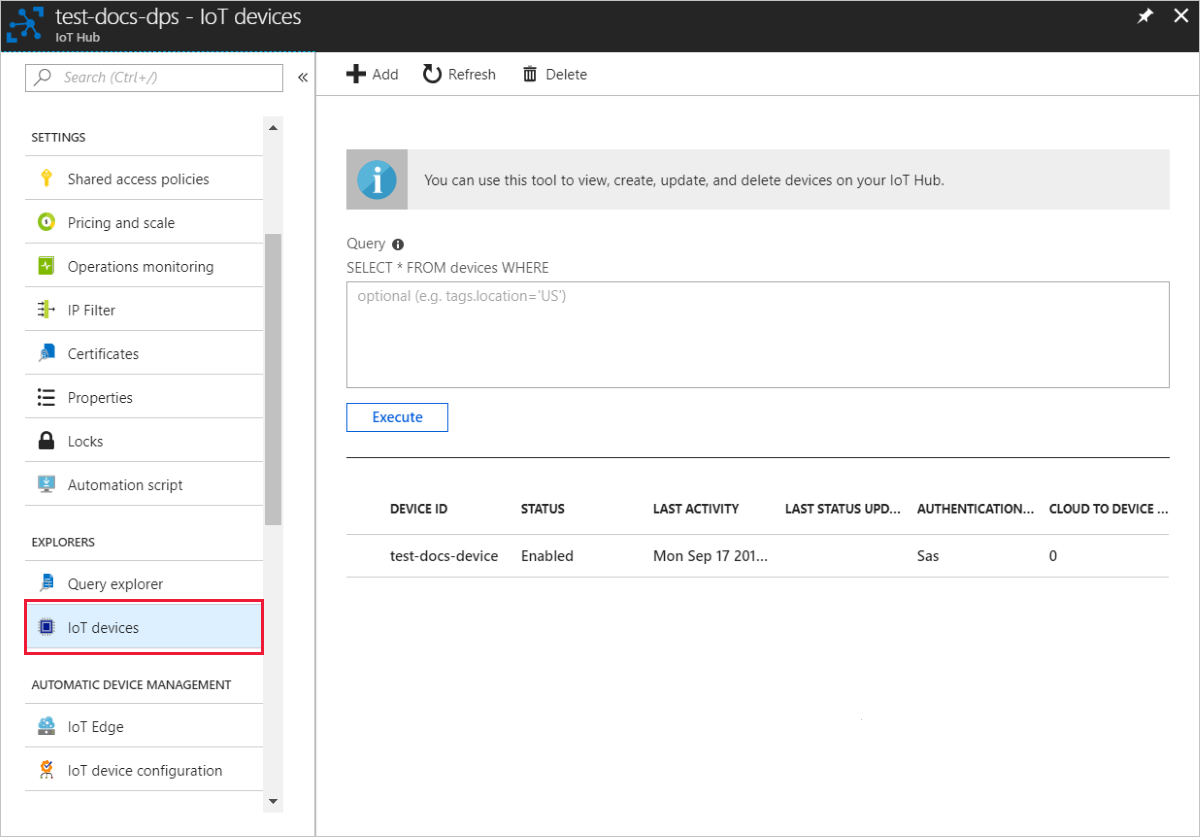
Once the simulated device is provisioned to the IoT hub by your provisioning service, the device ID appears with the hub's IoT devices.

Clean up resources
If you plan to continue working on and exploring the device client sample, do not clean up the resources created in this quickstart. If you do not plan to continue, use the following steps to delete all resources created by this quickstart.
- Close the device client sample output window on your machine.
- Close the TPM simulator window on your machine.
- From the left-hand menu in the Azure portal, select All resources and then select your Device Provisioning service. Open Manage Enrollments for your service, and then select the Individual Enrollments tab. Select the check box next to the REGISTRATION ID of the device you enrolled in this quickstart, and press the Delete button at the top of the pane.
- From the left-hand menu in the Azure portal, select All resources and then select your IoT hub. Open IoT devices for your hub, select the check box next to the DEVICE ID of the device you registered in this quickstart, and then press the Delete button at the top of the pane.
Next steps
In this quickstart, you've created a TPM simulated device on your machine and provisioned it to your IoT hub using the IoT Hub Device Provisioning Service. To learn how to enroll your TPM device programmatically, continue to the quickstart for programmatic enrollment of a TPM device.