Note
Access to this page requires authorization. You can try signing in or changing directories.
Access to this page requires authorization. You can try changing directories.
In this quickstart, you create a simulated IoT device on a Windows computer. The simulated device includes a TPM simulator as a Hardware Security Module (HSM). You use device sample Node.js code to connect this simulated device with your IoT hub using an individual enrollment with the Device Provisioning Service (DPS).
Prerequisites
- Familiar with provisioning concepts.
- Completion of Set up IoT Hub Device Provisioning Service with the Azure portal.
- An Azure account with an active subscription. Trial Subscription.
- Node.js v4.0+.
- Git.
Note
The initial device twin state configuration is available only in the standard tier of IoT Hub. For more information about the basic and standard IoT Hub tiers, see How to choose the right IoT Hub tier.
Prepare the environment
Make sure you have Node.js v4.0 or above installed on your machine.
Make sure
gitis installed on your machine and is added to the environment variables accessible to the command window. See Software Freedom Conservancy's Git client tools for the latest version ofgittools to install, which includes the Git Bash, the command-line app that you can use to interact with your local Git repository.
Simulate a TPM device
Open a command prompt or Git Bash. Clone the
azure-utpm-cGitHub repo:git clone https://github.com/Azure/azure-utpm-c.git --recursiveNavigate to the GitHub root folder and run the TPM simulator. It listens over a socket on ports 2321 and 2322. Do not close this command window; you need to keep this simulator running until the end of this quickstart guide:
.\azure-utpm-c\tools\tpm_simulator\Simulator.exeCreate a new empty folder called registerdevice. In the registerdevice folder, create a package.json file using the following command at your command prompt. Make sure to answer all questions asked by
npmor accept the defaults if they suit you:npm initInstall the following precursor packages:
npm install node-gyp -g
npm install ffi -g
Note
There are some known issues to installing the above packages. To resolve these issues, run
npm install --global --production windows-build-toolsusing a command prompt in Run as administrator mode, runSET VCTargetsPath=C:\Program Files (x86)\MSBuild\Microsoft.Cpp\v4.0\V140after replacing the path with your installed version, and then rerun the above installation commands.Install the following packages containing the components used during registration:
a security client that works with TPM:
azure-iot-security-tpma transport for the device to connect to the Device Provisioning Service: either
azure-iot-provisioning-device-httporazure-iot-provisioning-device-amqpa client to use the transport and security client:
azure-iot-provisioning-deviceOnce the device is registered, you can use the usual IoT Hub Device Client packages to connect the device using the credentials provided during registration. You will need:
the device client:
azure-iot-devicea transport: any of
azure-iot-device-amqp,azure-iot-device-mqtt, orazure-iot-device-httpthe security client that you already installed:
azure-iot-security-tpmNote
The samples below use the
azure-iot-provisioning-device-httpandazure-iot-device-mqtttransports.You can install all of these packages at once by running the following command at your command prompt in the registerdevice folder:
npm install --save azure-iot-device azure-iot-device-mqtt azure-iot-security-tpm azure-iot-provisioning-device-http azure-iot-provisioning-device
Using a text editor, create a new ExtractDevice.js file in the registerdevice folder.
Add the following
requirestatements at the start of the ExtractDevice.js file:'use strict'; var tpmSecurity = require('azure-iot-security-tpm'); var tssJs = require("tss.js"); var myTpm = new tpmSecurity.TpmSecurityClient(undefined, new tssJs.Tpm(true));Add the following function to implement the method:
myTpm.getEndorsementKey(function(err, endorsementKey) {
  if (err) {
    console.log('The error returned from get key is: ' + err);
  } else {
    console.log('the endorsement key is: ' + endorsementKey.toString('base64'));
    myTpm.getRegistrationId((getRegistrationIdError, registrationId) => {
      if (getRegistrationIdError) {
        console.log('The error returned from get registration id is: ' + getRegistrationIdError);
      } else {
        console.log('The Registration Id is: ' + registrationId);
        process.exit();
      }
    });
  }
});
Save and close the ExtractDevice.js file. Run the sample:
node ExtractDevice.jsThe output window displays the Endorsement key and the Registration ID needed for device enrollment. Note down these values.
Create a device entry
The Azure IoT Device Provisioning Service supports two types of enrollments:
- Enrollment groups: Used to enroll multiple related devices.
- Individual enrollments: Used to enroll a single device.
This article demonstrates individual enrollments.
Sign in to the Azure portal, select the All resources button on the left-hand menu and open your Device Provisioning service.
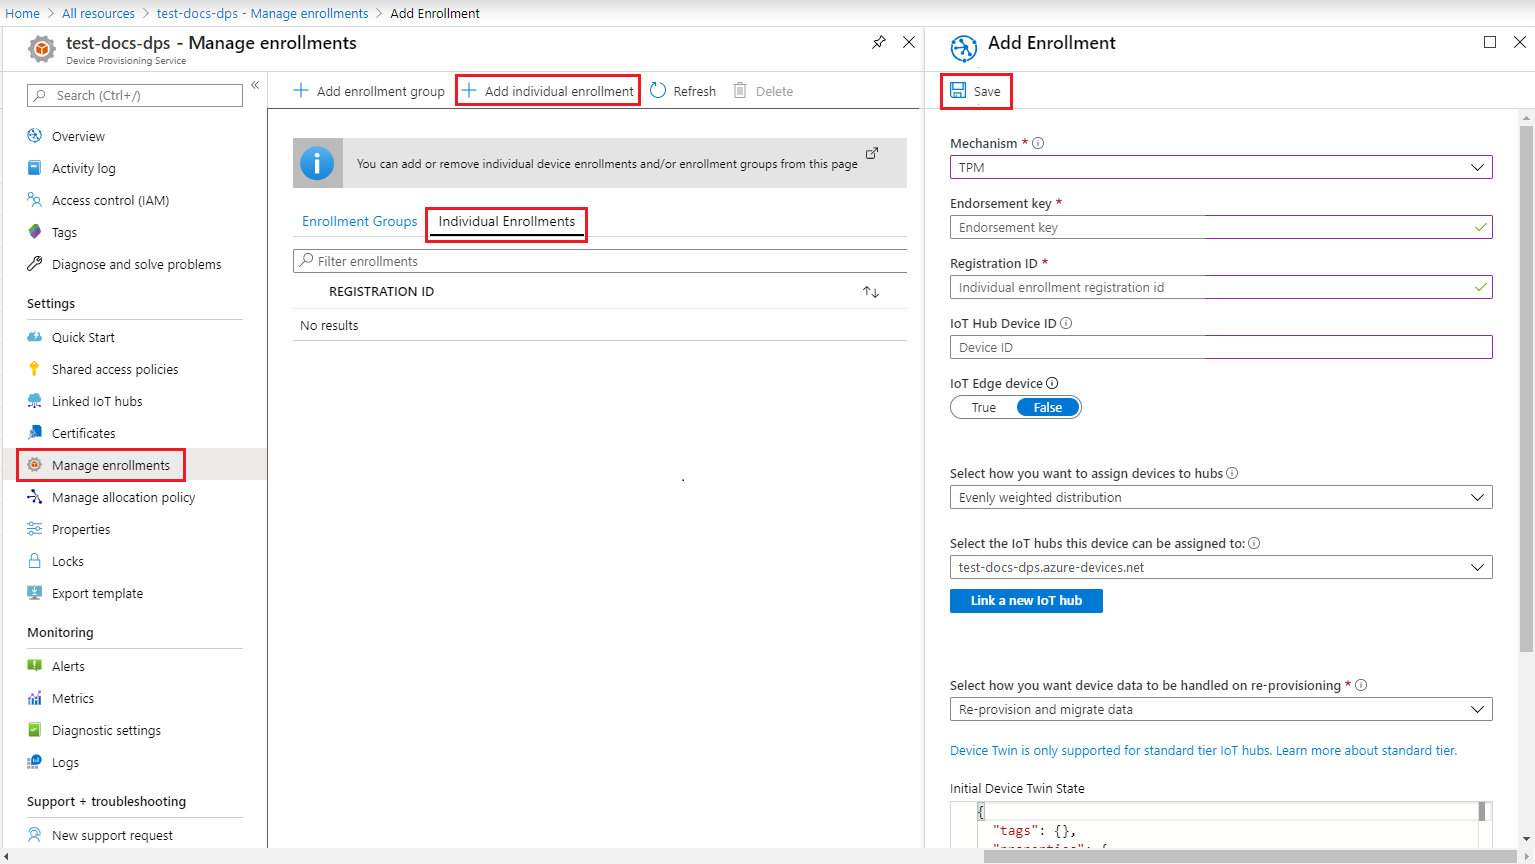
From the Device Provisioning Service menu, select Manage enrollments. Select Individual Enrollments tab and select the Add individual enrollment button at the top.
In the Add Enrollment panel, enter the following information:
Select TPM as the identity attestation Mechanism.
Enter the Registration ID and Endorsement key for your TPM device from the values you noted previously.
Select an IoT hub linked with your provisioning service.
Optionally, you may provide the following information:
- Enter a unique Device ID. Make sure to avoid sensitive data while naming your device. If you choose not to provide one, the registration ID will be used to identify the device instead.
- Update the Initial device twin state with the desired initial configuration for the device.
Once complete, press the Save button.

On successful enrollment, the Registration ID of your device appears in the list under the Individual Enrollments tab.
Register the device
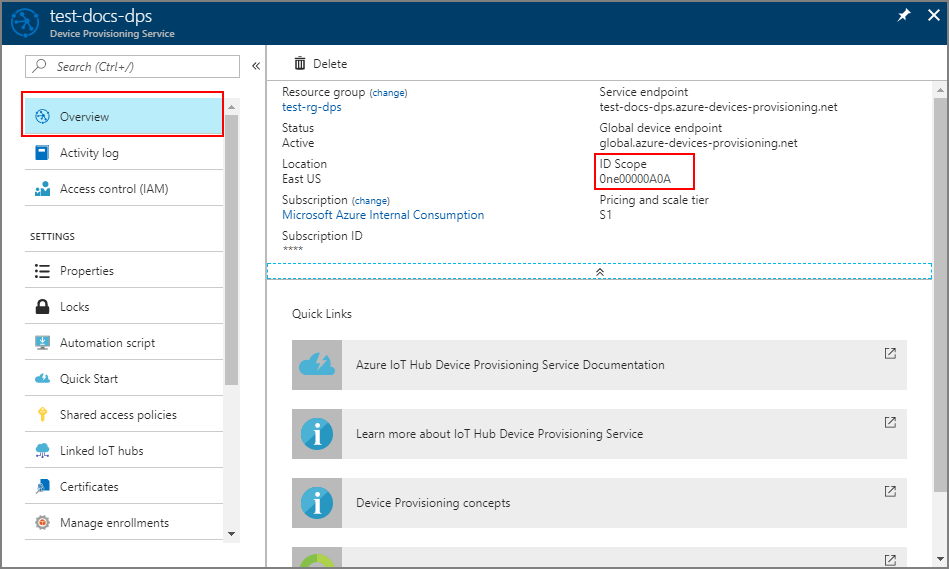
In the Azure portal, select the Overview blade for your Device Provisioning service and note the Global Device Endpoint and ID Scope values.

Using a text editor, create a new RegisterDevice.js file in the registerdevice folder.
Add the following
requirestatements at the start of the RegisterDevice.js file:'use strict'; var ProvisioningTransport = require('azure-iot-provisioning-device-http').Http; var iotHubTransport = require('azure-iot-device-mqtt').Mqtt; var Client = require('azure-iot-device').Client; var Message = require('azure-iot-device').Message; var tpmSecurity = require('azure-iot-security-tpm'); var ProvisioningDeviceClient = require('azure-iot-provisioning-device').ProvisioningDeviceClient;Note
The Azure IoT SDK for Node.js supports additional protocols like AMQP, AMQP WS, and MQTT WS. For more examples, see Device Provisioning Service SDK for Node.js samples.
Add globalDeviceEndpoint and idScope variables and use them to create a ProvisioningDeviceClient instance. Replace {globalDeviceEndpoint} and {idScope} with the Global Device Endpoint and ID Scope values from Step 1:
var provisioningHost = '{globalDeviceEndpoint}';
var idScope = '{idScope}';

var tssJs = require("tss.js");
var securityClient = new tpmSecurity.TpmSecurityClient('', new tssJs.Tpm(true));
// if using non-simulated device, replace the above line with following:
//var securityClient = new tpmSecurity.TpmSecurityClient();

var provisioningClient = ProvisioningDeviceClient.create(provisioningHost, idScope, new ProvisioningTransport(), securityClient);
Add the following function to implement the method on the device:
provisioningClient.register(function(err, result) {
  if (err) {
    console.log("error registering device: " + err);
  } else {
    console.log('registration succeeded');
    console.log('assigned hub=' + result.registrationState.assignedHub);
    console.log('deviceId=' + result.registrationState.deviceId);
    var tpmAuthenticationProvider = tpmSecurity.TpmAuthenticationProvider.fromTpmSecurityClient(result.registrationState.deviceId, result.registrationState.assignedHub, securityClient);
    var hubClient = Client.fromAuthenticationProvider(tpmAuthenticationProvider, iotHubTransport);

    var connectCallback = function (err) {
      if (err) {
        console.error('Could not connect: ' + err.message);
      } else {
        console.log('Client connected');
        var message = new Message('Hello world');
        hubClient.sendEvent(message, printResultFor('send'));
      }
    };

    hubClient.open(connectCallback);

    function printResultFor(op) {
      return function printResult(err, res) {
        if (err) console.log(op + ' error: ' + err.toString());
        if (res) console.log(op + ' status: ' + res.constructor.name);
        process.exit(1);
      };
    }
  }
});
Save and close the RegisterDevice.js file. Run the sample:
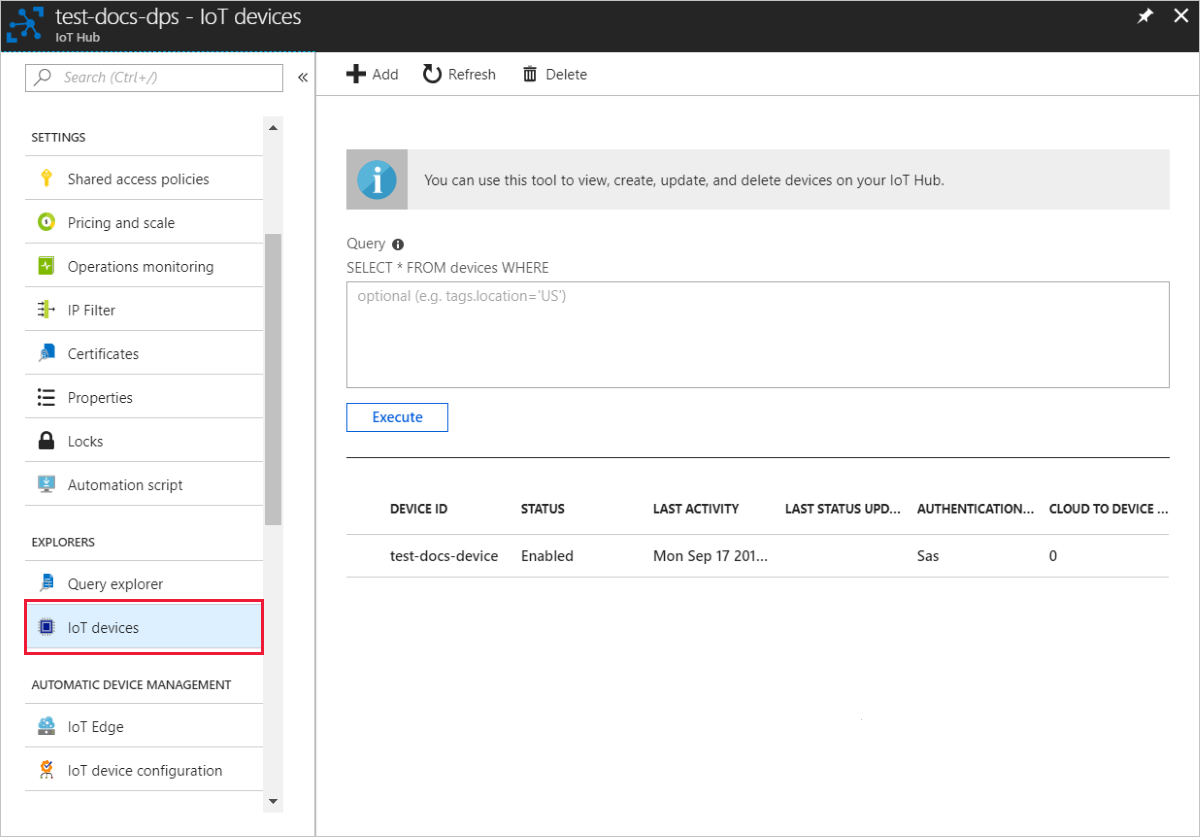
node RegisterDevice.jsNotice the messages that simulate the device booting and connecting to the Device Provisioning Service to get your IoT hub information. On successful provisioning of your simulated device to the IoT hub linked with your provisioning service, the device ID appears on the hub's IoT devices blade.

If you changed the initial device twin state from the default value in the enrollment entry for your device, it can pull the desired twin state from the hub and act accordingly. For more information, see Understand and use device twins in IoT Hub
Clean up resources
If you plan to continue working on and exploring the device client sample, do not clean up the resources created in this quickstart. If you do not plan to continue, use the following steps to delete all resources created by this quickstart.
- Close the device client sample output window on your machine.
- Close the TPM simulator window on your machine.
- From the left-hand menu in the Azure portal, select All resources and then select your Device Provisioning service. Open the Manage Enrollments blade for your service, and then select the Individual Enrollments tab. Select the check box next to the REGISTRATION ID of the device you enrolled in this quickstart, and press the Delete button at the top of the pane.
- From the left-hand menu in the Azure portal, select All resources and then select your IoT hub. Open the IoT devices blade for your hub, select the check box next to the DEVICE ID of the device you registered in this quickstart, and then press the Delete button at the top of the pane.
Next steps
In this quickstart, you've created a TPM simulated device on your machine and provisioned it to your IoT hub using the IoT Hub Device Provisioning Service. To learn how to enroll your TPM device programmatically, continue to the quickstart for programmatic enrollment of a TPM device.