Note
Access to this page requires authorization. You can try signing in or changing directories.
Access to this page requires authorization. You can try changing directories.
In this quickstart, you provision a development machine as a Python X.509 device. You use sample device code from the Azure IoT Python SDK to connect the device to your IoT hub. An individual enrollment is used with the Device Provisioning Service (DPS) in this example.
Prerequisites
- Familiar with provisioning concepts.
- Completion of Set up IoT Hub Device Provisioning Service with the Azure portal.
- An Azure account with an active subscription. Trial Subscription.
- Python 3.6 or later
- Git.
Note
The initial device twin state configuration is available only in the standard tier of IoT Hub. For more information about the basic and standard IoT Hub tiers, see How to choose the right IoT Hub tier.
Prepare the environment
Make sure
gitis installed on your machine and is added to the environment variables accessible to the command window. See Software Freedom Conservancy's Git client tools for the latest version ofgittools to install, which includes the Git Bash, the command-line app that you can use to interact with your local Git repository.Open a Git Bash prompt. Clone the GitHub repo for Azure IoT Python SDK.
git clone https://github.com/Azure/azure-iot-sdk-python.git --recursive
Create a self-signed X.509 device certificate
In this section, you will create a self-signed X.509 certificate. It is important to keep in mind the following points:
- Self-signed certificates are for testing only, and should not be used in production.
- The default expiration date for a self-signed certificate is one year.
If you don't already have your device certificates to authenticate a device, you can create a self-signed certificate with OpenSSL for testing with this article. OpenSSL is included with the Git installation.
Run the following command in the Git Bash prompt.
winpty openssl req -outform PEM -x509 -sha256 -newkey rsa:4096 -keyout ./python-device.key.pem -out ./python-device.pem -days 365 -extensions usr_cert -subj "//CN=Python-device-01"Important
The extra forward slash given for the subject name (
//CN=Python-device-01) is only required to escape the string with Git on Windows platforms.When asked to Enter PEM pass phrase:, use the pass phrase
1234for testing with this article.When asked again Verifying - Enter PEM pass phrase:, use the pass phrase
1234again.
A test certificate file (python-device.pem) and private key file (python-device.key.pem) are generated in the directory where you ran the openssl command.
Create an individual enrollment entry in DPS
The Azure IoT Device Provisioning Service supports two types of enrollments:
- Enrollment groups: Used to enroll multiple related devices.
- Individual enrollments: Used to enroll a single device.
This article demonstrates an individual enrollment for a single device to be provisioned with an IoT hub.
Sign in to the Azure portal, select the All resources button on the left-hand menu and open your provisioning service.
From the Device Provisioning Service menu, select Manage enrollments. Select Individual Enrollments tab and select the Add individual enrollment button at the top.
In the Add Enrollment panel, enter the following information:
Select X.509 as the identity attestation Mechanism.
Under the Primary certificate .pem or .cer file, choose Select a file to select the certificate file python-device.pem if you are using the test certificate created earlier.
Optionally, you may provide the following information:
- Select an IoT hub linked with your provisioning service.
- Update the Initial device twin state with the desired initial configuration for the device.
Once complete, press the Save button.

Upon successful enrollment, your X.509 device appears as Python-device-01 under the Registration ID column in the Individual Enrollments tab. This registration value comes from the subject name on the device certificate.

Simulate the device
The Python provisioning sample, provision_x509.py is located in the azure-iot-sdk-python/azure-iot-device/samples/async-hub-scenarios directory. This sample uses six environment variables to authenticate and provision an IoT device using DPS. These environment variables are:
| Variable name | Description |
|---|---|
PROVISIONING_HOST |
This value is the global endpoint used for connecting to your DPS resource |
PROVISIONING_IDSCOPE |
This value is the ID Scope for your DPS resource |
DPS_X509_REGISTRATION_ID |
This value is the ID for your device. It must also match the subject name on the device certificate |
X509_CERT_FILE |
Your device certificate filename |
X509_KEY_FILE |
The private key filename for your device certificate |
PASS_PHRASE |
The pass phrase you used to encrypt the certificate and private key file (1234). |
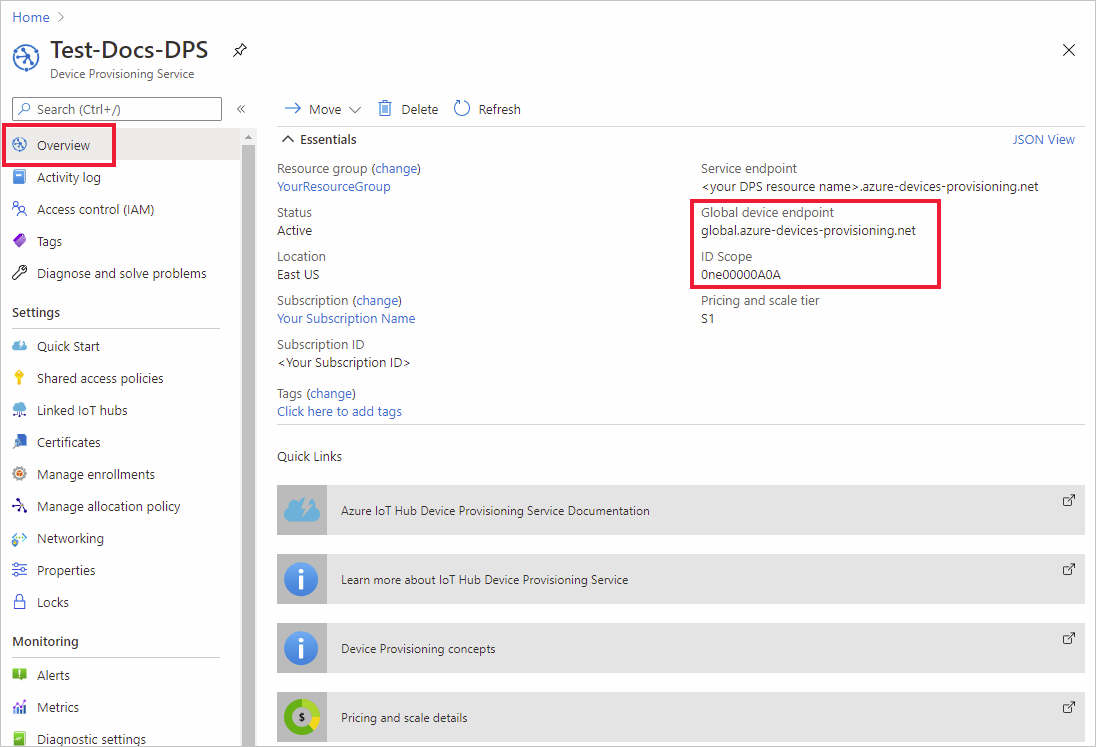
From the Device Provisioning Service menu, select Overview. Note your ID Scope and Global device endpoint.
In your Git Bash prompt, use the following commands add the environment variables for the global device endpoint and ID Scope.
$export PROVISIONING_HOST=global.azure-devices-provisioning.cn
$export PROVISIONING_IDSCOPE=<ID scope for your DPS resource>
The registration ID for the IoT device must match subject name on its device certificate. If you generated a self-signed test certificate,
Python-device-01is the subject name and registration ID for the device.If you already have a device certificate, you can use
certutilto verify the subject common name used for your device as shown below for a self-signed test certificate:$ certutil python-device.pem X509 Certificate: Version: 3 Serial Number: fa33152fe1140dc8 Signature Algorithm: Algorithm ObjectId: 1.2.840.113549.1.1.11 sha256RSA Algorithm Parameters: 05 00 Issuer: CN=Python-device-01 Name Hash(sha1): 1dd88de40e9501fb64892b698afe12d027011000 Name Hash(md5): a62c784820daa931b9d3977739b30d12 NotBefore: 1/29/2021 7:05 PM NotAfter: 1/29/2022 7:05 PM Subject: ===> CN=Python-device-01 <=== Name Hash(sha1): 1dd88de40e9501fb64892b698afe12d027011000 Name Hash(md5): a62c784820daa931b9d3977739b30d12In the Git Bash prompt, set the environment variable for the registration ID as follows:
$export DPS_X509_REGISTRATION_ID=Python-device-01In the Git Bash prompt, set the environment variables for the certificate file, private key file, and pass phrase.
$export X509_CERT_FILE=./python-device.pem
$export X509_KEY_FILE=./python-device.key.pem
$export PASS_PHRASE=1234
Review the code for provision_x509.py If your not using Python version 3.7 or later, make the code change mentioned here to replace
asyncio.run(main())and save your change.Run the sample. The sample will connect, provision the device to a hub, and send some test messages to the hub.
$ winpty python azure-iot-sdk-python/azure-iot-device/samples/async-hub-scenarios/provision_x509.py
RegistrationStage(RequestAndResponseOperation): Op will transition into polling after interval 2.  Setting timer.
The complete registration result is
Python-device-01
TestHub12345.azure-devices.cn
initialAssignment
null
Will send telemetry from the provisioned device
sending message #4
sending message #7
sending message #2
sending message #8
sending message #5
sending message #9
sending message #1
sending message #6
sending message #10
sending message #3
done sending message #4
done sending message #7
done sending message #2
done sending message #8
done sending message #5
done sending message #9
done sending message #1
done sending message #6
done sending message #10
done sending message #3
In the portal, navigate to the IoT hub linked to your provisioning service and open the IoT devices blade located under the Explorers section in the left menu. On successful provisioning of the simulated X.509 device to the hub, its device ID appears on the Device Explorer blade, with STATUS as enabled. You might need to press the Refresh button at the top if you already opened the blade prior to running the sample device application.

Note
If you changed the initial device twin state from the default value in the enrollment entry for your device, it can pull the desired twin state from the hub and act accordingly. For more information, see Understand and use device twins in IoT Hub.
Clean up resources
If you plan to continue working on and exploring the device client sample, do not clean up the resources created in this quickstart. If you do not plan to continue, use the following steps to delete all resources created by this quickstart.
- Close the device client sample output window on your machine.
- From the left-hand menu in the Azure portal, select All resources and then select your Device Provisioning service. Open the Manage Enrollments blade for your service, and then select the Individual Enrollments tab. Select the check box next to the REGISTRATION ID of the device you enrolled in this quickstart, and press the Delete button at the top of the pane.
- From the left-hand menu in the Azure portal, select All resources and then select your IoT hub. Open the IoT devices blade for your hub, select the check box next to the DEVICE ID of the device you registered in this quickstart, and then press the Delete button at the top of the pane.
Next steps
In this quickstart, you’ve created a simulated X.509 device on your development machine and provisioned it to your IoT hub using the Azure IoT Hub Device Provisioning Service on the portal. To learn how to enroll your X.509 device programmatically, continue to the quickstart for programmatic enrollment of X.509 devices.