Note
Access to this page requires authorization. You can try signing in or changing directories.
Access to this page requires authorization. You can try changing directories.
In this quickstart, you use Java to programmatically enroll a group of X.509 simulated devices to the Azure IoT Hub Device Provisioning Service. Devices are enrolled to a provisioning service instance by creating an enrollment group, or an individual enrollment. This quickstart shows how to create both types of enrollments by using the Java Service SDK and a sample Java application.
Prerequisites
- Completion of Set up the IoT Hub Device Provisioning Service with the Azure portal.
- An Azure account with an active subscription. Create a trial subscription.
- Java SE Development Kit 8. This quickstart installs the Java Service SDK below. It works on both Windows and Linux. This quickstart uses Windows.
- Maven 3.
- Git.
Download and modify the Java sample code
This section uses a self-signed X.509 certificate, it is important to keep in mind the following points:
- Self-signed certificates are for testing only, and should not be used in production.
- The default expiration date for a self-signed certificate is one year.
The following steps show how to add the provisioning details of your X.509 device to the sample code.
Open a command prompt. Clone the GitHub repo for device enrollment code sample using the Java Service SDK:
git clone https://github.com/Azure/azure-iot-sdk-java.git --recursiveIn the downloaded source code, navigate to the sample folder azure-iot-sdk-java/provisioning/provisioning-samples/service-enrollment-group-sample. Open the file /src/main/java/samples/com/microsoft/azure/sdk/iot/ServiceEnrollmentGroupSample.java in an editor of your choice, and add the following details:
Add the
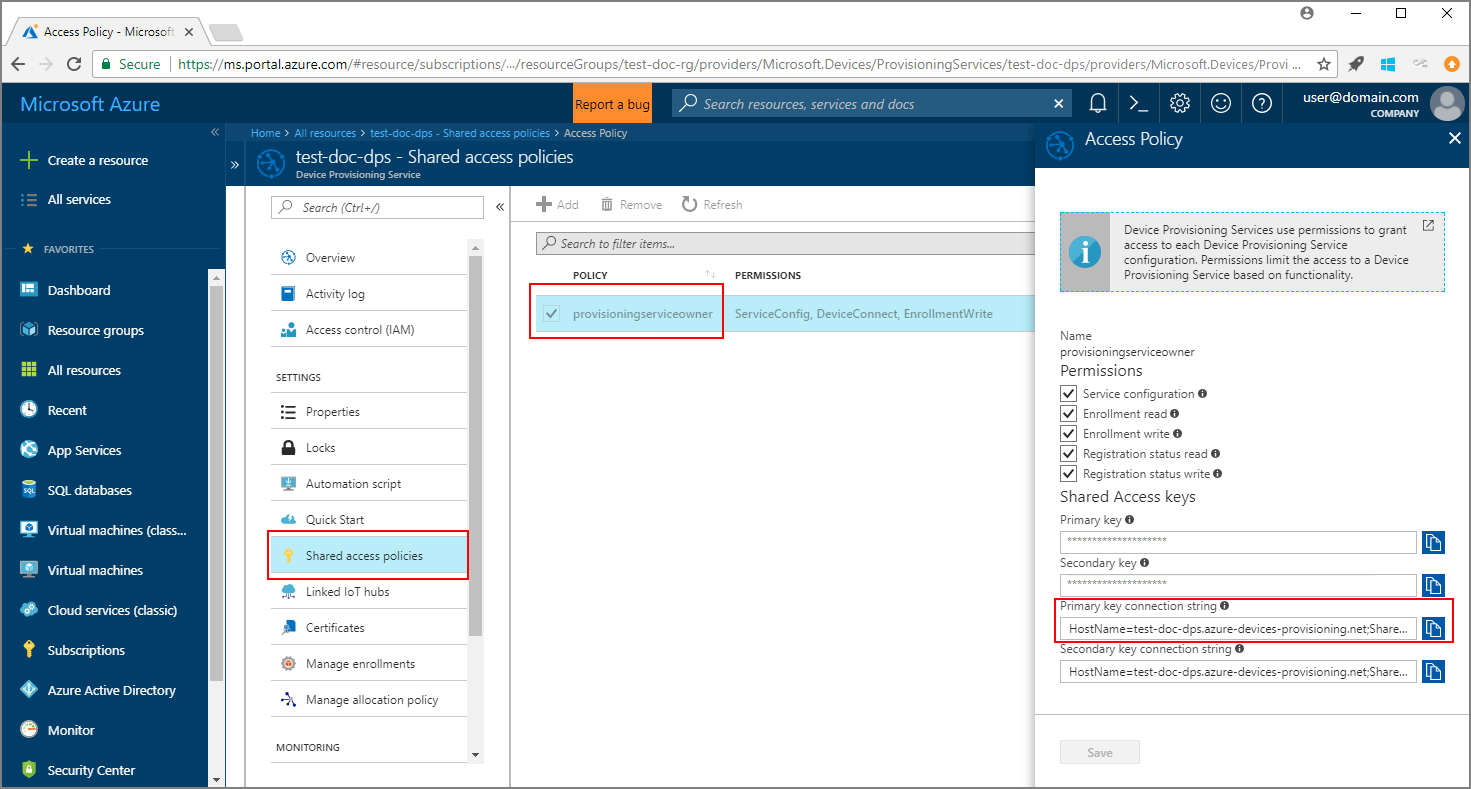
[Provisioning Connection String]for your provisioning service, from the portal as following:Navigate to your provisioning service in the Azure portal.
Open the Shared access policies, and select a policy, which has the EnrollmentWrite permission.
Copy the Primary key connection string.

In the sample code file ServiceEnrollmentGroupSample.java, replace the
[Provisioning Connection String]with the Primary key connection string.private static final String PROVISIONING_CONNECTION_STRING = "[Provisioning Connection String]";
Add the root certificate for the group of devices. If you need a sample root certificate, use the X.509 certificate generator tool as follows:
In a command window, navigate to the folder azure-iot-sdk-java/provisioning/provisioning-tools/provisioning-x509-cert-generator.
Build the tool by running the following command:
mvn clean installRun the tool using the following commands:
cd target
java -jar ./provisioning-x509-cert-generator-{version}-with-deps.jar
When prompted, you may optionally enter a Common Name for your certificates.
The tool locally generates a Client Cert, the Client Cert Private Key, and the Root Cert.
Copy the Root Cert, including the lines -----BEGIN CERTIFICATE----- and -----END CERTIFICATE-----.
Assign the value of the Root Cert to the parameter PUBLIC_KEY_CERTIFICATE_STRING as shown below:
private static final String PUBLIC_KEY_CERTIFICATE_STRING =
"-----BEGIN CERTIFICATE-----\n" +
"XXXXXXXXXXXXXXXXXXXXXXXXXXXXXXXXXXXXXXXXXXXXXXXXXXXXXXXXXXXXXXXX\n" +
"XXXXXXXXXXXXXXXXXXXXXXXXXXXXXXXXXXXXXXXXXXXXXXXXXXXXXXXXXXXXXXXX\n" +
"XXXXXXXXXXXXXXXXXXXXXXXXXXXXXXXXXXXXXXXXXXXXXXXXXXXXXXXXXXXXXXXX\n" +
"XXXXXXXXXXXXXXXXXXXXXXXXXXXXXXXXXXXXXXXXXXXXXXXXXXXXXXXXXXXXXXXX\n" +
"XXXXXXXXXXXXXXXXXXXXXXXXXXXXXXXXXXXXXXXXXXXXXXXXXXXXXXXXXXXXXXXX\n" +
"XXXXXXXXXXXXXXXXXXXXXXXXXXXXXXXXXXXXXXXXXXXXXXXXXXXXXXXXXXXXXXXX\n" +
"XXXXXXXXXXXXXXXXXXXXXXXXXXXXXXXXXXXXXXXXXXXXXXXXXXXXXXXXXXXXXXXX\n" +
"XXXXXXXXXXXXXXXXXXXXXXXXXXXXXXXXXXXXXXXXXXXXXXXXXXXXXXXXXXXXXXXX\n" +
"XXXXXXXXXXXXXXXXXXXXXXXXXXXXXXXXXXXXXXXXXXXXXXXXXXXXXXXXXXXXXXXX\n" +
"XXXXXXXXXXXXXXXXXXXXXXXXXXXXXXXXXXXXXXXXXXXXXXXXXXXXXXXXXXXXXXXX\n" +
"-----END CERTIFICATE-----\n";
Close the command window, or enter n when prompted for Verification Code.
Optionally, you may configure your provisioning service through the sample code:
To add this configuration to the sample, follow these steps:
Navigate to the IoT hub linked to your provisioning service in the Azure portal. Open the Overview tab for the hub, and copy the Hostname. Assign this Hostname to the IOTHUB_HOST_NAME parameter.
private static final String IOTHUB_HOST_NAME = "[Host name].azure-devices.cn";Assign a friendly name to the DEVICE_ID parameter, and keep the PROVISIONING_STATUS as the default ENABLED value.
OR, if you choose not to configure your provisioning service, make sure to comment out or delete the following statements in the ServiceEnrollmentGroupSample.java file:
enrollmentGroup.setIotHubHostName(IOTHUB_HOST_NAME);                // Optional parameter.
enrollmentGroup.setProvisioningStatus(ProvisioningStatus.ENABLED);  // Optional parameter.
Study the sample code. It creates, updates, queries, and deletes a group enrollment for X.509 devices. To verify successful enrollment in portal, temporarily comment out the following lines of code at the end of the ServiceEnrollmentGroupSample.java file:
// ************************************** Delete info of enrollmentGroup ***************************************
System.out.println("\nDelete the enrollmentGroup...");
provisioningServiceClient.deleteEnrollmentGroup(enrollmentGroupId);
Save the file ServiceEnrollmentGroupSample.java.
Build and run sample group enrollment
The Azure IoT Device Provisioning Service supports two types of enrollments:
- Enrollment groups: Used to enroll multiple related devices.
- Individual enrollments: Used to enroll a single device.
This procedure uses an enrollment group. The next section uses an individual enrollment.
Open a command window, and navigate to the folder azure-iot-sdk-java/provisioning/provisioning-samples/service-enrollment-group-sample.
Build the sample code by using this command:
mvn install -DskipTestsThis command downloads the Maven package
com.microsoft.azure.sdk.iot.provisioning.serviceto your machine. This package includes the binaries for the Java service SDK, that the sample code needs to build. If you ran the X.509 certificate generator tool in the preceding section, this package will be already downloaded on your machine.Run the sample by using these commands at the command window:
cd target
java -jar ./service-enrollment-group-sample-{version}-with-deps.jar
Observe the output window for successful enrollment.
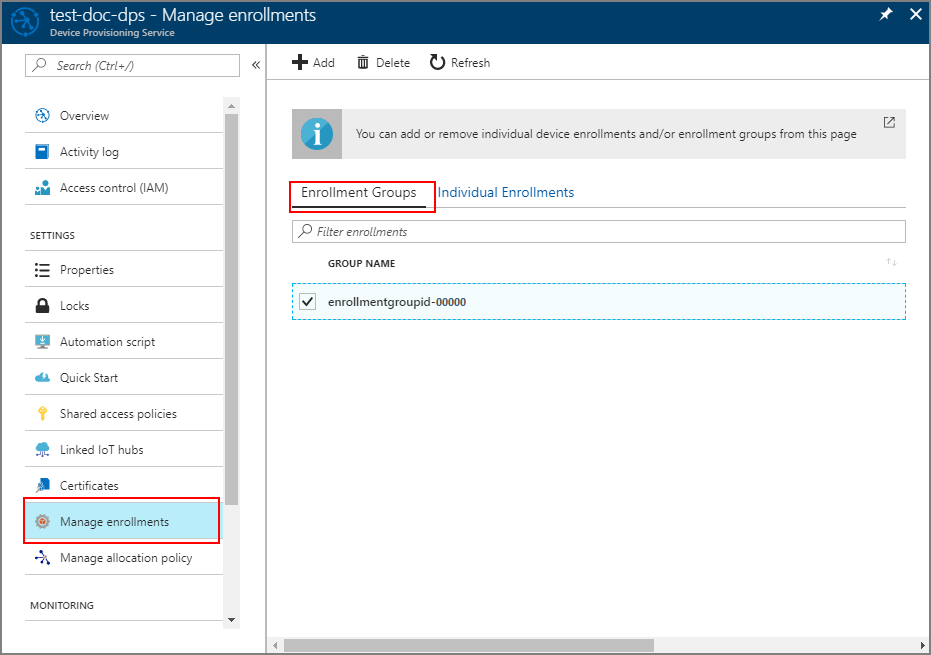
Navigate to your provisioning service in the Azure portal. Click Manage enrollments. Notice that your group of X.509 devices appears under the Enrollment Groups tab, with an autogenerated GROUP NAME.

Modifications to enroll a single X.509 device
To enroll a single X.509 device, modify the individual enrollment sample code used in Enroll TPM device to IoT Hub Device Provisioning Service using Java service SDK as follows:
Copy the Common Name of your X.509 client certificate to the clipboard. If you wish to use the X.509 certificate generator tool as shown in the preceding sample code section, either enter a Common Name for your certificate, or use the default microsoftriotcore. Use this Common Name as the value for the REGISTRATION_ID variable.
// Use common name of your X.509 client certificate
private static final String REGISTRATION_ID = "[RegistrationId]";
Rename the variable TPM_ENDORSEMENT_KEY as PUBLIC_KEY_CERTIFICATE_STRING. Copy your client certificate or the Client Cert from the output of the X.509 certificate generator tool, as the value for the PUBLIC_KEY_CERTIFICATE_STRING variable.
// Rename the variable *TPM_ENDORSEMENT_KEY* as *PUBLIC_KEY_CERTIFICATE_STRING*
private static final String PUBLIC_KEY_CERTIFICATE_STRING =
        "-----BEGIN CERTIFICATE-----\n" +
        "XXXXXXXXXXXXXXXXXXXXXXXXXXXXXXXXXXXXXXXXXXXXXXXXXXXXXXXXXXXXXXXX\n" +
        "XXXXXXXXXXXXXXXXXXXXXXXXXXXXXXXXXXXXXXXXXXXXXXXXXXXXXXXXXXXXXXXX\n" +
        "XXXXXXXXXXXXXXXXXXXXXXXXXXXXXXXXXXXXXXXXXXXXXXXXXXXXXXXXXXXXXXXX\n" +
        "XXXXXXXXXXXXXXXXXXXXXXXXXXXXXXXXXXXXXXXXXXXXXXXXXXXXXXXXXXXXXXXX\n" +
        "XXXXXXXXXXXXXXXXXXXXXXXXXXXXXXXXXXXXXXXXXXXXXXXXXXXXXXXXXXXXXXXX\n" +
        "XXXXXXXXXXXXXXXXXXXXXXXXXXXXXXXXXXXXXXXXXXXXXXXXXXXXXXXXXXXXXXXX\n" +
        "XXXXXXXXXXXXXXXXXXXXXXXXXXXXXXXXXXXXXXXXXXXXXXXXXXXXXXXXXXXXXXXX\n" +
        "XXXXXXXXXXXXXXXXXXXXXXXXXXXXXXXXXXXXXXXXXXXXXXXXXXXXXXXXXXXXXXXX\n" +
        "XXXXXXXXXXXXXXXXXXXXXXXXXXXXXXXXXXXXXXXXXXXXXXXXXXXXXXXXXXXXXXXX\n" +
        "XXXXXXXXXXXXXXXXXXXXXXXXXXXXXXXXXXXXXXXXXXXXXXXXXXXXXXXXXXXXXXXX\n" +
        "-----END CERTIFICATE-----\n";
In the main function, replace the line
Attestation attestation = new TpmAttestation(TPM_ENDORSEMENT_KEY);with the following to use the X.509 client certificate:Attestation attestation = X509Attestation.createFromClientCertificates(PUBLIC_KEY_CERTIFICATE_STRING);Save, build, and run the individual enrollment sample file, using the steps in the section Build and run the sample code for individual enrollment.
Clean up resources
If you plan to explore the Java service sample, do not clean up the resources created in this quickstart. If you do not plan to continue, use the following steps to delete all resources created by this quickstart.
- Close the Java sample output window on your machine.
- Close the X509 Cert Generator window on your machine.
- Navigate to your Device Provisioning service in the Azure portal, select Manage enrollments, and then select the Enrollment Groups tab. Select the check box next to the GROUP NAME for the X.509 devices you enrolled using this quickstart, and press the Delete button at the top of the pane.
Next steps
In this quickstart, you enrolled a simulated group of X.509 devices to your Device Provisioning service. To learn about device provisioning in depth, continue to the tutorial for the Device Provisioning Service setup in the Azure portal.