Note
Access to this page requires authorization. You can try signing in or changing directories.
Access to this page requires authorization. You can try changing directories.
Use message routing in Azure IoT Hub to send telemetry data from your IoT devices to Azure services such as blob storage, Service Bus Queues, Service Bus Topics, and Event Hubs. Every IoT hub has a default built-in endpoint that is compatible with Event Hubs. You can also create custom endpoints and route messages to other Azure services by defining routing queries. Each message that arrives at the IoT hub is routed to all endpoints whose routing queries it matches. If a message doesn't match any of the defined routing queries, it's routed to the default endpoint.
In this tutorial, you perform the following tasks:
- Create an IoT hub and send device messages to it.
- Create a storage account.
- Create a custom endpoint for the storage account and route messages to it from the IoT hub.
- View device messages in the storage account blob.
Prerequisites
An Azure subscription. If you don't have an Azure subscription, create a Trial before you begin.
An IoT hub in your Azure subscription. If you don't have an IoT hub yet, you can follow the steps in Create an IoT hub.
This tutorial uses sample code from Azure IoT SDK for .NET.
- Download or clone the SDK repo to your development machine.
- Have .NET Core 3.0.0 or greater on your development machine. Check your version by running
dotnet --versionand Download .NET if necessary.
Make sure that port 8883 is open in your firewall. The sample in this tutorial uses MQTT protocol, which communicates over port 8883. This port might be blocked in some corporate and educational network environments. For more information and ways to work around this issue, see Connecting to IoT Hub (MQTT).
Optionally, install Azure IoT Explorer (preview). This tool helps you observe the messages as they arrive at your IoT hub. This article uses Azure IoT Explorer.
There are no other prerequisites for the Azure portal.
Register a device and send messages to IoT Hub
Register a new device in your IoT hub.
Sign in to the Azure portal and navigate to your IoT hub.
Select Devices from the Device management section of the menu.
Select Add device.
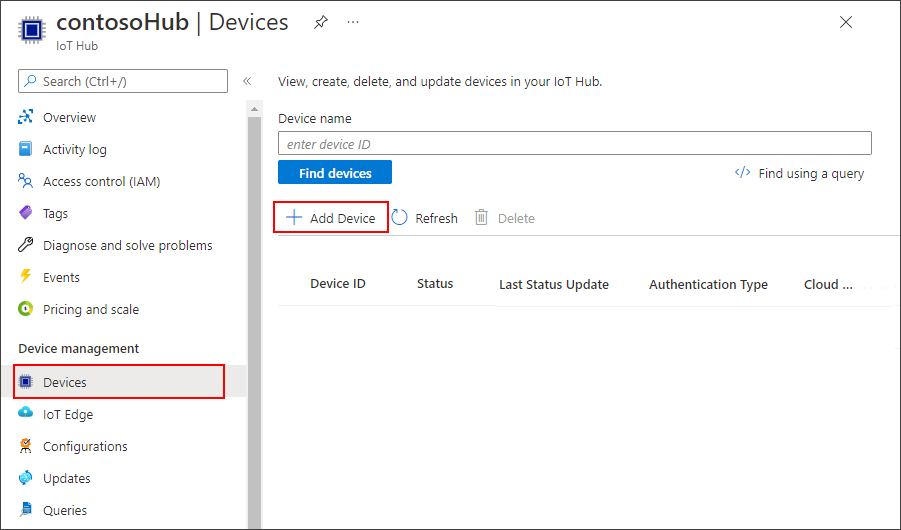
Provide a device ID and select Save.
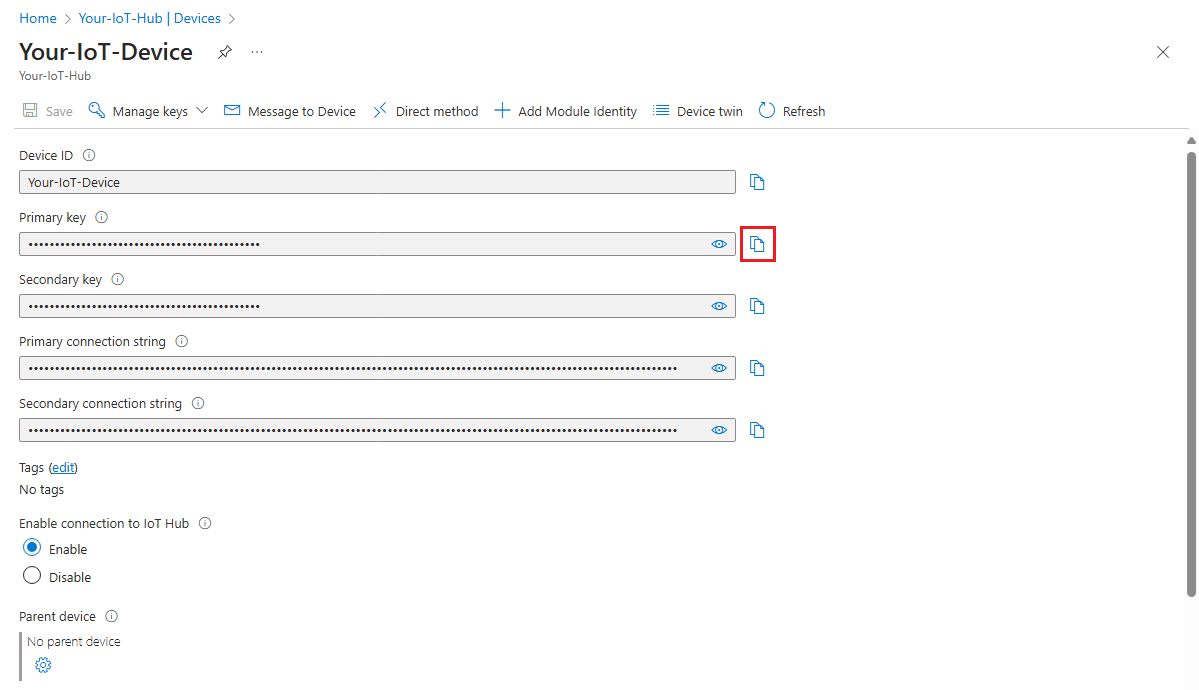
The new device should be in the list of devices now. If it's not, refresh the page. Select the device ID to open the device details page.
Copy one of the device keys and save it. You use this value to configure the sample code that generates simulated device telemetry messages.
Now that you have a device ID and key, use the sample code to start sending device telemetry messages to IoT Hub.
Tip
If you're following the Azure CLI steps for this tutorial, run the sample code in a separate session. That way, you can allow the sample code to continue running while you follow the rest of the CLI steps.
If you didn't as part of the prerequisites, download or clone the Azure IoT SDK for .NET repository from GitHub now.
From the folder where you downloaded or cloned the SDK, navigate to the
azure-iot-sdk-csharp\iothub\device\samples\how to guides\HubRoutingSamplefolder.Install the Azure IoT SDK for .NET and necessary dependencies as specified in the
HubRoutingSample.csprojfile:dotnet restoreIn an editor of your choice, open the
Parameters.csfile. This file shows the parameters supported by the sample. Only thePrimaryConnectionStringparameter is used in this article when running the sample. Review the code in this file. No changes are needed.Build and run the sample code using the following command:
Replace
<myDevicePrimaryConnectionString>with your primary connection string from your device in your IoT hub.dotnet run --PrimaryConnectionString <myDevicePrimaryConnectionString>You should start to see messages printed to output as they're sent to IoT Hub. Leave this program running during the tutorial.
Configure IoT Explorer to view messages
Configure IoT Explorer to connect to your IoT hub and read messages as they arrive at the built-in endpoint.
First, retrieve the connection string for your IoT hub.
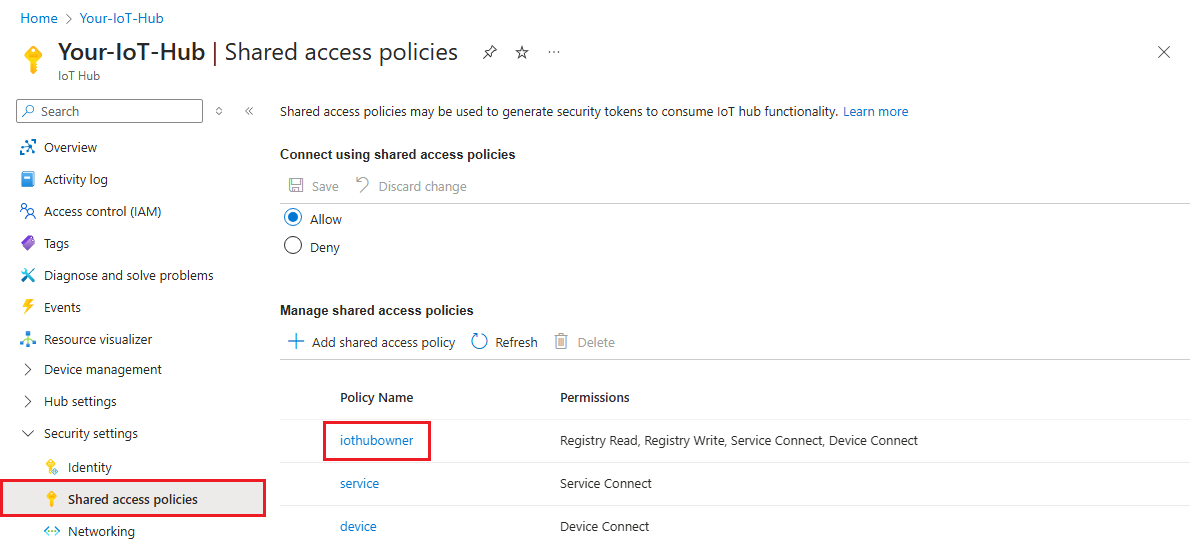
In the Azure portal, navigate to your IoT hub.
Select Shared access policies from the Security settings section of the menu.
Select the iothubowner policy.
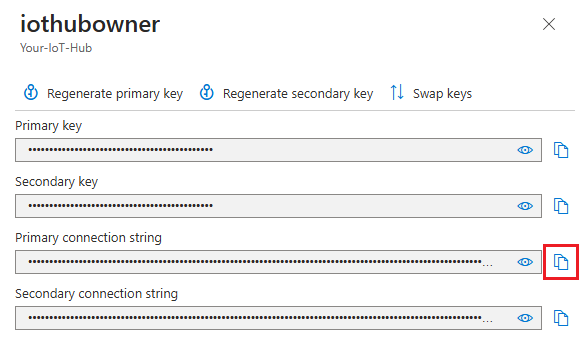
Copy the Primary connection string.
Now, use that connection string to configure IoT Explorer for your IoT hub.
Open IoT Explorer on your development machine.
If displayed, select Connect via IoT Hub connection string.

Select Add connection.
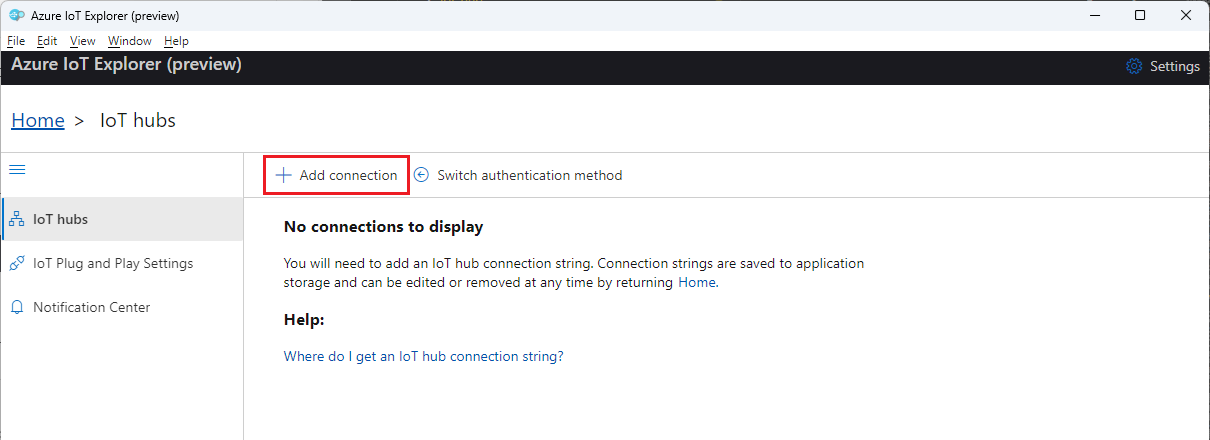
Paste your hub's connection string into the text box.
Select Save.
Once you connect to your IoT hub, you should see a list of devices. Select the device ID that you created for this tutorial.
Select Telemetry.
With your device still running, select Start. If your device isn't running, you can't see telemetry.
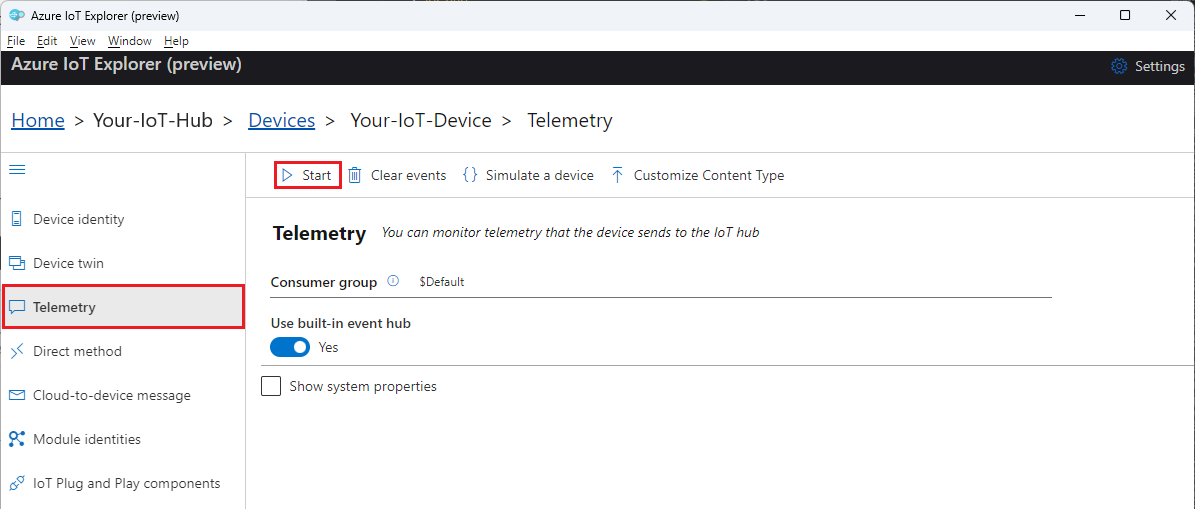
You should see the messages arriving from your device, with the most recent displayed at the top.
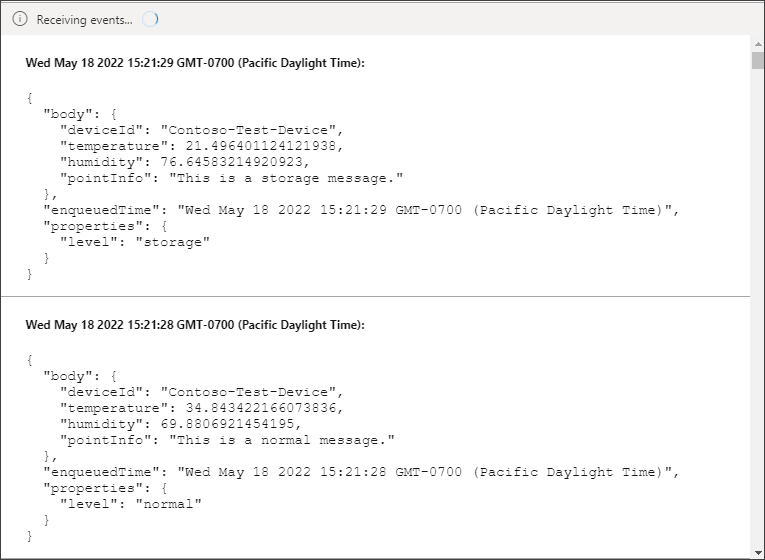
Watch the incoming messages for a few moments to verify that you see three different types of messages: normal, storage, and critical. After seeing all three types of messages, you can stop your device.
These messages are all arriving at the default built-in endpoint for your IoT hub. In the next sections, we're going to create a custom endpoint and route some of these messages to storage based on the message properties. Those messages stop appearing in IoT Explorer because messages only go to the built-in endpoint when they don't match any other routes in IoT hub.
Set up message routing
You're going to route messages to different resources based on properties attached to the message by the simulated device. Messages that aren't custom routed are sent to the default endpoint (messages/events).
The sample app for this tutorial assigns a level property to each message it sends to IoT hub. Each message is randomly assigned a level of normal, storage, or critical.
The first step is to set up the endpoint to which the data is routed. The second step is to set up the message route that uses that endpoint. After setting up the routing, you can view endpoints and message routes in the portal.
Create a storage account
Create an Azure Storage account and a container within that account, which holds the device messages that are routed to it.
In the Azure portal, search for Storage accounts.
Select Create.
Provide the following values for your storage account:
Parameter Value Subscription Select the same subscription that contains your IoT hub. Resource group Select the same resource group that contains your IoT hub. Storage account name Provide a globally unique name for your storage account. Performance Accept the default Standard value. 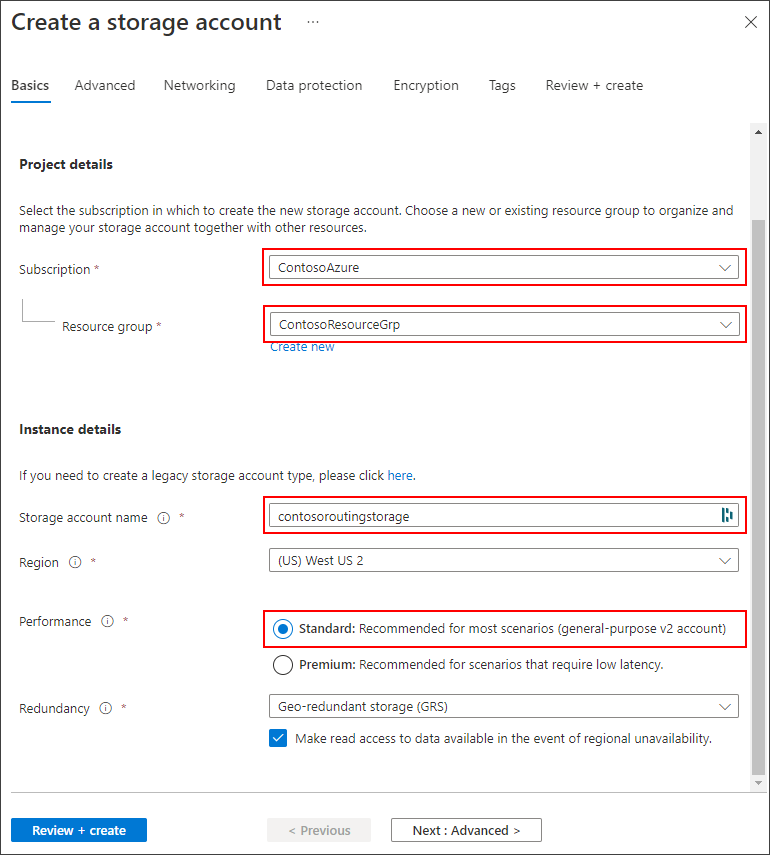
You can accept all the other default values by selecting Review + create.
After validation completes, select Create.
After the deployment is complete, select Go to resource.
In the storage account menu, select Containers from the Data storage section.
Select + Container to create a new container.
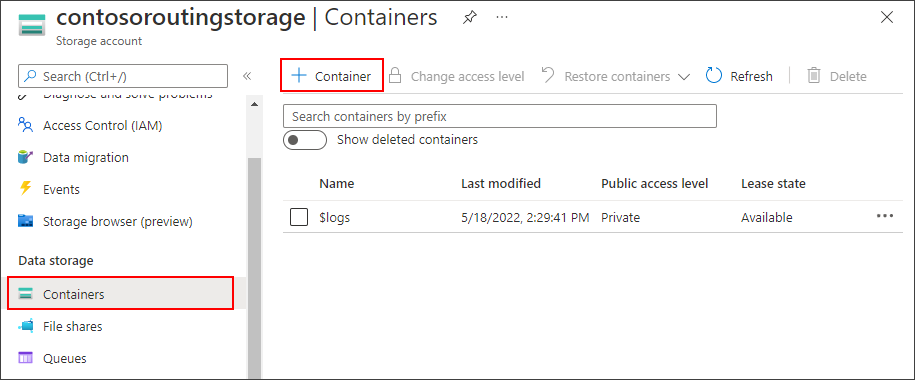
Provide a name for your container and select Create.
Route to a storage account
Now set up the routing for the storage account. In this section, you define a new endpoint that points to the storage account you created. Then, you create a route that filters for messages where the level property is set to storage, and route those messages to the storage endpoint.
Note
The data can be written to blob storage in either the Apache Avro format, which is the default, or JSON.
The encoding format can be only set at the time the blob storage endpoint is configured. The format can't be changed for a previously configured endpoint. When using JSON encoding, you must set the contentType to JSON and the contentEncoding to UTF-8 in the message system properties.
For more detailed information about using a blob storage endpoint, see Azure Storage as a routing endpoint.
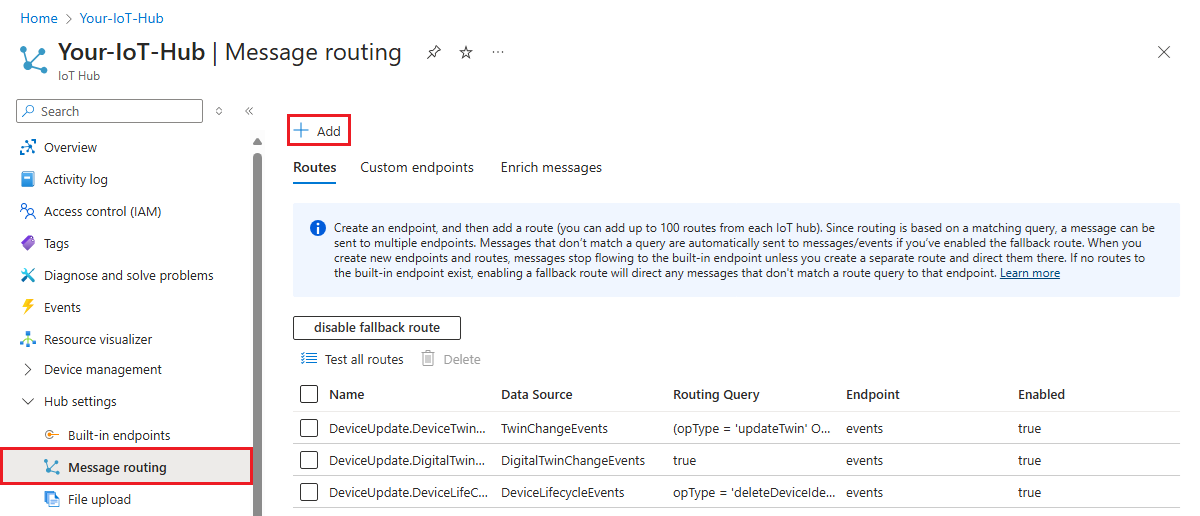
In the Azure portal, go to your IoT hub.
In the resource menu under Hub settings, select Message routing then select Add.
On the Endpoint tab, create a Storage endpoint by providing the following information:
Parameter Value Endpoint type Select Storage. Endpoint name Provide a unique name for this endpoint. Azure Storage container Select Pick a container. Follow the prompts to select the storage account and container that you created in the previous section. Encoding Select JSON. If this field is greyed out, then your storage account region doesn't support JSON. In that case, continue with the default AVRO. 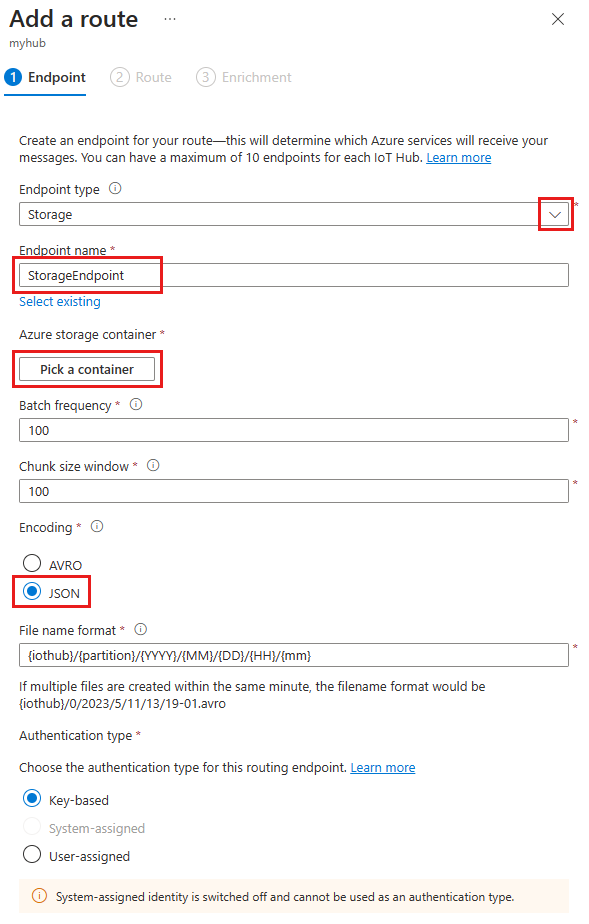
Accept the default values for the rest of the parameters and select Create + next.
On the Route tab, provide the following information to create a route that points to the Storage endpoint you created:
Parameter Value Name Create a name for your route. Data source Verify that Device Telemetry Messages is selected from the dropdown list. Enable route Verify that this field is checked. Routing query Enter level="storage"as the query string.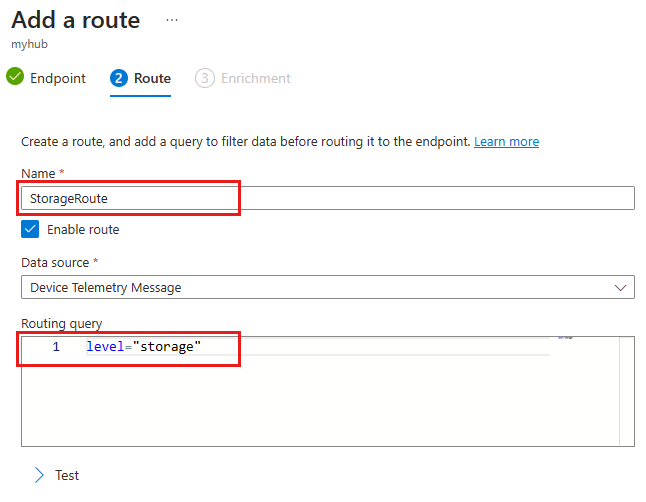
Select Create + skip enrichments.
View routed messages
Once the route is created in IoT Hub and enabled, it immediately starts routing messages that meet its query condition to the storage endpoint.
Monitor the built-in endpoint with IoT Explorer
Return to the IoT Explorer session on your development machine. Recall that the IoT Explorer monitors the built-in endpoint for your IoT hub. That means that now you should be seeing only the messages that aren't routed by the custom route we created.
Start the sample again by running the code. Watch the incoming messages for a few moments and you should only see messages where level is set to normal or critical.
View messages in the storage container
Verify that the messages are arriving in the storage container.
In the Azure portal, navigate to your storage account.
Select Containers from the Data storage section of the menu.
Select the container that you created for this tutorial.
There should be a folder with the name of your IoT hub. Drill down through the file structure until you get to a .json file.
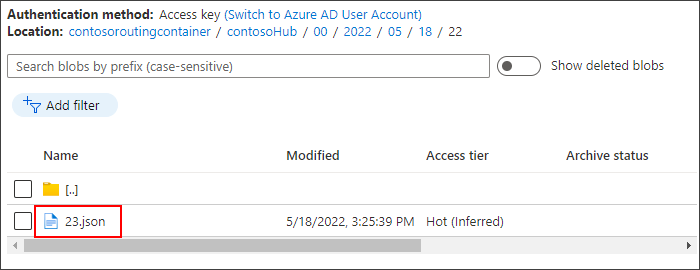
Select the JSON file, then select Download to download the JSON file. Confirm that the file contains messages from your device that have the
levelproperty set tostorage.Stop running the sample.
Clean up resources
If you want to remove all of the Azure resources you used for this tutorial, delete the resource group. This action deletes all resources contained within the group. If you don't want to delete the entire resource group, use the Azure portal to locate and delete the individual resources.
If you intend to continue to the next tutorial, keep the resources that you created here.
- In the Azure portal, navigate to the resource group that contains the IoT hub and storage account for this tutorial.
- Review all the resources that are in the resource group to determine which ones you want to clean up.
- If you want to delete all the resource, select Delete resource group.
- If you only want to delete certain resource, use the check boxes next to each resource name to select the ones you want to delete. Then select Delete.
Next steps
In this tutorial, you learned how to create a custom endpoint for an Azure resource and then create a route to send device messages to that endpoint. Continue to the next tutorial to learn how to enrich messages with extra data that can be used to simplify downstream processing