Note
Access to this page requires authorization. You can try signing in or changing directories.
Access to this page requires authorization. You can try changing directories.
You can use X.509 certificates to authenticate devices to your IoT hub. For production environments, we recommend that you purchase an X.509 CA certificate from a professional certificate services vendor. You can then issue certificates within your organization from an internal, self-managed certificate authority (CA) chained to the purchased CA certificate as part of a comprehensive public key infrastructure (PKI) strategy. For more information about getting an X.509 CA certificate from a professional certificate services vendor, see the Get an X.509 CA certificate section of Authenticate devices using X.509 CA certificates.
However, creating your own self-managed, private CA that uses an internal root CA as the trust anchor is adequate for testing environments. A self-managed private CA with at least one subordinate CA chained to your internal root CA, with client certificates for your devices signed by your subordinate CAs, allows you to simulate a recommended production environment.
Important
We don't recommend the use of self-signed certificates for production environments. This tutorial is presented for demonstration purposes only.
The following tutorial uses OpenSSL and the OpenSSL Cookbook to describe how to accomplish the following tasks:
- Create an internal root certificate authority (CA) and root CA certificate
- Create an internal subordinate CA and subordinate CA certificate, signed by your internal root CA certificate
- Upload your subordinate CA certificate to your IoT hub for testing purposes
- Use the subordinate CA to create client certificates for the IoT devices you want to test with your IoT hub
Note
Azure provides PowerShell and Bash scripts to help you understand how to create your own X.509 certificates and authenticate them to an IoT hub. The scripts are included with the Azure IoT Hub Device SDK for C. The scripts are provided for demonstration purposes only. Certificates created by them must not be used for production. The certificates contain hard-coded passwords (�1234�) and expire after 30 days. You must use your own best practices for certificate creation and lifetime management in a production environment. For more information, see Managing test CA certificates for samples and tutorials in the GitHub repository for the Azure IoT Hub Device SDK for C.
Prerequisites
An Azure subscription. If you don't have an Azure subscription, create a Trial before you begin.
An IoT hub in your Azure subscription. If you don't have a hub yet, you can follow the steps in Create an IoT hub.
The latest version of Git. Make sure that Git is added to the environment variables accessible to the command window. See Software Freedom Conservancy's Git client tools for the latest version of
gittools to install, which includes Git Bash, the command-line app that you can use to interact with your local Git repository.An OpenSSL installation. On Windows, your installation of Git includes an installation of OpenSSL. You can access OpenSSL from the Git Bash prompt. To verify that OpenSSL is installed, open a Git Bash prompt and enter
openssl version.Note
Unless you're familiar with OpenSSL and it's already installed on your Windows machine, we recommend using OpenSSL from the Git Bash prompt. Alternatively, you can choose to download the source code and build OpenSSL. To learn more, see the OpenSSL Downloads page. Or, you can download OpenSSL prebuilt from a non-Microsoft partner. To learn more, see the OpenSSL wiki. Microsoft makes no guarantees about the validity of packages downloaded from third-parties. If you do choose to build or download OpenSSL, make sure that the OpenSSL binary is accessible in your path and that the
OPENSSL_CNFenvironment variable is set to the path of your openssl.cnf file.
Create a root CA
You must first create an internal root certificate authority (CA) and a self-signed root CA certificate to serve as a trust anchor from which you can create other certificates for testing. The files used to create and maintain your internal root CA are stored in a folder structure and initialized as part of this process. Perform the following steps to:
- Create and initialize the folders and files used by your root CA
- Create a configuration file used by OpenSSL to configure your root CA and certificates created with your root CA
- Request and create a self-signed CA certificate that serves as your root CA certificate
Start a Git Bash window and run the following command, replacing
{base_dir}with the desired directory in which to create the certificates in this tutorial.cd {base_dir}In the Git Bash window, run the following commands, one at a time. This step creates the following directory structure and support files for the root CA.
Directory or file Description rootca The root directory of the root CA. rootca/certs The directory in which CA certificates for the root CA are created and stored. rootca/db The directory in which the certificate database and support files for the root CA are stored. rootca/db/index The certificate database for the root CA. The touchcommand creates a file without any content, for later use. The certificate database is a plain text file managed by OpenSSL that contains information about issued certificates. For more information about the certificate database, see the openssl-ca manual page.rootca/db/serial A file used to store the serial number of the next certificate to be created for the root CA. The opensslcommand creates a 16-byte random number in hexadecimal format, then stores it in this file to initialize the file for creating the root CA certificate.rootca/db/crlnumber A file used to store serial numbers for revoked certificates issued by the root CA. The echocommand pipes a sample serial number, 1001, into the file.rootca/private The directory in which private files for the root CA, including the private key, are stored.
The files in this directory must be secured and protected.mkdir rootca cd rootca mkdir certs db private chmod 700 private touch db/index openssl rand -hex 16 > db/serial echo 1001 > db/crlnumberCreate a text file named
rootca.confin therootcadirectory that was created in the previous step. Open that file in a text editor, and then copy and save the following OpenSSL configuration settings into that file.The file provides OpenSSL with the values needed to configure your test root CA. For this example, the file configures a root CA called rootca using the directories and files created in previous steps. The file also provides configuration settings for:
- The CA policy used by the root CA for certificate Distinguished Name (DN) fields
- Certificate requests created by the root CA
- X.509 extensions applied to root CA certificates, subordinate CA certificates, and client certificates issued by the root CA
Note
The
homeattribute, in theca_defaultsection, is set to../rootcabecause this configuration file is also used when creating the certificate for your subordinate CA. The specified relative path allows OpenSSL to navigate from your subordinate CA folder to your root CA folder during that process.For more information about the syntax of OpenSSL configuration files, see the config manual page in OpenSSL documentation.
[default]
name                     = rootca
domain_suffix            = exampledomain.com
aia_url                  = http://$name.$domain_suffix/$name.crt
crl_url                  = http://$name.$domain_suffix/$name.crl
default_ca               = ca_default
name_opt                 = utf8,esc_ctrl,multiline,lname,align

[ca_dn]
commonName               = "rootca_common_name"

[ca_default]
home                     = ../rootca
database                 = $home/db/index
serial                   = $home/db/serial
crlnumber                = $home/db/crlnumber
certificate              = $home/$name.crt
private_key              = $home/private/$name.key
RANDFILE                 = $home/private/random
new_certs_dir            = $home/certs
unique_subject           = no
copy_extensions          = none
default_days             = 3650
default_crl_days         = 365
default_md               = sha256
policy                   = policy_c_o_match

[policy_c_o_match]
countryName              = optional
stateOrProvinceName      = optional
organizationName         = optional
organizationalUnitName   = optional
commonName               = supplied
emailAddress             = optional

[req]
default_bits             = 2048
encrypt_key              = yes
default_md               = sha256
utf8                     = yes
string_mask              = utf8only
prompt                   = no
distinguished_name       = ca_dn
req_extensions           = ca_ext

[ca_ext]
basicConstraints         = critical,CA:true
keyUsage                 = critical,keyCertSign,cRLSign
subjectKeyIdentifier     = hash

[sub_ca_ext]
authorityKeyIdentifier   = keyid:always
basicConstraints         = critical,CA:true,pathlen:0
extendedKeyUsage         = clientAuth,serverAuth
keyUsage                 = critical,keyCertSign,cRLSign
subjectKeyIdentifier     = hash

[client_ext]
authorityKeyIdentifier   = keyid:always
basicConstraints         = critical,CA:false
extendedKeyUsage         = clientAuth
keyUsage                 = critical,digitalSignature
subjectKeyIdentifier     = hash
In the Git Bash window, run the following command to generate a certificate signing request (CSR) in the
rootcadirectory and a private key in therootca/privatedirectory. For more information about the OpenSSLreqcommand, see the openssl-req manual page in OpenSSL documentation.Note
We recommend that you don't copy or share the private key even though this root CA is for testing purposes and isn't exposed as part of a public key infrastructure (PKI).
winpty openssl req -new -config rootca.conf -out rootca.csr -keyout private/rootca.keyYou're prompted to enter a PEM pass phrase, as shown in the following example, for the private key file. Enter and confirm a pass phrase to generate your private key and CSR.
Enter PEM pass phrase:
Verifying - Enter PEM pass phrase:
-----
Confirm that the CSR file,
rootca.csr, is present in therootcadirectory. Then, confirm that the private key file,rootca.key, is present in theprivatesubdirectory before continuing.In the Git Bash window, run the following command to create a self-signed root CA certificate. The command applies the
ca_extconfiguration file extensions to the certificate. These extensions indicate that the certificate is for a root CA and can be used to sign certificates and certificate revocation lists (CRLs). For more information about the OpenSSLcacommand, see the openssl-ca manual page in OpenSSL documentation.winpty openssl ca -selfsign -config rootca.conf -in rootca.csr -out rootca.crt -extensions ca_extYou're prompted to provide the PEM pass phrase, as shown in the following example, for the private key file. After providing the pass phrase, OpenSSL generates a certificate, then prompts you to sign and commit the certificate for your root CA. Specify y for both prompts to generate the self-signed certificate for your root CA.
Using configuration from rootca.conf
Enter pass phrase for ../rootca/private/rootca.key:
Check that the request matches the signature
Signature ok
Certificate Details:
    {Details omitted from output for clarity}
Certificate is to be certified until Mar 24 18:51:41 2033 GMT (3650 days)
Sign the certificate? [y/n]:


1 out of 1 certificate requests certified, commit? [y/n]
Write out database with 1 new entries
Database updated
After OpenSSL updates the certificate database, confirm that both the certificate file,
rootca.crt, is present in therootcadirectory and the PEM certificate (.pem) file for the certificate is present in therootca/certsdirectory. The file name of the .pem file matches the serial number of the root CA certificate.
Create a subordinate CA
After you create your internal root CA, you should create a subordinate CA to use as an intermediate CA with which to sign client certificates for your devices. In theory, you don't need to create a subordinate CA; you can upload your root CA certificate to your IoT hub and sign client certificates directly from your root CA. However, using a subordinate CA as an intermediate CA to sign client certificates more closely simulates a recommended production environment, in which your root CA is kept offline. You can also use a subordinate CA to sign another subordinate CA, which in turn can sign another subordinate CA, and so on. Using subordinate CAs to sign other subordinate CAs creates a hierarchy of intermediate CAs as part of a certificate chain of trust. In a production environment, the certificate chain of trust allows a delegation of trust towards signing devices. For more information about signing devices into a certificate chain of trust, see Authenticate identities with X.509 certificates.
Similar to your root CA, the files used to create and maintain your subordinate CA are stored in a folder structure and initialized as part of this process. Perform the following steps to:
- Create and initialize the folders and files used by your subordinate CA
- Create a configuration file used by OpenSSL to configure your subordinate CA and certificates created with your subordinate CA
- Request and create a CA certificate signed by your root CA that serves as your subordinate CA certificate
Return to the base directory that contains the
rootcadirectory. For this example, both the root CA and the subordinate CA reside in the same base directory.cd ..In the Git Bash window, run the following commands, one at a time.
This step creates a directory structure and support files for the subordinate CA that is similar to the folder structure and files created for the root CA in the previous section.
mkdir subca
cd subca
mkdir certs db private
chmod 700 private
touch db/index
openssl rand -hex 16 > db/serial
echo 1001 > db/crlnumber
Create a text file named
subca.confin thesubcadirectory that was created in the previous step. Open that file in a text editor, and then copy and save the following OpenSSL configuration settings into that file.As with the configuration file for your test root CA, this file provides OpenSSL with the values needed to configure your test subordinate CA. You can create multiple subordinate CAs, for managing testing scenarios or environments.
For more information about the syntax of OpenSSL configuration files, see the config master manual page in OpenSSL documentation.
[default]
name                     = subca
domain_suffix            = exampledomain.com
aia_url                  = http://$name.$domain_suffix/$name.crt
crl_url                  = http://$name.$domain_suffix/$name.crl
default_ca               = ca_default
name_opt                 = utf8,esc_ctrl,multiline,lname,align

[ca_dn]
commonName               = "subca_common_name"

[ca_default]
home                     = ../subca
database                 = $home/db/index
serial                   = $home/db/serial
crlnumber                = $home/db/crlnumber
certificate              = $home/$name.crt
private_key              = $home/private/$name.key
RANDFILE                 = $home/private/random
new_certs_dir            = $home/certs
unique_subject           = no
copy_extensions          = copy
default_days             = 365
default_crl_days         = 90
default_md               = sha256
policy                   = policy_c_o_match

[policy_c_o_match]
countryName              = optional
stateOrProvinceName      = optional
organizationName         = optional
organizationalUnitName   = optional
commonName               = supplied
emailAddress             = optional

[req]
default_bits             = 2048
encrypt_key              = yes
default_md               = sha256
utf8                     = yes
string_mask              = utf8only
prompt                   = no
distinguished_name       = ca_dn
req_extensions           = ca_ext

[ca_ext]
basicConstraints         = critical,CA:true
keyUsage                 = critical,keyCertSign,cRLSign
subjectKeyIdentifier     = hash

[sub_ca_ext]
authorityKeyIdentifier   = keyid:always
basicConstraints         = critical,CA:true,pathlen:0
extendedKeyUsage         = clientAuth,serverAuth
keyUsage                 = critical,keyCertSign,cRLSign
subjectKeyIdentifier     = hash

[client_ext]
authorityKeyIdentifier   = keyid:always
basicConstraints         = critical,CA:false
extendedKeyUsage         = clientAuth
keyUsage                 = critical,digitalSignature
subjectKeyIdentifier     = hash
In the Git Bash window, run the following commands to generate a private key and a certificate signing request (CSR) in the subordinate CA directory.
You're prompted to enter a PEM pass phrase, as shown in the following example, for the private key file. Enter and verify a pass phrase to generate your private key and CSR.
Enter PEM pass phrase:
Verifying - Enter PEM pass phrase:
-----
Confirm that the CSR file
subca.csris present in the subordinate CA directory. Then, confirm that the private key filesubca.keyis present in theprivatesubdirectory before continuing.In the Git Bash window, run the following command to create a subordinate CA certificate in the subordinate CA directory. The command applies the
sub_ca_extconfiguration file extensions to the certificate. These extensions indicate that the certificate is for a subordinate CA and can also be used to sign certificates and certificate revocation lists (CRLs). Unlike the root CA certificate, this certificate isn't self-signed. Instead, the subordinate CA certificate is signed with the root CA certificate, establishing a certificate chain similar to what you would use for a public key infrastructure (PKI). The subordinate CA certificate is then used to sign client certificates for testing your devices.winpty openssl ca -config ../rootca/rootca.conf -in subca.csr -out subca.crt -extensions sub_ca_extYou're prompted to enter the pass phrase, as shown in the following example, for the private key file of your root CA. After you enter the pass phrase, OpenSSL generates and displays the details of the certificate, then prompts you to sign and commit the certificate for your subordinate CA. Specify
yfor both prompts to generate the certificate for your subordinate CA.Using configuration from rootca.conf Enter pass phrase for ../rootca/private/rootca.key: Check that the request matches the signature Signature ok Certificate Details: {Details omitted from output for clarity} Certificate is to be certified until Mar 24 18:55:00 2024 GMT (365 days) Sign the certificate? [y/n]: 1 out of 1 certificate requests certified, commit? [y/n] Write out database with 1 new entries Database updatedAfter OpenSSL updates the certificate database, confirm that the certificate file
subca.crtis present in the subordinate CA directory. Then, confirm that the PEM certificate (.pem) file for the certificate is present in therootca/certsdirectory. The file name of the .pem file matches the serial number of the subordinate CA certificate.
Register your subordinate CA certificate to your IoT hub
Register the subordinate CA certificate to your IoT hub, which uses it to authenticate your devices during registration and connection. The following steps describe how to upload and automatically verify your subordinate CA certificate to your IoT hub.
In the Azure portal, navigate to your IoT hub and select Certificates from the resource menu, under Security settings.
Select Add from the command bar to add a new CA certificate.
Enter a display name for your subordinate CA certificate in the Certificate name field.
Select the PEM certificate (.pem) file of your subordinate CA certificate from the
rootca/certsdirectory to add in the Certificate .pem or .cer file field.Check the box next to Set certificate status to verified on upload.
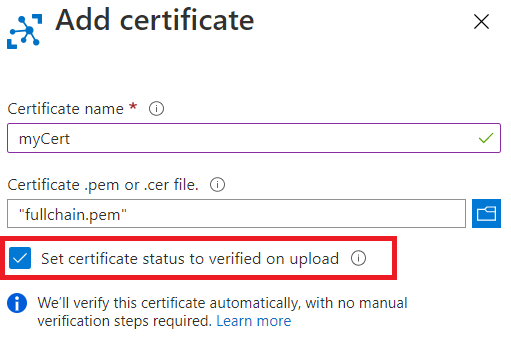
Select Save.
Your uploaded subordinate CA certificate is shown with its status set to Verified on the Certificates tab of the working pane.
Create a client certificate for a device
After you created your subordinate CA, you can create client certificates for your devices. The files and folders created for your subordinate CA are used to store the CSR, private key, and certificate files for your client certificates.
The client certificate must have the value of its Subject Common Name (CN) field set to the value of the device ID that is used when registering the corresponding device in Azure IoT Hub.
Perform the following steps to:
- Create a private key and certificate signing request (CSR) for a client certificate
- Create a client certificate signed by your subordinate CA certificate
In your Git Bash window, make sure that you're still in the
subcadirectory.In the Git Bash window, run the following commands one at a time. Replace the placeholder with a name for your IoT device, for example
testdevice. This step creates the private key and CSR for your client certificate.This step creates a 2048-bit RSA private key for your client certificate, and then generates a certificate signing request (CSR) using that private key.
When prompted, provide certificate details as shown in the following example.
The only prompt that you have to provide a specific value for is the Common Name, which must be the same device name provided in the previous step. You can skip or provide arbitrary values for the rest of the prompts.
After providing the certificate details, OpenSSL generates and displays the details of the certificate, then prompts you to sign and commit the certificate for your subordinate CA. Specify y for both prompts to generate the certificate for your subordinate CA.
-----
Country Name (2 letter code) [XX]:.
State or Province Name (full name) []:.
Locality Name (eg, city) [Default City]:.
Organization Name (eg, company) [Default Company Ltd]:.
Organizational Unit Name (eg, section) []:
Common Name (eg, your name or your server hostname) []:'<DEVICE_NAME>'
Email Address []:

Please enter the following 'extra' attributes
to be sent with your certificate request
A challenge password []:
An optional company name []:
Confirm that the CSR file is present in the subordinate CA directory. Then, confirm that the private key file is present in the
privatesubdirectory before continuing. For more information about the formats of the CSR and private key files, see X.509 certificates.In the Git Bash window, run the following command, replacing the device name placeholders with the same name you used in the previous steps.
This step creates a client certificate in the subordinate CA directory. The command applies the
client_extconfiguration file extensions to the certificate. These extensions indicate that the certificate is for a client certificate, which can't be used as a CA certificate. The client certificate is signed with the subordinate CA certificate.winpty openssl ca -config subca.conf -in <DEVICE_NAME>.csr -out <DEVICE_NAME>.crt -extensions client_extYou're prompted to enter the pass phrase, as shown in the following example, for the private key file of your subordinate CA. After you enter the pass phrase, OpenSSL generates and displays the details of the certificate, then prompts you to sign and commit the client certificate for your device. Specify y for both prompts to generate the client certificate.
Using configuration from subca.conf
Enter pass phrase for ../subca/private/subca.key:
Check that the request matches the signature
Signature ok
Certificate Details:
    {Details omitted from output for clarity}
Certificate is to be certified until Mar 24 18:51:41 2024 GMT (365 days)
Sign the certificate? [y/n]:


1 out of 1 certificate requests certified, commit? [y/n]
Write out database with 1 new entries
Database updated
After OpenSSL updates the certificate database, confirm that the certificate file for the client certificate is present in the subordinate CA directory. Then, confirm that the PEM certificate (.pem) file for the client certificate is present in the certs subdirectory of the subordinate CA directory. The file name of the .pem file matches the serial number of the client certificate.
Next steps
You can register your device with your IoT hub for testing the client certificate that you created for that device. For more information about registering a device, see Create and manage device identities.