APPLIES TO:
 Azure CLI ml extension v2 (current)
Python SDK azure-ai-ml v2 (current)
Azure CLI ml extension v2 (current)
Python SDK azure-ai-ml v2 (current)
In this article, you learn to deploy your model to an online endpoint for use in real-time inferencing. You begin by deploying a model on your local machine to debug any errors. Then, you deploy and test the model in Azure, view the deployment logs, and monitor the service-level agreement (SLA). By the end of this article, you have a scalable HTTPS/REST endpoint that you can use for real-time inference.
Online endpoints are endpoints that are used for real-time inferencing. There are two types of online endpoints: managed online endpoints and Kubernetes online endpoints. For more information about the differences, see Managed online endpoints vs. Kubernetes online endpoints.
Managed online endpoints help to deploy your machine learning models in a turnkey manner. Managed online endpoints work with powerful CPU and GPU machines in Azure in a scalable, fully managed way. Managed online endpoints take care of serving, scaling, securing, and monitoring your models. This assistance frees you from the overhead of setting up and managing the underlying infrastructure.
The main example in this article uses managed online endpoints for deployment. To use Kubernetes instead, see the notes in this document that are inline with the managed online endpoint discussion.
Prerequisites
APPLIES TO:
Azure CLI ml extension v2 (current)
The Azure CLI and the ml extension to the Azure CLI, installed and configured. For more information, see Install and set up the CLI (v2).
A Bash shell or a compatible shell, for example, a shell on a Linux system or Windows Subsystem for Linux. The Azure CLI examples in this article assume that you use this type of shell.
An Azure Machine Learning workspace. For instructions to create a workspace, see Set up.
Azure role-based access control (Azure RBAC) is used to grant access to operations in Azure Machine Learning. To perform the steps in this article, your user account must be assigned the Owner or Contributor role for the Azure Machine Learning workspace, or a custom role must allow Microsoft.MachineLearningServices/workspaces/onlineEndpoints/*. If you use Azure Machine Learning studio to create and manage online endpoints or deployments, you need the extra permission Microsoft.Resources/deployments/write from the resource group owner. For more information, see Manage access to Azure Machine Learning workspaces.
(Optional) To deploy locally, you must install Docker Engine on your local computer. We highly recommend this option, which makes it easier to debug issues.
APPLIES TO:
Python SDK azure-ai-ml v2 (current)
An Azure Machine Learning workspace. For steps for creating a workspace, see Create the workspace.
The Azure Machine Learning SDK for Python v2. To install the SDK, use the following command:
pip install azure-ai-ml azure-identity
To update an existing installation of the SDK to the latest version, use the following command:
pip install --upgrade azure-ai-ml azure-identity
For more information, see Azure Machine Learning Package client library for Python.
Azure RBAC is used to grant access to operations in Azure Machine Learning. To perform the steps in this article, your user account must be assigned the Owner or Contributor role for the Azure Machine Learning workspace, or a custom role must allow Microsoft.MachineLearningServices/workspaces/onlineEndpoints/*. For more information, see Manage access to Azure Machine Learning workspaces.
(Optional) To deploy locally, you must install Docker Engine on your local computer. We highly recommend this option, which makes it easier to debug issues.
Before you follow the steps in this article, make sure that you have the following prerequisites:
The Azure CLI and the CLI extension for machine learning are used in these steps, but they're not the main focus. They're used more as utilities to pass templates to Azure and check the status of template deployments.
The Azure CLI and the ml extension to the Azure CLI, installed and configured. For more information, see Install and set up the CLI (v2).
A Bash shell or a compatible shell, for example, a shell on a Linux system or Windows Subsystem for Linux. The Azure CLI examples in this article assume that you use this type of shell.
An Azure Machine Learning workspace. For instructions to create a workspace, see Set up.
- Azure RBAC is used to grant access to operations in Azure Machine Learning. To perform the steps in this article, your user account must be assigned the Owner or Contributor role for the Azure Machine Learning workspace, or a custom role must allow
Microsoft.MachineLearningServices/workspaces/onlineEndpoints/*. For more information, see Manage access to an Azure Machine Learning workspace.
Ensure that you have enough virtual machine (VM) quota allocated for deployment. Azure Machine Learning reserves 20% of your compute resources for performing upgrades on some VM versions. For example, if you request 10 instances in a deployment, you must have a quota of 12 for each number of cores for the VM version. Failure to account for the extra compute resources results in an error. Some VM versions are exempt from the extra quota reservation. For more information on quota allocation, see Virtual machine quota allocation for deployment.
Alternatively, you could use quota from the Azure Machine Learning shared quota pool for a limited time. Azure Machine Learning provides a shared quota pool from which users across various regions can access quota to perform testing for a limited time, depending upon availability.
When you use the studio to deploy Llama-2, Phi, Nemotron, Mistral, Dolly, and Deci-DeciLM models from the model catalog to a managed online endpoint, Azure Machine Learning allows you to access its shared quota pool for a short time so that you can perform testing. For more information on the shared quota pool, see Azure Machine Learning shared quota.
Prepare your system
Set environment variables
If you haven't already set the defaults for the Azure CLI, save your default settings. To avoid passing in the values for your subscription, workspace, and resource group multiple times, run this code:
az account set --subscription <subscription ID>
az configure --defaults workspace=<Azure Machine Learning workspace name> group=<resource group>
Clone the examples repository
To follow along with this article, first clone the azureml-examples repository, and then change into the repository's azureml-examples/cli directory:
git clone --depth 1 https://github.com/Azure/azureml-examples
cd azureml-examples/cli
Use --depth 1 to clone only the latest commit to the repository, which reduces the time to complete the operation.
The commands in this tutorial are in the files deploy-local-endpoint.sh and deploy-managed-online-endpoint.sh in the cli directory. The YAML configuration files are in the endpoints/online/managed/sample/ subdirectory.
Note
The YAML configuration files for Kubernetes online endpoints are in the endpoints/online/kubernetes/ subdirectory.
Clone the examples repository
To run the training examples, first clone the azureml-examples repository, and then change into the azureml-examples/sdk/python/endpoints/online/managed directory:
git clone --depth 1 https://github.com/Azure/azureml-examples
cd azureml-examples/sdk/python/endpoints/online/managed
Use --depth 1 to clone only the latest commit to the repository, which reduces the time to complete the operation.
The information in this article is based on the online-endpoints-simple-deployment.ipynb notebook. It contains the same content as this article, although the order of the codes is slightly different.
Connect to Azure Machine Learning workspace
The workspace is the top-level resource for Azure Machine Learning. It provides a centralized place to work with all the artifacts you create when you use Azure Machine Learning. In this section, you connect to the workspace in which you perform deployment tasks. To follow along, open your online-endpoints-simple-deployment.ipynb notebook.
Import the required libraries:
# import required libraries
from azure.ai.ml import MLClient
from azure.ai.ml.entities import (
    ManagedOnlineEndpoint,
    ManagedOnlineDeployment,
    Model,
    Environment,
    CodeConfiguration
)
from azure.identity import DefaultAzureCredential
Note
If you use the Kubernetes online endpoint, import the KubernetesOnlineEndpoint and KubernetesOnlineDeployment class from the azure.ai.ml.entities library.
Configure workspace details and get a handle to the workspace.
To connect to a workspace, you need these identifier parameters: a subscription, resource group, and workspace name. You use these details in MLClient from azure.ai.ml to get a handle to the required Azure Machine Learning workspace. This example uses the default Azure authentication.
# enter details of your Azure Machine Learning workspace
subscription_id = "<subscription ID>"
resource_group = "<resource group>"
workspace = "<workspace name>"
# get a handle to the workspace
ml_client = MLClient(
    DefaultAzureCredential(), subscription_id, resource_group, workspace
)
If you have Git installed on your local machine, you can follow the instructions to clone the examples repository. Otherwise, follow the instructions to download files from the examples repository.
Clone the examples repository
To follow along with this article, first clone the azureml-examples repository, and then change into the azureml-examples/cli/endpoints/online/model-1 directory.
git clone --depth 1 https://github.com/Azure/azureml-examples
cd azureml-examples/cli/endpoints/online/model-1
Use --depth 1 to clone only the latest commit to the repository, which reduces the time to complete the operation.
Download files from the examples repository
If you cloned the examples repo, your local machine already has copies of the files for this example, and you can skip to the next section. If you didn't clone the repo, download it to your local machine.
- Go to the examples repository (azureml-examples).
- Go to the <> Code button on the page, and then on the Local tab, select Download ZIP.
- Locate the folder /cli/endpoints/online/model-1/model and the file /cli/endpoints/online/model-1/onlinescoring/score.py.
Set environment variables
Set the following environment variables so that you can use them in the examples in this article. Replace the values with your Azure subscription ID, the Azure region where your workspace is located, the resource group that contains the workspace, and the workspace name:
export SUBSCRIPTION_ID="<subscription ID>"
export LOCATION="<your region>"
export RESOURCE_GROUP="<resource group>"
export WORKSPACE="<workspace name>"
A couple of the template examples require you to upload files to Azure Blob Storage for your workspace. The following steps query the workspace and store this information in environment variables used in the examples:
Get an access token:
TOKEN=$(az account get-access-token --query accessToken -o tsv)
Set the REST API version:
API_VERSION="2022-05-01"
Get the storage information:
# Get values for storage account
response=$(curl --location --request GET "https://management.chinacloudapi.cn/subscriptions/$SUBSCRIPTION_ID/resourceGroups/$RESOURCE_GROUP/providers/Microsoft.MachineLearningServices/workspaces/$WORKSPACE/datastores?api-version=$API_VERSION&isDefault=true" \
--header "Authorization: Bearer $TOKEN")
AZUREML_DEFAULT_DATASTORE=$(echo $response | jq -r '.value[0].name')
AZUREML_DEFAULT_CONTAINER=$(echo $response | jq -r '.value[0].properties.containerName')
export AZURE_STORAGE_ACCOUNT=$(echo $response | jq -r '.value[0].properties.accountName')
Clone the examples repository
To follow along with this article, first clone the azureml-examples repository, and then change into the azureml-examples directory:
git clone --depth 1 https://github.com/Azure/azureml-examples
cd azureml-examples
Use --depth 1 to clone only the latest commit to the repository, which reduces the time to complete the operation.
Define the endpoint
To define an online endpoint, specify the endpoint name and authentication mode. For more information on managed online endpoints, see Online endpoints.
Set an endpoint name
To set your endpoint name, run the following command. Replace <YOUR_ENDPOINT_NAME> with a name that's unique in the Azure region. For more information on the naming rules, see Endpoint limits.
export ENDPOINT_NAME="<YOUR_ENDPOINT_NAME>"
The following snippet shows the endpoints/online/managed/sample/endpoint.yml file:
$schema: https://azuremlschemas.azureedge.net/latest/managedOnlineEndpoint.schema.json
name: my-endpoint
auth_mode: key
The reference for the endpoint YAML format is described in the following table. To learn how to specify these attributes, see the online endpoint YAML reference. For information about limits related to managed endpoints, see Azure Machine Learning online endpoints and batch endpoints.
| Key |
Description |
$schema |
(Optional) The YAML schema. To see all available options in the YAML file, you can view the schema in the preceding code snippet in a browser. |
name |
The name of the endpoint. |
auth_mode |
Use key for key-based authentication.
Use aml_token for Azure Machine Learning token-based authentication.
Use aad_token for Microsoft Entra token-based authentication. For production workloads on managed online endpoints, this is the most secure option.
For more information on authenticating, see Authenticate clients for online endpoints. |
First define the name of the online endpoint, and then configure the endpoint.
Replace <YOUR_ENDPOINT_NAME> with a name that's unique in the Azure region, or use the example method to define a random name. Be sure to delete the method that you don't use. For more information on the naming rules, see Endpoint limits.
# method 1: define an endpoint name
endpoint_name = "<YOUR_ENDPOINT_NAME>"

# method 2: example way to define a random name
import datetime

endpoint_name = "endpt-" + datetime.datetime.now().strftime("%m%d%H%M%f")

# create an online endpoint
endpoint = ManagedOnlineEndpoint(
    name = endpoint_name,
    description="this is a sample endpoint",
    auth_mode="key"
)
The previous code uses key for key-based authentication. To use Azure Machine Learning token-based authentication, use aml_token. To use Microsoft Entra token-based authentication, use aad_token. For more information on authenticating, see Authenticate clients for online endpoints.
When you deploy to Azure from the studio, you create an endpoint and a deployment to add to it. At that time, you're prompted to provide names for the endpoint and deployment.
Set an endpoint name
To set your endpoint name, run the following command to generate a random name. It must be unique in the Azure region. For more information on the naming rules, see Endpoint limits.
export ENDPOINT_NAME="<YOUR_ENDPOINT_NAME>"
To define the endpoint and deployment, this article uses the Azure Resource Manager templates (ARM templates) online-endpoint.json and online-endpoint-deployment.json. To use the templates for defining an online endpoint and deployment, see the Deploy to Azure section.
Define the deployment
A deployment is a set of resources required for hosting the model that does the actual inferencing. For this example, you deploy a scikit-learn model that does regression and use a scoring script score.py to run the model on a specific input request.
To learn about the key attributes of a deployment, see Online deployments.
Your deployment configuration uses the location of the model that you want to deploy.
The following snippet shows the endpoints/online/managed/sample/blue-deployment.yml file, with all the required inputs to configure a deployment:
$schema: https://azuremlschemas.azureedge.net/latest/managedOnlineDeployment.schema.json
name: blue
endpoint_name: my-endpoint
model:
  path: ../../model-1/model/
code_configuration:
  code: ../../model-1/onlinescoring/
  scoring_script: score.py
environment:
  conda_file: ../../model-1/environment/conda.yaml
  image: mcr.microsoft.com/azureml/openmpi4.1.0-ubuntu20.04:latest
instance_type: Standard_DS3_v2
instance_count: 1
The blue-deployment.yml file specifies the following deployment attributes:
model: Specifies the model properties inline by using the path parameter (where to upload files from). The CLI automatically uploads the model files and registers the model with an autogenerated name.environment: Uses inline definitions that include where to upload files from. The CLI automatically uploads the conda.yaml file and registers the environment. Later, to build the environment, the deployment uses the image parameter for the base image. In this example, it's mcr.microsoft.com/azureml/openmpi4.1.0-ubuntu20.04:latest. The conda_file dependencies are installed on top of the base image.code_configuration: Uploads the local files, such as the Python source for the scoring model, from the development environment during deployment.
For more information about the YAML schema, see the online endpoint YAML reference.
Note
To use Kubernetes endpoints instead of managed online endpoints as a compute target:
- Create and attach your Kubernetes cluster as a compute target to your Azure Machine Learning workspace by using Azure Machine Learning studio.
- Use the endpoint YAML to target Kubernetes instead of the managed endpoint YAML. You need to edit the YAML to change the value of
compute to the name of your registered compute target. You can use this deployment.yaml that has other properties that apply to a Kubernetes deployment.
All the commands that are used in this article for managed online endpoints also apply to Kubernetes endpoints, except for the following capabilities that don't apply to Kubernetes endpoints:
Use the following code to configure a deployment:
model = Model(path="../model-1/model/sklearn_regression_model.pkl")
env = Environment(
    conda_file="../model-1/environment/conda.yaml",
    image="mcr.microsoft.com/azureml/openmpi4.1.0-ubuntu22.04:latest",
)

blue_deployment = ManagedOnlineDeployment(
    name="blue",
    endpoint_name=endpoint_name,
    model=model,
    environment=env,
    code_configuration=CodeConfiguration(
        code="../model-1/onlinescoring", scoring_script="score.py"
    ),
    instance_type="Standard_DS3_v2",
    instance_count=1,
)
Model: Specifies the model properties inline by using the path parameter (where to upload files from). The SDK automatically uploads the model files and registers the model with an autogenerated name.Environment: Uses inline definitions that include where to upload files from. The SDK automatically uploads the conda.yaml file and registers the environment. Later, to build the environment, the deployment uses the image parameter for the base image. In this example, it's mcr.microsoft.com/azureml/openmpi4.1.0-ubuntu22.04:latest. The conda_file dependencies are installed on top of the base image.CodeConfiguration: Uploads the local files, such as the Python source for the scoring model, from the development environment during deployment.
For more information about online deployment definition, see OnlineDeployment Class.
When you deploy to Azure, you create an endpoint and a deployment to add to it. At that time, you're prompted to provide names for the endpoint and deployment.
Understand the scoring script
The format of the scoring script for online endpoints is the same format that's used in the preceding version of the CLI and in the Python SDK.
The scoring script specified in code_configuration.scoring_script must have an init() function and a run() function.
The scoring script must have an init() function and a run() function.
The scoring script must have an init() function and a run() function.
The scoring script must have an init() function and a run() function. This article uses the score.py file.
When you use a template for deployment, you must first upload the scoring file to Blob Storage, and then register it:
- The following code uses the Azure CLI command
az storage blob upload-batch to upload the scoring file:
set -x

#<get_access_token>
TOKEN=$(az account get-access-token --query accessToken -o tsv)
#</get_access_token>

# <create_variables>
SUBSCRIPTION_ID=$(az account show --query id -o tsv)
LOCATION=$(az ml workspace show --query location -o tsv)
RESOURCE_GROUP=$(az group show --query name -o tsv)
WORKSPACE=$(az configure -l --query "[?name=='workspace'].value" -o tsv)
#</create_variables>

# <set_endpoint_name>
export ENDPOINT_NAME=endpoint-`echo $RANDOM`
# </set_endpoint_name>

#<api_version>
API_VERSION="2022-05-01"
#</api_version>

echo -e "Using:\nSUBSCRIPTION_ID=$SUBSCRIPTION_ID\nLOCATION=$LOCATION\nRESOURCE_GROUP=$RESOURCE_GROUP\nWORKSPACE=$WORKSPACE"

# define how to wait
wait_for_completion () {
    operation_id=$1
    status="unknown"

    if [[ $operation_id == "" || -z $operation_id  || $operation_id == "null" ]]; then
        echo "operation id cannot be empty"
        exit 1
    fi

    while [[ $status != "Succeeded" && $status != "Failed" ]]
    do
        echo "Getting operation status from: $operation_id"
        operation_result=$(curl --location --request GET $operation_id --header "Authorization: Bearer $TOKEN")
        # TODO error handling here
        status=$(echo $operation_result | jq -r '.status')
        echo "Current operation status: $status"
        sleep 5
    done

    if [[ $status == "Failed" ]]
    then
        error=$(echo $operation_result | jq -r '.error')
        echo "Error: $error"
    fi
}

# <get_storage_details>
# Get values for storage account
response=$(curl --location --request GET "https://management.chinacloudapi.cn/subscriptions/$SUBSCRIPTION_ID/resourceGroups/$RESOURCE_GROUP/providers/Microsoft.MachineLearningServices/workspaces/$WORKSPACE/datastores?api-version=$API_VERSION&isDefault=true" \
--header "Authorization: Bearer $TOKEN")
AZUREML_DEFAULT_DATASTORE=$(echo $response | jq -r '.value[0].name')
AZUREML_DEFAULT_CONTAINER=$(echo $response | jq -r '.value[0].properties.containerName')
export AZURE_STORAGE_ACCOUNT=$(echo $response | jq -r '.value[0].properties.accountName')
# </get_storage_details>

# <upload_code>
az storage blob upload-batch -d $AZUREML_DEFAULT_CONTAINER/score -s cli/endpoints/online/model-1/onlinescoring --account-name $AZURE_STORAGE_ACCOUNT
# </upload_code>

# <create_code>
az deployment group create -g $RESOURCE_GROUP \
--template-file arm-templates/code-version.json \
--parameters \
workspaceName=$WORKSPACE \
codeAssetName="score-sklearn" \
codeUri="https://$AZURE_STORAGE_ACCOUNT.blob.core.chinacloudapi.cn/$AZUREML_DEFAULT_CONTAINER/score"
# </create_code>

# <upload_model>
az storage blob upload-batch -d $AZUREML_DEFAULT_CONTAINER/model -s cli/endpoints/online/model-1/model --account-name $AZURE_STORAGE_ACCOUNT
# </upload_model>

# <create_model>
az deployment group create -g $RESOURCE_GROUP \
--template-file arm-templates/model-version.json \
--parameters \
workspaceName=$WORKSPACE \
modelAssetName="sklearn" \
modelUri="azureml://subscriptions/$SUBSCRIPTION_ID/resourceGroups/$RESOURCE_GROUP/workspaces/$WORKSPACE/datastores/$AZUREML_DEFAULT_DATASTORE/paths/model/sklearn_regression_model.pkl"
# </create_model>

# <read_condafile>
CONDA_FILE=$(cat cli/endpoints/online/model-1/environment/conda.yaml)
# </read_condafile>

# <create_environment>
ENV_VERSION=$RANDOM
az deployment group create -g $RESOURCE_GROUP \
--template-file arm-templates/environment-version.json \
--parameters \
workspaceName=$WORKSPACE \
environmentAssetName=sklearn-env \
environmentAssetVersion=$ENV_VERSION \
dockerImage=mcr.microsoft.com/azureml/openmpi3.1.2-ubuntu18.04:20210727.v1 \
condaFile="$CONDA_FILE"
# </create_environment>

# <create_endpoint>
az deployment group create -g $RESOURCE_GROUP \
--template-file arm-templates/online-endpoint.json \
--parameters \
workspaceName=$WORKSPACE \
onlineEndpointName=$ENDPOINT_NAME \
identityType=SystemAssigned \
authMode=AMLToken \
location=$LOCATION
# </create_endpoint>

# <get_endpoint>
response=$(curl --location --request GET "https://management.chinacloudapi.cn/subscriptions/$SUBSCRIPTION_ID/resourceGroups/$RESOURCE_GROUP/providers/Microsoft.MachineLearningServices/workspaces/$WORKSPACE/onlineEndpoints/$ENDPOINT_NAME?api-version=$API_VERSION" \
--header "Content-Type: application/json" \
--header "Authorization: Bearer $TOKEN")

operation_id=$(echo $response | jq -r '.properties.properties.AzureAsyncOperationUri')
wait_for_completion $operation_id
# </get_endpoint>

# <create_deployment>
resourceScope="/subscriptions/$SUBSCRIPTION_ID/resourceGroups/$RESOURCE_GROUP/providers/Microsoft.MachineLearningServices"
az deployment group create -g $RESOURCE_GROUP \
 --template-file arm-templates/online-endpoint-deployment.json \
 --parameters \
 workspaceName=$WORKSPACE \
 location=$LOCATION \
 onlineEndpointName=$ENDPOINT_NAME \
 onlineDeploymentName=blue \
 codeId="$resourceScope/workspaces/$WORKSPACE/codes/score-sklearn/versions/1" \
 scoringScript=score.py \
 environmentId="$resourceScope/workspaces/$WORKSPACE/environments/sklearn-env/versions/$ENV_VERSION" \
 model="$resourceScope/workspaces/$WORKSPACE/models/sklearn/versions/1" \
 endpointComputeType=Managed \
 skuName=Standard_F2s_v2 \
 skuCapacity=1
 # </create_deployment>

# <get_deployment>
response=$(curl --location --request GET "https://management.chinacloudapi.cn/subscriptions/$SUBSCRIPTION_ID/resourceGroups/$RESOURCE_GROUP/providers/Microsoft.MachineLearningServices/workspaces/$WORKSPACE/onlineEndpoints/$ENDPOINT_NAME/deployments/blue?api-version=$API_VERSION" \
--header "Content-Type: application/json" \
--header "Authorization: Bearer $TOKEN")

operation_id=$(echo $response | jq -r '.properties.properties.AzureAsyncOperationUri')
wait_for_completion $operation_id

scoringUri=$(echo $response | jq -r '.properties.scoringUri')
# </get_endpoint>

# <get_endpoint_access_token>
response=$(curl -H "Content-Length: 0" --location --request POST "https://management.chinacloudapi.cn/subscriptions/$SUBSCRIPTION_ID/resourceGroups/$RESOURCE_GROUP/providers/Microsoft.MachineLearningServices/workspaces/$WORKSPACE/onlineEndpoints/$ENDPOINT_NAME/token?api-version=$API_VERSION" \
--header "Authorization: Bearer $TOKEN")
accessToken=$(echo $response | jq -r '.accessToken')
# </get_endpoint_access_token>

# <score_endpoint>
curl --location --request POST $scoringUri \
--header "Authorization: Bearer $accessToken" \
--header "Content-Type: application/json" \
--data-raw @cli/endpoints/online/model-1/sample-request.json
# </score_endpoint>

# <get_deployment_logs>
curl --location --request POST "https://management.chinacloudapi.cn/subscriptions/$SUBSCRIPTION_ID/resourceGroups/$RESOURCE_GROUP/providers/Microsoft.MachineLearningServices/workspaces/$WORKSPACE/onlineEndpoints/$ENDPOINT_NAME/deployments/blue/getLogs?api-version=$API_VERSION" \
--header "Authorization: Bearer $TOKEN" \
--header "Content-Type: application/json" \
--data-raw "{ \"tail\": 100 }"
# </get_deployment_logs>

# <delete_endpoint>
curl --location --request DELETE "https://management.chinacloudapi.cn/subscriptions/$SUBSCRIPTION_ID/resourceGroups/$RESOURCE_GROUP/providers/Microsoft.MachineLearningServices/workspaces/$WORKSPACE/onlineEndpoints/$ENDPOINT_NAME?api-version=$API_VERSION" \
--header "Content-Type: application/json" \
--header "Authorization: Bearer $TOKEN" || true
# </delete_endpoint>
- The following code uses a template to register the code:
set -x

#<get_access_token>
TOKEN=$(az account get-access-token --query accessToken -o tsv)
#</get_access_token>

# <create_variables>
SUBSCRIPTION_ID=$(az account show --query id -o tsv)
LOCATION=$(az ml workspace show --query location -o tsv)
RESOURCE_GROUP=$(az group show --query name -o tsv)
WORKSPACE=$(az configure -l --query "[?name=='workspace'].value" -o tsv)
#</create_variables>

# <set_endpoint_name>
export ENDPOINT_NAME=endpoint-`echo $RANDOM`
# </set_endpoint_name>

#<api_version>
API_VERSION="2022-05-01"
#</api_version>

echo -e "Using:\nSUBSCRIPTION_ID=$SUBSCRIPTION_ID\nLOCATION=$LOCATION\nRESOURCE_GROUP=$RESOURCE_GROUP\nWORKSPACE=$WORKSPACE"

# define how to wait
wait_for_completion () {
    operation_id=$1
    status="unknown"

    if [[ $operation_id == "" || -z $operation_id  || $operation_id == "null" ]]; then
        echo "operation id cannot be empty"
        exit 1
    fi

    while [[ $status != "Succeeded" && $status != "Failed" ]]
    do
        echo "Getting operation status from: $operation_id"
        operation_result=$(curl --location --request GET $operation_id --header "Authorization: Bearer $TOKEN")
        # TODO error handling here
        status=$(echo $operation_result | jq -r '.status')
        echo "Current operation status: $status"
        sleep 5
    done

    if [[ $status == "Failed" ]]
    then
        error=$(echo $operation_result | jq -r '.error')
        echo "Error: $error"
    fi
}

# <get_storage_details>
# Get values for storage account
response=$(curl --location --request GET "https://management.chinacloudapi.cn/subscriptions/$SUBSCRIPTION_ID/resourceGroups/$RESOURCE_GROUP/providers/Microsoft.MachineLearningServices/workspaces/$WORKSPACE/datastores?api-version=$API_VERSION&isDefault=true" \
--header "Authorization: Bearer $TOKEN")
AZUREML_DEFAULT_DATASTORE=$(echo $response | jq -r '.value[0].name')
AZUREML_DEFAULT_CONTAINER=$(echo $response | jq -r '.value[0].properties.containerName')
export AZURE_STORAGE_ACCOUNT=$(echo $response | jq -r '.value[0].properties.accountName')
# </get_storage_details>

# <upload_code>
az storage blob upload-batch -d $AZUREML_DEFAULT_CONTAINER/score -s cli/endpoints/online/model-1/onlinescoring --account-name $AZURE_STORAGE_ACCOUNT
# </upload_code>

# <create_code>
az deployment group create -g $RESOURCE_GROUP \
--template-file arm-templates/code-version.json \
--parameters \
workspaceName=$WORKSPACE \
codeAssetName="score-sklearn" \
codeUri="https://$AZURE_STORAGE_ACCOUNT.blob.core.chinacloudapi.cn/$AZUREML_DEFAULT_CONTAINER/score"
# </create_code>

# <upload_model>
az storage blob upload-batch -d $AZUREML_DEFAULT_CONTAINER/model -s cli/endpoints/online/model-1/model --account-name $AZURE_STORAGE_ACCOUNT
# </upload_model>

# <create_model>
az deployment group create -g $RESOURCE_GROUP \
--template-file arm-templates/model-version.json \
--parameters \
workspaceName=$WORKSPACE \
modelAssetName="sklearn" \
modelUri="azureml://subscriptions/$SUBSCRIPTION_ID/resourceGroups/$RESOURCE_GROUP/workspaces/$WORKSPACE/datastores/$AZUREML_DEFAULT_DATASTORE/paths/model/sklearn_regression_model.pkl"
# </create_model>

# <read_condafile>
CONDA_FILE=$(cat cli/endpoints/online/model-1/environment/conda.yaml)
# </read_condafile>

# <create_environment>
ENV_VERSION=$RANDOM
az deployment group create -g $RESOURCE_GROUP \
--template-file arm-templates/environment-version.json \
--parameters \
workspaceName=$WORKSPACE \
environmentAssetName=sklearn-env \
environmentAssetVersion=$ENV_VERSION \
dockerImage=mcr.microsoft.com/azureml/openmpi3.1.2-ubuntu18.04:20210727.v1 \
condaFile="$CONDA_FILE"
# </create_environment>

# <create_endpoint>
az deployment group create -g $RESOURCE_GROUP \
--template-file arm-templates/online-endpoint.json \
--parameters \
workspaceName=$WORKSPACE \
onlineEndpointName=$ENDPOINT_NAME \
identityType=SystemAssigned \
authMode=AMLToken \
location=$LOCATION
# </create_endpoint>

# <get_endpoint>
response=$(curl --location --request GET "https://management.chinacloudapi.cn/subscriptions/$SUBSCRIPTION_ID/resourceGroups/$RESOURCE_GROUP/providers/Microsoft.MachineLearningServices/workspaces/$WORKSPACE/onlineEndpoints/$ENDPOINT_NAME?api-version=$API_VERSION" \
--header "Content-Type: application/json" \
--header "Authorization: Bearer $TOKEN")

operation_id=$(echo $response | jq -r '.properties.properties.AzureAsyncOperationUri')
wait_for_completion $operation_id
# </get_endpoint>

# <create_deployment>
resourceScope="/subscriptions/$SUBSCRIPTION_ID/resourceGroups/$RESOURCE_GROUP/providers/Microsoft.MachineLearningServices"
az deployment group create -g $RESOURCE_GROUP \
 --template-file arm-templates/online-endpoint-deployment.json \
 --parameters \
 workspaceName=$WORKSPACE \
 location=$LOCATION \
 onlineEndpointName=$ENDPOINT_NAME \
 onlineDeploymentName=blue \
 codeId="$resourceScope/workspaces/$WORKSPACE/codes/score-sklearn/versions/1" \
 scoringScript=score.py \
 environmentId="$resourceScope/workspaces/$WORKSPACE/environments/sklearn-env/versions/$ENV_VERSION" \
 model="$resourceScope/workspaces/$WORKSPACE/models/sklearn/versions/1" \
 endpointComputeType=Managed \
 skuName=Standard_F2s_v2 \
 skuCapacity=1
 # </create_deployment>

# <get_deployment>
response=$(curl --location --request GET "https://management.chinacloudapi.cn/subscriptions/$SUBSCRIPTION_ID/resourceGroups/$RESOURCE_GROUP/providers/Microsoft.MachineLearningServices/workspaces/$WORKSPACE/onlineEndpoints/$ENDPOINT_NAME/deployments/blue?api-version=$API_VERSION" \
--header "Content-Type: application/json" \
--header "Authorization: Bearer $TOKEN")

operation_id=$(echo $response | jq -r '.properties.properties.AzureAsyncOperationUri')
wait_for_completion $operation_id

scoringUri=$(echo $response | jq -r '.properties.scoringUri')
# </get_endpoint>

# <get_endpoint_access_token>
response=$(curl -H "Content-Length: 0" --location --request POST "https://management.chinacloudapi.cn/subscriptions/$SUBSCRIPTION_ID/resourceGroups/$RESOURCE_GROUP/providers/Microsoft.MachineLearningServices/workspaces/$WORKSPACE/onlineEndpoints/$ENDPOINT_NAME/token?api-version=$API_VERSION" \
--header "Authorization: Bearer $TOKEN")
accessToken=$(echo $response | jq -r '.accessToken')
# </get_endpoint_access_token>

# <score_endpoint>
curl --location --request POST $scoringUri \
--header "Authorization: Bearer $accessToken" \
--header "Content-Type: application/json" \
--data-raw @cli/endpoints/online/model-1/sample-request.json
# </score_endpoint>

# <get_deployment_logs>
curl --location --request POST "https://management.chinacloudapi.cn/subscriptions/$SUBSCRIPTION_ID/resourceGroups/$RESOURCE_GROUP/providers/Microsoft.MachineLearningServices/workspaces/$WORKSPACE/onlineEndpoints/$ENDPOINT_NAME/deployments/blue/getLogs?api-version=$API_VERSION" \
--header "Authorization: Bearer $TOKEN" \
--header "Content-Type: application/json" \
--data-raw "{ \"tail\": 100 }"
# </get_deployment_logs>

# <delete_endpoint>
curl --location --request DELETE "https://management.chinacloudapi.cn/subscriptions/$SUBSCRIPTION_ID/resourceGroups/$RESOURCE_GROUP/providers/Microsoft.MachineLearningServices/workspaces/$WORKSPACE/onlineEndpoints/$ENDPOINT_NAME?api-version=$API_VERSION" \
--header "Content-Type: application/json" \
--header "Authorization: Bearer $TOKEN" || true
# </delete_endpoint>
This example uses the score.py file from the repo that you cloned or downloaded earlier:
import os
import logging
import json
import numpy
import joblib


def init():
    """
    This function is called when the container is initialized/started, typically after create/update of the deployment.
    You can write the logic here to perform init operations like caching the model in memory
    """
    global model
    # AZUREML_MODEL_DIR is an environment variable created during deployment.
    # It is the path to the model folder (./azureml-models/$MODEL_NAME/$VERSION)
    # Please provide your model's folder name if there is one
    model_path = os.path.join(
        os.getenv("AZUREML_MODEL_DIR"), "model/sklearn_regression_model.pkl"
    )
    # deserialize the model file back into a sklearn model
    model = joblib.load(model_path)
    logging.info("Init complete")


def run(raw_data):
    """
    This function is called for every invocation of the endpoint to perform the actual scoring/prediction.
    In the example we extract the data from the json input and call the scikit-learn model's predict()
    method and return the result back
    """
    logging.info("model 1: request received")
    data = json.loads(raw_data)["data"]
    data = numpy.array(data)
    result = model.predict(data)
    logging.info("Request processed")
    return result.tolist()
The init() function is called when the container is initialized or started. Initialization typically occurs shortly after the deployment is created or updated. The init function is the place to write logic for global initialization operations like caching the model in memory (as shown in this score.py file).
The run() function is called every time the endpoint is invoked. It does the actual scoring and prediction. In this score.py file, the run() function extracts data from a JSON input, calls the scikit-learn model's predict() method, and then returns the prediction result.
Deploy and debug locally by using a local endpoint
We highly recommend that you test run your endpoint locally to validate and debug your code and configuration before you deploy to Azure. The Azure CLI and Python SDK support local endpoints and deployments, but Azure Machine Learning studio and ARM templates don't.
To deploy locally, Docker Engine must be installed and running. Docker Engine typically starts when the computer starts. If it doesn't, you can troubleshoot Docker Engine.
You can use the Azure Machine Learning inference HTTP server Python package to debug your scoring script locally without Docker Engine. Debugging with the inference server helps you to debug the scoring script before you deploy to local endpoints so that you can debug without being affected by the deployment container configurations.
For more information on debugging online endpoints locally before you deploy to Azure, see Online endpoint debugging.
Deploy the model locally
First, create an endpoint. Optionally, for a local endpoint, you can skip this step. You can create the deployment directly (next step), which in turn creates the required metadata. Deploying models locally is useful for development and testing purposes.
az ml online-endpoint create --local -n $ENDPOINT_NAME -f endpoints/online/managed/sample/endpoint.yml
ml_client.online_endpoints.begin_create_or_update(endpoint, local=True)
The studio doesn't support local endpoints. For steps to test the endpoint locally, see the Azure CLI or Python tabs.
The template doesn't support local endpoints. For steps to test the endpoint locally, see the Azure CLI or Python tabs.
Now, create a deployment named blue under the endpoint.
az ml online-deployment create --local -n blue --endpoint $ENDPOINT_NAME -f endpoints/online/managed/sample/blue-deployment.yml
The --local flag directs the CLI to deploy the endpoint in the Docker environment.
ml_client.online_deployments.begin_create_or_update(
    deployment=blue_deployment, local=True
)
The local=True flag directs the SDK to deploy the endpoint in the Docker environment.
The studio doesn't support local endpoints. For steps to test the endpoint locally, see the Azure CLI or Python tabs.
The template doesn't support local endpoints. For steps to test the endpoint locally, see the Azure CLI or Python tabs.
Verify that the local deployment succeeded
Check the deployment status to see whether the model was deployed without error:
az ml online-endpoint show -n $ENDPOINT_NAME --local
The output should appear similar to the following JSON. The provisioning_state parameter is Succeeded.
{
  "auth_mode": "key",
  "location": "local",
  "name": "docs-endpoint",
  "properties": {},
  "provisioning_state": "Succeeded",
  "scoring_uri": "http://localhost:49158/score",
  "tags": {},
  "traffic": {}
}
ml_client.online_endpoints.get(name=endpoint_name, local=True)
The method returns ManagedOnlineEndpoint entity. The provisioning_state parameter is Succeeded.
ManagedOnlineEndpoint({'public_network_access': None, 'provisioning_state': 'Succeeded', 'scoring_uri': 'http://localhost:49158/score', 'swagger_uri': None, 'name': 'endpt-10061534497697', 'description': 'this is a sample endpoint', 'tags': {}, 'properties': {}, 'id': None, 'Resource__source_path': None, 'base_path': '/path/to/your/working/directory', 'creation_context': None, 'serialize': <msrest.serialization.Serializer object at 0x7ffb781bccd0>, 'auth_mode': 'key', 'location': 'local', 'identity': None, 'traffic': {}, 'mirror_traffic': {}, 'kind': None})
The studio doesn't support local endpoints. For steps to test the endpoint locally, see the Azure CLI or Python tabs.
The template doesn't support local endpoints. For steps to test the endpoint locally, see the Azure CLI or Python tabs.
The following table contains the possible values for provisioning_state:
| Value |
Description |
Creating |
The resource is being created. |
Updating |
The resource is being updated. |
Deleting |
The resource is being deleted. |
Succeeded |
The create or update operation succeeded. |
Failed |
The create, update, or delete operation failed. |
Invoke the local endpoint to score data by using your model
Invoke the endpoint to score the model by using the invoke command and passing query parameters that are stored in a JSON file:
az ml online-endpoint invoke --local --name $ENDPOINT_NAME --request-file endpoints/online/model-1/sample-request.json
If you want to use a REST client (like curl), you must have the scoring URI. To get the scoring URI, run az ml online-endpoint show --local -n $ENDPOINT_NAME. In the returned data, find the scoring_uri attribute.
Invoke the endpoint to score the model by using the invoke command and passing query parameters that are stored in a JSON file.
ml_client.online_endpoints.invoke(
    endpoint_name=endpoint_name,
    request_file="../model-1/sample-request.json",
    local=True,
)
If you want to use a REST client (like curl), you must have the scoring URI. To get the scoring URI, run the following code. In the returned data, find the scoring_uri attribute.
endpoint = ml_client.online_endpoints.get(endpoint_name, local=True)
scoring_uri = endpoint.scoring_uri
The studio doesn't support local endpoints. For steps to test the endpoint locally, see the Azure CLI or Python tabs.
The template doesn't support local endpoints. For steps to test the endpoint locally, see the Azure CLI or Python tabs.
Review the logs for output from the invoke operation
In the example score.py file, the run() method logs some output to the console.
You can view this output by using the get-logs command:
az ml online-deployment get-logs --local -n blue --endpoint $ENDPOINT_NAME
You can view this output by using the get_logs method:
ml_client.online_deployments.get_logs(
    name="blue", endpoint_name=endpoint_name, local=True, lines=50
)
The studio doesn't support local endpoints. For steps to test the endpoint locally, see the Azure CLI or Python tabs.
The template doesn't support local endpoints. For steps to test the endpoint locally, see the Azure CLI or Python tabs.
Deploy your online endpoint to Azure
Next, deploy your online endpoint to Azure. As a best practice for production, we recommend that you register the model and environment that you use in your deployment.
Register your model and environment
We recommend that you register your model and environment before deployment to Azure so that you can specify their registered names and versions during deployment. After you register your assets, you can reuse them without the need to upload them every time you create deployments. This practice increases reproducibility and traceability.
Unlike deployment to Azure, local deployment doesn't support using registered models and environments. Instead, local deployment uses local model files and uses environments with local files only.
For deployment to Azure, you can use either local or registered assets (models and environments). In this section of the article, the deployment to Azure uses registered assets, but you have the option of using local assets instead. For an example of a deployment configuration that uploads local files to use for local deployment, see Configure a deployment.
To register the model and environment, use the form model: azureml:my-model:1 or environment: azureml:my-env:1.
For registration, you can extract the YAML definitions of model and environment into separate YAML files in the endpoints/online/managed/sample folder, and use the commands az ml model create and az ml environment create. To learn more about these commands, run az ml model create -h and az ml environment create -h.
Create a YAML definition for the model. Name the file model.yml:
$schema: https://azuremlschemas.azureedge.net/latest/model.schema.json
name: my-model
path: ../../model-1/model/
Register the model:
az ml model create -n my-model -v 1 -f endpoints/online/managed/sample/model.yml
Create a YAML definition for the environment. Name the file environment.yml:
$schema: https://azuremlschemas.azureedge.net/latest/environment.schema.json
name: my-env
image: mcr.microsoft.com/azureml/openmpi4.1.0-ubuntu22.04:latest
conda_file: ../../model-1/environment/conda.yaml
Register the environment:
az ml environment create -n my-env -v 1 -f endpoints/online/managed/sample/environment.yml
For more information on how to register your model as an asset, see Register a model by using the Azure CLI or Python SDK. For more information on creating an environment, see Create a custom environment.
Register a model:
from azure.ai.ml.entities import Model
from azure.ai.ml.constants import AssetTypes

file_model = Model(
    path="../model-1/model/",
    type=AssetTypes.CUSTOM_MODEL,
    name="my-model",
    description="Model created from local file.",
)
ml_client.models.create_or_update(file_model)
Register the environment:
from azure.ai.ml.entities import Environment

env_docker_conda = Environment(
    image="mcr.microsoft.com/azureml/openmpi4.1.0-ubuntu22.04:latest",
    conda_file="../model-1/environment/conda.yaml",
    name="my-env",
    description="Environment created from a Docker image plus Conda environment.",
)
ml_client.environments.create_or_update(env_docker_conda)
To learn how to register your model as an asset so that you can specify its registered name and version during deployment, see Register a model by using the Azure CLI or Python SDK.
For more information on creating an environment, see Create a custom environment.
Register the model
A model registration is a logical entity in the workspace that can contain a single model file or a directory of multiple files. As a best practice for production, register the model and environment. Before you create the endpoint and deployment in this article, register the model folder that contains the model.
To register the example model, follow these steps:
Go to Azure Machine Learning studio.
On the left pane, select the Models page.
Select Register, and then choose From local files.
Select Unspecified type for the Model type.
Select Browse, and choose Browse folder.

Select the \azureml-examples\cli\endpoints\online\model-1\model folder from the local copy of the repo that you cloned or downloaded earlier. When you're prompted, select Upload and wait for the upload to finish.
Select Next.
Enter a friendly name for the model. The steps in this article assume that the model is named model-1.
Select Next, and then select Register to finish registration.
For more information on how to work with registered models, see Work with registered models.
Create and register the environment
On the left pane, select the Environments page.
Select the Custom environments tab, and then choose Create.
On the Settings page, enter a name, such as my-env for the environment.
For Select environment source, choose Use existing docker image with optional conda source.
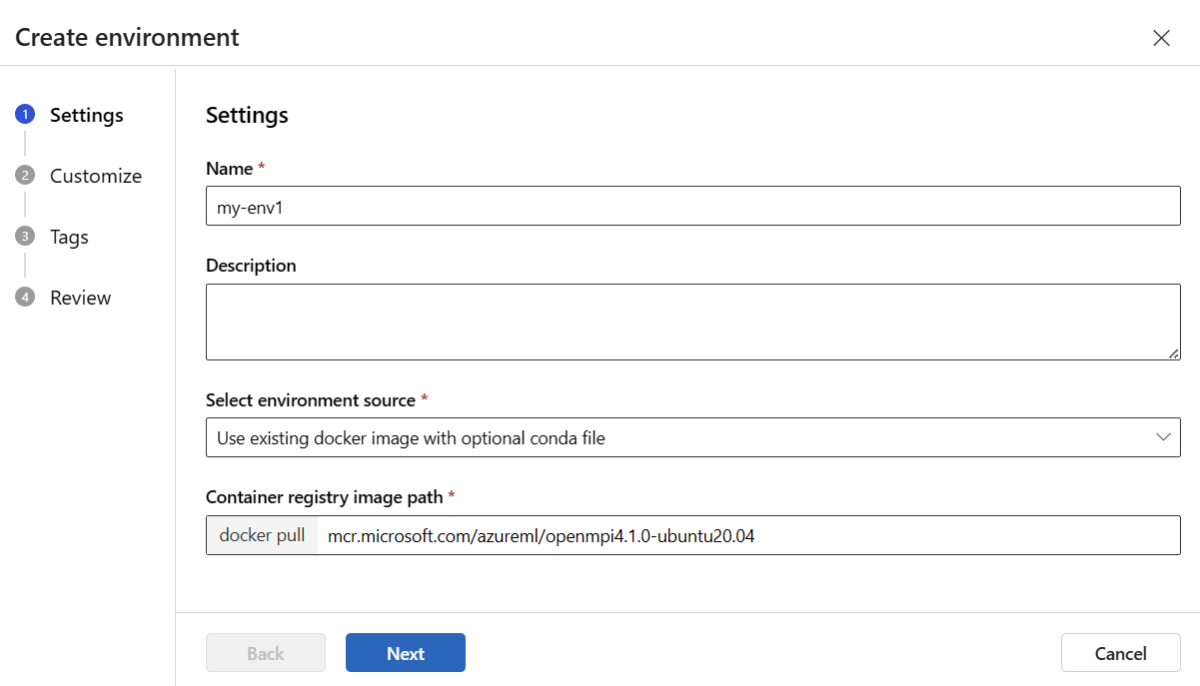
Select Next to go to the Customize page.
Copy the contents of the \azureml-examples\cli\endpoints\online\model-1\environment\conda.yaml file from the repo that you cloned or downloaded earlier.
Paste the contents into the text box.
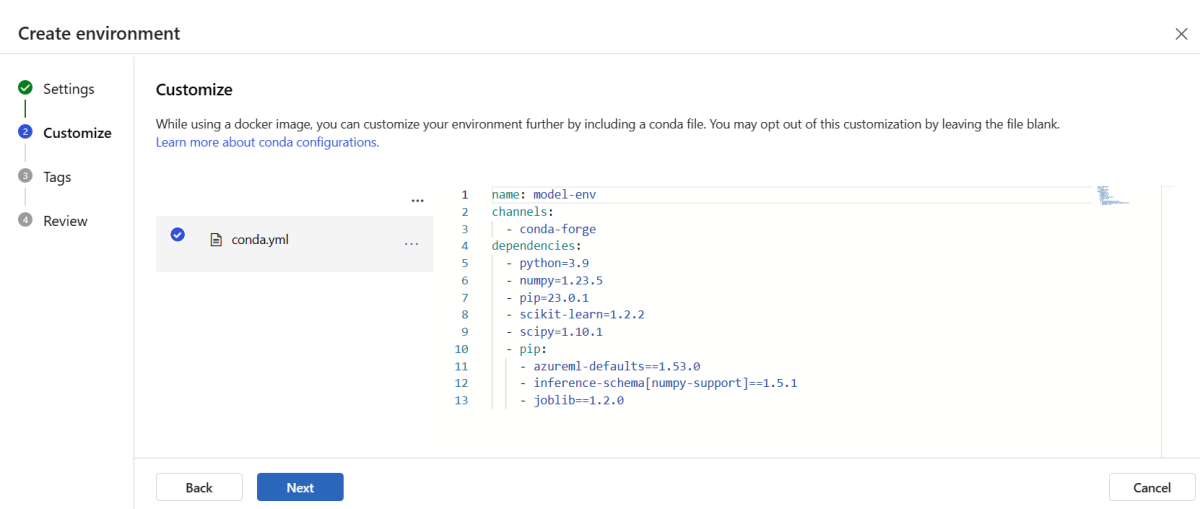
Select Next until you get to the Create page, and then select Create.
For more information on how to create an environment in the studio, see Create an environment.
- To register the model by using a template, you must first upload the model file to Blob Storage. The following example uses the
az storage blob upload-batch command to upload a file to the default storage for your workspace:
set -x

#<get_access_token>
TOKEN=$(az account get-access-token --query accessToken -o tsv)
#</get_access_token>

# <create_variables>
SUBSCRIPTION_ID=$(az account show --query id -o tsv)
LOCATION=$(az ml workspace show --query location -o tsv)
RESOURCE_GROUP=$(az group show --query name -o tsv)
WORKSPACE=$(az configure -l --query "[?name=='workspace'].value" -o tsv)
#</create_variables>

# <set_endpoint_name>
export ENDPOINT_NAME=endpoint-`echo $RANDOM`
# </set_endpoint_name>

#<api_version>
API_VERSION="2022-05-01"
#</api_version>

echo -e "Using:\nSUBSCRIPTION_ID=$SUBSCRIPTION_ID\nLOCATION=$LOCATION\nRESOURCE_GROUP=$RESOURCE_GROUP\nWORKSPACE=$WORKSPACE"

# define how to wait
wait_for_completion () {
    operation_id=$1
    status="unknown"

    if [[ $operation_id == "" || -z $operation_id  || $operation_id == "null" ]]; then
        echo "operation id cannot be empty"
        exit 1
    fi

    while [[ $status != "Succeeded" && $status != "Failed" ]]
    do
        echo "Getting operation status from: $operation_id"
        operation_result=$(curl --location --request GET $operation_id --header "Authorization: Bearer $TOKEN")
        # TODO error handling here
        status=$(echo $operation_result | jq -r '.status')
        echo "Current operation status: $status"
        sleep 5
    done

    if [[ $status == "Failed" ]]
    then
        error=$(echo $operation_result | jq -r '.error')
        echo "Error: $error"
    fi
}

# <get_storage_details>
# Get values for storage account
response=$(curl --location --request GET "https://management.chinacloudapi.cn/subscriptions/$SUBSCRIPTION_ID/resourceGroups/$RESOURCE_GROUP/providers/Microsoft.MachineLearningServices/workspaces/$WORKSPACE/datastores?api-version=$API_VERSION&isDefault=true" \
--header "Authorization: Bearer $TOKEN")
AZUREML_DEFAULT_DATASTORE=$(echo $response | jq -r '.value[0].name')
AZUREML_DEFAULT_CONTAINER=$(echo $response | jq -r '.value[0].properties.containerName')
export AZURE_STORAGE_ACCOUNT=$(echo $response | jq -r '.value[0].properties.accountName')
# </get_storage_details>

# <upload_code>
az storage blob upload-batch -d $AZUREML_DEFAULT_CONTAINER/score -s cli/endpoints/online/model-1/onlinescoring --account-name $AZURE_STORAGE_ACCOUNT
# </upload_code>

# <create_code>
az deployment group create -g $RESOURCE_GROUP \
--template-file arm-templates/code-version.json \
--parameters \
workspaceName=$WORKSPACE \
codeAssetName="score-sklearn" \
codeUri="https://$AZURE_STORAGE_ACCOUNT.blob.core.chinacloudapi.cn/$AZUREML_DEFAULT_CONTAINER/score"
# </create_code>

# <upload_model>
az storage blob upload-batch -d $AZUREML_DEFAULT_CONTAINER/model -s cli/endpoints/online/model-1/model --account-name $AZURE_STORAGE_ACCOUNT
# </upload_model>

# <create_model>
az deployment group create -g $RESOURCE_GROUP \
--template-file arm-templates/model-version.json \
--parameters \
workspaceName=$WORKSPACE \
modelAssetName="sklearn" \
modelUri="azureml://subscriptions/$SUBSCRIPTION_ID/resourceGroups/$RESOURCE_GROUP/workspaces/$WORKSPACE/datastores/$AZUREML_DEFAULT_DATASTORE/paths/model/sklearn_regression_model.pkl"
# </create_model>

# <read_condafile>
CONDA_FILE=$(cat cli/endpoints/online/model-1/environment/conda.yaml)
# </read_condafile>

# <create_environment>
ENV_VERSION=$RANDOM
az deployment group create -g $RESOURCE_GROUP \
--template-file arm-templates/environment-version.json \
--parameters \
workspaceName=$WORKSPACE \
environmentAssetName=sklearn-env \
environmentAssetVersion=$ENV_VERSION \
dockerImage=mcr.microsoft.com/azureml/openmpi3.1.2-ubuntu18.04:20210727.v1 \
condaFile="$CONDA_FILE"
# </create_environment>

# <create_endpoint>
az deployment group create -g $RESOURCE_GROUP \
--template-file arm-templates/online-endpoint.json \
--parameters \
workspaceName=$WORKSPACE \
onlineEndpointName=$ENDPOINT_NAME \
identityType=SystemAssigned \
authMode=AMLToken \
location=$LOCATION
# </create_endpoint>

# <get_endpoint>
response=$(curl --location --request GET "https://management.chinacloudapi.cn/subscriptions/$SUBSCRIPTION_ID/resourceGroups/$RESOURCE_GROUP/providers/Microsoft.MachineLearningServices/workspaces/$WORKSPACE/onlineEndpoints/$ENDPOINT_NAME?api-version=$API_VERSION" \
--header "Content-Type: application/json" \
--header "Authorization: Bearer $TOKEN")

operation_id=$(echo $response | jq -r '.properties.properties.AzureAsyncOperationUri')
wait_for_completion $operation_id
# </get_endpoint>

# <create_deployment>
resourceScope="/subscriptions/$SUBSCRIPTION_ID/resourceGroups/$RESOURCE_GROUP/providers/Microsoft.MachineLearningServices"
az deployment group create -g $RESOURCE_GROUP \
 --template-file arm-templates/online-endpoint-deployment.json \
 --parameters \
 workspaceName=$WORKSPACE \
 location=$LOCATION \
 onlineEndpointName=$ENDPOINT_NAME \
 onlineDeploymentName=blue \
 codeId="$resourceScope/workspaces/$WORKSPACE/codes/score-sklearn/versions/1" \
 scoringScript=score.py \
 environmentId="$resourceScope/workspaces/$WORKSPACE/environments/sklearn-env/versions/$ENV_VERSION" \
 model="$resourceScope/workspaces/$WORKSPACE/models/sklearn/versions/1" \
 endpointComputeType=Managed \
 skuName=Standard_F2s_v2 \
 skuCapacity=1
 # </create_deployment>

# <get_deployment>
response=$(curl --location --request GET "https://management.chinacloudapi.cn/subscriptions/$SUBSCRIPTION_ID/resourceGroups/$RESOURCE_GROUP/providers/Microsoft.MachineLearningServices/workspaces/$WORKSPACE/onlineEndpoints/$ENDPOINT_NAME/deployments/blue?api-version=$API_VERSION" \
--header "Content-Type: application/json" \
--header "Authorization: Bearer $TOKEN")

operation_id=$(echo $response | jq -r '.properties.properties.AzureAsyncOperationUri')
wait_for_completion $operation_id

scoringUri=$(echo $response | jq -r '.properties.scoringUri')
# </get_endpoint>

# <get_endpoint_access_token>
response=$(curl -H "Content-Length: 0" --location --request POST "https://management.chinacloudapi.cn/subscriptions/$SUBSCRIPTION_ID/resourceGroups/$RESOURCE_GROUP/providers/Microsoft.MachineLearningServices/workspaces/$WORKSPACE/onlineEndpoints/$ENDPOINT_NAME/token?api-version=$API_VERSION" \
--header "Authorization: Bearer $TOKEN")
accessToken=$(echo $response | jq -r '.accessToken')
# </get_endpoint_access_token>

# <score_endpoint>
curl --location --request POST $scoringUri \
--header "Authorization: Bearer $accessToken" \
--header "Content-Type: application/json" \
--data-raw @cli/endpoints/online/model-1/sample-request.json
# </score_endpoint>

# <get_deployment_logs>
curl --location --request POST "https://management.chinacloudapi.cn/subscriptions/$SUBSCRIPTION_ID/resourceGroups/$RESOURCE_GROUP/providers/Microsoft.MachineLearningServices/workspaces/$WORKSPACE/onlineEndpoints/$ENDPOINT_NAME/deployments/blue/getLogs?api-version=$API_VERSION" \
--header "Authorization: Bearer $TOKEN" \
--header "Content-Type: application/json" \
--data-raw "{ \"tail\": 100 }"
# </get_deployment_logs>

# <delete_endpoint>
curl --location --request DELETE "https://management.chinacloudapi.cn/subscriptions/$SUBSCRIPTION_ID/resourceGroups/$RESOURCE_GROUP/providers/Microsoft.MachineLearningServices/workspaces/$WORKSPACE/onlineEndpoints/$ENDPOINT_NAME?api-version=$API_VERSION" \
--header "Content-Type: application/json" \
--header "Authorization: Bearer $TOKEN" || true
# </delete_endpoint>
- After you upload the file, use the template to create a model registration. In the following example, the
modelUri parameter contains the path to the model:
set -x

#<get_access_token>
TOKEN=$(az account get-access-token --query accessToken -o tsv)
#</get_access_token>

# <create_variables>
SUBSCRIPTION_ID=$(az account show --query id -o tsv)
LOCATION=$(az ml workspace show --query location -o tsv)
RESOURCE_GROUP=$(az group show --query name -o tsv)
WORKSPACE=$(az configure -l --query "[?name=='workspace'].value" -o tsv)
#</create_variables>

# <set_endpoint_name>
export ENDPOINT_NAME=endpoint-`echo $RANDOM`
# </set_endpoint_name>

#<api_version>
API_VERSION="2022-05-01"
#</api_version>

echo -e "Using:\nSUBSCRIPTION_ID=$SUBSCRIPTION_ID\nLOCATION=$LOCATION\nRESOURCE_GROUP=$RESOURCE_GROUP\nWORKSPACE=$WORKSPACE"

# define how to wait
wait_for_completion () {
    operation_id=$1
    status="unknown"

    if [[ $operation_id == "" || -z $operation_id  || $operation_id == "null" ]]; then
        echo "operation id cannot be empty"
        exit 1
    fi

    while [[ $status != "Succeeded" && $status != "Failed" ]]
    do
        echo "Getting operation status from: $operation_id"
        operation_result=$(curl --location --request GET $operation_id --header "Authorization: Bearer $TOKEN")
        # TODO error handling here
        status=$(echo $operation_result | jq -r '.status')
        echo "Current operation status: $status"
        sleep 5
    done

    if [[ $status == "Failed" ]]
    then
        error=$(echo $operation_result | jq -r '.error')
        echo "Error: $error"
    fi
}

# <get_storage_details>
# Get values for storage account
response=$(curl --location --request GET "https://management.chinacloudapi.cn/subscriptions/$SUBSCRIPTION_ID/resourceGroups/$RESOURCE_GROUP/providers/Microsoft.MachineLearningServices/workspaces/$WORKSPACE/datastores?api-version=$API_VERSION&isDefault=true" \
--header "Authorization: Bearer $TOKEN")
AZUREML_DEFAULT_DATASTORE=$(echo $response | jq -r '.value[0].name')
AZUREML_DEFAULT_CONTAINER=$(echo $response | jq -r '.value[0].properties.containerName')
export AZURE_STORAGE_ACCOUNT=$(echo $response | jq -r '.value[0].properties.accountName')
# </get_storage_details>

# <upload_code>
az storage blob upload-batch -d $AZUREML_DEFAULT_CONTAINER/score -s cli/endpoints/online/model-1/onlinescoring --account-name $AZURE_STORAGE_ACCOUNT
# </upload_code>

# <create_code>
az deployment group create -g $RESOURCE_GROUP \
--template-file arm-templates/code-version.json \
--parameters \
workspaceName=$WORKSPACE \
codeAssetName="score-sklearn" \
codeUri="https://$AZURE_STORAGE_ACCOUNT.blob.core.chinacloudapi.cn/$AZUREML_DEFAULT_CONTAINER/score"
# </create_code>

# <upload_model>
az storage blob upload-batch -d $AZUREML_DEFAULT_CONTAINER/model -s cli/endpoints/online/model-1/model --account-name $AZURE_STORAGE_ACCOUNT
# </upload_model>

# <create_model>
az deployment group create -g $RESOURCE_GROUP \
--template-file arm-templates/model-version.json \
--parameters \
workspaceName=$WORKSPACE \
modelAssetName="sklearn" \
modelUri="azureml://subscriptions/$SUBSCRIPTION_ID/resourceGroups/$RESOURCE_GROUP/workspaces/$WORKSPACE/datastores/$AZUREML_DEFAULT_DATASTORE/paths/model/sklearn_regression_model.pkl"
# </create_model>

# <read_condafile>
CONDA_FILE=$(cat cli/endpoints/online/model-1/environment/conda.yaml)
# </read_condafile>

# <create_environment>
ENV_VERSION=$RANDOM
az deployment group create -g $RESOURCE_GROUP \
--template-file arm-templates/environment-version.json \
--parameters \
workspaceName=$WORKSPACE \
environmentAssetName=sklearn-env \
environmentAssetVersion=$ENV_VERSION \
dockerImage=mcr.microsoft.com/azureml/openmpi3.1.2-ubuntu18.04:20210727.v1 \
condaFile="$CONDA_FILE"
# </create_environment>

# <create_endpoint>
az deployment group create -g $RESOURCE_GROUP \
--template-file arm-templates/online-endpoint.json \
--parameters \
workspaceName=$WORKSPACE \
onlineEndpointName=$ENDPOINT_NAME \
identityType=SystemAssigned \
authMode=AMLToken \
location=$LOCATION
# </create_endpoint>

# <get_endpoint>
response=$(curl --location --request GET "https://management.chinacloudapi.cn/subscriptions/$SUBSCRIPTION_ID/resourceGroups/$RESOURCE_GROUP/providers/Microsoft.MachineLearningServices/workspaces/$WORKSPACE/onlineEndpoints/$ENDPOINT_NAME?api-version=$API_VERSION" \
--header "Content-Type: application/json" \
--header "Authorization: Bearer $TOKEN")

operation_id=$(echo $response | jq -r '.properties.properties.AzureAsyncOperationUri')
wait_for_completion $operation_id
# </get_endpoint>

# <create_deployment>
resourceScope="/subscriptions/$SUBSCRIPTION_ID/resourceGroups/$RESOURCE_GROUP/providers/Microsoft.MachineLearningServices"
az deployment group create -g $RESOURCE_GROUP \
 --template-file arm-templates/online-endpoint-deployment.json \
 --parameters \
 workspaceName=$WORKSPACE \
 location=$LOCATION \
 onlineEndpointName=$ENDPOINT_NAME \
 onlineDeploymentName=blue \
 codeId="$resourceScope/workspaces/$WORKSPACE/codes/score-sklearn/versions/1" \
 scoringScript=score.py \
 environmentId="$resourceScope/workspaces/$WORKSPACE/environments/sklearn-env/versions/$ENV_VERSION" \
 model="$resourceScope/workspaces/$WORKSPACE/models/sklearn/versions/1" \
 endpointComputeType=Managed \
 skuName=Standard_F2s_v2 \
 skuCapacity=1
 # </create_deployment>

# <get_deployment>
response=$(curl --location --request GET "https://management.chinacloudapi.cn/subscriptions/$SUBSCRIPTION_ID/resourceGroups/$RESOURCE_GROUP/providers/Microsoft.MachineLearningServices/workspaces/$WORKSPACE/onlineEndpoints/$ENDPOINT_NAME/deployments/blue?api-version=$API_VERSION" \
--header "Content-Type: application/json" \
--header "Authorization: Bearer $TOKEN")

operation_id=$(echo $response | jq -r '.properties.properties.AzureAsyncOperationUri')
wait_for_completion $operation_id

scoringUri=$(echo $response | jq -r '.properties.scoringUri')
# </get_endpoint>

# <get_endpoint_access_token>
response=$(curl -H "Content-Length: 0" --location --request POST "https://management.chinacloudapi.cn/subscriptions/$SUBSCRIPTION_ID/resourceGroups/$RESOURCE_GROUP/providers/Microsoft.MachineLearningServices/workspaces/$WORKSPACE/onlineEndpoints/$ENDPOINT_NAME/token?api-version=$API_VERSION" \
--header "Authorization: Bearer $TOKEN")
accessToken=$(echo $response | jq -r '.accessToken')
# </get_endpoint_access_token>

# <score_endpoint>
curl --location --request POST $scoringUri \
--header "Authorization: Bearer $accessToken" \
--header "Content-Type: application/json" \
--data-raw @cli/endpoints/online/model-1/sample-request.json
# </score_endpoint>

# <get_deployment_logs>
curl --location --request POST "https://management.chinacloudapi.cn/subscriptions/$SUBSCRIPTION_ID/resourceGroups/$RESOURCE_GROUP/providers/Microsoft.MachineLearningServices/workspaces/$WORKSPACE/onlineEndpoints/$ENDPOINT_NAME/deployments/blue/getLogs?api-version=$API_VERSION" \
--header "Authorization: Bearer $TOKEN" \
--header "Content-Type: application/json" \
--data-raw "{ \"tail\": 100 }"
# </get_deployment_logs>

# <delete_endpoint>
curl --location --request DELETE "https://management.chinacloudapi.cn/subscriptions/$SUBSCRIPTION_ID/resourceGroups/$RESOURCE_GROUP/providers/Microsoft.MachineLearningServices/workspaces/$WORKSPACE/onlineEndpoints/$ENDPOINT_NAME?api-version=$API_VERSION" \
--header "Content-Type: application/json" \
--header "Authorization: Bearer $TOKEN" || true
# </delete_endpoint>
- Part of the environment is a conda file that specifies the model dependencies that are needed to host the model. The following example demonstrates how to read the contents of the conda file into environment variables:
set -x

#<get_access_token>
TOKEN=$(az account get-access-token --query accessToken -o tsv)
#</get_access_token>

# <create_variables>
SUBSCRIPTION_ID=$(az account show --query id -o tsv)
LOCATION=$(az ml workspace show --query location -o tsv)
RESOURCE_GROUP=$(az group show --query name -o tsv)
WORKSPACE=$(az configure -l --query "[?name=='workspace'].value" -o tsv)
#</create_variables>

# <set_endpoint_name>
export ENDPOINT_NAME=endpoint-`echo $RANDOM`
# </set_endpoint_name>

#<api_version>
API_VERSION="2022-05-01"
#</api_version>

echo -e "Using:\nSUBSCRIPTION_ID=$SUBSCRIPTION_ID\nLOCATION=$LOCATION\nRESOURCE_GROUP=$RESOURCE_GROUP\nWORKSPACE=$WORKSPACE"

# define how to wait
wait_for_completion () {
    operation_id=$1
    status="unknown"

    if [[ $operation_id == "" || -z $operation_id  || $operation_id == "null" ]]; then
        echo "operation id cannot be empty"
        exit 1
    fi

    while [[ $status != "Succeeded" && $status != "Failed" ]]
    do
        echo "Getting operation status from: $operation_id"
        operation_result=$(curl --location --request GET $operation_id --header "Authorization: Bearer $TOKEN")
        # TODO error handling here
        status=$(echo $operation_result | jq -r '.status')
        echo "Current operation status: $status"
        sleep 5
    done

    if [[ $status == "Failed" ]]
    then
        error=$(echo $operation_result | jq -r '.error')
        echo "Error: $error"
    fi
}

# <get_storage_details>
# Get values for storage account
response=$(curl --location --request GET "https://management.chinacloudapi.cn/subscriptions/$SUBSCRIPTION_ID/resourceGroups/$RESOURCE_GROUP/providers/Microsoft.MachineLearningServices/workspaces/$WORKSPACE/datastores?api-version=$API_VERSION&isDefault=true" \
--header "Authorization: Bearer $TOKEN")
AZUREML_DEFAULT_DATASTORE=$(echo $response | jq -r '.value[0].name')
AZUREML_DEFAULT_CONTAINER=$(echo $response | jq -r '.value[0].properties.containerName')
export AZURE_STORAGE_ACCOUNT=$(echo $response | jq -r '.value[0].properties.accountName')
# </get_storage_details>

# <upload_code>
az storage blob upload-batch -d $AZUREML_DEFAULT_CONTAINER/score -s cli/endpoints/online/model-1/onlinescoring --account-name $AZURE_STORAGE_ACCOUNT
# </upload_code>

# <create_code>
az deployment group create -g $RESOURCE_GROUP \
--template-file arm-templates/code-version.json \
--parameters \
workspaceName=$WORKSPACE \
codeAssetName="score-sklearn" \
codeUri="https://$AZURE_STORAGE_ACCOUNT.blob.core.chinacloudapi.cn/$AZUREML_DEFAULT_CONTAINER/score"
# </create_code>

# <upload_model>
az storage blob upload-batch -d $AZUREML_DEFAULT_CONTAINER/model -s cli/endpoints/online/model-1/model --account-name $AZURE_STORAGE_ACCOUNT
# </upload_model>

# <create_model>
az deployment group create -g $RESOURCE_GROUP \
--template-file arm-templates/model-version.json \
--parameters \
workspaceName=$WORKSPACE \
modelAssetName="sklearn" \
modelUri="azureml://subscriptions/$SUBSCRIPTION_ID/resourceGroups/$RESOURCE_GROUP/workspaces/$WORKSPACE/datastores/$AZUREML_DEFAULT_DATASTORE/paths/model/sklearn_regression_model.pkl"
# </create_model>

# <read_condafile>
CONDA_FILE=$(cat cli/endpoints/online/model-1/environment/conda.yaml)
# </read_condafile>

# <create_environment>
ENV_VERSION=$RANDOM
az deployment group create -g $RESOURCE_GROUP \
--template-file arm-templates/environment-version.json \
--parameters \
workspaceName=$WORKSPACE \
environmentAssetName=sklearn-env \
environmentAssetVersion=$ENV_VERSION \
dockerImage=mcr.microsoft.com/azureml/openmpi3.1.2-ubuntu18.04:20210727.v1 \
condaFile="$CONDA_FILE"
# </create_environment>

# <create_endpoint>
az deployment group create -g $RESOURCE_GROUP \
--template-file arm-templates/online-endpoint.json \
--parameters \
workspaceName=$WORKSPACE \
onlineEndpointName=$ENDPOINT_NAME \
identityType=SystemAssigned \
authMode=AMLToken \
location=$LOCATION
# </create_endpoint>

# <get_endpoint>
response=$(curl --location --request GET "https://management.chinacloudapi.cn/subscriptions/$SUBSCRIPTION_ID/resourceGroups/$RESOURCE_GROUP/providers/Microsoft.MachineLearningServices/workspaces/$WORKSPACE/onlineEndpoints/$ENDPOINT_NAME?api-version=$API_VERSION" \
--header "Content-Type: application/json" \
--header "Authorization: Bearer $TOKEN")

operation_id=$(echo $response | jq -r '.properties.properties.AzureAsyncOperationUri')
wait_for_completion $operation_id
# </get_endpoint>

# <create_deployment>
resourceScope="/subscriptions/$SUBSCRIPTION_ID/resourceGroups/$RESOURCE_GROUP/providers/Microsoft.MachineLearningServices"
az deployment group create -g $RESOURCE_GROUP \
 --template-file arm-templates/online-endpoint-deployment.json \
 --parameters \
 workspaceName=$WORKSPACE \
 location=$LOCATION \
 onlineEndpointName=$ENDPOINT_NAME \
 onlineDeploymentName=blue \
 codeId="$resourceScope/workspaces/$WORKSPACE/codes/score-sklearn/versions/1" \
 scoringScript=score.py \
 environmentId="$resourceScope/workspaces/$WORKSPACE/environments/sklearn-env/versions/$ENV_VERSION" \
 model="$resourceScope/workspaces/$WORKSPACE/models/sklearn/versions/1" \
 endpointComputeType=Managed \
 skuName=Standard_F2s_v2 \
 skuCapacity=1
 # </create_deployment>

# <get_deployment>
response=$(curl --location --request GET "https://management.chinacloudapi.cn/subscriptions/$SUBSCRIPTION_ID/resourceGroups/$RESOURCE_GROUP/providers/Microsoft.MachineLearningServices/workspaces/$WORKSPACE/onlineEndpoints/$ENDPOINT_NAME/deployments/blue?api-version=$API_VERSION" \
--header "Content-Type: application/json" \
--header "Authorization: Bearer $TOKEN")

operation_id=$(echo $response | jq -r '.properties.properties.AzureAsyncOperationUri')
wait_for_completion $operation_id

scoringUri=$(echo $response | jq -r '.properties.scoringUri')
# </get_endpoint>

# <get_endpoint_access_token>
response=$(curl -H "Content-Length: 0" --location --request POST "https://management.chinacloudapi.cn/subscriptions/$SUBSCRIPTION_ID/resourceGroups/$RESOURCE_GROUP/providers/Microsoft.MachineLearningServices/workspaces/$WORKSPACE/onlineEndpoints/$ENDPOINT_NAME/token?api-version=$API_VERSION" \
--header "Authorization: Bearer $TOKEN")
accessToken=$(echo $response | jq -r '.accessToken')
# </get_endpoint_access_token>

# <score_endpoint>
curl --location --request POST $scoringUri \
--header "Authorization: Bearer $accessToken" \
--header "Content-Type: application/json" \
--data-raw @cli/endpoints/online/model-1/sample-request.json
# </score_endpoint>

# <get_deployment_logs>
curl --location --request POST "https://management.chinacloudapi.cn/subscriptions/$SUBSCRIPTION_ID/resourceGroups/$RESOURCE_GROUP/providers/Microsoft.MachineLearningServices/workspaces/$WORKSPACE/onlineEndpoints/$ENDPOINT_NAME/deployments/blue/getLogs?api-version=$API_VERSION" \
--header "Authorization: Bearer $TOKEN" \
--header "Content-Type: application/json" \
--data-raw "{ \"tail\": 100 }"
# </get_deployment_logs>

# <delete_endpoint>
curl --location --request DELETE "https://management.chinacloudapi.cn/subscriptions/$SUBSCRIPTION_ID/resourceGroups/$RESOURCE_GROUP/providers/Microsoft.MachineLearningServices/workspaces/$WORKSPACE/onlineEndpoints/$ENDPOINT_NAME?api-version=$API_VERSION" \
--header "Content-Type: application/json" \
--header "Authorization: Bearer $TOKEN" || true
# </delete_endpoint>
- The following example demonstrates how to use the template to register the environment. The contents of the conda file from the previous step are passed to the template by using the
condaFile parameter:
set -x

#<get_access_token>
TOKEN=$(az account get-access-token --query accessToken -o tsv)
#</get_access_token>

# <create_variables>
SUBSCRIPTION_ID=$(az account show --query id -o tsv)
LOCATION=$(az ml workspace show --query location -o tsv)
RESOURCE_GROUP=$(az group show --query name -o tsv)
WORKSPACE=$(az configure -l --query "[?name=='workspace'].value" -o tsv)
#</create_variables>

# <set_endpoint_name>
export ENDPOINT_NAME=endpoint-`echo $RANDOM`
# </set_endpoint_name>

#<api_version>
API_VERSION="2022-05-01"
#</api_version>

echo -e "Using:\nSUBSCRIPTION_ID=$SUBSCRIPTION_ID\nLOCATION=$LOCATION\nRESOURCE_GROUP=$RESOURCE_GROUP\nWORKSPACE=$WORKSPACE"

# define how to wait
wait_for_completion () {
    operation_id=$1
    status="unknown"

    if [[ $operation_id == "" || -z $operation_id  || $operation_id == "null" ]]; then
        echo "operation id cannot be empty"
        exit 1
    fi

    while [[ $status != "Succeeded" && $status != "Failed" ]]
    do
        echo "Getting operation status from: $operation_id"
        operation_result=$(curl --location --request GET $operation_id --header "Authorization: Bearer $TOKEN")
        # TODO error handling here
        status=$(echo $operation_result | jq -r '.status')
        echo "Current operation status: $status"
        sleep 5
    done

    if [[ $status == "Failed" ]]
    then
        error=$(echo $operation_result | jq -r '.error')
        echo "Error: $error"
    fi
}

# <get_storage_details>
# Get values for storage account
response=$(curl --location --request GET "https://management.chinacloudapi.cn/subscriptions/$SUBSCRIPTION_ID/resourceGroups/$RESOURCE_GROUP/providers/Microsoft.MachineLearningServices/workspaces/$WORKSPACE/datastores?api-version=$API_VERSION&isDefault=true" \
--header "Authorization: Bearer $TOKEN")
AZUREML_DEFAULT_DATASTORE=$(echo $response | jq -r '.value[0].name')
AZUREML_DEFAULT_CONTAINER=$(echo $response | jq -r '.value[0].properties.containerName')
export AZURE_STORAGE_ACCOUNT=$(echo $response | jq -r '.value[0].properties.accountName')
# </get_storage_details>

# <upload_code>
az storage blob upload-batch -d $AZUREML_DEFAULT_CONTAINER/score -s cli/endpoints/online/model-1/onlinescoring --account-name $AZURE_STORAGE_ACCOUNT
# </upload_code>

# <create_code>
az deployment group create -g $RESOURCE_GROUP \
--template-file arm-templates/code-version.json \
--parameters \
workspaceName=$WORKSPACE \
codeAssetName="score-sklearn" \
codeUri="https://$AZURE_STORAGE_ACCOUNT.blob.core.chinacloudapi.cn/$AZUREML_DEFAULT_CONTAINER/score"
# </create_code>

# <upload_model>
az storage blob upload-batch -d $AZUREML_DEFAULT_CONTAINER/model -s cli/endpoints/online/model-1/model --account-name $AZURE_STORAGE_ACCOUNT
# </upload_model>

# <create_model>
az deployment group create -g $RESOURCE_GROUP \
--template-file arm-templates/model-version.json \
--parameters \
workspaceName=$WORKSPACE \
modelAssetName="sklearn" \
modelUri="azureml://subscriptions/$SUBSCRIPTION_ID/resourceGroups/$RESOURCE_GROUP/workspaces/$WORKSPACE/datastores/$AZUREML_DEFAULT_DATASTORE/paths/model/sklearn_regression_model.pkl"
# </create_model>

# <read_condafile>
CONDA_FILE=$(cat cli/endpoints/online/model-1/environment/conda.yaml)
# </read_condafile>

# <create_environment>
ENV_VERSION=$RANDOM
az deployment group create -g $RESOURCE_GROUP \
--template-file arm-templates/environment-version.json \
--parameters \
workspaceName=$WORKSPACE \
environmentAssetName=sklearn-env \
environmentAssetVersion=$ENV_VERSION \
dockerImage=mcr.microsoft.com/azureml/openmpi3.1.2-ubuntu18.04:20210727.v1 \
condaFile="$CONDA_FILE"
# </create_environment>

# <create_endpoint>
az deployment group create -g $RESOURCE_GROUP \
--template-file arm-templates/online-endpoint.json \
--parameters \
workspaceName=$WORKSPACE \
onlineEndpointName=$ENDPOINT_NAME \
identityType=SystemAssigned \
authMode=AMLToken \
location=$LOCATION
# </create_endpoint>

# <get_endpoint>
response=$(curl --location --request GET "https://management.chinacloudapi.cn/subscriptions/$SUBSCRIPTION_ID/resourceGroups/$RESOURCE_GROUP/providers/Microsoft.MachineLearningServices/workspaces/$WORKSPACE/onlineEndpoints/$ENDPOINT_NAME?api-version=$API_VERSION" \
--header "Content-Type: application/json" \
--header "Authorization: Bearer $TOKEN")

operation_id=$(echo $response | jq -r '.properties.properties.AzureAsyncOperationUri')
wait_for_completion $operation_id
# </get_endpoint>

# <create_deployment>
resourceScope="/subscriptions/$SUBSCRIPTION_ID/resourceGroups/$RESOURCE_GROUP/providers/Microsoft.MachineLearningServices"
az deployment group create -g $RESOURCE_GROUP \
 --template-file arm-templates/online-endpoint-deployment.json \
 --parameters \
 workspaceName=$WORKSPACE \
 location=$LOCATION \
 onlineEndpointName=$ENDPOINT_NAME \
 onlineDeploymentName=blue \
 codeId="$resourceScope/workspaces/$WORKSPACE/codes/score-sklearn/versions/1" \
 scoringScript=score.py \
 environmentId="$resourceScope/workspaces/$WORKSPACE/environments/sklearn-env/versions/$ENV_VERSION" \
 model="$resourceScope/workspaces/$WORKSPACE/models/sklearn/versions/1" \
 endpointComputeType=Managed \
 skuName=Standard_F2s_v2 \
 skuCapacity=1
 # </create_deployment>

# <get_deployment>
response=$(curl --location --request GET "https://management.chinacloudapi.cn/subscriptions/$SUBSCRIPTION_ID/resourceGroups/$RESOURCE_GROUP/providers/Microsoft.MachineLearningServices/workspaces/$WORKSPACE/onlineEndpoints/$ENDPOINT_NAME/deployments/blue?api-version=$API_VERSION" \
--header "Content-Type: application/json" \
--header "Authorization: Bearer $TOKEN")

operation_id=$(echo $response | jq -r '.properties.properties.AzureAsyncOperationUri')
wait_for_completion $operation_id

scoringUri=$(echo $response | jq -r '.properties.scoringUri')
# </get_endpoint>

# <get_endpoint_access_token>
response=$(curl -H "Content-Length: 0" --location --request POST "https://management.chinacloudapi.cn/subscriptions/$SUBSCRIPTION_ID/resourceGroups/$RESOURCE_GROUP/providers/Microsoft.MachineLearningServices/workspaces/$WORKSPACE/onlineEndpoints/$ENDPOINT_NAME/token?api-version=$API_VERSION" \
--header "Authorization: Bearer $TOKEN")
accessToken=$(echo $response | jq -r '.accessToken')
# </get_endpoint_access_token>

# <score_endpoint>
curl --location --request POST $scoringUri \
--header "Authorization: Bearer $accessToken" \
--header "Content-Type: application/json" \
--data-raw @cli/endpoints/online/model-1/sample-request.json
# </score_endpoint>

# <get_deployment_logs>
curl --location --request POST "https://management.chinacloudapi.cn/subscriptions/$SUBSCRIPTION_ID/resourceGroups/$RESOURCE_GROUP/providers/Microsoft.MachineLearningServices/workspaces/$WORKSPACE/onlineEndpoints/$ENDPOINT_NAME/deployments/blue/getLogs?api-version=$API_VERSION" \
--header "Authorization: Bearer $TOKEN" \
--header "Content-Type: application/json" \
--data-raw "{ \"tail\": 100 }"
# </get_deployment_logs>

# <delete_endpoint>
curl --location --request DELETE "https://management.chinacloudapi.cn/subscriptions/$SUBSCRIPTION_ID/resourceGroups/$RESOURCE_GROUP/providers/Microsoft.MachineLearningServices/workspaces/$WORKSPACE/onlineEndpoints/$ENDPOINT_NAME?api-version=$API_VERSION" \
--header "Content-Type: application/json" \
--header "Authorization: Bearer $TOKEN" || true
# </delete_endpoint>
Important
When you define a custom environment for your deployment, ensure that the azureml-inference-server-http package is included in the conda file. This package is essential for the inference server to function properly. If you're unfamiliar with how to create your own custom environment, use one of our curated environments such as minimal-py-inference (for custom models that don't use mlflow) or mlflow-py-inference (for models that use mlflow). You can find these curated environments on the Environments tab of your instance of Azure Machine Learning studio. Alternatively, you can use a purpose-built inference base image like mcr.microsoft.com/azureml/minimal-py312-inference:latest for a lighter-weight custom environment.
Your deployment configuration uses the registered model that you want to deploy and your registered environment.
Use the registered assets (model and environment) in your deployment definition. The following snippet shows the endpoints/online/managed/sample/blue-deployment-with-registered-assets.yml file, with all the required inputs to configure a deployment:
$schema: https://azuremlschemas.azureedge.net/latest/managedOnlineDeployment.schema.json
name: blue
endpoint_name: my-endpoint
model: azureml:my-model:1
code_configuration:
  code: ../../model-1/onlinescoring/
  scoring_script: score.py
environment: azureml:my-env:1
instance_type: Standard_DS3_v2
instance_count: 1
To configure a deployment, use the registered model and environment:
model = "azureml:my-model:1"
env = "azureml:my-env:1"

blue_deployment_with_registered_assets = ManagedOnlineDeployment(
    name="blue",
    endpoint_name=endpoint_name,
    model=model,
    environment=env,
    code_configuration=CodeConfiguration(
        code="../model-1/onlinescoring", scoring_script="score.py"
    ),
    instance_type="Standard_DS3_v2",
    instance_count=1,
)
When you deploy from the studio, you create an endpoint and a deployment to add to it. At that time, you're prompted to enter names for the endpoint and deployment.
Use different CPU and GPU instance types and images
You can specify the CPU or GPU instance types and images in your deployment definition for both local deployment and deployment to Azure.
Your deployment definition in the blue-deployment-with-registered-assets.yml file used a general-purpose type Standard_DS3_v2 instance and the non-GPU Docker image mcr.microsoft.com/azureml/openmpi4.1.0-ubuntu22.04:latest. For GPU compute, choose a GPU compute type version and a GPU Docker image.
For supported general-purpose and GPU instance types, see Managed online endpoints SKU list. For a list of Azure Machine Learning CPU and GPU base images, see Azure Machine Learning base images.
You can specify the CPU or GPU instance types and images in your deployment configuration for both local deployment and deployment to Azure.
Earlier, you configured a deployment that used a general-purpose type Standard_DS3_v2 instance and a non-GPU Docker image mcr.microsoft.com/azureml/openmpi4.1.0-ubuntu22.04:latest. For GPU compute, choose a GPU compute type version and a GPU Docker image.
For supported general-purpose and GPU instance types, see Managed online endpoints SKU list. For a list of Azure Machine Learning CPU and GPU base images, see Azure Machine Learning base images.
The preceding registration of the environment specifies a non-GPU Docker image mcr.microsoft.com/azureml/openmpi4.1.0-ubuntu22.04:latest by passing the value to the environment-version.json template by using the dockerImage parameter. For a GPU compute, provide a value for a GPU Docker image to the template (use the dockerImage parameter) and provide a GPU compute type version to the online-endpoint-deployment.json template (use the skuName parameter).
For supported general-purpose and GPU instance types, see Managed online endpoints SKU list. For a list of Azure Machine Learning CPU and GPU base images, see Azure Machine Learning base images.
Next, deploy your online endpoint to Azure.
Deploy to Azure
Create the endpoint in the Azure cloud:
az ml online-endpoint create --name $ENDPOINT_NAME -f endpoints/online/managed/sample/endpoint.yml
Create the deployment named blue under the endpoint:
az ml online-deployment create --name blue --endpoint $ENDPOINT_NAME -f endpoints/online/managed/sample/blue-deployment-with-registered-assets.yml --all-traffic
The deployment creation can take up to 15 minutes, depending on whether the underlying environment or image is being built for the first time. Subsequent deployments that use the same environment are processed faster.
If you prefer not to block your CLI console, you can add the flag --no-wait to the command. However, this option stops the interactive display of the deployment status.
The --all-traffic flag in the code az ml online-deployment create that's used to create the deployment allocates 100% of the endpoint traffic to the newly created blue deployment. Using this flag is helpful for development and testing purposes, but for production, you might want to route traffic to the new deployment through an explicit command. For example, use az ml online-endpoint update -n $ENDPOINT_NAME --traffic "blue=100".
Create the endpoint:
By using the endpoint parameter that you defined earlier and the MLClient parameter that you created earlier, you can now create the endpoint in the workspace. This command starts the endpoint creation and returns a confirmation response while the endpoint creation continues.
ml_client.online_endpoints.begin_create_or_update(endpoint)
Create the deployment:
By using the blue_deployment_with_registered_assets parameter that you defined earlier and the MLClient parameter that you created earlier, you can now create the deployment in the workspace. This command starts the deployment creation and returns a confirmation response while the deployment creation continues.
ml_client.online_deployments.begin_create_or_update(blue_deployment_with_registered_assets)
If you prefer not to block your Python console, you can add the flag no_wait=True to the parameters. However, this option stops the interactive display of the deployment status.
# blue deployment takes 100 traffic
endpoint.traffic = {"blue": 100}
ml_client.online_endpoints.begin_create_or_update(endpoint)
Create a managed online endpoint and deployment
Use the studio to create a managed online endpoint directly in your browser. When you create a managed online endpoint in the studio, you must define an initial deployment. You can't create an empty managed online endpoint.
One way to create a managed online endpoint in the studio is from the Models page. This method also provides an easy way to add a model to an existing managed online deployment. To deploy the model named model-1 that you registered previously in the Register your model and environment section:
Go to Azure Machine Learning studio.
On the left pane, select the Models page.
Select the model named model-1.
Select Deploy > Real-time endpoint.
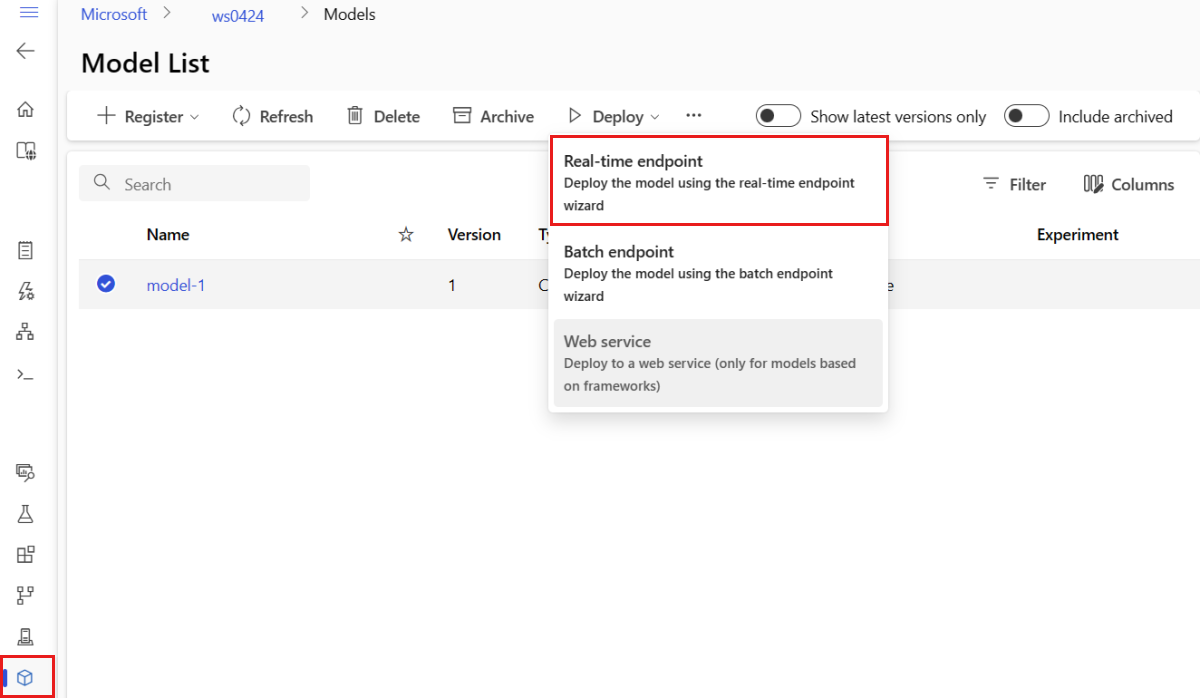
This action opens up a window where you can specify details about your endpoint.
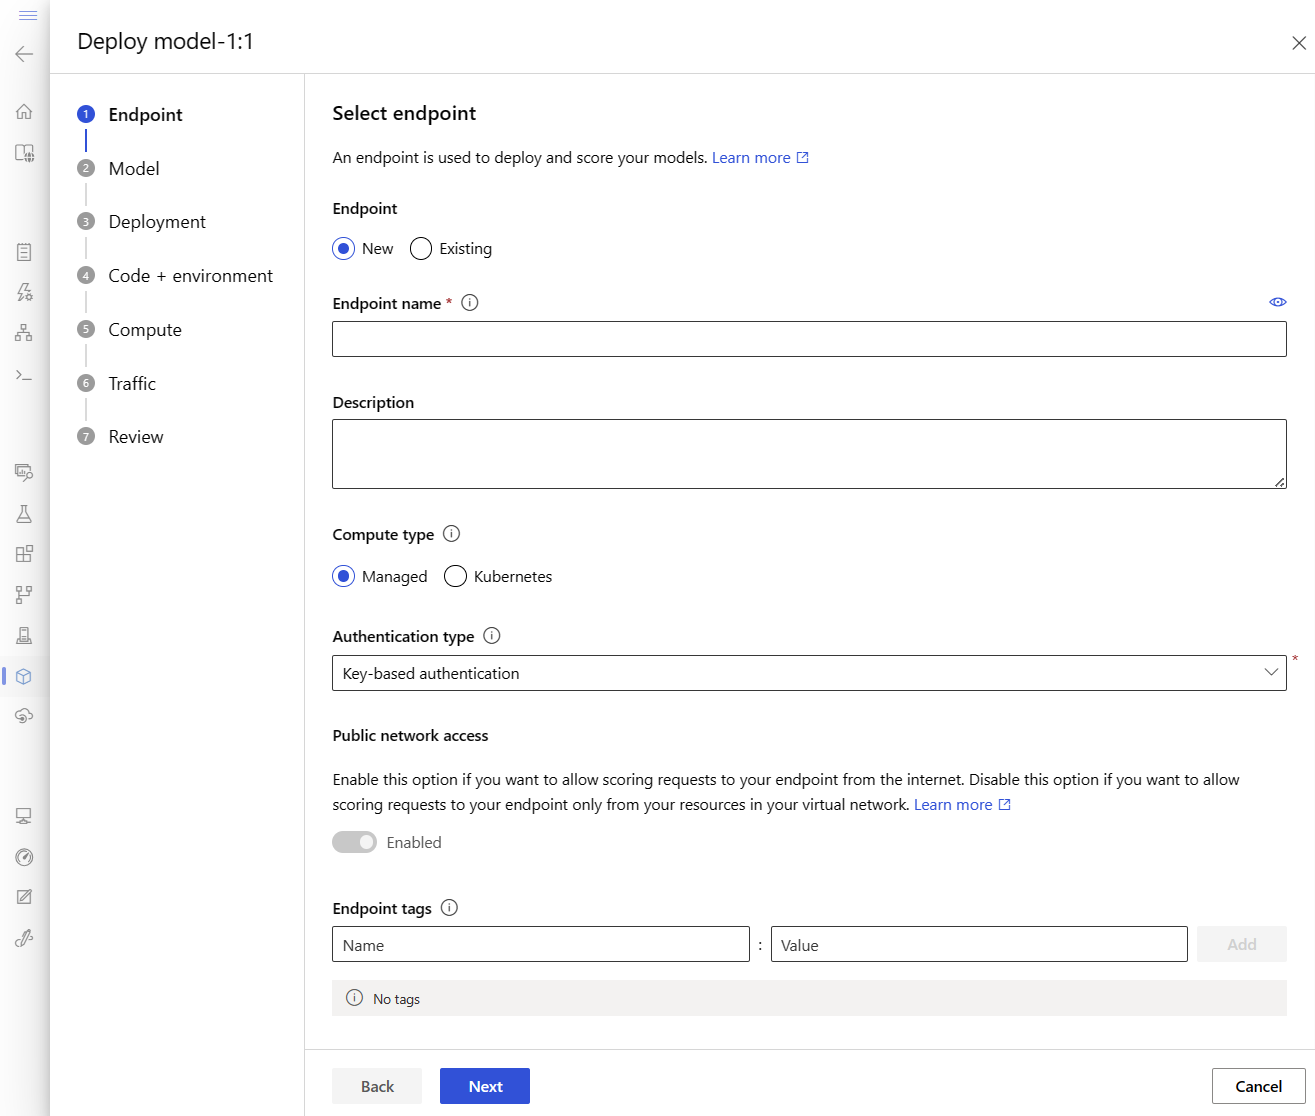
Enter an endpoint name that's unique in the Azure region. For more information on the naming rules, see Endpoint limits.
Keep the default selection: Managed for the compute type.
Keep the default selection: key-based authentication for the authentication type. For more information on authenticating, see Authenticate clients for online endpoints.
Select Next until you get to the Deployment page. Toggle Application Insights diagnostics to Enabled so that you can view graphs of your endpoint's activities in the studio later and analyze metrics and logs by using Application Insights.
Select Next to go to the Code + environment page. Select the following options:
- Select a scoring script for inferencing: Browse and select the \azureml-examples\cli\endpoints\online\model-1\onlinescoring\score.py file from the repo that you cloned or downloaded earlier.
- Select environment section: Select Custom environments and then select the my-env:1 environment that you created earlier.
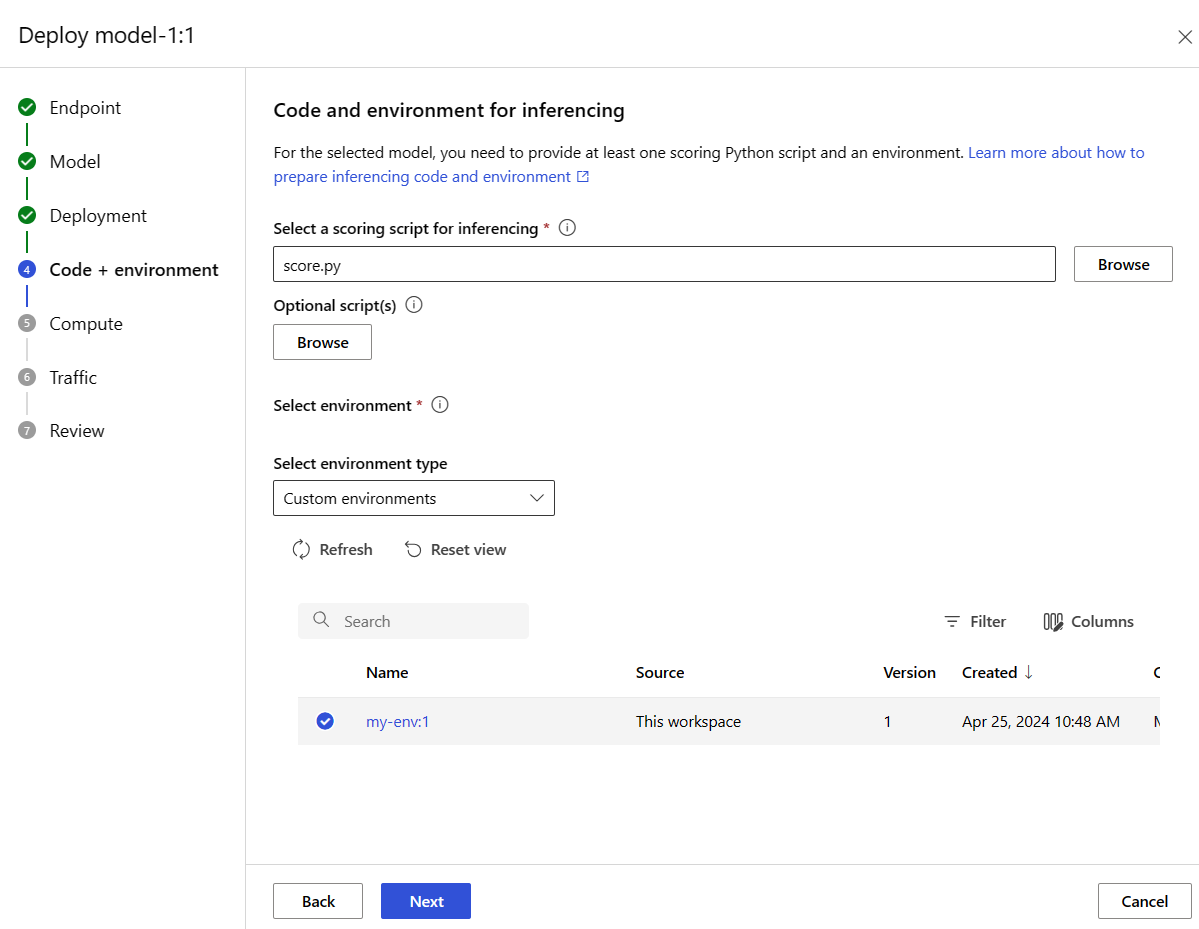
Select Next, and accept defaults until you're prompted to create the deployment.
Review your deployment settings and select Create.
Alternatively, you can create a managed online endpoint from the Endpoints page in the studio.
Go to Azure Machine Learning studio.
On the left pane, select the Endpoints page.
Select + Create.
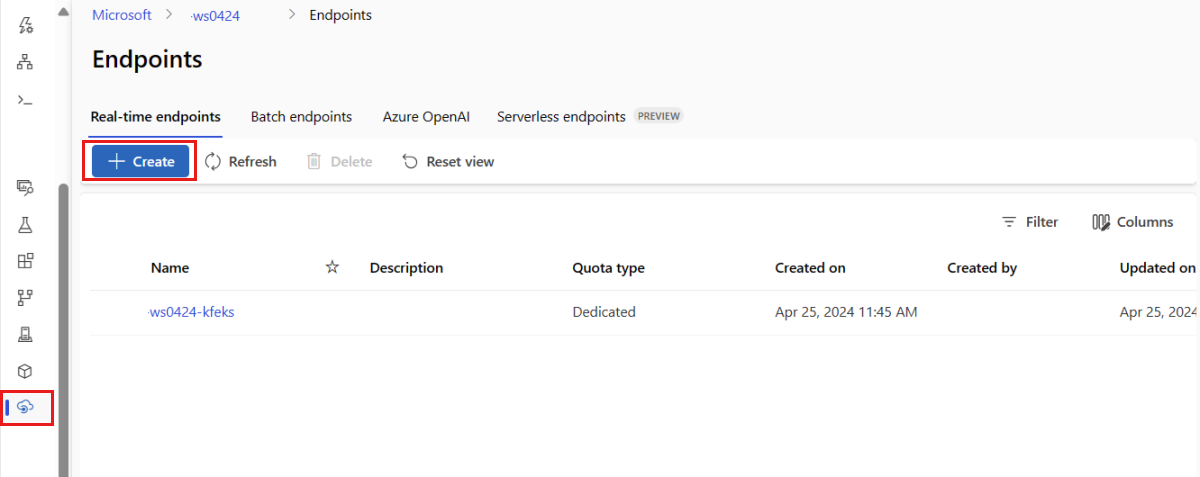
This action opens up a window for you to select your model and specify details about your endpoint and deployment. Enter settings for your endpoint and deployment as described previously, and then select Create to create the deployment.
- Use the template to create an online endpoint:
set -x

#<get_access_token>
TOKEN=$(az account get-access-token --query accessToken -o tsv)
#</get_access_token>

# <create_variables>
SUBSCRIPTION_ID=$(az account show --query id -o tsv)
LOCATION=$(az ml workspace show --query location -o tsv)
RESOURCE_GROUP=$(az group show --query name -o tsv)
WORKSPACE=$(az configure -l --query "[?name=='workspace'].value" -o tsv)
#</create_variables>

# <set_endpoint_name>
export ENDPOINT_NAME=endpoint-`echo $RANDOM`
# </set_endpoint_name>

#<api_version>
API_VERSION="2022-05-01"
#</api_version>

echo -e "Using:\nSUBSCRIPTION_ID=$SUBSCRIPTION_ID\nLOCATION=$LOCATION\nRESOURCE_GROUP=$RESOURCE_GROUP\nWORKSPACE=$WORKSPACE"

# define how to wait
wait_for_completion () {
    operation_id=$1
    status="unknown"

    if [[ $operation_id == "" || -z $operation_id  || $operation_id == "null" ]]; then
        echo "operation id cannot be empty"
        exit 1
    fi

    while [[ $status != "Succeeded" && $status != "Failed" ]]
    do
        echo "Getting operation status from: $operation_id"
        operation_result=$(curl --location --request GET $operation_id --header "Authorization: Bearer $TOKEN")
        # TODO error handling here
        status=$(echo $operation_result | jq -r '.status')
        echo "Current operation status: $status"
        sleep 5
    done

    if [[ $status == "Failed" ]]
    then
        error=$(echo $operation_result | jq -r '.error')
        echo "Error: $error"
    fi
}

# <get_storage_details>
# Get values for storage account
response=$(curl --location --request GET "https://management.chinacloudapi.cn/subscriptions/$SUBSCRIPTION_ID/resourceGroups/$RESOURCE_GROUP/providers/Microsoft.MachineLearningServices/workspaces/$WORKSPACE/datastores?api-version=$API_VERSION&isDefault=true" \
--header "Authorization: Bearer $TOKEN")
AZUREML_DEFAULT_DATASTORE=$(echo $response | jq -r '.value[0].name')
AZUREML_DEFAULT_CONTAINER=$(echo $response | jq -r '.value[0].properties.containerName')
export AZURE_STORAGE_ACCOUNT=$(echo $response | jq -r '.value[0].properties.accountName')
# </get_storage_details>

# <upload_code>
az storage blob upload-batch -d $AZUREML_DEFAULT_CONTAINER/score -s cli/endpoints/online/model-1/onlinescoring --account-name $AZURE_STORAGE_ACCOUNT
# </upload_code>

# <create_code>
az deployment group create -g $RESOURCE_GROUP \
--template-file arm-templates/code-version.json \
--parameters \
workspaceName=$WORKSPACE \
codeAssetName="score-sklearn" \
codeUri="https://$AZURE_STORAGE_ACCOUNT.blob.core.chinacloudapi.cn/$AZUREML_DEFAULT_CONTAINER/score"
# </create_code>

# <upload_model>
az storage blob upload-batch -d $AZUREML_DEFAULT_CONTAINER/model -s cli/endpoints/online/model-1/model --account-name $AZURE_STORAGE_ACCOUNT
# </upload_model>

# <create_model>
az deployment group create -g $RESOURCE_GROUP \
--template-file arm-templates/model-version.json \
--parameters \
workspaceName=$WORKSPACE \
modelAssetName="sklearn" \
modelUri="azureml://subscriptions/$SUBSCRIPTION_ID/resourceGroups/$RESOURCE_GROUP/workspaces/$WORKSPACE/datastores/$AZUREML_DEFAULT_DATASTORE/paths/model/sklearn_regression_model.pkl"
# </create_model>

# <read_condafile>
CONDA_FILE=$(cat cli/endpoints/online/model-1/environment/conda.yaml)
# </read_condafile>

# <create_environment>
ENV_VERSION=$RANDOM
az deployment group create -g $RESOURCE_GROUP \
--template-file arm-templates/environment-version.json \
--parameters \
workspaceName=$WORKSPACE \
environmentAssetName=sklearn-env \
environmentAssetVersion=$ENV_VERSION \
dockerImage=mcr.microsoft.com/azureml/openmpi3.1.2-ubuntu18.04:20210727.v1 \
condaFile="$CONDA_FILE"
# </create_environment>

# <create_endpoint>
az deployment group create -g $RESOURCE_GROUP \
--template-file arm-templates/online-endpoint.json \
--parameters \
workspaceName=$WORKSPACE \
onlineEndpointName=$ENDPOINT_NAME \
identityType=SystemAssigned \
authMode=AMLToken \
location=$LOCATION
# </create_endpoint>

# <get_endpoint>
response=$(curl --location --request GET "https://management.chinacloudapi.cn/subscriptions/$SUBSCRIPTION_ID/resourceGroups/$RESOURCE_GROUP/providers/Microsoft.MachineLearningServices/workspaces/$WORKSPACE/onlineEndpoints/$ENDPOINT_NAME?api-version=$API_VERSION" \
--header "Content-Type: application/json" \
--header "Authorization: Bearer $TOKEN")

operation_id=$(echo $response | jq -r '.properties.properties.AzureAsyncOperationUri')
wait_for_completion $operation_id
# </get_endpoint>

# <create_deployment>
resourceScope="/subscriptions/$SUBSCRIPTION_ID/resourceGroups/$RESOURCE_GROUP/providers/Microsoft.MachineLearningServices"
az deployment group create -g $RESOURCE_GROUP \
 --template-file arm-templates/online-endpoint-deployment.json \
 --parameters \
 workspaceName=$WORKSPACE \
 location=$LOCATION \
 onlineEndpointName=$ENDPOINT_NAME \
 onlineDeploymentName=blue \
 codeId="$resourceScope/workspaces/$WORKSPACE/codes/score-sklearn/versions/1" \
 scoringScript=score.py \
 environmentId="$resourceScope/workspaces/$WORKSPACE/environments/sklearn-env/versions/$ENV_VERSION" \
 model="$resourceScope/workspaces/$WORKSPACE/models/sklearn/versions/1" \
 endpointComputeType=Managed \
 skuName=Standard_F2s_v2 \
 skuCapacity=1
 # </create_deployment>

# <get_deployment>
response=$(curl --location --request GET "https://management.chinacloudapi.cn/subscriptions/$SUBSCRIPTION_ID/resourceGroups/$RESOURCE_GROUP/providers/Microsoft.MachineLearningServices/workspaces/$WORKSPACE/onlineEndpoints/$ENDPOINT_NAME/deployments/blue?api-version=$API_VERSION" \
--header "Content-Type: application/json" \
--header "Authorization: Bearer $TOKEN")

operation_id=$(echo $response | jq -r '.properties.properties.AzureAsyncOperationUri')
wait_for_completion $operation_id

scoringUri=$(echo $response | jq -r '.properties.scoringUri')
# </get_endpoint>

# <get_endpoint_access_token>
response=$(curl -H "Content-Length: 0" --location --request POST "https://management.chinacloudapi.cn/subscriptions/$SUBSCRIPTION_ID/resourceGroups/$RESOURCE_GROUP/providers/Microsoft.MachineLearningServices/workspaces/$WORKSPACE/onlineEndpoints/$ENDPOINT_NAME/token?api-version=$API_VERSION" \
--header "Authorization: Bearer $TOKEN")
accessToken=$(echo $response | jq -r '.accessToken')
# </get_endpoint_access_token>

# <score_endpoint>
curl --location --request POST $scoringUri \
--header "Authorization: Bearer $accessToken" \
--header "Content-Type: application/json" \
--data-raw @cli/endpoints/online/model-1/sample-request.json
# </score_endpoint>

# <get_deployment_logs>
curl --location --request POST "https://management.chinacloudapi.cn/subscriptions/$SUBSCRIPTION_ID/resourceGroups/$RESOURCE_GROUP/providers/Microsoft.MachineLearningServices/workspaces/$WORKSPACE/onlineEndpoints/$ENDPOINT_NAME/deployments/blue/getLogs?api-version=$API_VERSION" \
--header "Authorization: Bearer $TOKEN" \
--header "Content-Type: application/json" \
--data-raw "{ \"tail\": 100 }"
# </get_deployment_logs>

# <delete_endpoint>
curl --location --request DELETE "https://management.chinacloudapi.cn/subscriptions/$SUBSCRIPTION_ID/resourceGroups/$RESOURCE_GROUP/providers/Microsoft.MachineLearningServices/workspaces/$WORKSPACE/onlineEndpoints/$ENDPOINT_NAME?api-version=$API_VERSION" \
--header "Content-Type: application/json" \
--header "Authorization: Bearer $TOKEN" || true
# </delete_endpoint>
- Deploy the model to the endpoint after the endpoint is created:
set -x

#<get_access_token>
TOKEN=$(az account get-access-token --query accessToken -o tsv)
#</get_access_token>

# <create_variables>
SUBSCRIPTION_ID=$(az account show --query id -o tsv)
LOCATION=$(az ml workspace show --query location -o tsv)
RESOURCE_GROUP=$(az group show --query name -o tsv)
WORKSPACE=$(az configure -l --query "[?name=='workspace'].value" -o tsv)
#</create_variables>

# <set_endpoint_name>
export ENDPOINT_NAME=endpoint-`echo $RANDOM`
# </set_endpoint_name>

#<api_version>
API_VERSION="2022-05-01"
#</api_version>

echo -e "Using:\nSUBSCRIPTION_ID=$SUBSCRIPTION_ID\nLOCATION=$LOCATION\nRESOURCE_GROUP=$RESOURCE_GROUP\nWORKSPACE=$WORKSPACE"

# define how to wait
wait_for_completion () {
    operation_id=$1
    status="unknown"

    if [[ $operation_id == "" || -z $operation_id  || $operation_id == "null" ]]; then
        echo "operation id cannot be empty"
        exit 1
    fi

    while [[ $status != "Succeeded" && $status != "Failed" ]]
    do
        echo "Getting operation status from: $operation_id"
        operation_result=$(curl --location --request GET $operation_id --header "Authorization: Bearer $TOKEN")
        # TODO error handling here
        status=$(echo $operation_result | jq -r '.status')
        echo "Current operation status: $status"
        sleep 5
    done

    if [[ $status == "Failed" ]]
    then
        error=$(echo $operation_result | jq -r '.error')
        echo "Error: $error"
    fi
}

# <get_storage_details>
# Get values for storage account
response=$(curl --location --request GET "https://management.chinacloudapi.cn/subscriptions/$SUBSCRIPTION_ID/resourceGroups/$RESOURCE_GROUP/providers/Microsoft.MachineLearningServices/workspaces/$WORKSPACE/datastores?api-version=$API_VERSION&isDefault=true" \
--header "Authorization: Bearer $TOKEN")
AZUREML_DEFAULT_DATASTORE=$(echo $response | jq -r '.value[0].name')
AZUREML_DEFAULT_CONTAINER=$(echo $response | jq -r '.value[0].properties.containerName')
export AZURE_STORAGE_ACCOUNT=$(echo $response | jq -r '.value[0].properties.accountName')
# </get_storage_details>

# <upload_code>
az storage blob upload-batch -d $AZUREML_DEFAULT_CONTAINER/score -s cli/endpoints/online/model-1/onlinescoring --account-name $AZURE_STORAGE_ACCOUNT
# </upload_code>

# <create_code>
az deployment group create -g $RESOURCE_GROUP \
--template-file arm-templates/code-version.json \
--parameters \
workspaceName=$WORKSPACE \
codeAssetName="score-sklearn" \
codeUri="https://$AZURE_STORAGE_ACCOUNT.blob.core.chinacloudapi.cn/$AZUREML_DEFAULT_CONTAINER/score"
# </create_code>

# <upload_model>
az storage blob upload-batch -d $AZUREML_DEFAULT_CONTAINER/model -s cli/endpoints/online/model-1/model --account-name $AZURE_STORAGE_ACCOUNT
# </upload_model>

# <create_model>
az deployment group create -g $RESOURCE_GROUP \
--template-file arm-templates/model-version.json \
--parameters \
workspaceName=$WORKSPACE \
modelAssetName="sklearn" \
modelUri="azureml://subscriptions/$SUBSCRIPTION_ID/resourceGroups/$RESOURCE_GROUP/workspaces/$WORKSPACE/datastores/$AZUREML_DEFAULT_DATASTORE/paths/model/sklearn_regression_model.pkl"
# </create_model>

# <read_condafile>
CONDA_FILE=$(cat cli/endpoints/online/model-1/environment/conda.yaml)
# </read_condafile>

# <create_environment>
ENV_VERSION=$RANDOM
az deployment group create -g $RESOURCE_GROUP \
--template-file arm-templates/environment-version.json \
--parameters \
workspaceName=$WORKSPACE \
environmentAssetName=sklearn-env \
environmentAssetVersion=$ENV_VERSION \
dockerImage=mcr.microsoft.com/azureml/openmpi3.1.2-ubuntu18.04:20210727.v1 \
condaFile="$CONDA_FILE"
# </create_environment>

# <create_endpoint>
az deployment group create -g $RESOURCE_GROUP \
--template-file arm-templates/online-endpoint.json \
--parameters \
workspaceName=$WORKSPACE \
onlineEndpointName=$ENDPOINT_NAME \
identityType=SystemAssigned \
authMode=AMLToken \
location=$LOCATION
# </create_endpoint>

# <get_endpoint>
response=$(curl --location --request GET "https://management.chinacloudapi.cn/subscriptions/$SUBSCRIPTION_ID/resourceGroups/$RESOURCE_GROUP/providers/Microsoft.MachineLearningServices/workspaces/$WORKSPACE/onlineEndpoints/$ENDPOINT_NAME?api-version=$API_VERSION" \
--header "Content-Type: application/json" \
--header "Authorization: Bearer $TOKEN")

operation_id=$(echo $response | jq -r '.properties.properties.AzureAsyncOperationUri')
wait_for_completion $operation_id
# </get_endpoint>

# <create_deployment>
resourceScope="/subscriptions/$SUBSCRIPTION_ID/resourceGroups/$RESOURCE_GROUP/providers/Microsoft.MachineLearningServices"
az deployment group create -g $RESOURCE_GROUP \
 --template-file arm-templates/online-endpoint-deployment.json \
 --parameters \
 workspaceName=$WORKSPACE \
 location=$LOCATION \
 onlineEndpointName=$ENDPOINT_NAME \
 onlineDeploymentName=blue \
 codeId="$resourceScope/workspaces/$WORKSPACE/codes/score-sklearn/versions/1" \
 scoringScript=score.py \
 environmentId="$resourceScope/workspaces/$WORKSPACE/environments/sklearn-env/versions/$ENV_VERSION" \
 model="$resourceScope/workspaces/$WORKSPACE/models/sklearn/versions/1" \
 endpointComputeType=Managed \
 skuName=Standard_F2s_v2 \
 skuCapacity=1
 # </create_deployment>

# <get_deployment>
response=$(curl --location --request GET "https://management.chinacloudapi.cn/subscriptions/$SUBSCRIPTION_ID/resourceGroups/$RESOURCE_GROUP/providers/Microsoft.MachineLearningServices/workspaces/$WORKSPACE/onlineEndpoints/$ENDPOINT_NAME/deployments/blue?api-version=$API_VERSION" \
--header "Content-Type: application/json" \
--header "Authorization: Bearer $TOKEN")

operation_id=$(echo $response | jq -r '.properties.properties.AzureAsyncOperationUri')
wait_for_completion $operation_id

scoringUri=$(echo $response | jq -r '.properties.scoringUri')
# </get_endpoint>

# <get_endpoint_access_token>
response=$(curl -H "Content-Length: 0" --location --request POST "https://management.chinacloudapi.cn/subscriptions/$SUBSCRIPTION_ID/resourceGroups/$RESOURCE_GROUP/providers/Microsoft.MachineLearningServices/workspaces/$WORKSPACE/onlineEndpoints/$ENDPOINT_NAME/token?api-version=$API_VERSION" \
--header "Authorization: Bearer $TOKEN")
accessToken=$(echo $response | jq -r '.accessToken')
# </get_endpoint_access_token>

# <score_endpoint>
curl --location --request POST $scoringUri \
--header "Authorization: Bearer $accessToken" \
--header "Content-Type: application/json" \
--data-raw @cli/endpoints/online/model-1/sample-request.json
# </score_endpoint>

# <get_deployment_logs>
curl --location --request POST "https://management.chinacloudapi.cn/subscriptions/$SUBSCRIPTION_ID/resourceGroups/$RESOURCE_GROUP/providers/Microsoft.MachineLearningServices/workspaces/$WORKSPACE/onlineEndpoints/$ENDPOINT_NAME/deployments/blue/getLogs?api-version=$API_VERSION" \
--header "Authorization: Bearer $TOKEN" \
--header "Content-Type: application/json" \
--data-raw "{ \"tail\": 100 }"
# </get_deployment_logs>

# <delete_endpoint>
curl --location --request DELETE "https://management.chinacloudapi.cn/subscriptions/$SUBSCRIPTION_ID/resourceGroups/$RESOURCE_GROUP/providers/Microsoft.MachineLearningServices/workspaces/$WORKSPACE/onlineEndpoints/$ENDPOINT_NAME?api-version=$API_VERSION" \
--header "Content-Type: application/json" \
--header "Authorization: Bearer $TOKEN" || true
# </delete_endpoint>
To debug errors in your deployment, see Troubleshooting online endpoint deployments.
Check the status of the online endpoint
Use the show command to display information in the provisioning_state for the endpoint and deployment:
az ml online-endpoint show -n $ENDPOINT_NAME
List all the endpoints in the workspace in a table format by using the list command:
az ml online-endpoint list --output table
Check the endpoint's status to see whether the model was deployed without error:
ml_client.online_endpoints.get(name=endpoint_name)
List all the endpoints in the workspace in a table format by using the list method:
for endpoint in ml_client.online_endpoints.list():
    print(endpoint.name)
The method returns a list (iterator) of ManagedOnlineEndpoint entities.
You can get more information by specifying more parameters. For example, output the list of endpoints like a table:
print("Kind\tLocation\tName")
print("-------\t----------\t------------------------")
for endpoint in ml_client.online_endpoints.list():
    print(f"{endpoint.kind}\t{endpoint.location}\t{endpoint.name}")
View managed online endpoints
You can view all your managed online endpoints on the Endpoints page. Go to the endpoint's Details page to find critical information, such as the endpoint URI, status, testing tools, activity monitors, deployment logs, and sample consumption code.
On the left pane, select Endpoints to see a list of all the endpoints in the workspace.
(Optional) Create a filter on Compute type to show only Managed compute types.
Select an endpoint name to view the endpoint's Details page.
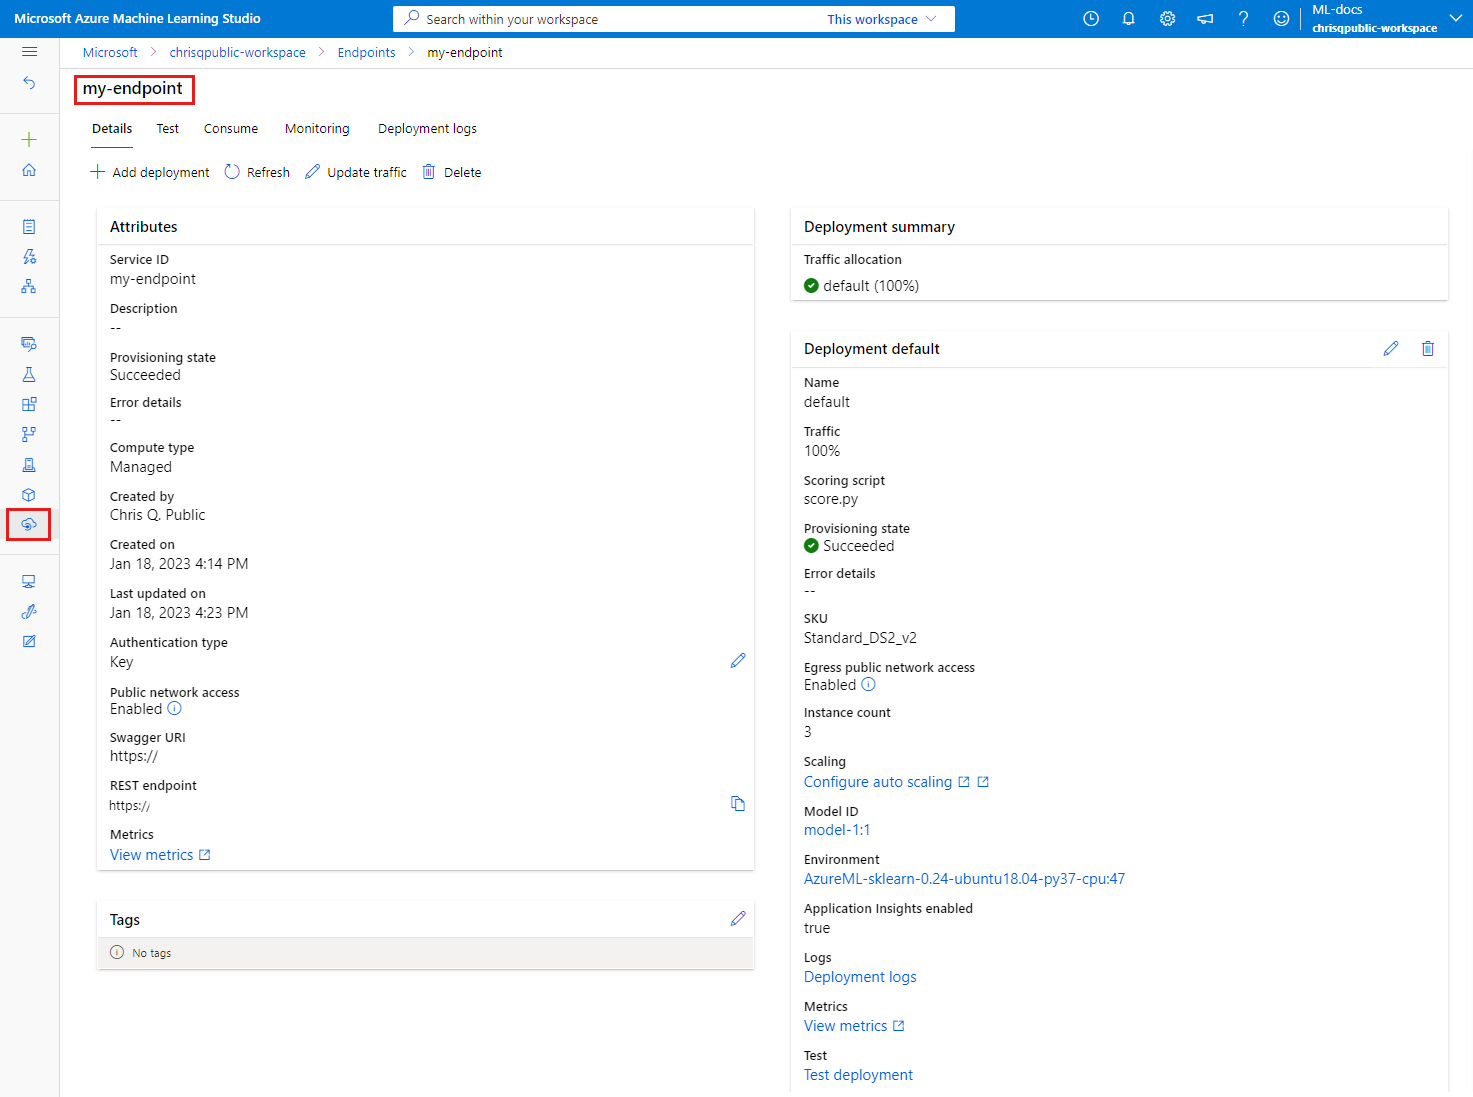
Templates are useful for deploying resources, but you can't use them to list, show, or invoke resources. Use the Azure CLI, Python SDK, or the studio to perform these operations. The following code uses the Azure CLI.
Use the show command to display information in the provisioning_state parameter for the endpoint and deployment:
az ml online-endpoint show -n $ENDPOINT_NAME
List all the endpoints in the workspace in a table format by using the list command:
az ml online-endpoint list --output table
Check the status of the online deployment
Check the logs to see whether the model was deployed without error.
To see log output from a container, use the following CLI command:
az ml online-deployment get-logs --name blue --endpoint $ENDPOINT_NAME
By default, logs are pulled from the inference server container. To see logs from the storage initializer container, add the --container storage-initializer flag. For more information on deployment logs, see Get container logs.
You can view log output by using the get_logs method:
ml_client.online_deployments.get_logs(
    name="blue", endpoint_name=endpoint_name, lines=50
)
By default, logs are pulled from the inference server container. To see logs from the storage initializer container, add the container_type="storage-initializer" option. For more information on deployment logs, see Get container logs.
ml_client.online_deployments.get_logs(
    name="blue", endpoint_name=endpoint_name, lines=50, container_type="storage-initializer"
)
To view log output, select the Logs tab from the endpoint's page. If you have multiple deployments in your endpoint, use the dropdown list to select the deployment with the log that you want to see.
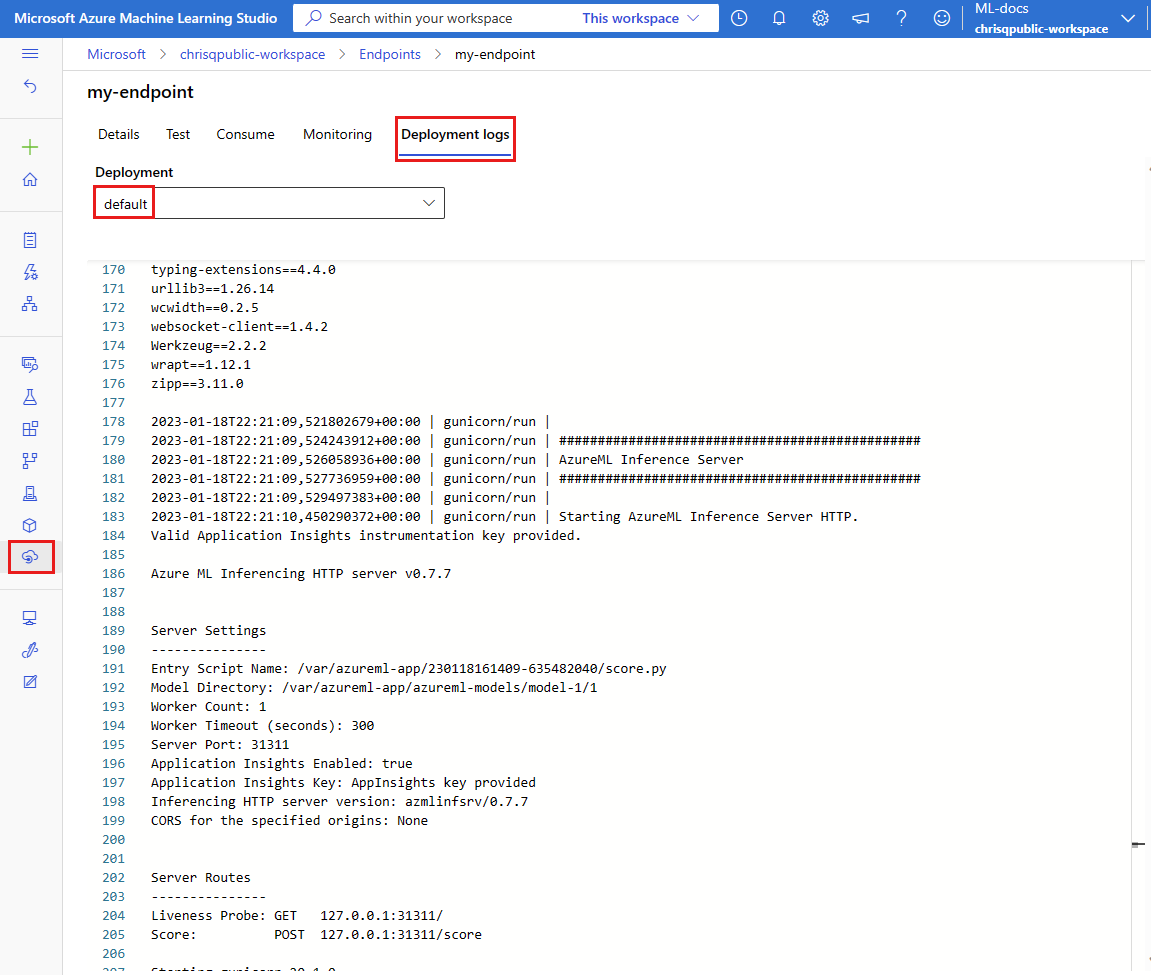
By default, logs are pulled from the inference server. To see logs from the storage initializer container, use the Azure CLI or Python SDK (see each tab for details). Logs from the storage initializer container provide information on whether code and model data were successfully downloaded to the container. For more information on deployment logs, see Get container logs.
Templates are useful for deploying resources, but you can't use them to list, show, or invoke resources. Use the Azure CLI, Python SDK, or the studio to perform these operations. The following code uses the Azure CLI.
To see log output from a container, use the following CLI command:
az ml online-deployment get-logs --name blue --endpoint $ENDPOINT_NAME
By default, logs are pulled from the inference server container. To see logs from the storage initializer container, add the --container storage-initializer flag. For more information on deployment logs, see Get container logs.
Invoke the endpoint to score data by using your model
Use either the invoke command or a REST client of your choice to invoke the endpoint and score some data:
az ml online-endpoint invoke --name $ENDPOINT_NAME --request-file endpoints/online/model-1/sample-request.json
Get the key used to authenticate to the endpoint:
You can control which Microsoft Entra security principals can get the authentication key by assigning them to a custom role that allows Microsoft.MachineLearningServices/workspaces/onlineEndpoints/token/action and Microsoft.MachineLearningServices/workspaces/onlineEndpoints/listkeys/action. For more information on how to manage authorization to workspaces, see Manage access to an Azure Machine Learning workspace.
 ENDPOINT_KEY=$(az ml online-endpoint get-credentials -n $ENDPOINT_NAME -o tsv --query primaryKey)
 SCORING_URI=$(az ml online-endpoint show -n $ENDPOINT_NAME -o tsv --query scoring_uri)

 curl --request POST "$SCORING_URI" --header "Authorization: Bearer $ENDPOINT_KEY" --header 'Content-Type: application/json' --data @endpoints/online/model-1/sample-request.json
Use curl to score data.
 SCORING_URI=$(az ml online-endpoint show -n $ENDPOINT_NAME -o tsv --query scoring_uri)

 curl --request POST "$SCORING_URI" --header "Authorization: Bearer $ENDPOINT_KEY" --header 'Content-Type: application/json' --data @endpoints/online/model-1/sample-request.json
Notice that you use show and get-credentials commands to get the authentication credentials. Also notice that you use the --query flag to filter only the attributes that are needed. To learn more about the --query flag, see Query Azure CLI command output.
To see the invocation logs, run get-logs again.
By using the MLClient parameter that you created earlier, you get a handle to the endpoint. You can then invoke the endpoint by using the invoke command with the following parameters:
endpoint_name: Name of the endpoint.request_file: File with request data.deployment_name: Name of the specific deployment to test in an endpoint.
Send a sample request by using a JSON file.
# test the blue deployment with some sample data
ml_client.online_endpoints.invoke(
    endpoint_name=endpoint_name,
    deployment_name="blue",
    request_file="../model-1/sample-request.json",
)
Use the Test tab on the endpoint's details page to test your managed online deployment. Enter sample input and view the results.
Select the Test tab on the endpoint's detail page.
Use the dropdown list to select the deployment that you want to test.
Enter the sample input.
Select Test.
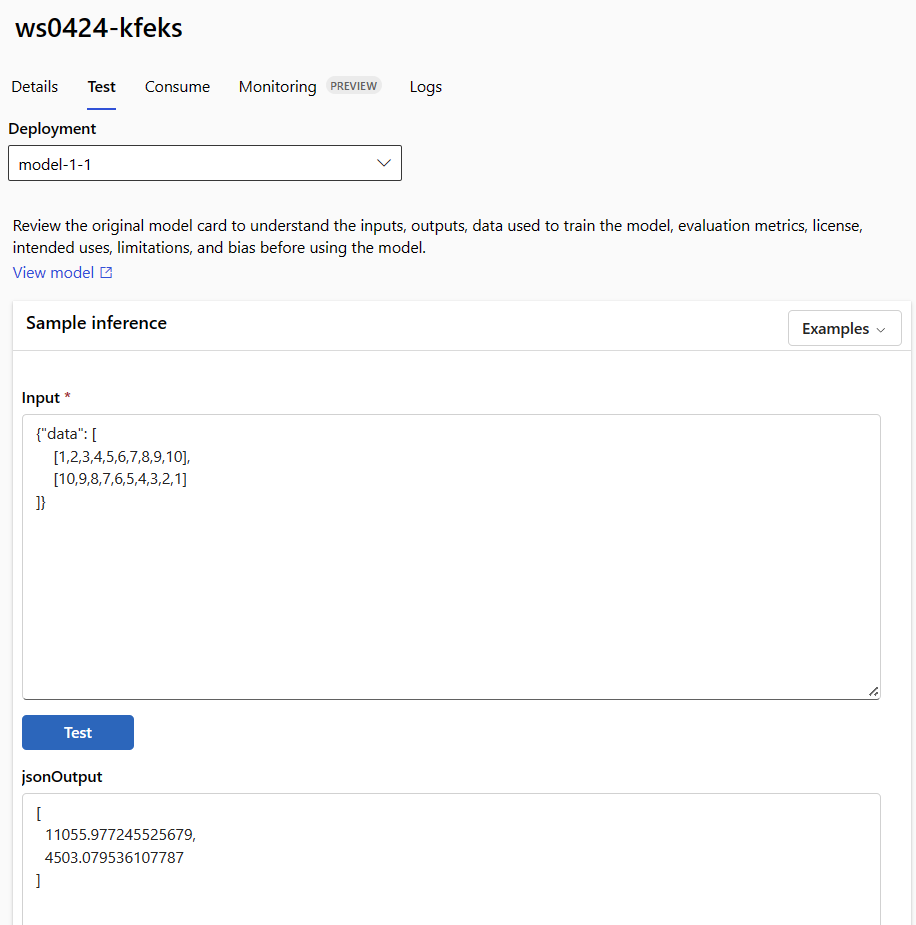
Templates are useful for deploying resources, but you can't use them to list, show, or invoke resources. Use the Azure CLI, Python SDK, or the studio to perform these operations. The following code uses the Azure CLI.
Use either the invoke command or a REST client of your choice to invoke the endpoint and score some data:
az ml online-endpoint invoke --name $ENDPOINT_NAME --request-file cli/endpoints/online/model-1/sample-request.json
(Optional) Update the deployment
If you want to update the code, model, or environment, update the YAML file. Then run the az ml online-endpoint update command.
If you update instance count (to scale your deployment) along with other model settings (such as code, model, or environment) in a single update command, the scaling operation is performed first. The other updates are applied next. It's a good practice to perform these operations separately in a production environment.
To understand how update works:
Open the file online/model-1/onlinescoring/score.py.
Change the last line of the init() function: After logging.info("Init complete"), add logging.info("Updated successfully").
Save the file.
Run this command:
az ml online-deployment update -n blue --endpoint $ENDPOINT_NAME -f endpoints/online/managed/sample/blue-deployment-with-registered-assets.yml
Updating by using YAML is declarative. That is, changes in the YAML are reflected in the underlying Resource Manager resources (endpoints and deployments). A declarative approach facilitates GitOps: All changes to endpoints and deployments (even instance_count) go through the YAML.
You can use generic update parameters, such as the --set parameter, with the CLI update command to override attributes in your YAML or to set specific attributes without passing them in the YAML file. Using --set for single attributes is especially valuable in development and test scenarios. For example, to scale up the instance_count value for the first deployment, you could use the --set instance_count=2 flag. However, because the YAML isn't updated, this technique doesn't facilitate GitOps.
Specifying the YAML file isn't mandatory. For example, if you wanted to test different concurrency settings for a specific deployment, you can try something like az ml online-deployment update -n blue -e my-endpoint --set request_settings.max_concurrent_requests_per_instance=4 environment_variables.WORKER_COUNT=4. This approach keeps all the existing configuration but updates only the specified parameters.
Because you modified the init() function, which runs when the endpoint is created or updated, the message Updated successfully appears in the logs. Retrieve the logs by running:
az ml online-deployment get-logs --name blue --endpoint $ENDPOINT_NAME
The update command also works with local deployments. Use the same az ml online-deployment update command with the --local flag.
If you want to update the code, model, or environment, update the configuration and then run the MLClient's online_deployments.begin_create_or_update method to create or update a deployment.
If you update the instance count (to scale your deployment) along with other model settings (such as code, model, or environment) in a single begin_create_or_update method, the scaling operation is performed first. Then the other updates are applied. It's a good practice to perform these operations separately in a production environment.
To understand how begin_create_or_update works:
Open the file online/model-1/onlinescoring/score.py.
Change the last line of the init() function: After logging.info("Init complete"), add logging.info("Updated successfully").
Save the file.
Run the method:
ml_client.online_deployments.begin_create_or_update(blue_deployment_with_registered_assets)
Because you modified the init() function, which runs when the endpoint is created or updated, the message Updated successfully appears in the logs. Retrieve the logs by running:
ml_client.online_deployments.get_logs(
    name="blue", endpoint_name=endpoint_name, lines=50
)
The begin_create_or_update method also works with local deployments. Use the same method with the local=True flag.
Currently, you can make updates only to the instance count of a deployment. Use the following instructions to scale an individual deployment up or down by adjusting the number of instances:
- Open the endpoint's Details page and find the card for the deployment that you want to update.
- Select the edit icon (pencil icon) next to the deployment's name.
- Update the instance count associated with the deployment. Choose between Default or Target Utilization for Deployment scale type.
- If you select Default, you can also specify a numerical value for Instance count.
- If you select Target Utilization, you can specify values to use for parameters when you autoscale the deployment.
- Select Update to finish updating the instance counts for your deployment.
There currently isn't an option to update the deployment by using an ARM template.
Note
The update to the deployment in this section is an example of an in-place rolling update.
- For a managed online endpoint, the deployment is updated to the new configuration with 20% of the nodes at a time. That is, if the deployment has 10 nodes, 2 nodes at a time are updated.
- For a Kubernetes online endpoint, the system iteratively creates a new deployment instance with the new configuration and deletes the old one.
- For production usage, consider blue-green deployment, which offers a safer alternative for updating a web service.
Autoscale automatically runs the right amount of resources to handle the load on your application. Managed online endpoints support autoscaling through integration with the Azure Monitor autoscale feature. To configure autoscaling, see Autoscale online endpoints.
(Optional) Monitor SLA by using Azure Monitor
To view metrics and set alerts based on your SLA, follow the steps that are described in Monitor online endpoints.
(Optional) Integrate with Log Analytics
The get-logs command for the CLI or the get_logs method for the SDK provides only the last few hundred lines of logs from an automatically selected instance. However, Log Analytics provides a way to durably store and analyze logs. For more information on how to use logging, see Use logs.
Delete the endpoint and the deployment
Use the following command to delete the endpoint and all its underlying deployments:
az ml online-endpoint delete --name $ENDPOINT_NAME --yes --no-wait
Use the following command to delete the endpoint and all its underlying deployments:
ml_client.online_endpoints.begin_delete(name=endpoint_name)
If you aren't going to use the endpoint and deployment, delete them. By deleting the endpoint, you also delete all its underlying deployments.
- Go to Azure Machine Learning studio.
- On the left pane, select the Endpoints page.
- Select an endpoint.
- Select Delete.
Alternatively, you can delete a managed online endpoint directly by selecting the Delete icon on the endpoint details page.
Use the following command to delete the endpoint and all its underlying deployments:
az ml online-endpoint delete --name $ENDPOINT_NAME --yes --no-wait
Related content


