Note
Access to this page requires authorization. You can try signing in or changing directories.
Access to this page requires authorization. You can try changing directories.
This article describes how to set up the Azure Migrate appliance for assessment by using the Azure Migrate: Discovery and assessment tool.
The Azure Migrate appliance is a lightweight appliance that the Azure Migrate: Discovery and assessment tool uses to discover servers running in vCenter Server and to send server configuration and performance metadata to Azure.
Set up the appliance
Note
The appliance VM can be domain joined and managed with a domain account.
You can deploy the Azure Migration appliance using these methods:
- Set up the appliance on an existing server by using a PowerShell installer script. You should run a PowerShell script.
After you create the appliance, check if the appliance can connect to Azure Migrate: Discovery and assessment, register the appliance with the project, and configure the appliance to start discovery.
Deploy by using Powershell script
To set up the appliance by using Powershell script, you'll complete these steps, which are described in detail in this section:
Note
OVA templates are not available for Azure operated by 21Vianet.
Provide an appliance name and generate a project key in the portal.
Download an ZIP file, and install it with administration proviledge. Verify that the ZIP file is secure.
Create the appliance by running the ZIP file. Verify that the appliance can connect to Azure Migrate.
Configure the appliance for the first time.
Register the appliance with the project by using the project key.
Generate the project key
In Windows, Linux and SQL Server > Azure Migrate: Discovery and assessment > Discover.
In Discover servers, select Are your servers virtualized? > Yes, with VMware vSphere hypervisor.
In 1:Generate project key, provide a name for the Azure Migrate appliance that you'll set up to discover servers in your VMware environment. The name should be alphanumeric and 14 characters or fewer.
To start creating the required Azure resources, select Generate key. Don't close the Discover pane while the resources are being created.
After the Azure resources are successfully created, a project key is generated.
Copy the key. You'll use the key to complete registration of the appliance when you configure the appliance.
Download Azure Migrate appliance
In 2: Download Azure Migrate appliance, select Download to save ZIP file on your local PC.
Verify security
Check that the zipped file is secure, before you deploy it.
On the server on which you downloaded the file, open a Command Prompt window by using the Run as administrator option.
Verify the latest hash value by comparing the outcome of above command to the value documented here.
Create the appliance server
We can follow the action to Set up the appliance for Hyper-V.
Make sure that the appliance can connect to Azure URLs Azure operated by 21Vianet.
Verify appliance access to Azure
Make sure that the appliance server can connect to Azure URLs for Azure operated by 21Vianet.
Configure the appliance
To set up the appliance for the first time:
Note
If you set up the appliance by using a PowerShell script, you can skip the first two steps.
In vSphere Client, right-click the server, and select Open Console.
Select or enter the language, time zone, and password for the appliance.
Open a browser on any server that can connect to the appliance server. Navigate to the URL of the appliance configuration manager:
https://appliance name or IP address: 44368.Or, you can open the configuration manager from the appliance server desktop by selecting the shortcut for the configuration manager.
Accept the license terms and read the third-party information.
Set up prerequisites and register the appliance
In the configuration manager, select Set up prerequisites, and complete these steps:
Connectivity: The appliance checks that the server has internet access. If the server uses a proxy:
Select Setup proxy to specify the proxy address (in the form
http://ProxyIPAddressorhttp://ProxyFQDN, where FQDN refers to a fully qualified domain name) and listening port.Enter the credentials if the proxy needs authentication.
If you have added proxy details or disabled the proxy or authentication, select Save to trigger connectivity and check connectivity again.
Note
Only HTTP proxy is supported.
Time sync: Check that the time on the appliance is in sync with internet time for discovery to work properly.
Install updates and register appliance: To run auto-update and register the appliance, follow these steps:

Note
This is a new user experience in Azure Migrate appliance which is available only if you have set up an appliance using the latest OVA/Installer script downloaded from the portal. The appliances which have already been registered will continue seeing the older version of the user experience and will continue to work without any issues.
For the appliance to run auto-update, paste the project key that you copied from the portal. If you don't have the key, go to Azure Migrate: Discovery and assessment > Overview > Manage existing appliances. Select the appliance name you provided when you generated the project key, and copy the key that's shown.
The appliance will verify the key and start the auto-update service, which updates all the services on the appliance to their latest versions. When the auto-update has run, you can select View appliance services to see the status and versions of the services running on the appliance server.
To register the appliance, you need to select Login. In Continue with Azure Login, select Copy code & Login to copy the device code (you must have a device code to authenticate with Azure) and go to an Azure sign-in prompt in a new browser tab. Make sure you've disabled the pop-up blocker in the browser to see the prompt.
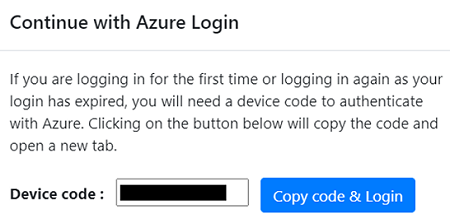
In a new tab in your browser, paste the device code and sign in by using your Azure username and password. Signing in with a PIN isn't supported.
Note
If you close the login tab accidentally without logging in, refresh the browser tab of the appliance configuration manager to display the device code and Copy code & Login button.
After you successfully sign in, return to the browser tab that displays the appliance configuration manager. If the Azure user account that you used to sign in has the required permissions for the Azure resources that were created during key generation, appliance registration starts.
After the appliance is successfully registered, select View details to see the registration details.
Install the VDDK: The appliance checks if the VMware vSphere Virtual Disk Development Kit (VDDK) is installed. Download VDDK version 8.0 from the Broadcom Developer portal. After downloading, extract the zip file to the default location: C:\Program Files\VMware\VMware Virtual Disk Development Kit, as mentioned in the installation instructions.
The Azure Migrate: Server Migration tool uses the VDDK to replicate servers during migration to Azure.
You can rerun prerequisites at any time during appliance configuration to check whether the appliance meets all the prerequisites.
Start continuous discovery
Complete the setup steps in the appliance configuration manager to prepare for and start discovery.
Provide vCenter Server details
The appliance must connect to vCenter Server to discover the configuration and performance data of the servers:
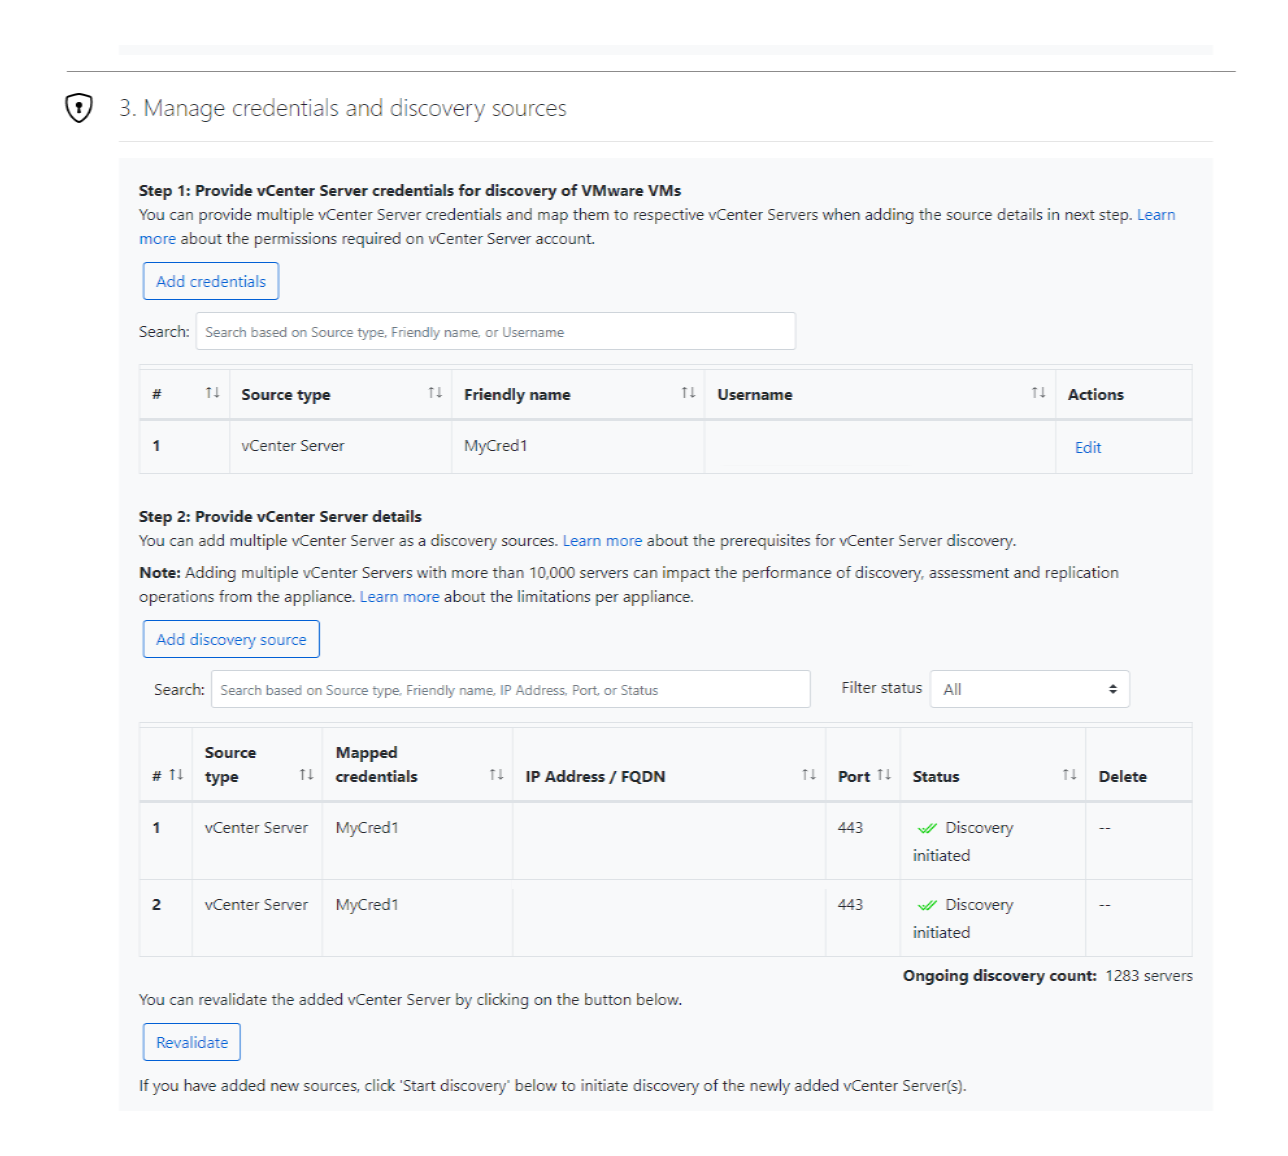
In Step 1: Provide vCenter Server credentials, select Add credentials to enter a name for the credentials. Add the username and password for the vCenter Server account that the appliance will use to discover servers running on vCenter Server.
- You should have set up an account with the required permissions as described earlier in this article.
- If you want to scope discovery to specific VMware objects (vCenter Server datacenters, clusters, hosts, folders of clusters or hosts, or individual servers), review the instructions to set discovery scope to restrict the account that Azure Migrate uses.
- If you want to add multiple credentials at once, select Add more to save and add more credentials. Multiple credentials are supported for discovery of servers across multiple vCenter Servers using a single appliance.
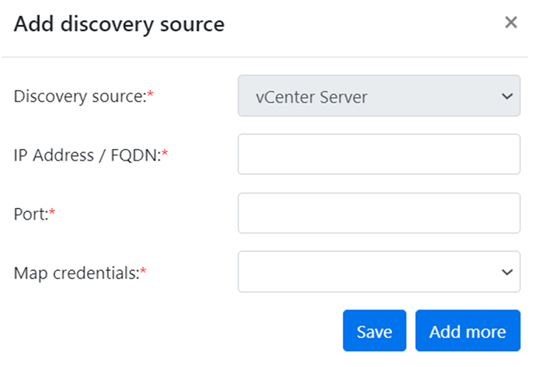
In Step 2: Provide vCenter Server details, select Add discovery source to add the IP address or FQDN of a vCenter Server. You can leave the port as the default (443) or specify a custom port on which vCenter Server listens. Select the friendly name for credentials you would like to map to the vCenter Server and select Save.
Select on Add more to save the previous details and add more vCenter Server details. You can add up to 10 vCenter Servers per appliance.
The appliance attempts to validate the connection to the vCenter Server(s) added by using the credentials mapped to each vCenter Server. It displays the validation status with the vCenter Server(s) IP address or FQDN in the sources table.
You can revalidate the connectivity to vCenter Server(s) anytime before starting discovery.
Provide server credentials
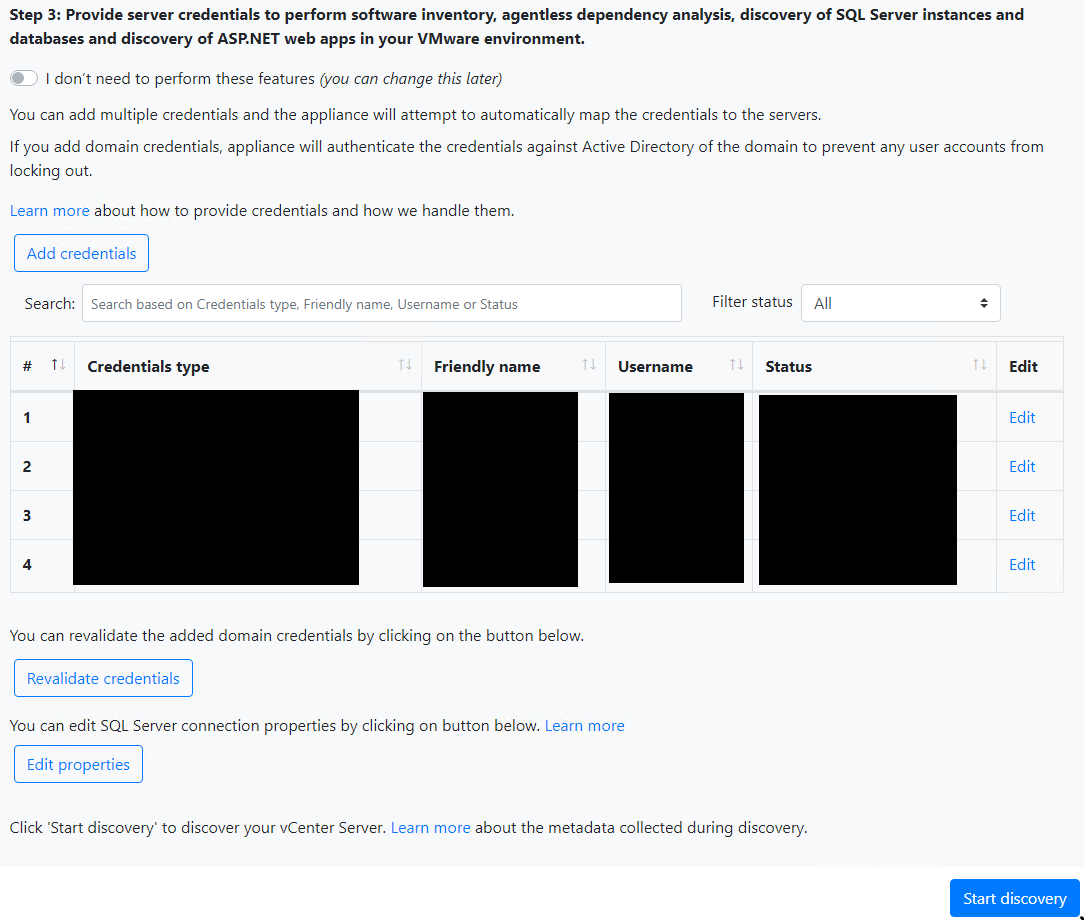
In Step 3: Provide server credentials to perform software inventory, agentless dependency analysis, discovery of SQL Server instances and databases and discovery of ASP.NET web apps in your VMware environment., you can provide multiple server credentials. If you don't want to use any of these appliance features, you can skip this step and proceed with vCenter Server discovery. You can change this option at any time.
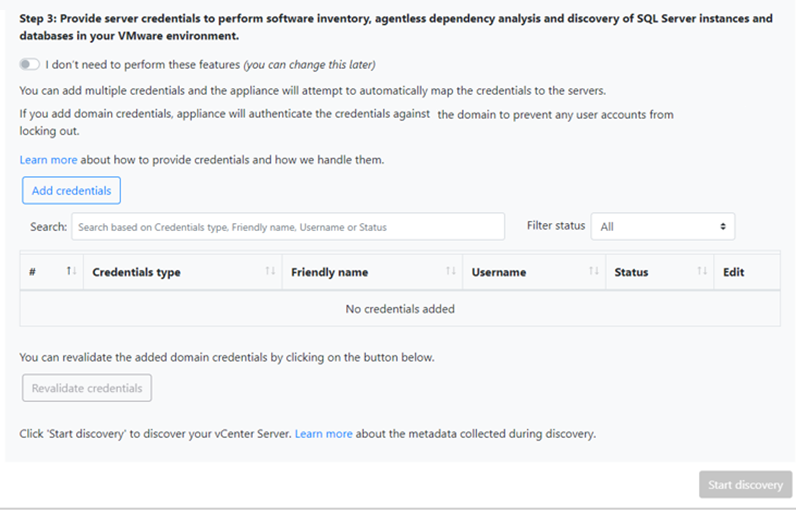
If you want to use these features, provide server credentials by completing the following steps. The appliance attempts to automatically map the credentials to the servers to perform the discovery features.
To add server credentials:
Select Add Credentials.
In the dropdown menu, select Credentials type.
You can provide domain/, Windows(non-domain)/, Linux(non-domain)/, and SQL Server authentication credentials. Learn how to provide credentials and how we handle them.
For each type of credentials, enter:
- A friendly name.
- A username.
- A password. Select Save.
If you choose to use domain credentials, you also must enter the FQDN for the domain. The FQDN is required to validate the authenticity of the credentials with the Active Directory instance in that domain.
Review the required permissions on the account for Step 3: Provide server credentials to perform software inventory, agentless dependency analysis, discovery of SQL Server instances and databases and discovery of ASP.NET web apps.
To add multiple credentials at once, select Add more to save credentials, and add more credentials.
When you select Save or Add more, the appliance validates the domain credentials with the domain's Active Directory instance for authentication. Validation is made after each addition to avoid account lockouts as the appliance iterates to map credentials to respective servers.
To check validation of the domain credentials:
In the configuration manager, in the credentials table, see the Validation status for domain credentials. Only domain credentials are validated.
If validation fails, you can select a Failed status to see the validation error. Fix the issue, and select Revalidate credentials to reattempt validation of the credentials.
Note
Ensure that the following special characters are not passed in any credentials as they are not supported for SSO passwords:
- Non-ASCII characters.
- Ampersand (&)
- Semicolon (;)
- Double quotation mark (")
- Single quotation mark (')
- Circumflex (^)
- Backslash (\)
- Percentage (%)
- Angle brackets (<,>)
- Pound (£)
Start discovery
To start vCenter Server discovery, in Step 3: Provide server credentials to perform software inventory, agentless dependency analysis, discovery of SQL Server instances and databases and discovery of ASP.NET web apps in your VMware environment., select Start discovery. After the discovery is successfully initiated, you can check the discovery status by looking at the vCenter Server IP address or FQDN in the sources table.
How discovery works
- It takes approximately 20-25 minutes for the discovery of servers across 10 vCenter Servers added to a single appliance.
- If you have provided server credentials, software inventory (discovery of installed applications) is automatically initiated when the discovery of servers running on vCenter Server(s) is finished. Software inventory occurs once every 12 hours.
- Software inventory identifies the SQL Server instances that are running on the servers. Using the information it collects, the appliance attempts to connect to the SQL Server instances through the Windows authentication credentials or the SQL Server authentication credentials that are provided on the appliance. It gathers data on SQL Server databases and their properties. The SQL Server discovery is performed once every 24 hours.
- Software inventory identifies the web server role on the servers. Using the information it collects, the appliance attempts to connect to the IIS web server through the Windows authentication credentials that are provided on the appliance. It gathers data on web apps. The web app discovery is performed once every 24 hours.
- Discovery of installed applications might take longer than 15 minutes. The duration depends on the number of discovered servers. For 500 servers, it takes approximately one hour for the discovered inventory to appear in the Azure Migrate project in the portal.
- During software inventory, the added server credentials are iterated against servers and validated for agentless dependency analysis. When the discovery of servers is finished, in the portal, you can enable agentless dependency analysis on the servers. Only the servers on which validation succeeds can be selected to enable agentless dependency analysis.
- SQL Server instances and databases data and web apps data begin to appear in the portal within 24 hours after you start discovery.
Next steps
Review the tutorials for VMware assessment and tutorials for agentless migration.