Note
Access to this page requires authorization. You can try signing in or changing directories.
Access to this page requires authorization. You can try changing directories.
Overview
This tutorial shows you how to use Azure Notification Hubs to broadcast breaking news notifications to an iOS app. When complete, you're able to register for breaking news categories you're interested in, and receive only push notifications for those categories. This scenario is a common pattern for many apps where notifications have to be sent to groups of users that have previously declared interest in them, for example, RSS reader, apps for music fans, etc.
Broadcast scenarios are enabled by including one or more tags when creating a registration in the notification hub. When notifications are sent to a tag, devices that have registered for the tag receive the notification. Because tags are simply strings, they don't have to be provisioned in advance. For more information about tags, see Notification Hubs Routing and Tag Expressions.
In this tutorial, you take the following steps:
- Add a category selection to the app
- Send tagged notifications
- Send notifications from the device
- Run the app and generate notifications
Prerequisites
This topic builds on the app you created in Tutorial: Push notifications to iOS apps using Azure Notification Hubs. Before starting this tutorial, you must have already completed Tutorial: Push notifications to iOS apps using Azure Notification Hubs.
Add category selection to the app
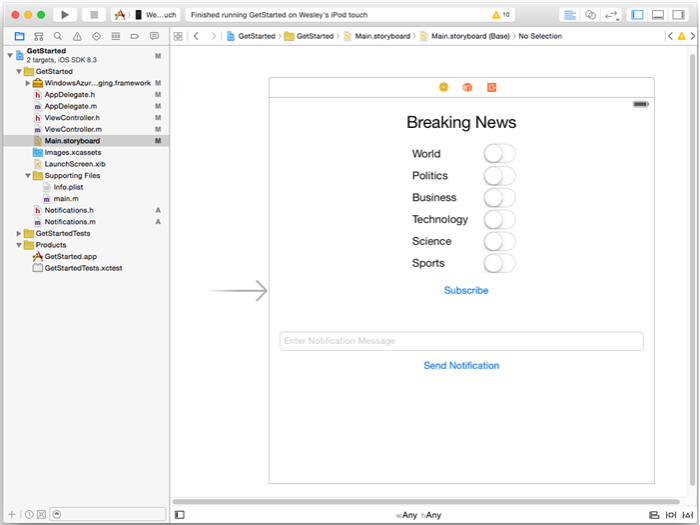
The first step is to add the UI elements to your existing storyboard that enable the user to select categories to register. The categories selected by a user are stored on the device. When the app starts, a device registration is created in your notification hub with the selected categories as tags.
In your MainStoryboard_iPhone.storyboard add the following components from the object library:
A label with Breaking News" text.
Labels with category texts World, Politics, Business, Technology, Science, and Sports.
Six switches, one per category, set each switch State to be Off by default.
One button labeled Subscribe.
Your storyboard should look as follows:

In the assistant editor, create outlets for all the switches and call them WorldSwitch, PoliticsSwitch, BusinessSwitch, TechnologySwitch, ScienceSwitch, and SportsSwitch.
Create an Action for your button called
subscribe; yourViewController.hshould contain the following code:@property (weak, nonatomic) IBOutlet UISwitch *WorldSwitch; @property (weak, nonatomic) IBOutlet UISwitch *PoliticsSwitch; @property (weak, nonatomic) IBOutlet UISwitch *BusinessSwitch; @property (weak, nonatomic) IBOutlet UISwitch *TechnologySwitch; @property (weak, nonatomic) IBOutlet UISwitch *ScienceSwitch; @property (weak, nonatomic) IBOutlet UISwitch *SportsSwitch; - (IBAction)subscribe:(id)sender;Create a new Cocoa Touch Class called
Notifications. Copy the following code in the interface section of the file Notifications.h:@property NSData* deviceToken; - (id)initWithConnectionString:(NSString*)listenConnectionString HubName:(NSString*)hubName; - (void)storeCategoriesAndSubscribeWithCategories:(NSArray*)categories completion:(void (^)(NSError* error))completion; - (NSSet*)retrieveCategories; - (void)subscribeWithCategories:(NSSet*)categories completion:(void (^)(NSError *))completion;Add the following import directive to Notifications.m:
#import <WindowsAzureMessaging/WindowsAzureMessaging.h>Copy the following code in the implementation section of the file Notifications.m.
SBNotificationHub* hub;

- (id)initWithConnectionString:(NSString*)listenConnectionString HubName:(NSString*)hubName{

    hub = [[SBNotificationHub alloc] initWithConnectionString:listenConnectionString
                                notificationHubPath:hubName];

    return self;
}

- (void)storeCategoriesAndSubscribeWithCategories:(NSSet *)categories completion:(void (^)(NSError *))completion {
    NSUserDefaults* defaults = [NSUserDefaults standardUserDefaults];
    [defaults setValue:[categories allObjects] forKey:@"BreakingNewsCategories"];

    [self subscribeWithCategories:categories completion:completion];
}

- (NSSet*)retrieveCategories {
    NSUserDefaults* defaults = [NSUserDefaults standardUserDefaults];

    NSArray* categories = [defaults stringArrayForKey:@"BreakingNewsCategories"];

    if (!categories) return [[NSSet alloc] init];
    return [[NSSet alloc] initWithArray:categories];
}

- (void)subscribeWithCategories:(NSSet *)categories completion:(void (^)(NSError *))completion
{
    NSString* templateBodyAPNS = @"{\"aps\":{\"alert\":\"$(messageParam)\"}}";

    [hub registerTemplateWithDeviceToken:self.deviceToken name:@"simpleAPNSTemplate"
        jsonBodyTemplate:templateBodyAPNS expiryTemplate:@"0" tags:categories completion:completion];
}
This class uses local storage to store and retrieve the categories of news that this device receives. Also, it contains a method to register for these categories using a Template registration.
In the
AppDelegate.hfile, add an import statement forNotifications.hand add a property for an instance of theNotificationsclass:#import "Notifications.h" @property (nonatomic) Notifications* notifications;In the
didFinishLaunchingWithOptionsmethod inAppDelegate.m, add the code to initialize the notifications instance at the beginning of the method.
HUBNAMEandHUBLISTENACCESS(defined inhubinfo.h) should already have the<hub name>and<connection string with listen access>placeholders replaced with your notification hub name and the connection string for DefaultListenSharedAccessSignature that you obtained earlierself.notifications = [[Notifications alloc] initWithConnectionString:HUBLISTENACCESS HubName:HUBNAME];Note
Because credentials that are distributed with a client app aren't generally secure, you should only distribute the key for listen access with your client app. Listen access enables your app to register for notifications, but existing registrations can't be modified and notifications can't be sent. The full access key is used in a secured backend service for sending notifications and changing existing registrations.
In the
didRegisterForRemoteNotificationsWithDeviceTokenmethod inAppDelegate.m, replace the code in the method with the following code to pass the device token to thenotificationsclass. Thenotificationsclass performs the registering for notifications with the categories. If the user changes category selections, call thesubscribeWithCategoriesmethod in response to the subscribe button to update them.Note
Because the device token assigned by the Apple Push Notification Service (APNS) can change at any time, you should register for notifications frequently to avoid notification failures. This example registers for notification every time that the app starts. For apps that are run frequently, more than once a day, you can probably skip registration to preserve bandwidth if less than a day has passed since the previous registration.
self.notifications.deviceToken = deviceToken;

// Retrieves the categories from local storage and requests a registration for these categories
// each time the app starts and performs a registration.

NSSet* categories = [self.notifications retrieveCategories];
[self.notifications subscribeWithCategories:categories completion:^(NSError* error) {
    if (error != nil) {
        NSLog(@"Error registering for notifications: %@", error);
    }
}];
At this point, there should be no other code in the
didRegisterForRemoteNotificationsWithDeviceTokenmethod.The following methods should already be present in
AppDelegate.mfrom completing the Get started with Notification Hubs tutorial. If not, add them.- (void)MessageBox:(NSString *)title message:(NSString *)messageText { UIAlertView *alert = [[UIAlertView alloc] initWithTitle:title message:messageText delegate:self cancelButtonTitle:@"OK" otherButtonTitles: nil]; [alert show]; } - (void)application:(UIApplication *)application didReceiveRemoteNotification: (NSDictionary *)userInfo { NSLog(@"%@", userInfo); [self MessageBox:@"Notification" message:[[userInfo objectForKey:@"aps"] valueForKey:@"alert"]]; }This method handles notifications received when the app is running by displaying a simple UIAlert.
In
ViewController.m, add animportstatement forAppDelegate.hand copy the following code into the XCode-generatedsubscribemethod. This code updates the notification registration to use the new category tags the user has chosen in the user interface.#import "Notifications.h" NSMutableArray* categories = [[NSMutableArray alloc] init]; if (self.WorldSwitch.isOn) [categories addObject:@"World"]; if (self.PoliticsSwitch.isOn) [categories addObject:@"Politics"]; if (self.BusinessSwitch.isOn) [categories addObject:@"Business"]; if (self.TechnologySwitch.isOn) [categories addObject:@"Technology"]; if (self.ScienceSwitch.isOn) [categories addObject:@"Science"]; if (self.SportsSwitch.isOn) [categories addObject:@"Sports"]; Notifications* notifications = [(AppDelegate*)[[UIApplication sharedApplication]delegate] notifications]; [notifications storeCategoriesAndSubscribeWithCategories:categories completion: ^(NSError* error) { if (!error) { UIAlertView *alert = [[UIAlertView alloc] initWithTitle:"Notification" message:"Subscribed" delegate:self cancelButtonTitle:@"OK" otherButtonTitles: nil]; [alert show]; } else { NSLog(@"Error subscribing: %@", error); } }];This method creates an
NSMutableArrayof categories and uses theNotificationsclass to store the list in the local storage and registers the corresponding tags with your notification hub. When categories are changed, the registration is recreated with the new categories.In
ViewController.m, add the following code in theviewDidLoadmethod to set the user interface based on the previously saved categories.// This updates the UI on startup based on the status of previously saved categories. Notifications* notifications = [(AppDelegate*)[[UIApplication sharedApplication]delegate] notifications]; NSSet* categories = [notifications retrieveCategories]; if ([categories containsObject:@"World"]) self.WorldSwitch.on = true; if ([categories containsObject:@"Politics"]) self.PoliticsSwitch.on = true; if ([categories containsObject:@"Business"]) self.BusinessSwitch.on = true; if ([categories containsObject:@"Technology"]) self.TechnologySwitch.on = true; if ([categories containsObject:@"Science"]) self.ScienceSwitch.on = true; if ([categories containsObject:@"Sports"]) self.SportsSwitch.on = true;
The app can now store a set of categories in the device local storage used to register with the notification hub whenever the app starts. The user can change the selection of categories at runtime and click the subscribe method to update the registration for the device. Next, you update the app to send the breaking news notifications directly in the app itself.
(Optional) Send tagged notifications
If you don't have access to Visual Studio, you can skip to the next section and send notifications from the app itself. You can also send the proper template notification from the Azure portal using the debug tab for your notification hub.
In this section, you send breaking news as tagged template notifications from a .NET console app.
In Visual Studio, create a new Visual C# console application:
- On the menu, select File > New > Project.
- In Create a new project, select Console App (.NET Framework) for C# in the list of templates, and select Next.
- Enter a name for the app.
- For Solution, choose Add to solution, and select Create to create the project.
Select Tools > NuGet Package Manager > Package Manager Console and then, in the console window, run the following command:
Install-Package Microsoft.Azure.NotificationHubsThis action adds a reference to the Azure Notification Hubs SDK by using the Microsoft.Azure.NotificationHubs package.
Open the Program.cs file, and add the following
usingstatement:using Microsoft.Azure.NotificationHubs;In the
Programclass, add the following method, or replace it if it already exists:private static async void SendTemplateNotificationAsync() { // Define the notification hub. NotificationHubClient hub = NotificationHubClient.CreateClientFromConnectionString("<connection string with full access>", "<hub name>"); // Apple requires the apns-push-type header for all requests var headers = new Dictionary<string, string> {{"apns-push-type", "alert"}}; // Create an array of breaking news categories. var categories = new string[] { "World", "Politics", "Business", "Technology", "Science", "Sports"}; // Send the notification as a template notification. All template registrations that contain // "messageParam" and the proper tags will receive the notifications. // This includes APNS, WNS, and MPNS template registrations. Dictionary<string, string> templateParams = new Dictionary<string, string>(); foreach (var category in categories) { templateParams["messageParam"] = "Breaking " + category + " News!"; await hub.SendTemplateNotificationAsync(templateParams, category); } }This code sends a template notification for each of the six tags in the string array. The use of tags ensures that devices receive notifications only for the registered categories.
In the preceding code, replace the
<hub name>and<connection string with full access>placeholders with your notification hub name and the connection string for DefaultFullSharedAccessSignature from the dashboard of your notification hub.In the
Main()method, add the following lines:SendTemplateNotificationAsync(); Console.ReadLine();Build the console app.
(Optional) Send notifications from the device
Normally notifications would be sent by a backend service but, you can send breaking news notifications directly from the app. To do so, you update the SendNotificationRESTAPI method that you defined in the Get started with Notification Hubs tutorial.
In
ViewController.m, update theSendNotificationRESTAPImethod as follows so that it accepts a parameter for the category tag and sends the proper template notification.- (void)SendNotificationRESTAPI:(NSString*)categoryTag { NSURLSession* session = [NSURLSession sessionWithConfiguration:[NSURLSessionConfiguration defaultSessionConfiguration] delegate:nil delegateQueue:nil]; NSString *json; // Construct the messages REST endpoint NSURL* url = [NSURL URLWithString:[NSString stringWithFormat:@"%@%@/messages/%@", HubEndpoint, HUBNAME, API_VERSION]]; // Generated the token to be used in the authorization header. NSString* authorizationToken = [self generateSasToken:[url absoluteString]]; //Create the request to add the template notification message to the hub NSMutableURLRequest *request = [NSMutableURLRequest requestWithURL:url]; [request setHTTPMethod:@"POST"]; // Add the category as a tag [request setValue:categoryTag forHTTPHeaderField:@"ServiceBusNotification-Tags"]; // Template notification json = [NSString stringWithFormat:@"{\"messageParam\":\"Breaking %@ News : %@\"}", categoryTag, self.notificationMessage.text]; // Signify template notification format [request setValue:@"template" forHTTPHeaderField:@"ServiceBusNotification-Format"]; // JSON Content-Type [request setValue:@"application/json;charset=utf-8" forHTTPHeaderField:@"Content-Type"]; //Authenticate the notification message POST request with the SaS token [request setValue:authorizationToken forHTTPHeaderField:@"Authorization"]; //Add the notification message body [request setHTTPBody:[json dataUsingEncoding:NSUTF8StringEncoding]]; // Send the REST request NSURLSessionDataTask* dataTask = [session dataTaskWithRequest:request completionHandler:^(NSData *data, NSURLResponse *response, NSError *error) { NSHTTPURLResponse* httpResponse = (NSHTTPURLResponse*) response; if (error || httpResponse.statusCode != 200) { NSLog(@"\nError status: %d\nError: %@", httpResponse.statusCode, error); } if (data != NULL) { //xmlParser = [[NSXMLParser alloc] initWithData:data]; //[xmlParser setDelegate:self]; //[xmlParser parse]; } }]; [dataTask resume]; }In
ViewController.m, update theSend Notificationaction as shown in the code that follows. So that it sends the notifications using each tag individually and sends to multiple platforms.- (IBAction)SendNotificationMessage:(id)sender { self.sendResults.text = @""; NSArray* categories = [NSArray arrayWithObjects: @"World", @"Politics", @"Business", @"Technology", @"Science", @"Sports", nil]; // Lets send the message as breaking news for each category to WNS, Baidu and APNS // using a template. for(NSString* category in categories) { [self SendNotificationRESTAPI:category]; } }Rebuild your project and make sure you have no build errors.
Run the app and generate notifications
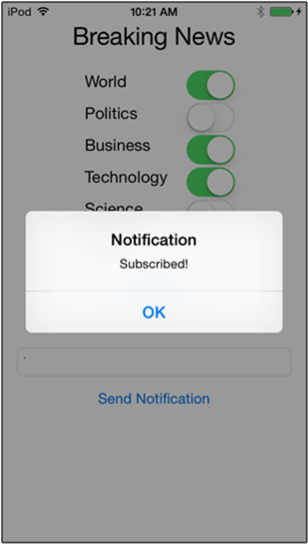
Press the Run button to build the project and start the app. Select some breaking news options to subscribe to and then press the Subscribe button. You should see a dialog indicating the notifications have been subscribed to.

When you choose Subscribe, the app converts the selected categories into tags and requests a new device registration for the selected tags from the notification hub.
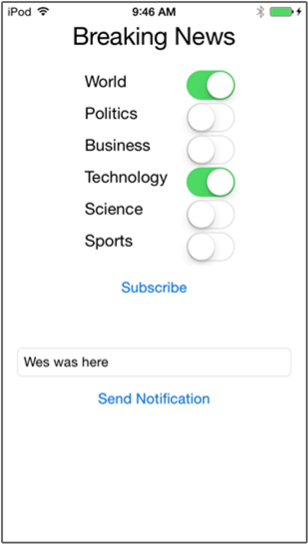
Enter a message to be sent as breaking news then press the Send Notification button. Alternatively, run the .NET console app to generate notifications.

Each device subscribed to breaking news receives the breaking news notifications you just sent.
Next steps
In this tutorial, you sent broadcast notifications to specific iOS devices that have registered for the categories. To learn how to push localized notifications, advance to the following tutorial: