Note
Access to this page requires authorization. You can try signing in or changing directories.
Access to this page requires authorization. You can try changing directories.
This tutorial shows you how to use Azure Notification Hubs to send push notifications to specific Windows Phone 8 or Windows Phone 8.1 devices. If you are targeting Windows Phone 8.1 (non-Silverlight), see the Windows Universal version of this tutorial.
You enable this scenario by including one or more tags when creating a registration in the notification hub. When notifications are sent to a tag, all devices that have registered for the tag receive the notification. For more information about tags, see Tags in registrations.
Note
The Notification Hubs Windows Phone SDK does not support using the Windows Push Notification Service (WNS) with Windows Phone 8.1 Silverlight apps. To use WNS (instead of MPNS) with Windows Phone 8.1 Silverlight apps, follow the [Notification Hubs - Windows Phone Silverlight tutorial], which uses REST APIs.
In this tutorial, you learn how to:
- Add category selection to the mobile app
- Register for notifications with tags
- Send tagged notifications
- Test the app
Prerequisites
Complete the Tutorial: Push notifications to Windows Phone apps by using Azure Notification Hubs. In this tutorial, you update the mobile application so that you can register for breaking news categories you are interested in, and receive only push notifications for those categories.
Add category selection to the mobile app
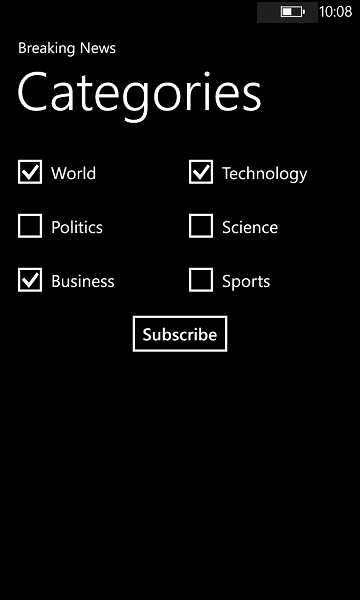
The first step is to add the UI elements to your existing main page that enable the user to select categories to register. The categories selected by a user are stored on the device. When the app starts, a device registration is created in your notification hub with the selected categories as tags.
Open the
MainPage.xamlfile, then replace theGridelements namedTitlePanelandContentPanelwith the following code:<StackPanel x:Name="TitlePanel" Grid.Row="0" Margin="12,17,0,28"> <TextBlock Text="Breaking News" Style="{StaticResource PhoneTextNormalStyle}" Margin="12,0"/> <TextBlock Text="Categories" Margin="9,-7,0,0" Style="{StaticResource PhoneTextTitle1Style}"/> </StackPanel> <Grid Name="ContentPanel" Grid.Row="1" Margin="12,0,12,0"> <Grid.RowDefinitions> <RowDefinition Height="auto"/> <RowDefinition Height="auto" /> <RowDefinition Height="auto" /> <RowDefinition Height="auto" /> </Grid.RowDefinitions> <Grid.ColumnDefinitions> <ColumnDefinition /> <ColumnDefinition /> </Grid.ColumnDefinitions> <CheckBox Name="WorldCheckBox" Grid.Row="0" Grid.Column="0">World</CheckBox> <CheckBox Name="PoliticsCheckBox" Grid.Row="1" Grid.Column="0">Politics</CheckBox> <CheckBox Name="BusinessCheckBox" Grid.Row="2" Grid.Column="0">Business</CheckBox> <CheckBox Name="TechnologyCheckBox" Grid.Row="0" Grid.Column="1">Technology</CheckBox> <CheckBox Name="ScienceCheckBox" Grid.Row="1" Grid.Column="1">Science</CheckBox> <CheckBox Name="SportsCheckBox" Grid.Row="2" Grid.Column="1">Sports</CheckBox> <Button Name="SubscribeButton" Content="Subscribe" HorizontalAlignment="Center" Grid.Row="3" Grid.Column="0" Grid.ColumnSpan="2" Click="SubscribeButton_Click" /> </Grid>Add a class named
Notificationsto the project. Add thepublicmodifier to the class definition. Then, add the followingusingstatements to the new file:using Microsoft.Phone.Notification; using Microsoft.WindowsAzure.Messaging; using System.IO.IsolatedStorage; using System.Windows;Copy the following code into the new
Notificationsclass:private NotificationHub hub; // Registration task to complete registration in the ChannelUriUpdated event handler private TaskCompletionSource<Registration> registrationTask; public Notifications(string hubName, string listenConnectionString) { hub = new NotificationHub(hubName, listenConnectionString); } public IEnumerable<string> RetrieveCategories() { var categories = (string)IsolatedStorageSettings.ApplicationSettings["categories"]; return categories != null ? categories.Split(',') : new string[0]; } public async Task<Registration> StoreCategoriesAndSubscribe(IEnumerable<string> categories) { var categoriesAsString = string.Join(",", categories); var settings = IsolatedStorageSettings.ApplicationSettings; if (!settings.Contains("categories")) { settings.Add("categories", categoriesAsString); } else { settings["categories"] = categoriesAsString; } settings.Save(); return await SubscribeToCategories(); } public async Task<Registration> SubscribeToCategories() { registrationTask = new TaskCompletionSource<Registration>(); var channel = HttpNotificationChannel.Find("MyPushChannel"); if (channel == null) { channel = new HttpNotificationChannel("MyPushChannel"); channel.Open(); channel.BindToShellToast(); channel.ChannelUriUpdated += channel_ChannelUriUpdated; // This is optional, used to receive notifications while the app is running. channel.ShellToastNotificationReceived += channel_ShellToastNotificationReceived; } // If channel.ChannelUri is not null, complete the registrationTask here. // If it is null, the registrationTask will be completed in the ChannelUriUpdated event handler. if (channel.ChannelUri != null) { await RegisterTemplate(channel.ChannelUri); } return await registrationTask.Task; } async void channel_ChannelUriUpdated(object sender, NotificationChannelUriEventArgs e) { await RegisterTemplate(e.ChannelUri); } async Task<Registration> RegisterTemplate(Uri channelUri) { // Using a template registration to support notifications across platforms. // Any template notifications that contain messageParam and a corresponding tag expression // will be delivered for this registration. const string templateBodyMPNS = "<wp:Notification xmlns:wp=\"WPNotification\">" + "<wp:Toast>" + "<wp:Text1>$(messageParam)</wp:Text1>" + "</wp:Toast>" + "</wp:Notification>"; // The stored categories tags are passed with the template registration. registrationTask.SetResult(await hub.RegisterTemplateAsync(channelUri.ToString(), templateBodyMPNS, "simpleMPNSTemplateExample", this.RetrieveCategories())); return await registrationTask.Task; } // This is optional. It is used to receive notifications while the app is running. void channel_ShellToastNotificationReceived(object sender, NotificationEventArgs e) { StringBuilder message = new StringBuilder(); string relativeUri = string.Empty; message.AppendFormat("Received Toast {0}:\n", DateTime.Now.ToShortTimeString()); // Parse out the information that was part of the message. foreach (string key in e.Collection.Keys) { message.AppendFormat("{0}: {1}\n", key, e.Collection[key]); if (string.Compare( key, "wp:Param", System.Globalization.CultureInfo.InvariantCulture, System.Globalization.CompareOptions.IgnoreCase) == 0) { relativeUri = e.Collection[key]; } } // Display a dialog of all the fields in the toast. System.Windows.Deployment.Current.Dispatcher.BeginInvoke(() => { MessageBox.Show(message.ToString()); }); }This class uses the isolated storage to store the categories of news that this device is to receive. It also contains methods to register for these categories using a template notification registration.
In the
App.xaml.csproject file, add the following property to theAppclass. Replace the<hub name>and<connection string with listen access>placeholders with your notification hub name and the connection string for DefaultListenSharedAccessSignature that you obtained earlier.public Notifications notifications = new Notifications("<hub name>", "<connection string with listen access>");Note
Because credentials that are distributed with a client app are not generally secure, you should only distribute the key for listen access with your client app. Listen access enables your app to register for notifications, but existing registrations cannot be modified and notifications cannot be sent. The full access key is used in a secured backend service for sending notifications and changing existing registrations.
In the
MainPage.xaml.cs, add the following line:using Windows.UI.Popups;In the MainPage.xaml.cs project file, add the following method:
private async void SubscribeButton_Click(object sender, RoutedEventArgs e)
{
    var categories = new HashSet<string>();
    if (WorldCheckBox.IsChecked == true) categories.Add("World");
    if (PoliticsCheckBox.IsChecked == true) categories.Add("Politics");
    if (BusinessCheckBox.IsChecked == true) categories.Add("Business");
    if (TechnologyCheckBox.IsChecked == true) categories.Add("Technology");
    if (ScienceCheckBox.IsChecked == true) categories.Add("Science");
    if (SportsCheckBox.IsChecked == true) categories.Add("Sports");

    var result = await ((App)Application.Current).notifications.StoreCategoriesAndSubscribe(categories);

    MessageBox.Show("Subscribed to: " + string.Join(",", categories) + " on registration id : " +
        result.RegistrationId);
}
This method creates a list of categories and uses the
Notificationsclass to store the list in the local storage and register the corresponding tags with your notification hub. When categories are changed, the registration is recreated with the new categories.
Your app is now able to store a set of categories in local storage on the device and register with the notification hub whenever the user changes the selection of categories.
Register for notifications
These steps register with the notification hub on startup using the categories that have been stored in local storage.
Note
Because the channel URI assigned by the Azure Push Notification Service (MPNS) can change at any time, you should register for notifications frequently to avoid notification failures. This example registers for notifications every time that the app starts. For apps that are run frequently, more than once a day, you can probably skip registration to preserve bandwidth if less than a day has passed since the previous registration.
Open the App.xaml.cs file and add the
asyncmodifier toApplication_Launchingmethod and replace the Notification Hubs registration code that you added in Get started with Notification Hubs with the following code:private async void Application_Launching(object sender, LaunchingEventArgs e) { var result = await notifications.SubscribeToCategories(); if (result != null) System.Windows.Deployment.Current.Dispatcher.BeginInvoke(() => { MessageBox.Show("Registration Id :" + result.RegistrationId, "Registered", MessageBoxButton.OK); }); }This code makes sure that every time the app starts it retrieves the categories from local storage and requests a registration for these categories.
In the MainPage.xaml.cs project file, add the following code that implements the
OnNavigatedTomethod:protected override void OnNavigatedTo(NavigationEventArgs e) { var categories = ((App)Application.Current).notifications.RetrieveCategories(); if (categories.Contains("World")) WorldCheckBox.IsChecked = true; if (categories.Contains("Politics")) PoliticsCheckBox.IsChecked = true; if (categories.Contains("Business")) BusinessCheckBox.IsChecked = true; if (categories.Contains("Technology")) TechnologyCheckBox.IsChecked = true; if (categories.Contains("Science")) ScienceCheckBox.IsChecked = true; if (categories.Contains("Sports")) SportsCheckBox.IsChecked = true; }This code updates the main page based on the status of previously saved categories.
The app is now complete and can store a set of categories in the device local storage used to register with the notification hub whenever the user changes the selection of categories. Next, define a backend that can send category notifications to this app.
Send tagged notifications
In this section, you send breaking news as tagged template notifications from a .NET console app.
In Visual Studio, create a new Visual C# console application:
- On the menu, select File > New > Project.
- In Create a new project, select Console App (.NET Framework) for C# in the list of templates, and select Next.
- Enter a name for the app.
- For Solution, choose Add to solution, and select Create to create the project.
Select Tools > NuGet Package Manager > Package Manager Console and then, in the console window, run the following command:
Install-Package Microsoft.Azure.NotificationHubsThis action adds a reference to the Azure Notification Hubs SDK by using the Microsoft.Azure.NotificationHubs package.
Open the Program.cs file, and add the following
usingstatement:using Microsoft.Azure.NotificationHubs;In the
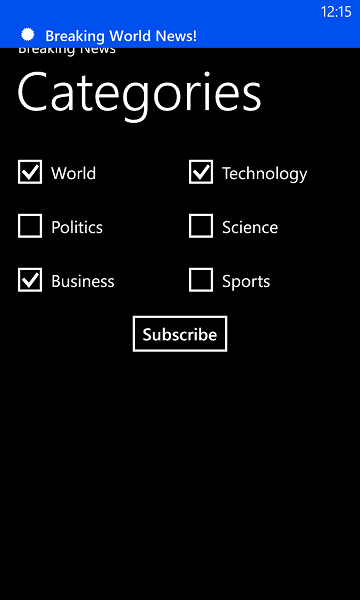
Programclass, add the following method, or replace it if it already exists:private static async void SendTemplateNotificationAsync() { // Define the notification hub. NotificationHubClient hub = NotificationHubClient.CreateClientFromConnectionString("<connection string with full access>", "<hub name>"); // Apple requires the apns-push-type header for all requests var headers = new Dictionary<string, string> {{"apns-push-type", "alert"}}; // Create an array of breaking news categories. var categories = new string[] { "World", "Politics", "Business", "Technology", "Science", "Sports"}; // Send the notification as a template notification. All template registrations that contain // "messageParam" and the proper tags will receive the notifications. // This includes APNS, WNS, and MPNS template registrations. Dictionary<string, string> templateParams = new Dictionary<string, string>(); foreach (var category in categories) { templateParams["messageParam"] = "Breaking " + category + " News!"; await hub.SendTemplateNotificationAsync(templateParams, category); } }This code sends a template notification for each of the six tags in the string array. The use of tags ensures that devices receive notifications only for the registered categories.
In the preceding code, replace the
<hub name>and<connection string with full access>placeholders with your notification hub name and the connection string for DefaultFullSharedAccessSignature from the dashboard of your notification hub.In the
Main()method, add the following lines:SendTemplateNotificationAsync(); Console.ReadLine();Build the console app.
Test the app
In Visual Studio, press F5 to compile and start the app.

The app UI provides a set of toggles that lets you choose the categories to subscribe to.
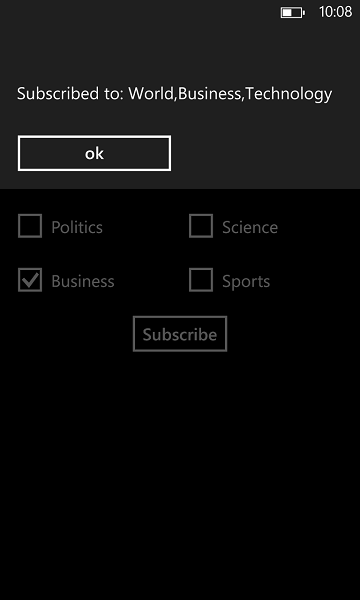
Enable one or more categories toggles, then click Subscribe.
The app converts the selected categories into tags and requests a new device registration for the selected tags from the notification hub. The registered categories are returned and displayed in a dialog.

After receiving a confirmation that your categories were subscription completed, run the console app to send notifications for each category. Verify you only receive a notification for the categories you have subscribed to.

Next steps
In this tutorial, you learned how to push notifications to specific devices that have tags associated with their registrations. To learn how to push notifications to specific users who may be using multiple devices, advance to the following tutorial: