Note
Access to this page requires authorization. You can try signing in or changing directories.
Access to this page requires authorization. You can try changing directories.
This quickstart shows you how to create an Azure Route Server and configure BGP peering with a network virtual appliance (NVA) using Azure CLI. Azure Route Server enables dynamic routing between your virtual network and network virtual appliances, automatically exchanging routes through BGP protocols.
By completing this quickstart, you have a functioning Route Server that can facilitate dynamic route exchange with network virtual appliances in your Azure virtual network.
Important
Route servers created before November 1, 2021, without an associated public IP address, were deployed with the public preview offering. The public preview offering doesn't include General Availability SLA and support. To deploy a route server with the General Availability offering and qualify for the General Availability SLA and support, delete and recreate your route server.
Prerequisites
Before you begin, ensure you have the following requirements:
- An Azure account with an active subscription. Create an account for trial.
- Familiarity with Azure Route Server service limits.
- Azure CLI installed locally.
Azure CLI setup
You can install Azure CLI locally to run the commands. Sign in to Azure using the az login command.
Create a Route Server
This section walks you through creating the foundational infrastructure for Azure Route Server, including the resource group, virtual network, and Route Server instance.
Create resource group and virtual network
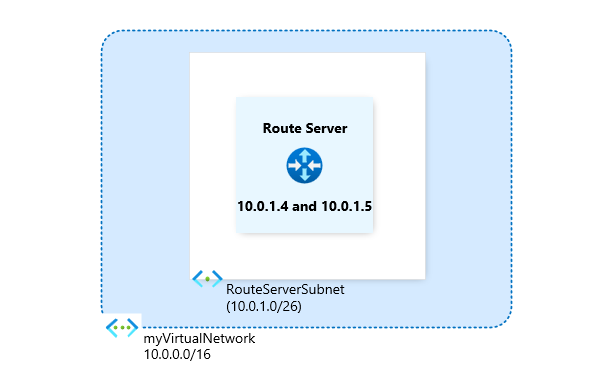
Route Server requires a dedicated subnet named RouteServerSubnet with a minimum size of /26. First, create the resource group and virtual network infrastructure:
Create a resource group using the az group create command:
# Create a resource group
az group create --name 'myResourceGroup' --location 'chinanorth3'
Create a virtual network with the required RouteServerSubnet using the az network virtual network create command:
# Create a virtual network and RouteServerSubnet
az network vnet create --resource-group 'myResourceGroup' --name 'myVirtualNetwork' --subnet-name 'RouteServerSubnet' --subnet-prefixes '10.0.1.0/26'

# Store the subnet ID in a variable for later use
subnetId=$(az network vnet subnet show --name 'RouteServerSubnet' --resource-group 'myResourceGroup' --vnet-name 'myVirtualNetwork' --query id -o tsv)
Create public IP and Route Server
Route Server requires a public IP address to ensure connectivity to the backend management service:
Create a Standard public IP address using the az network public-ip create command:
# Create a Standard public IP for Route Server
az network public-ip create --resource-group 'myResourceGroup' --name 'RouteServerIP' --sku Standard --version 'IPv4'
Create the Route Server using the az network routeserver create command:
# Create the Route Server
az network routeserver create --name 'myRouteServer' --resource-group 'myResourceGroup' --hosted-subnet $subnetId --public-ip-address 'RouteServerIP'
Note
The deployment of the Route Server can take up to 30 minutes.
Configure BGP peering with network virtual appliance
After creating the Route Server, configure BGP peering with your network virtual appliance to enable dynamic route exchange.
Establish BGP peering
Use the az network routeserver peering create command to create a BGP peering session between Route Server and your NVA:
# Create BGP peering with the network virtual appliance
az network routeserver peering create --name 'myNVA' --peer-ip '10.0.0.4' --peer-asn '65001' --routeserver 'myRouteServer' --resource-group 'myResourceGroup'
This command creates a peer named myNVA with:
- Peer IP address: 10.0.0.4 (the NVA's IP address)
- Autonomous System Number (ASN): 65001 (see supported ASN values)
Note
The peer name doesn't need to match the actual NVA name; it's just an identifier for the BGP peering session.
Get Route Server BGP information
To complete the BGP peering configuration on your NVA, you need the Route Server's IP addresses and ASN. Use the az network routeserver show command to retrieve this information:
# Get Route Server details for NVA configuration
az network routeserver show --resource-group 'myResourceGroup' --name 'myRouteServer'
The command returns output similar to the following example. Note the virtualRouterAsn and virtualRouterIps values needed for your NVA configuration:
{
  "allowBranchToBranchTraffic": false,
  "etag": "W/\"aaaa0000-bb11-2222-33cc-444444dddddd\"",
  "hubRoutingPreference": "ExpressRoute",
  "id": "/subscriptions/aaaa0a0a-bb1b-cc2c-dd3d-eeeeee4e4e4e/resourceGroups/myResourceGroup/providers/Microsoft.Network/virtualHubs/myRouteServer",
  "kind": "RouteServer",
  "location": "chinanorth3",
  "name": "myRouteServer",
  "provisioningState": "Succeeded",
  "resourceGroup": "myResourceGroup",
  "routeTable": {
    "routes": []
  },
  "routingState": "Provisioned",
  "sku": "Standard",
  "type": "Microsoft.Network/virtualHubs",
  "virtualHubRouteTableV2s": [],
  "virtualRouterAsn": 65515,
  "virtualRouterAutoScaleConfiguration": {
    "minCapacity": 2
  },
  "virtualRouterIps": [
    "10.0.1.4",
    "10.0.1.5"
  ]
}
Use these values to configure BGP on your NVA:
- ASN: 65515 (virtualRouterAsn)
- Peer IP addresses: 10.0.1.4 and 10.0.1.5 (virtualRouterIps)
Important
We recommend peering each NVA with both route server instances to ensure that virtual network routes are advertised over the NVA connections and achieve high availability.
Clean up resources
When you no longer need the Route Server and associated resources, delete the resource group using the az group delete command:
# Delete the resource group and all contained resources
az group delete --name 'myResourceGroup' --yes --no-wait
Next step
Now that you've created a Route Server and established BGP peering, learn more about Route Server capabilities: