Note
Access to this page requires authorization. You can try signing in or changing directories.
Access to this page requires authorization. You can try changing directories.
Applies to: ✔️ SMB file shares
Before you can configure directory-level and file-level permissions, you must assign share-level permissions to an identity with Azure role-based access control (RBAC). After the share-level permissions propagate, follow the steps in this article to configure Windows access control lists (ACLs), also known as NTFS permissions, for more granular access control.
Prerequisites
Consult the following table to determine which tool can be used to configure ACLs for which authentication type.
| Tool | AD DS (Hybrid) | Entra Domain Services (Hybrid) | Entra Kerberos (Hybrid) |
|---|---|---|---|
| Windows File Explorer | ✔️ | ✔️ | ✔️ |
| icacls | ✔️ | ✔️ | ✔️ |
| Azure portal | ⛔ | ⛔ | ✔️ |
| PowerShell (RestSetAcls module) | ⛔ | ⛔ | ✔️ |
To configure ACLs by using Windows File Explorer or icacls, you need a client machine running Windows. You also need to mount the file share with admin-level access. If the identity source for your storage account is Active Directory Domain Services (AD DS) or Microsoft Entra Kerberos, this machine must have unimpeded network connectivity to an on-premises Active Directory. If the identity source is Microsoft Entra Domain Services, the machine must have unimpeded network connectivity to the domain controllers for the domain that Microsoft Entra Domain Services manages; these domain controllers are located in Azure.
To use the Azure portal or the PowerShell RestSetAcls module, there's no dependency on domain controllers. However, the identities must be hybrid. For RestSetAcls, you need a client machine running Windows.
How Azure RBAC and Windows ACLs work together
Share-level permissions (RBAC roles) act as a high-level gatekeeper that determines whether a user can access the share. Windows ACLs (NTFS permissions) operate at a more granular level to control what operations the user can do at the directory or file level. You can set Windows ACLs at the root, directory, or file level.
When a user tries to access a file or directory, share-level, file-level, and directory-level permissions are enforced. If there are differences among them, only the most restrictive one applies.
For example, if a user has read/write access at the file level, but only read access at a share level, they can only read that file. The same rule applies if the permissions are reversed: if a user has read/write access at the share level, but only read access at the file level, they can still only read the file.
The following table shows how share-level permissions and Windows ACLs work together to determine access to a file or directory in Azure Files.
| No RBAC role | RBAC - SMB Share Reader | RBAC - SMB Share Contributor | RBAC - SMB Share Elevated Contributor | |
|---|---|---|---|---|
| NTFS - None | Access denied | Access denied | Access denied | Access denied |
| NTFS - Read | Access denied | Read | Read | Read |
| NTFS - Read & Execute | Access denied | Read | Read | Read |
| NTFS - List Folder | Access denied | Read | Read | Read |
| NTFS - Write | Access denied | Read | Read, Write | Read, Write |
| NTFS - Modify | Access denied | Read | Read, Write, Delete | Read, Write, Delete, Apply permissions to your own folders/files |
| NTFS - Full | Access denied | Read | Read, Write, Delete | Read, Write, Delete, Apply permissions to anyone's folders/files |
To configure ACLs by using identity-based authentication instead of a storage account key (recommended), you need an additional RBAC role: Storage File Data SMB Admin. This role grants share-level access and the takeOwnership permission, which allows a user to take ownership of any file or directory by using the Windows takeown command, even if there's no existing ACL entry. After taking ownership, the user can modify ACLs. For details, see Use the Windows permission model for SMB admin.
Supported Windows ACLs
Azure Files supports the full set of basic and advanced Windows ACLs.
| Users | Definition |
|---|---|
BUILTIN\Administrators |
Built-in security group that represents administrators of the file server. For Azure Files, this group is empty, and no one can be added to it. |
BUILTIN\Users |
Built-in security group that represents users of the file server. It includes NT AUTHORITY\Authenticated Users by default. For a traditional file server, you can configure the membership definition per server. For Azure Files, there's no hosting server, so BUILTIN\Users includes the same set of users as NT AUTHORITY\Authenticated Users. |
NT AUTHORITY\SYSTEM |
The service account of the operating system of the file server. This service account doesn't apply in Azure Files context. It's included in the root directory to be consistent with the Windows file server experience for hybrid scenarios. |
NT AUTHORITY\Authenticated Users |
All users in Active Directory who can get a valid Kerberos ticket. |
CREATOR OWNER |
The object owner. Each object, either directory or file, has an owner. If ACLs are assigned to CREATOR OWNER on an object, the user who is the owner of the object has ACL-defined permissions to the object. |
The root directory of a file share includes the following permissions:
BUILTIN\Administrators:(OI)(CI)(F)BUILTIN\Users:(RX)BUILTIN\Users:(OI)(CI)(IO)(GR,GE)NT AUTHORITY\Authenticated Users:(OI)(CI)(M)NT AUTHORITY\SYSTEM:(OI)(CI)(F)NT AUTHORITY\SYSTEM:(F)CREATOR OWNER:(OI)(CI)(IO)(F)
For more information on these permissions, see the command-line reference for icacls.
Mount the file share with admin-level access
Before you configure Windows ACLs by using File Explorer or icacls, mount the file share with admin-level access. If you'll configure ACLs by using the Azure portal or the RestSetAcls PowerShell module, skip this section and proceed to Configure Windows ACLs by using the Azure portal or Configure Windows ACLs for identities by using PowerShell.
You have two options for mounting the file share with admin-level access:
Use the Windows permission model for SMB admin (recommended): Assign the built-in RBAC role Storage File Data SMB Admin to admin users who will configure ACLs. Then mount the file share by using identity-based authentication and configure ACLs. If an existing ACL on a file or directory denies the admin access, the admin can use the Windows
takeowncommand to take ownership of the file or directory and then modify the ACL. This approach is more secure because it doesn't require your storage account key to mount the file share.Use the storage account key (less secure): Use your storage account key to mount the file share and then configure ACLs. Mounting with a storage account key gives you immediate full access without needing to take ownership of files or directories. The storage account key is a sensitive credential. For security reasons, use this option only if you can't use identity-based authentication.
If a user has the Full Control ACL and the Storage File Data SMB Share Elevated Contributor role (or a custom role with the required permissions), they can configure ACLs without using the Windows permission model for SMB admin or the storage account key.
Use the Storage File Data SMB Admin role to mount the share
Use the Windows permission model for SMB admin instead of the storage account key. This feature enables you to assign the built-in RBAC role Storage File Data SMB Admin to admin users, so they can mount the share using identity-based authentication and configure ACLs.
If an existing ACL on a file or directory grants the admin sufficient permissions (such as Modify or Full Control), the admin can configure ACLs directly. If the existing ACL denies access, the admin can use the Windows takeown command to take ownership of the target file or directory, and then modify the ACL to grant the appropriate access permissions.
Note
Assigning the Storage File Data SMB Admin RBAC role doesn't work the same way as authenticating with a storage account key. When you mount a share with a storage account key, you get immediate full access to all files and directories without needing to take ownership. With the Storage File Data SMB Admin role, the existing ACLs still apply for normal file access. The role grants the special privilege to take ownership of any file or directory by using the takeown command, which is only needed when the existing ACL doesn't grant the admin sufficient permissions to modify ACLs.
The Storage File Data SMB Admin RBAC role includes the following three data actions:
Microsoft.Storage/storageAccounts/fileServices/readFileBackupSemantics/actionMicrosoft.Storage/storageAccounts/fileServices/writeFileBackupSemantics/actionMicrosoft.Storage/storageAccounts/fileServices/takeOwnership/action
To use the Windows permission model for SMB admin, follow these steps:
Assign the Storage File Data SMB Admin RBAC role to users who configure ACLs. For instructions on how to assign a role, see Assign Azure roles using the Azure portal.
Have users mount the file share by using their domain identity. As long as identity-based authentication is configured for your storage account, you can mount the share and configure and edit Windows ACLs without using your storage account key.
Sign in to a domain-joined device or a device that has unimpeded network connectivity to the domain controllers. Sign in as a Microsoft Entra user if your identity source is Microsoft Entra Domain Services.
Open a Windows command prompt and mount the file share by running the following command. Replace
<YourStorageAccountName>and<FileShareName>with your own values. If drive Z is already in use, replace it with an available drive letter.Use the
net usecommand to mount the share at this stage and not PowerShell. If you use PowerShell to mount the share, the share isn't visible to Windows File Explorer or cmd.exe, and you have difficulty configuring Windows ACLs.net use Z: \\<YourStorageAccountName>.file.core.chinacloudapi.cn\<FileShareName>
Mount the file share by using your storage account key (not recommended)
Warning
If possible, use the Windows permission model for SMB admin to mount the share instead of using the storage account key.
Sign in to a domain-joined device or a device that has unimpeded network connectivity to the domain controllers. Sign in as a Microsoft Entra user if your identity source is Microsoft Entra Domain Services.
Open a Windows command prompt, and mount the file share by running the following command. Replace <YourStorageAccountName>, <FileShareName>, and <YourStorageAccountKey> with your own values. If drive Z is already in use, replace it with an available drive letter. You can find your storage account key in the Azure portal by going to the storage account and selecting Security + networking > Access keys, or you can use the Get-AzStorageAccountKey PowerShell cmdlet.
Use the net use command to mount the share at this stage and not PowerShell. If you use PowerShell to mount the share, the share isn't visible to Windows File Explorer or cmd.exe, and you have difficulty configuring Windows ACLs.
net use Z: \\<YourStorageAccountName>.file.core.chinacloudapi.cn\<FileShareName> /user:localhost\<YourStorageAccountName> <YourStorageAccountKey>
Configure Windows ACLs for Azure file shares
You can configure Windows ACLs by using icacls, or you can use Windows File Explorer. If the identity source for your storage account is Microsoft Entra Kerberos, you can also use the Azure portal or RestSetAcls PowerShell module.
If you have directories or files in on-premises file servers with Windows ACLs configured against the AD DS identities, you can copy them over to Azure Files while preserving the ACLs by using traditional file copy tools like Robocopy or the latest version of Azure AzCopy. If you tier directories and files to Azure Files through Azure File Sync, your ACLs are carried over and persisted in their native format.
Important
If you're using Microsoft Entra Kerberos to authenticate hybrid identities, the hybrid identities must be synced to Microsoft Entra ID for ACLs to be enforced.
You can set file-level and directory-level ACLs for identities that aren't synced to Microsoft Entra ID. However, these ACLs aren't enforced because the Kerberos ticket used for authentication and authorization doesn't contain the not-synced identities. If you're using on-premises AD DS as your identity source, you can include not-synced identities in the ACLs. AD DS puts those security identifiers (SIDs) in the Kerberos ticket, and ACLs are enforced.
Configure Windows ACLs by using icacls
To grant full permissions to all directories and files under the file share, including the root directory, run the following Windows command from a machine that has unimpeded network connectivity to the Active Directory domain controller. Remember to replace the placeholder values in the example with your own values. If your identity source is Microsoft Entra Domain Services, then <user-upn> is <user-email>.
icacls <mapped-drive-letter>: /grant <user-upn>:(f)
For more information on how to use icacls to set Windows ACLs and on the types of supported permissions, see the command-line reference for icacls.
Configure Windows ACLs by using Windows File Explorer
If you sign in to a domain-joined Windows client, you can use Windows File Explorer to grant full permission to all directories and files under the file share, including the root directory. Using File Explorer works only for hybrid identities.
Important
If your client isn't domain joined, or if your environment has multiple Active Directory forests, don't use File Explorer to configure ACLs. Use icacls instead. This restriction exists because Windows File Explorer ACL configuration requires the client to be domain joined to the Active Directory domain that the storage account is joined to.
To configure ACLs by using Windows File Explorer, follow these steps:
Open Windows File Explorer, right-click the file or directory, and then select Properties.
Select the Security tab.
Select Edit to change permissions.
Change the permissions of existing users, or select Add to grant permissions to new users.
In the prompt window for adding new users, enter the target username that you want to grant permissions to in the Enter the object names to select box. To find the full user principal name (UPN) of the target user, select Check Names.
You might need to specify domain name and domain GUID for your on-premises Active Directory deployment. You can get this information from your domain admin or from an on-premises Active Directory-joined client.
Select OK.
On the Security tab, select all permissions you want to grant your new user.
Select Apply.
Configure Windows ACLs by using the Azure portal
If you configure Microsoft Entra Kerberos as the identity source for your storage account, you can configure Windows ACLs for each Microsoft Entra user or group by using the Azure portal.
Sign in to the Azure portal.
Go to the file share where you want to configure Windows ACLs.
On the service menu, select Browse. If you want to set an ACL at the root folder, select Manage access from the top menu.
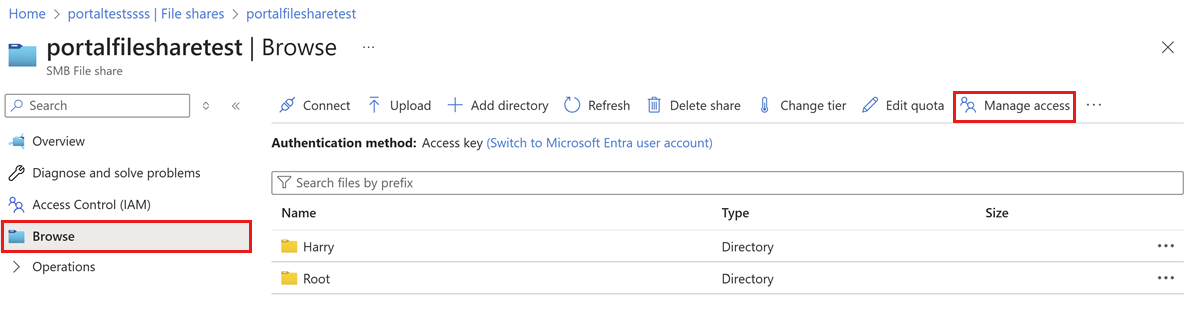
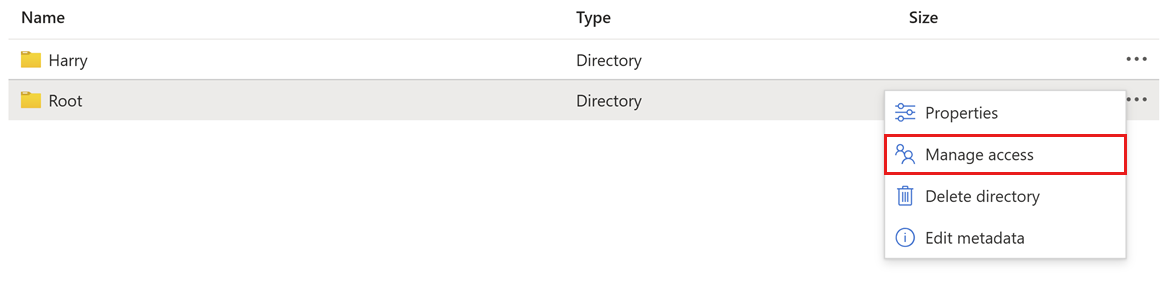
To set an ACL for a file or directory, right-click the file or directory, and then select Manage access.
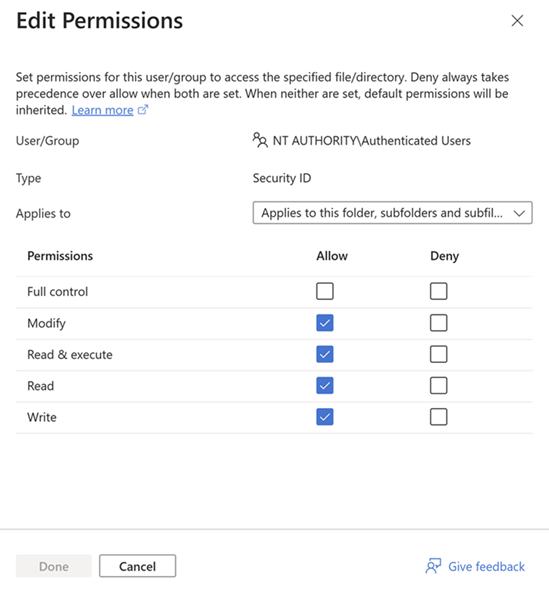
The pane shows the available users and groups. You can optionally add a new user or group. Select the pencil icon at the far right of any user or group to add or edit permissions for the user or group to access the specified file or directory.
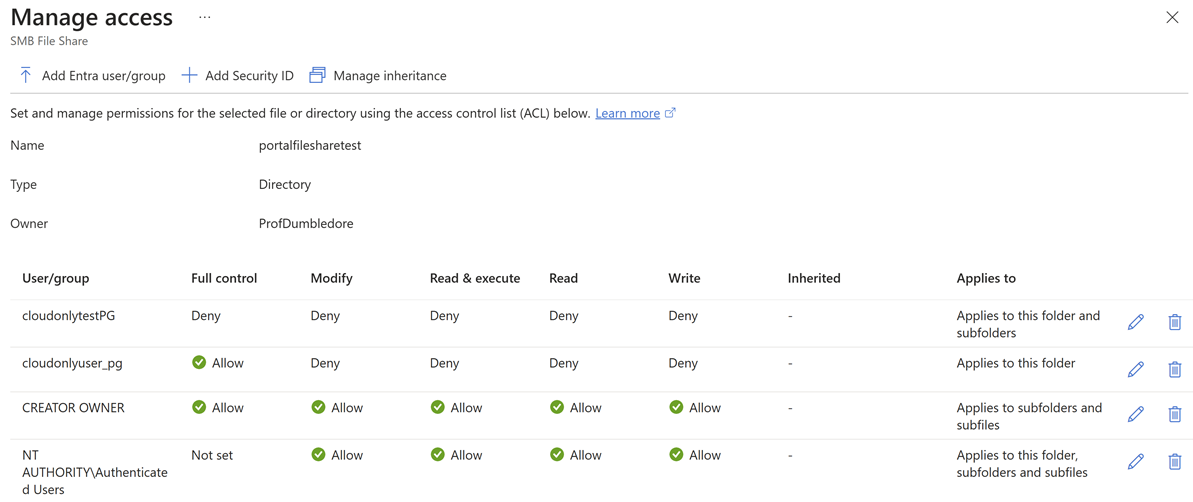
Edit the permissions. Deny always takes precedence over Allow when both are set. When neither is set, default permissions are inherited.
Select Save to set the ACL.


Configure Windows ACLs for identities by using PowerShell
If you need to assign ACLs in bulk to users, use the RestSetAcls PowerShell module to automate the process by using the Azure Files REST API. This module doesn't require network connectivity to Active Directory.
For example, if you want to set a root ACL that gives the user testUser@contoso.com read access:
$AccountName = "<storage-account-name>" # replace with the storage account name
$AccountKey = "<storage-account-key>" # replace with the storage account key
$context = New-AzStorageContext -StorageAccountName $AccountName -StorageAccountKey $AccountKey
Add-AzFileAce -Context $context -FileShareName test -FilePath "/" -Type Allow -Principal "testUser@contoso.com" -AccessRights Read,Synchronize -InheritanceFlags ObjectInherit,ContainerInherit
In this example, -Type Allow creates an allow access control entry (ACE) for the specified user. The -AccessRights Read,Synchronize parameter grants read access along with the Synchronize permission, which is commonly included with file system permissions. The -InheritanceFlags ObjectInherit,ContainerInherit parameter propagates the ACE to both files (ObjectInherit) and subdirectories (ContainerInherit) under the specified path.
Next step
After you configure directory-level and file-level permissions, you can mount the SMB file share on Windows or Linux.