Note
Access to this page requires authorization. You can try signing in or changing directories.
Access to this page requires authorization. You can try changing directories.
Applies to: ✔️ NFS file shares
This article covers the basic aspects of migrating from Linux file servers to NFS Azure file shares, which are only available as SSD (premium) file shares. We'll also compare the open source file copy tools fpsync and rsync to understand how they perform when copying data to Azure file shares.
Note
Azure Files doesn't support NFS access control lists (ACLs).
Prerequisites
You'll need at least one NFS Azure file share mounted to a Linux virtual machine (VM). To create one, see Create an Azure classic file share. We recommend mounting the share with nconnect to use multiple TCP connections. For more information, see Improve NFS Azure file share performance.
Migration tools
Many tools are available to transfer data to NFS file shares. However, not all of them are efficient when dealing with a distributed file system with distinct performance considerations compared to on-premises setups. In a distributed file system, each network call involves a round trip to a server that might not be local. Therefore, optimizing the time spent on network calls is crucial to achieving optimal performance and efficient data transfer over the network.
Using fpsync vs. rsync
Despite being single-threaded, rsync is a versatile, open source file copy tool. It can copy locally, to/from another host over any remote shell, or to/from a remote rsync daemon. It offers many options and enables flexible specification of the set of files to be copied. However, fpsync is a multithreaded application and therefore offers some advantages, including the ability to run rsync jobs in parallel.
In this article, we'll explain how to use fpsync to move data from a Linux file server to NFS Azure file shares.
To copy the data, fpsync uses either rsync (default), cpio, or tar tools. It computes subsets of the source directory src_dir/ and spawns synchronization jobs to synchronize them to the destination directory dst_dir/. It executes synchronization jobs on-the-fly while simultaneously crawling the file system, making it a useful tool for efficiently migrating large file systems and copying large datasets with multiple files.
Note
Fpsync only synchronizes directory contents, not the source directory itself. Unlike rsync, fpsync enforces the final '/' on the source directory, which means that you won't get a subdirectory with the name of the source directory in the target directory after synchronization.
Install fpart
To use fpsync, you'll need to install the fpart filesystem partitioner. Install fpart on the Linux distribution of your choice. Once it's installed, you should see fpsync under /usr/bin/.
On Ubuntu, use the apt package manager to install fpart.
sudo apt-get install fpart
Copy data from source to destination
Make sure your destination (target) Azure file share is mounted to a Linux VM. See Prerequisites.
If you're doing a full migration, you'll copy your data in three phases:
- Baseline copy: Copy from source to destination when no data exists on the destination. For baseline copy, we recommend using fpsync with cpio as the copy tool.
- Incremental copy: Copy only the incremental changes from source to destination. For incremental sync, we recommend using fpsync with rsync as the copy tool. This should be done multiple times in order to capture all the changes.
- Final pass: A final pass is needed to delete any files on the destination that don't exist at the source.
Copying data with fpsync always involves some version of this command:
fpsync -m <specify copy tool - rsync/cpio/tar> -n <parallel transfers> <absolute source path> <absolute destination path>
Baseline copy
For baseline copy, use fpsync with cpio.
fpsync -m cpio -n <parallel transfers> <absolute source path> <absolute destination path>
For more information, see Cpio and Tar support.
Incremental copy
For incremental sync, use fpsync with the default copy tool (rsync). To capture all the changes, we recommend running this several times.
fpsync -n <parallel transfers> <absolute source path> <absolute destination path>
By default, fpsync will specify the following rsync options: -lptgoD -v --numeric-ids. You can specify additional rsync options by adding -o option to the fpsync command.
Final pass
After several incremental syncs, you need to do a final pass to delete any files on that destination that don't exist at source. You can either do this manually with rsync --delete to delete extra files from the /data/dst/ directory, or you can use fpsync with the -E option. For details, see The Final Pass.
Comparing rsync and fpsync with different datasets
This section compares the performance of rsync and fpsync with different datasets.
Datasets and configuration
The following table lists the different datasets we used to compare copy tool performance under different workloads.
| Config # | Copy type | File count | Directory count | File size | Total size |
|---|---|---|---|---|---|
| 1.1 | Baseline copy | 1 million | 1 | 0-32 KiB | 18 GiB |
| 1.2 | Incremental (delta change) | 1 million | 1 | 0-32 KiB | 18 GiB |
| 2 | Baseline copy | 191,345 | 3,906 | 0-32 KiB | 3 GiB |
| 3 | Baseline copy | 5,000 | 1 | 10 MiB | 50 GiB |
The tests were performed on Azure Standard_D8s_v3 VMs with 8 vCPUs, 32 GiB of memory, and more than 1 TiB of disk space for large datasets. For the target, we configured NFS Azure File shares with more than 1 TiB provisioned size.
Experiments and results: rsync vs. fpsync
Based on our experiments with the above configurations, we observed that fpsync performed best when used with 64 threads with rsync and 16 threads with cpio for an Azure NFS file share mounted with nconnect=8. Actual results will vary based on your configuration and datasets.
Note
Throughput for Azure Files can be much higher than represented in the following charts. Some of the experiments were deliberately conducted with small datasets for simplicity.
Configuration 1
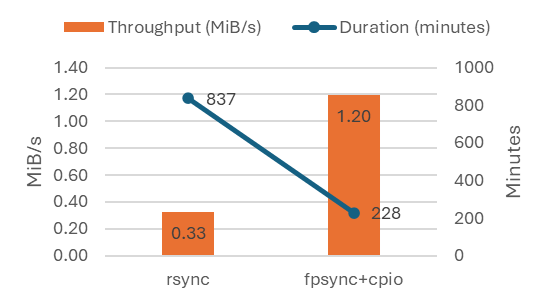
For a single directory with 1 million small files totaling 18 GiB, we ran this test as both a baseline copy and incremental copy.
We observed the following results doing a baseline copy from source to destination.
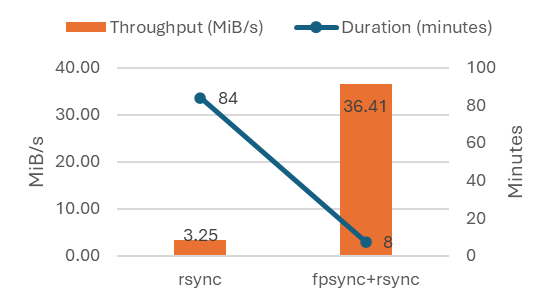
We observed the following results doing an incremental copy (delta change).
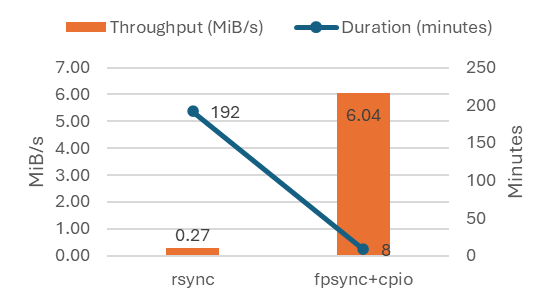
Configuration 2
We observed the following results doing a baseline copy of 191,345 small files in 3,906 directories with a total size of 3 GiB.
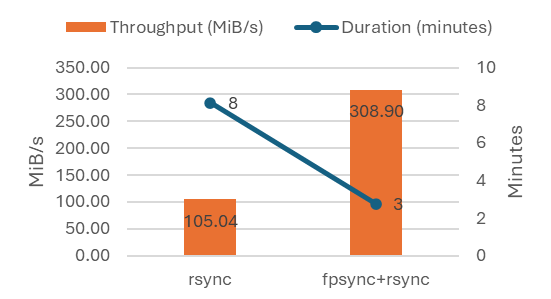
Configuration 3
We observed the following results doing a baseline copy of 5,000 large files (10 MiB) in a single directory with a total size of 50 GiB.
Summary of results
Using multi-threaded applications like fpsync can improve throughput and IOPS when migrating to NFS Azure file shares compared to single-threaded copy tools like rsync. Our tests show that:
- Distributing data across the directory helps parallelize the migration process and thus achieves better performance.
- Copying data from bigger file sizes yields better performance than copying data from smaller file sizes.
The following table summarizes the results:
| Config # | File count | Directory count | File size | Total size | rsync duration | rsync throughput | fpsync duration | fpsync throughput | Throughput gain |
|---|---|---|---|---|---|---|---|---|---|
| 1.1 (baseline) | 1 million | 1 | 0-32 KiB | 18 GiB | 837.06 mins | 0.33 MiB/s | 228.16 mins | 1.20 MiB/s | 267% |
| 1.2 (incremental) | 1 million | 1 | 0-32 KiB | 18 GiB | 84.02 mins | 3.25 MiB/s | 7.5 mins | 36.41 MiB/s | 1,020% |
| 2 (baseline) | 191,345 | 3,906 | 0-32 KiB | 3 GiB | 191.86 mins | 0.27 MiB/s | 8.47 mins | 6.04 MiB/s | 2,164% |
| 3 (baseline) | 5,000 | 1 | 10 MiB | 50 GiB | 8.12 mins | 105.04 MiB/s | 2.76 mins | 308.90 MiB/s | 194% |
Third-party information disclaimer
The open source tools mentioned in this article are well-known third-party solutions. They aren't developed, owned, or supported by Microsoft, either directly or indirectly. It's the customer's responsibility to examine the software license and support statement provided in the third party's documentation.