This article explains how to create private endpoints and restrict public endpoint access for Azure file shares. The classic file share steps also apply to storage accounts that Azure File Sync uses. For Azure File Sync networking requirements, see Configure Azure File Sync proxy and firewall settings.
To choose between private endpoints and network rules, see Azure Files networking considerations.
Prerequisites
Create a private endpoint
When you create a private endpoint for your file shares, you deploy the following Azure resources:
- A private endpoint: An Azure resource that represents the private endpoint. You can think of this resource as a connector between a target resource and a network interface.
- A network interface (NIC): The network interface that maintains a private IP address within the specified virtual network and subnet. This resource is the same as the one you deploy when you deploy a virtual machine (VM). However, instead of assigning it to a VM, the private endpoint owns it.
- A private Domain Name System (DNS) zone: These steps create or reuse an Azure private DNS zone linked to the virtual network and add an A record for the private endpoint. You can use your own DNS infrastructure instead, provided clients resolve the file share's host name to the private endpoint's IP address.
Go to the resource group where you want to create a private endpoint. Select + Create and search for Private Endpoint. Select the private endpoint resource, and then select Create.
The wizard has multiple pages to complete.
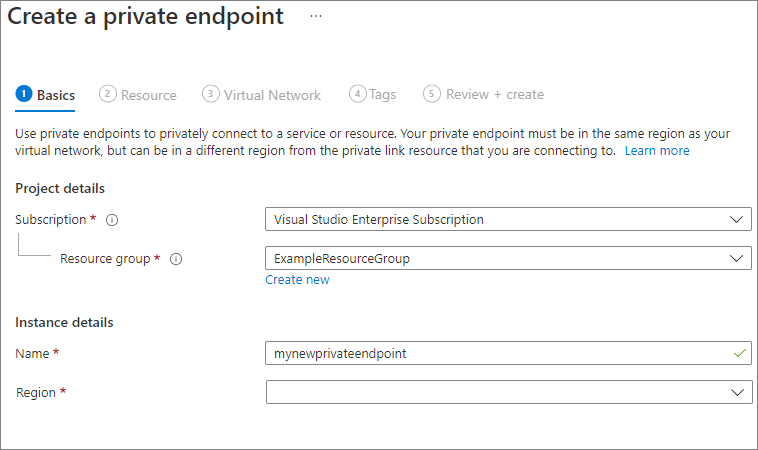
On the Basics page, select the subscription, resource group, name, network interface name, and region for your private endpoint. The private endpoint must be in the same region as its virtual network. Then select Next: Resource.
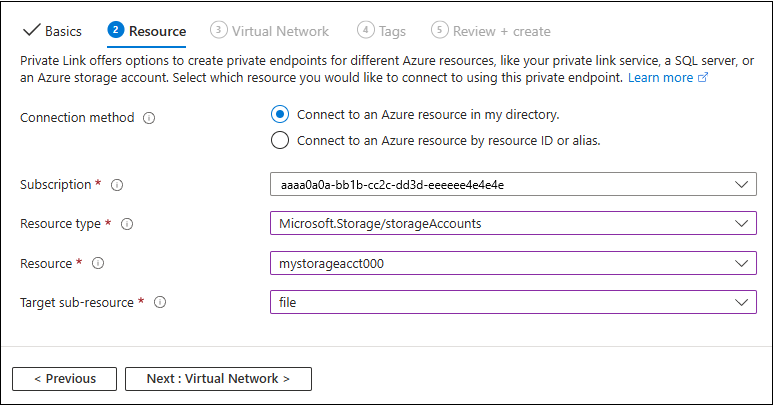
 On the Resource page, select Microsoft.Storage/storageAccounts from the drop-down menu for Resource type. For Resource, select the specific storage account you want to connect to. For Target sub-resource, select
file. Then select Next: Virtual Network.
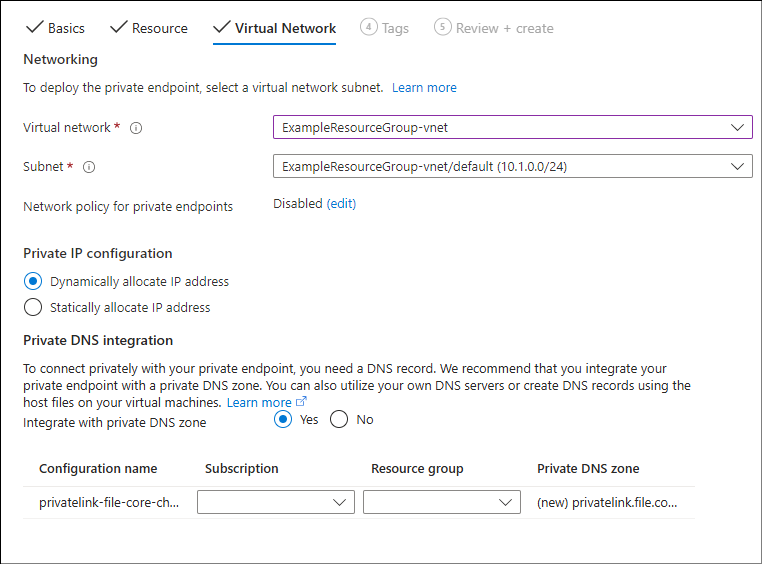
 The Virtual Network page allows you to select the specific virtual network and subnet you want to add your private endpoint to. Select dynamic or static IP address allocation for the new private endpoint. If you select static, you also need to provide a name and a private IP address.
The DNS page contains the information for integrating your private endpoint with a private DNS zone. Make sure the subscription and resource group are correct, and then select Next: Tags.
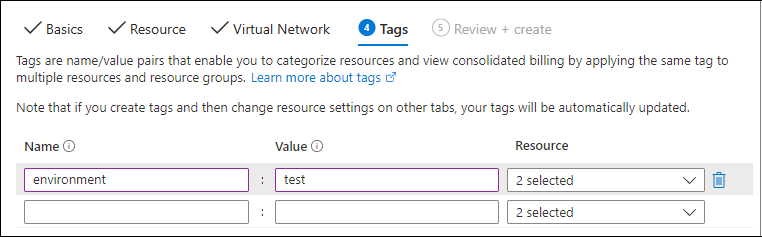
You can optionally apply tags to categorize your resources, such as applying the name Environment and the value Test to all testing resources. Enter any name/value pairs, and then select Next: Review + create.
Select Create to create the private endpoint.
To create a private endpoint, first get a reference to your storage account or your file share and the virtual network subnet where you want to add the private endpoint. Replace the placeholder values in the following code with your own values.
Get a reference to the storage account:
$storageAccountResourceGroupName = "<storage-account-resource-group-name>"
$storageAccountName = "<storage-account-name>"

$storageAccountParams = @{
    ResourceGroupName = $storageAccountResourceGroupName
    Name = $storageAccountName
    ErrorAction = "SilentlyContinue"
}
$storageAccount = Get-AzStorageAccount @storageAccountParams

if ($null -eq $storageAccount) {
    $errorMessage = "Storage account $storageAccountName not found "
    $errorMessage += "in resource group $storageAccountResourceGroupName."
    Write-Error -Message $errorMessage -ErrorAction Stop
}

# Set common variables for private endpoint creation
$resourceGroupName = $storageAccountResourceGroupName
$privateLinkResourceId = $storageAccount.Id
$groupId = "file"
$dnsRecordName = $storageAccountName
Get references to the virtual network and subnet:
$virtualNetworkResourceGroupName = "<vnet-resource-group-name>"
$virtualNetworkName = "<vnet-name>"
$subnetName = "<vnet-subnet-name>"

# Get virtual network reference, and throw error if it doesn't exist
$virtualNetworkParams = @{
    ResourceGroupName = $virtualNetworkResourceGroupName
    Name = $virtualNetworkName
    ErrorAction = "SilentlyContinue"
}
$virtualNetwork = Get-AzVirtualNetwork @virtualNetworkParams

if ($null -eq $virtualNetwork) {
    $errorMessage = "Virtual network $virtualNetworkName not found "
    $errorMessage += "in resource group $virtualNetworkResourceGroupName."
    Write-Error -Message $errorMessage -ErrorAction Stop
}

# Get reference to virtual network subnet, and throw error if it doesn't exist
$subnet = $virtualNetwork |
    Select-Object -ExpandProperty Subnets |
    Where-Object { $_.Name -eq $subnetName }

if ($null -eq $subnet) {
    $errorMessage = "Subnet $subnetName not found in virtual network $virtualNetworkName."
    Write-Error -Message $errorMessage -ErrorAction Stop
}
To create a private endpoint, you must create a private link service connection. The private link service connection is an input to the creation of the private endpoint.
# Disable private endpoint network policies
$subnet.PrivateEndpointNetworkPolicies = "Disabled"
$virtualNetwork = $virtualNetwork | Set-AzVirtualNetwork -ErrorAction Stop

# Create a private link service connection.
$connectionParams = @{
    Name = "$dnsRecordName-Connection"
    PrivateLinkServiceId = $privateLinkResourceId
    GroupId = $groupId
    ErrorAction = "Stop"
}
$privateEndpointConnection = New-AzPrivateLinkServiceConnection @connectionParams

# Create a new private endpoint.
$privateEndpointParams = @{
    ResourceGroupName = $resourceGroupName
    Name = "$dnsRecordName-PrivateEndpoint"
    Location = $virtualNetwork.Location
    Subnet = $subnet
    PrivateLinkServiceConnection = $privateEndpointConnection
    ErrorAction = "Stop"
}
$privateEndpoint = New-AzPrivateEndpoint @privateEndpointParams
Link an Azure private DNS zone to the virtual network so clients resolve the file share's original host name to the private endpoint's IP address. The following commands use a zone that's already linked to the virtual network. If none is linked, they use the zone in the virtual network's resource group, or create one, and link it.
# Get the host name suffix (core.chinacloudapi.cn for Azure China cloud).
$hostNameSuffix = Get-AzContext |
    Select-Object -ExpandProperty Environment |
    Select-Object -ExpandProperty StorageEndpointSuffix

# For Azure China cloud, this generates the following DNS suffix:
# privatelink.file.core.chinacloudapi.cn.
$dnsZoneName = "privatelink.file.$hostNameSuffix"

# Find a DNS zone matching desired name attached to this virtual network.
$dnsZone = Get-AzPrivateDnsZone |
    Where-Object { $_.Name -eq $dnsZoneName } |
    Where-Object {
        $dnsLinkParams = @{
            ResourceGroupName = $_.ResourceGroupName
            ZoneName = $_.Name
            ErrorAction = "SilentlyContinue"
        }
        $privateDnsLink = Get-AzPrivateDnsVirtualNetworkLink @dnsLinkParams

        $privateDnsLink.VirtualNetworkId -eq $virtualNetwork.Id
    }

if ($null -eq $dnsZone) {
    # No matching DNS zone attached to virtual network, so use the zone in the
    # virtual network's resource group, or create one, and link it.
    $dnsZoneParams = @{
        ResourceGroupName = $virtualNetworkResourceGroupName
        Name = $dnsZoneName
        ErrorAction = "SilentlyContinue"
    }
    $dnsZone = Get-AzPrivateDnsZone @dnsZoneParams

    if ($null -eq $dnsZone) {
        $dnsZoneParams.ErrorAction = "Stop"
        $dnsZone = New-AzPrivateDnsZone @dnsZoneParams
    }

    $dnsLinkParams = @{
        ResourceGroupName = $virtualNetworkResourceGroupName
        ZoneName = $dnsZoneName
        Name = "$virtualNetworkName-DnsLink"
        VirtualNetworkId = $virtualNetwork.Id
        ErrorAction = "Stop"
    }
    $privateDnsLink = New-AzPrivateDnsVirtualNetworkLink @dnsLinkParams
}
Now that you have a reference to the private DNS zone, create an A record.
$privateEndpointIP = $privateEndpoint |
    Select-Object -ExpandProperty NetworkInterfaces |
    Select-Object @{
        Name = "NetworkInterfaces"
        Expression = { Get-AzNetworkInterface -ResourceId $_.Id }
    } |
    Select-Object -ExpandProperty NetworkInterfaces |
    Select-Object -ExpandProperty IpConfigurations |
    Select-Object -ExpandProperty PrivateIpAddress

$privateDnsRecordConfig = New-AzPrivateDnsRecordConfig -IPv4Address $privateEndpointIP

$dnsRecordParams = @{
    ResourceGroupName = $dnsZone.ResourceGroupName
    Name = $dnsRecordName
    RecordType = "A"
    ZoneName = $dnsZone.Name
    Ttl = 600
    PrivateDnsRecords = $privateDnsRecordConfig
    ErrorAction = "Stop"
}
New-AzPrivateDnsRecordSet @dnsRecordParams | Out-Null
To create a private endpoint, first get a reference to your storage account or file share, plus the virtual network subnet where you want to add the private endpoint. Replace the placeholder values in the following steps with your own values.
Get a reference to the storage account:
storageAccountResourceGroupName="<storage-account-resource-group-name>"
storageAccountName="<storage-account-name>"

# Get storage account ID
privateLinkResourceId=$(az storage account show \
    --resource-group $storageAccountResourceGroupName \
    --name $storageAccountName \
    --query "id" --output tsv)

# Set common variables for private endpoint creation
resourceGroupName=$storageAccountResourceGroupName
groupId="file"
dnsRecordName=$storageAccountName
After setting the common variables. Get references to the virtual network and subnet:
virtualNetworkResourceGroupName="<vnet-resource-group-name>"
virtualNetworkName="<vnet-name>"
subnetName="<vnet-subnet-name>"

virtualNetwork=$(az network vnet show \
    --resource-group $virtualNetworkResourceGroupName \
    --name $virtualNetworkName \
    --query "id" --output tsv)

subnet=$(az network vnet subnet show \
    --resource-group $virtualNetworkResourceGroupName \
    --vnet-name $virtualNetworkName \
    --name $subnetName \
    --query "id" --output tsv)
To create a private endpoint, make sure the subnet's private endpoint network policy is disabled, and then create the private endpoint with az network private-endpoint create.
# Disable private endpoint network policies
az network vnet subnet update \
    --ids $subnet \
    --private-endpoint-network-policies Disabled \
    --output none

# Get virtual network location
region=$(az network vnet show \
    --ids $virtualNetwork \
    --query "location" --output tsv)

# Create a private endpoint
privateEndpoint=$(az network private-endpoint create \
    --resource-group $resourceGroupName \
    --name "$dnsRecordName-PrivateEndpoint" \
    --location $region \
    --subnet $subnet \
    --private-connection-resource-id $privateLinkResourceId \
    --group-id $groupId \
    --connection-name "$dnsRecordName-Connection" \
    --query "id" --output tsv)
Link an Azure private DNS zone to the virtual network so clients resolve the file share's original host name to the private endpoint's IP address. The following commands use a zone that's already linked to the virtual network. If none is linked, they use the zone in the virtual network's resource group, or create one, and link it.
# Get the desired storage account suffix (core.chinacloudapi.cn for Azure China cloud).
storageAccountSuffix=$(az cloud show \
    --query "suffixes.storageEndpoint" --output tsv)

# For Azure China cloud, this generates the DNS suffix:
# privatelink.file.core.chinacloudapi.cn.
dnsZoneName="privatelink.file.$storageAccountSuffix"

# Find a DNS zone matching the desired name attached to this virtual network.
possibleDnsZones=$(az network private-dns zone list \
    --query "[?name == '$dnsZoneName'].id" \
    --output tsv)

dnsZone=""
for possibleDnsZone in $possibleDnsZones
do
    possibleResourceGroupName=$(az resource show \
        --ids $possibleDnsZone \
        --query "resourceGroup" --output tsv)

    link=$(az network private-dns link vnet list \
        --resource-group $possibleResourceGroupName \
        --zone-name $dnsZoneName \
        --query "[?virtualNetwork.id == '$virtualNetwork'].id" \
        --output tsv)

    if [ -n "$link" ]
    then
        dnsZoneResourceGroup=$possibleResourceGroupName
        dnsZone=$possibleDnsZone
        break
    fi
done

if [ -z "$dnsZone" ]
then
    # No matching DNS zone is linked to the virtual network. Use the zone in the
    # virtual network's resource group if it exists, or create a new one.
    dnsZone=$(az network private-dns zone list \
        --resource-group $virtualNetworkResourceGroupName \
        --query "[?name == '$dnsZoneName'].id" \
        --output tsv)

    if [ -z "$dnsZone" ]
    then
        dnsZone=$(az network private-dns zone create \
            --resource-group $virtualNetworkResourceGroupName \
            --name $dnsZoneName \
            --query "id" --output tsv)
    fi

    az network private-dns link vnet create \
        --resource-group $virtualNetworkResourceGroupName \
        --zone-name $dnsZoneName \
        --name "$virtualNetworkName-DnsLink" \
        --virtual-network $virtualNetwork \
        --registration-enabled false \
        --output none

    dnsZoneResourceGroup=$virtualNetworkResourceGroupName
fi
Now that you have a reference to the private DNS zone, create an A record.
privateEndpointNIC=$(az network private-endpoint show \
    --ids $privateEndpoint \
    --query "networkInterfaces[0].id" --output tsv)

privateEndpointIP=$(az network nic show \
    --ids $privateEndpointNIC \
    --query "ipConfigurations[0].privateIPAddress" --output tsv)

az network private-dns record-set a create \
    --resource-group $dnsZoneResourceGroup \
    --zone-name $dnsZoneName \
    --name $dnsRecordName \
    --output none

az network private-dns record-set a add-record \
    --resource-group $dnsZoneResourceGroup \
    --zone-name $dnsZoneName \
    --record-set-name $dnsRecordName \
    --ipv4-address $privateEndpointIP \
    --output none
Verify connectivity
Run the checks from a client in the virtual network, or from a connected network with DNS configured to resolve the private endpoint. Use the original host name to mount the share, not the privatelink name.
Run the following DNS lookup from PowerShell, the command line, or a terminal on Windows, Linux, or macOS.
Replace <storage-account-name> with the appropriate storage account name:
nslookup <storage-account-name>.file.core.chinacloudapi.cn
If successful, you see output similar to the following, where 192.168.0.5 is the private IP address of the private endpoint in your virtual network (output shown for Windows).
Server:  UnKnown
Address:  10.2.4.4

Non-authoritative answer:
Name:    storageaccount.privatelink.file.core.chinacloudapi.cn
Address:  192.168.0.5
Aliases:  storageaccount.file.core.chinacloudapi.cn
To verify DNS resolution, get the host name with Azure PowerShell, and then look it up from a client in the virtual network.
$storageAccountHostName = [System.Uri]::new($storageAccount.PrimaryEndpoints.File) |
    Select-Object -ExpandProperty Host

$storageAccountHostName
On a client in the virtual network, run the following command. Replace <host-name> with the host name from the previous step.
Resolve-DnsName -Name "<host-name>"
If successful, you see output similar to the following, where 192.168.0.5 is the private IP address of the private endpoint in your virtual network.
Name                             Type   TTL   Section    NameHost
----                             ----   ---   -------    --------
storageaccount.file.core.chinacloudapi.cn CNAME  60    Answer     storageaccount.privatelink.file.core.chinacloudapi.cn

Name       : storageaccount.privatelink.file.core.chinacloudapi.cn
QueryType  : A
TTL        : 600
Section    : Answer
IP4Address : 192.168.0.5
To verify DNS resolution, get the host name with the Azure CLI, and then look it up from a client in the virtual network.
httpEndpoint=$(az storage account show \
    --resource-group $storageAccountResourceGroupName \
    --name $storageAccountName \
    --query "primaryEndpoints.file" --output tsv)

hostName=${httpEndpoint#https://}
hostName=${hostName%/}
echo $hostName
On a client in the virtual network, run the following command. Replace <host-name> with the host name from the previous step.
nslookup <host-name>
If successful, you see output similar to the following, where 192.168.0.5 is the private IP address of the private endpoint in your virtual network.
Server:         127.0.0.53
Address:        127.0.0.53#53

Non-authoritative answer:
storageaccount.file.core.chinacloudapi.cn      canonical name = storageaccount.privatelink.file.core.chinacloudapi.cn.
Name:   storageaccount.privatelink.file.core.chinacloudapi.cn
Address: 192.168.0.5
Restrict public endpoint access
You can disable public network access or keep it enabled for selected networks. Private endpoints continue to work.
Classic file shares can also use a network security perimeter, subject to its protocol limitations. In Enforced mode, a perimeter denies traffic through service endpoints that don't have an assigned IP address. Clients must use a private endpoint or a standard service endpoint.
Disable public network access
When you disable public network access, clients can't connect through the public endpoint, including through service endpoints. Clients can still connect through private endpoints. This setting doesn't restrict outbound traffic from the clients.
Note
Existing trusted service and resource instance exceptions remain in effect after you disable public network access. Review these exceptions if you require access only through private endpoints. See Exceptions for Azure services.
To disable public network access for classic file shares, follow these steps:
- Go to the storage account where you want to restrict all inbound access to the public endpoint.
- From the service menu, under Security + networking, select Networking.
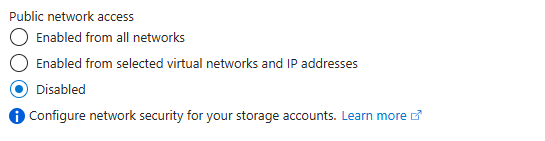
- Under Public network access, select Disable.
- Select Save.

Set -PublicNetworkAccess to Disabled on the storage account.
# Use the storage account variables from the beginning of this article.
$publicNetworkAccessParams = @{
    ResourceGroupName = $storageAccountResourceGroupName
    Name = $storageAccountName
    PublicNetworkAccess = "Disabled"
    ErrorAction = "Stop"
}
Set-AzStorageAccount @publicNetworkAccessParams | Out-Null
Set --public-network-access to Disabled on the storage account.
# This assumes $storageAccountResourceGroupName and $storageAccountName
# are still defined from the beginning of this article.
az storage account update \
    --resource-group $storageAccountResourceGroupName \
    --name $storageAccountName \
    --public-network-access Disabled \
    --output none
Restrict access to the public endpoint to specific networks
To allow clients from selected subnets, keep public network access enabled, enable service endpoints on those subnets, and add the subnets to the resource's network rules. You can use service endpoints with or without private endpoints. Subnets can be in other regions, subscriptions, and Microsoft Entra tenants. To add a subnet from another tenant, use PowerShell or the Azure CLI. For considerations, see Virtual network rules.
For SMB and FileREST access, you can also add IP address rules. IP address rules don't grant NFS access. For NFS access, use a virtual network rule. If the storage account is in a network security perimeter, you can use a standard service endpoint instead.
The PowerShell and CLI examples assume public network access is already enabled. To configure that endpoint, see Enable service endpoints on a subnet.
Fllow these steps to restrict the public endpoint to specific networks.
- Go to the storage account where you want to restrict the public endpoint to specific networks.
- From the service menu, under Security + networking, select Networking.
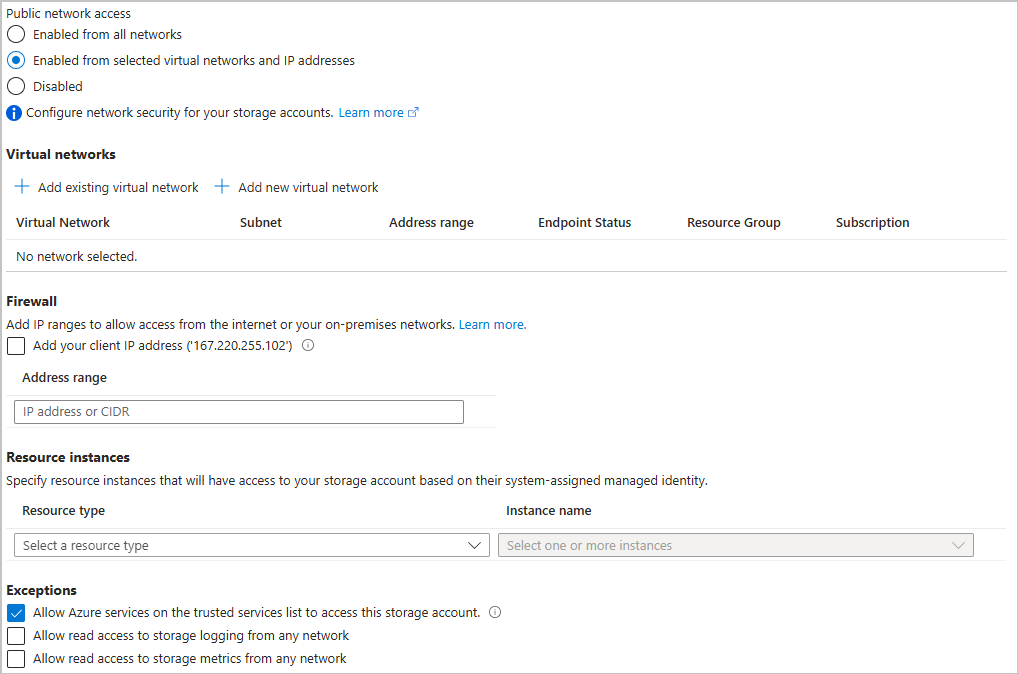
- Under Public network access scope, select Enabled from selected virtual networks and IP addresses. This selection reveals a number of settings for controlling the restriction of the public endpoint.
- Under Virtual networks, select Add a virtual network > Add existing virtual network to select the virtual network that should be allowed to access the storage account through the public endpoint. Select a virtual network and a subnet for that virtual network, and then select Enable. If you want to create a new virtual network for this purpose, select Add a virtual network > Add new virtual network, provide the details, and then select Create.
- For SMB or FileREST access, under IPv4 Addresses, enter the public IP addresses or ranges that you want to allow. IP address rules don't grant NFS access.
- If a service integration requires trusted service access, under Exceptions, select Allow trusted Microsoft services to access this resource.
- Select Save.
Restrict access to the storage account's public endpoint to specific virtual networks by using service endpoints. First, collect information about the storage account and virtual network. Replace the placeholder values in the following steps with your own values.
$storageAccountResourceGroupName = "<storage-account-resource-group>"
$storageAccountName = "<storage-account-name>"
$restrictToVirtualNetworkResourceGroupName = "<vnet-resource-group-name>"
$restrictToVirtualNetworkName = "<vnet-name>"
$subnetName = "<subnet-name>"

$storageAccountParams = @{
    ResourceGroupName = $storageAccountResourceGroupName
    Name = $storageAccountName
    ErrorAction = "Stop"
}
$storageAccount = Get-AzStorageAccount @storageAccountParams

$virtualNetworkParams = @{
    ResourceGroupName = $restrictToVirtualNetworkResourceGroupName
    Name = $restrictToVirtualNetworkName
    ErrorAction = "Stop"
}
$virtualNetwork = Get-AzVirtualNetwork @virtualNetworkParams

$subnet = $virtualNetwork |
    Select-Object -ExpandProperty Subnets |
    Where-Object { $_.Name -eq $subnetName }

if ($null -eq $subnet) {
    $errorMessage = "Subnet $subnetName not found in virtual network $restrictToVirtualNetworkName."
    Write-Error -Message $errorMessage -ErrorAction Stop
}
To allow traffic from the virtual network, the Azure network fabric must expose the Microsoft.Storage service endpoint to the virtual network's subnet. The following PowerShell commands add the Microsoft.Storage service endpoint to the subnet if it's not already there.
$serviceEndpoints = $subnet |
    Select-Object -ExpandProperty ServiceEndpoints |
    Select-Object -ExpandProperty Service

if ($serviceEndpoints -notcontains "Microsoft.Storage") {
    # Change the subnet object directly so the subnet keeps its delegations
    # and service endpoint policies.
    $storageEndpointParams = @{
        TypeName = "Microsoft.Azure.Commands.Network.Models.PSServiceEndpoint"
        Property = @{ Service = "Microsoft.Storage" }
    }
    $storageEndpoint = New-Object @storageEndpointParams
    $subnet.ServiceEndpoints = @($subnet.ServiceEndpoints | Where-Object { $_ }) + $storageEndpoint

    $virtualNetwork = $virtualNetwork | Set-AzVirtualNetwork -ErrorAction Stop
}
The final step in restricting traffic to the storage account is to create a virtual network rule and add it to the storage account's network rule set.
$networkRuleParams = @{
    VirtualNetworkResourceId = $subnet.Id
    ErrorAction = "Stop"
}
$networkRule = $storageAccount | Add-AzStorageAccountNetworkRule @networkRuleParams

$networkRuleSetParams = @{
    DefaultAction = "Deny"
    VirtualNetworkRule = $networkRule
    WarningAction = "SilentlyContinue"
    ErrorAction = "Stop"
}
$storageAccount | Update-AzStorageAccountNetworkRuleSet @networkRuleSetParams | Out-Null
These commands preserve existing bypass settings. If an integration requires trusted service access, add -Bypass AzureServices to the update command. The parameter replaces the bypass setting, so include any other bypass options that your workload still requires.
For SMB or FileREST access from the internet, you can also allow public IP addresses or ranges. IP address rules don't apply to clients in the same Azure region as the storage account. For other restrictions, see IP address rules.
$ipAddressOrRange = "<public-ip-address-or-cidr-range>"

$ipRuleParams = @{
    ResourceGroupName = $storageAccountResourceGroupName
    Name = $storageAccountName
    IPAddressOrRange = $ipAddressOrRange
    ErrorAction = "Stop"
}
Add-AzStorageAccountNetworkRule @ipRuleParams | Out-Null
Restrict access to the storage account's public endpoint to specific virtual networks by using service endpoints. First, collect information about the storage account and virtual network. Replace the placeholder values in the following steps with your own values.
storageAccountResourceGroupName="<storage-account-resource-group>"
storageAccountName="<storage-account-name>"
restrictToVirtualNetworkResourceGroupName="<vnet-resource-group-name>"
restrictToVirtualNetworkName="<vnet-name>"
subnetName="<subnet-name>"

storageAccount=$(az storage account show \
    --resource-group $storageAccountResourceGroupName \
    --name $storageAccountName \
    --query "id" --output tsv)

virtualNetwork=$(az network vnet show \
    --resource-group $restrictToVirtualNetworkResourceGroupName \
    --name $restrictToVirtualNetworkName \
    --query "id" --output tsv)

subnet=$(az network vnet subnet show \
    --resource-group $restrictToVirtualNetworkResourceGroupName \
    --vnet-name $restrictToVirtualNetworkName \
    --name $subnetName \
    --query "id" --output tsv)
To allow traffic from the virtual network, the Azure network fabric must expose the Microsoft.Storage service endpoint to the virtual network's subnet. The following CLI commands add the Microsoft.Storage service endpoint to the subnet if it's not already there.
serviceEndpoints=$(az network vnet subnet show \
    --resource-group $restrictToVirtualNetworkResourceGroupName \
    --vnet-name $restrictToVirtualNetworkName \
    --name $subnetName \
    --query "serviceEndpoints[].service" \
    --output tsv)

foundStorageServiceEndpoint=false
for serviceEndpoint in $serviceEndpoints
do
    if [ $serviceEndpoint = "Microsoft.Storage" ]
    then
        foundStorageServiceEndpoint=true
    fi
done

if [ $foundStorageServiceEndpoint = false ]
then
    serviceEndpointList=""

    for serviceEndpoint in $serviceEndpoints
    do
        serviceEndpointList+=$serviceEndpoint
        serviceEndpointList+=" "
    done

    serviceEndpointList+="Microsoft.Storage"

    az network vnet subnet update \
        --ids $subnet \
        --service-endpoints $serviceEndpointList \
        --output none
fi
The final step in restricting traffic to the storage account is to create a virtual network rule and add it to the storage account's network rule set.
az storage account network-rule add \
    --resource-group $storageAccountResourceGroupName \
    --account-name $storageAccountName \
    --subnet $subnet \
    --output none

az storage account update \
    --resource-group $storageAccountResourceGroupName \
    --name $storageAccountName \
    --default-action "Deny" \
    --output none
These commands preserve existing bypass settings. If an integration requires trusted service access, add --bypass AzureServices to the update command. The option replaces the bypass setting, so include any other bypass options that your workload still requires.
For SMB or FileREST access from the internet, you can also allow public IP addresses or ranges. IP address rules don't apply to clients in the same Azure region as the storage account. For other restrictions, see IP address rules.
ipAddressOrRange="<public-ip-address-or-cidr-range>"

az storage account network-rule add \
    --resource-group $storageAccountResourceGroupName \
    --account-name $storageAccountName \
    --ip-address $ipAddressOrRange \
    --output none
Allow access from a standard service endpoint
By using a standard service endpoint, clients in a subnet can reach a storage account in a network security perimeter through a service endpoint. One inbound access rule in the perimeter profile allows every subnet that uses the service endpoint's IP address. The rule applies to SMB, NFS, and FileREST.
The following steps create a public IP address, assign it to the subnet's Microsoft.Storage service endpoint, and add an inbound access rule for the address to the perimeter profile.
Keep these points in mind:
- The storage account must be associated with a network security perimeter. To create a perimeter and associate the storage account, see Quickstart: Create a network security perimeter - Azure portal.
- The subnet must already have the
Microsoft.Storage service endpoint. To add it, see Restrict access to the public endpoint to specific networks.
- The public IP address must use the Standard SKU, static allocation, and IPv4. It must be in the same region as the virtual network.
- You can assign the same IP address to other subnets and virtual networks in the same region, including virtual networks in other subscriptions in the same Microsoft Entra tenant.
- All service endpoints on a subnet must use the same IP address.
- Assigning or changing the IP address resets active connections from the subnet. Plan the change for a maintenance window.
- To assign a public IP address to a service endpoint, you need the
Microsoft.Network/publicIPAddresses/joinServiceEndpointNetworkIdentifier/action permission. The Network Contributor role includes this permission.
- Virtual network rules that allow the subnet continue to apply until the perimeter association is in Enforced mode.
- You can also add the IP address to the storage account's IP address rules instead of a perimeter rule. Without a perimeter, a basic service endpoint with a virtual network rule gives the same access at no extra charge.
To allow access from a standard service endpoint, follow these steps.
- In the search box at the top of the Azure portal, enter Public IP addresses. Select Public IP addresses in the search results.
- Select + Create.
- On the Basics tab, select the subscription, resource group, and the region of your virtual network. Enter a name. For IP Version, select IPv4. For SKU, select Standard.
- Select Review + create, and then select Create.
- After the deployment finishes, go to the new public IP address. Copy the value of IP address.
- Go to the virtual network that contains the client subnet. From the service menu, under Settings, select Subnets. Select the subnet.
- Under Service Endpoints, for Network identifier, select the public IP address that you created.
- In the Services list, for Microsoft.Storage, select Enable network identifier. Select Save.
- Go to the network security perimeter that the storage account is associated with. From the service menu, under Settings, select Profiles. Select the profile that the storage account is associated with.
- From the service menu, under Settings, select Inbound access rules. Select Add.
- For Rule name, enter a name. For Source type, select IP address ranges. For Allowed sources, enter the IP address that you copied, followed by
/32. Select Add.
The following PowerShell commands create a public IP address, assign it to the subnet's Microsoft.Storage service endpoint, and add an inbound access rule for the address to the perimeter profile. Replace the placeholder values with your own values.
$virtualNetworkResourceGroupName = "<vnet-resource-group-name>"
$virtualNetworkName = "<vnet-name>"
$subnetName = "<subnet-name>"
$publicIpName = "<public-ip-name>"
$perimeterResourceGroupName = "<perimeter-resource-group-name>"
$perimeterName = "<perimeter-name>"
$profileName = "<profile-name>"
$accessRuleName = "<access-rule-name>"

$virtualNetworkParams = @{
    ResourceGroupName = $virtualNetworkResourceGroupName
    Name = $virtualNetworkName
    ErrorAction = "Stop"
}
$virtualNetwork = Get-AzVirtualNetwork @virtualNetworkParams

$subnet = $virtualNetwork.Subnets | Where-Object { $_.Name -eq $subnetName }
if ($null -eq $subnet) {
    throw "Subnet '$subnetName' wasn't found in virtual network '$virtualNetworkName'."
}

$storageEndpoint = $subnet.ServiceEndpoints | Where-Object { $_.Service -eq "Microsoft.Storage" }
if ($null -eq $storageEndpoint) {
    throw "The subnet doesn't have the Microsoft.Storage service endpoint. Add it before you continue."
}

$publicIpParams = @{
    ResourceGroupName = $virtualNetworkResourceGroupName
    Name = $publicIpName
    Location = $virtualNetwork.Location
    Sku = "Standard"
    AllocationMethod = "Static"
    IpAddressVersion = "IPv4"
    ErrorAction = "Stop"
}
$publicIp = New-AzPublicIpAddress @publicIpParams

$networkIdentifierParams = @{
    TypeName = "Microsoft.Azure.Commands.Network.Models.PSResourceId"
    Property = @{ Id = $publicIp.Id }
}
$storageEndpoint.NetworkIdentifier = New-Object @networkIdentifierParams
$virtualNetwork | Set-AzVirtualNetwork -ErrorAction Stop | Out-Null

$accessRuleParams = @{
    ResourceGroupName = $perimeterResourceGroupName
    SecurityPerimeterName = $perimeterName
    ProfileName = $profileName
    Name = $accessRuleName
    Direction = "Inbound"
    AddressPrefix = @("$($publicIp.IpAddress)/32")
    ErrorAction = "Stop"
}
New-AzNetworkSecurityPerimeterAccessRule @accessRuleParams | Out-Null
The following CLI commands create a public IP address, assign it to the subnet's Microsoft.Storage service endpoint, and add an inbound access rule for the address to the perimeter profile. Replace the placeholder values with your own values. The az network perimeter commands need the nsp extension for Azure CLI. To install it, run az extension add --name nsp.
virtualNetworkResourceGroupName="<vnet-resource-group-name>"
virtualNetworkName="<vnet-name>"
subnetName="<subnet-name>"
publicIpName="<public-ip-name>"
perimeterResourceGroupName="<perimeter-resource-group-name>"
perimeterName="<perimeter-name>"
profileName="<profile-name>"
accessRuleName="<access-rule-name>"

storageEndpointIndex=$(az network vnet subnet show \
    --resource-group $virtualNetworkResourceGroupName \
    --vnet-name $virtualNetworkName \
    --name $subnetName \
    --query "serviceEndpoints[].service" \
    --output tsv | \
    grep --line-number --line-regexp --fixed-strings "Microsoft.Storage" | \
    cut -d ":" -f 1)

if [ -z "$storageEndpointIndex" ]; then
    echo "The subnet doesn't have the Microsoft.Storage service endpoint. Add it before you continue." >&2
else
    location=$(az network vnet show \
        --resource-group $virtualNetworkResourceGroupName \
        --name $virtualNetworkName \
        --query "location" \
        --output tsv) &&

    az network public-ip create \
        --resource-group $virtualNetworkResourceGroupName \
        --name $publicIpName \
        --location $location \
        --sku Standard \
        --allocation-method Static \
        --version IPv4 \
        --output none &&

    publicIpId=$(az network public-ip show \
        --resource-group $virtualNetworkResourceGroupName \
        --name $publicIpName \
        --query "id" \
        --output tsv) &&

    publicIpAddress=$(az network public-ip show \
        --resource-group $virtualNetworkResourceGroupName \
        --name $publicIpName \
        --query "ipAddress" \
        --output tsv) &&

    az network vnet subnet update \
        --resource-group $virtualNetworkResourceGroupName \
        --vnet-name $virtualNetworkName \
        --name $subnetName \
        --set "serviceEndpoints[$((storageEndpointIndex - 1))].networkIdentifier={\"id\":\"$publicIpId\"}" \
        --output none &&

    az network perimeter profile access-rule create \
        --resource-group $perimeterResourceGroupName \
        --perimeter-name $perimeterName \
        --profile-name $profileName \
        --access-rule-name $accessRuleName \
        --direction Inbound \
        --address-prefixes "$publicIpAddress/32" \
        --output none
fi
Restrict outbound access to specific storage accounts
Network rules for a file share control inbound access. They don't limit which other storage resources clients can access. For classic file shares, you can use a service endpoint policy to limit which storage accounts clients in a subnet can access through service endpoints. The policy filters destinations for traffic that bypasses Azure Firewall and network virtual appliances. It doesn't restrict other outbound paths or replace the destination's network rules and authorization requirements. For more information, see Restrict outbound access with service endpoint policies.
A service endpoint policy defines the allowed storage destinations for clients in the associated subnet. It blocks those clients from accessing other storage accounts through service endpoints. Keep these points in mind:
- Add every storage account that clients in the subnet use before you associate the policy with the subnet. This list includes storage accounts that other workloads in the subnet use.
- The service endpoint policy must be in the same region and subscription as the virtual network.
- A policy can contain only one policy definition for the
Microsoft.Storage service. To allow more storage accounts, add their resource IDs to the same policy definition. You can also allow all storage accounts in a resource group or subscription.
- After you associate a policy with a subnet, the policy applies to traffic to storage accounts in all regions.
- These steps assume that the subnet has no service endpoint policies. If policies are already associated, review and update those policies instead of replacing their associations. The PowerShell and CLI examples stop if they find existing associations.
To create a service endpoint policy and associate it with a subnet, follow these steps. For detailed steps, see Create and associate service endpoint policies.
- In the search box at the top of the Azure portal, enter Service endpoint policy. Select Service endpoint policies in the search results.
- Select + Create.
- On the Basics tab, select the subscription and region of your virtual network. Select a resource group, and enter a name for the policy.
- Select Next: Policy definitions.
- Select + Add a resource. For Service, select Microsoft.Storage. For Scope, select Single account, and then select the storage account that contains your file shares. Select Add. Repeat this step for each storage account that clients in the subnet use.
- Select Review + Create, and then select Create.
- Go to the new service endpoint policy. From the service menu, under Settings, select Associated subnets.
- Select Edit subnet association, select the virtual network and subnet, and then select Apply.
The following PowerShell commands create a service endpoint policy and associate it with a subnet. The policy limits client access from that subnet to one storage account through the service endpoint. The subnet must already have the Microsoft.Storage service endpoint. Replace the placeholder values with your own values.
$storageAccountResourceGroupName = "<storage-account-resource-group>"
$storageAccountName = "<storage-account-name>"
$virtualNetworkResourceGroupName = "<vnet-resource-group-name>"
$virtualNetworkName = "<vnet-name>"
$subnetName = "<subnet-name>"
$policyName = "<service-endpoint-policy-name>"

$storageAccountParams = @{
    ResourceGroupName = $storageAccountResourceGroupName
    Name = $storageAccountName
    ErrorAction = "Stop"
}
$storageAccount = Get-AzStorageAccount @storageAccountParams

$virtualNetworkParams = @{
    ResourceGroupName = $virtualNetworkResourceGroupName
    Name = $virtualNetworkName
    ErrorAction = "Stop"
}
$virtualNetwork = Get-AzVirtualNetwork @virtualNetworkParams

$subnet = $virtualNetwork.Subnets | Where-Object { $_.Name -eq $subnetName }
if ($null -eq $subnet) {
    throw "Subnet '$subnetName' wasn't found in virtual network '$virtualNetworkName'."
}

if ($subnet.ServiceEndpointPolicies.Count -gt 0) {
    throw "The subnet already has service endpoint policies. Review and update them before changing the configuration."
}

# To allow clients to access more storage accounts, add their resource IDs to ServiceResource.
$policyDefinitionParams = @{
    Name = "allowed-storage-accounts"
    Service = "Microsoft.Storage"
    ServiceResource = @($storageAccount.Id)
    ErrorAction = "Stop"
}
$policyDefinition = New-AzServiceEndpointPolicyDefinition @policyDefinitionParams

$policyParams = @{
    ResourceGroupName = $virtualNetworkResourceGroupName
    Name = $policyName
    Location = $virtualNetwork.Location
    ServiceEndpointPolicyDefinition = $policyDefinition
    ErrorAction = "Stop"
}
$policy = New-AzServiceEndpointPolicy @policyParams

$subnet.ServiceEndpointPolicies = @($policy)
$virtualNetwork | Set-AzVirtualNetwork -ErrorAction Stop | Out-Null
The following CLI commands create a service endpoint policy and associate it with a subnet. The policy limits client access from that subnet to one storage account through the service endpoint. The subnet must already have the Microsoft.Storage service endpoint. Replace the placeholder values with your own values.
storageAccountResourceGroupName="<storage-account-resource-group>"
storageAccountName="<storage-account-name>"
virtualNetworkResourceGroupName="<vnet-resource-group-name>"
virtualNetworkName="<vnet-name>"
subnetName="<subnet-name>"
policyName="<service-endpoint-policy-name>"

existingPolicyIds=$(az network vnet subnet show \
    --resource-group $virtualNetworkResourceGroupName \
    --vnet-name $virtualNetworkName \
    --name $subnetName \
    --query "serviceEndpointPolicies[].id" --output tsv)

if [ -n "$existingPolicyIds" ]; then
    echo "The subnet already has service endpoint policies. Review and update them before changing the configuration." >&2
else
    storageAccountId=$(az storage account show \
        --resource-group $storageAccountResourceGroupName \
        --name $storageAccountName \
        --query "id" --output tsv) &&

    location=$(az network vnet show \
        --resource-group $virtualNetworkResourceGroupName \
        --name $virtualNetworkName \
        --query "location" --output tsv) &&

    az network service-endpoint policy create \
        --resource-group $virtualNetworkResourceGroupName \
        --name $policyName \
        --location $location \
        --output none &&

    # To allow clients to access more storage accounts, add their resource IDs to --service-resources.
    az network service-endpoint policy-definition create \
        --resource-group $virtualNetworkResourceGroupName \
        --policy-name $policyName \
        --name "allowed-storage-accounts" \
        --service "Microsoft.Storage" \
        --service-resources $storageAccountId \
        --output none &&

    az network vnet subnet update \
        --resource-group $virtualNetworkResourceGroupName \
        --vnet-name $virtualNetworkName \
        --name $subnetName \
        --service-endpoint-policy $policyName \
        --output none
fi
Related content
 On the Resource page, select Microsoft.Storage/storageAccounts from the drop-down menu for Resource type. For Resource, select the specific storage account you want to connect to. For Target sub-resource, select
 The Virtual Network page allows you to select the specific virtual network and subnet you want to add your private endpoint to. Select dynamic or static IP address allocation for the new private endpoint. If you select static, you also need to provide a name and a private IP address.