Before you create an Azure file share, you need to answer two questions about how you want to use it:
What are the performance requirements for your Azure file share?
Azure Files offers two different media tiers of storage, SSD (premium) and HDD (standard), which enable you to tailor your file shares to the performance and price requirements of your scenario. SSD file shares provide consistent high performance and low latency, within single-digit milliseconds for most IO operations. HDD file shares provide cost-effective storage for general purpose use.
What are your redundancy requirements for your Azure file share?
Azure Files offers Local (LRS), Zone (ZRS), Geo (GRS), and GeoZone (GZRS) redundancy options for file shares. SSD file shares are only available for the Local and Zone redundancy types. See Azure Files redundancy for more information.
Azure file shares are deployed into storage accounts, which are top-level objects that represent a shared pool of storage. This pool of storage can be used to deploy multiple file shares.
Storage accounts have two properties, kind and SKU, which dictate the billing model, media tier, and redundancy of the file shares deployed in the storage account. For Azure Files, there are two main combinations of kind and SKU to consider:
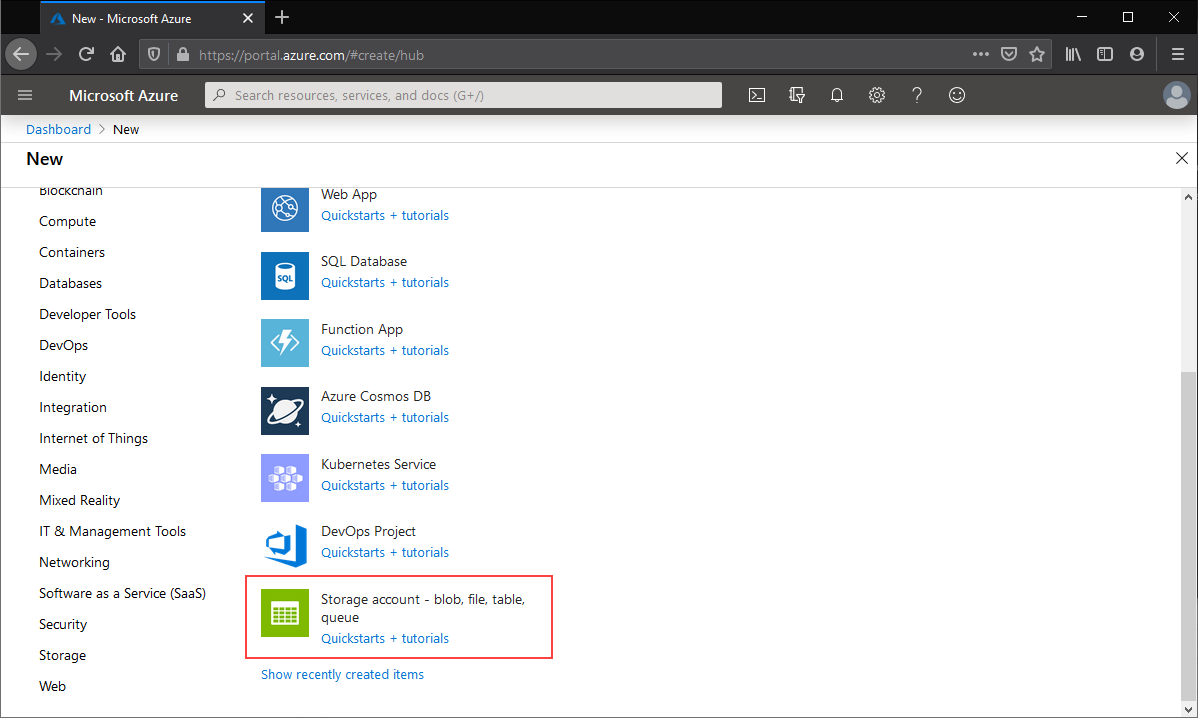
To create a storage account via the Azure portal, use the search box at the top of the Azure portal to search for storage accounts and select the matching result.
This shows a list of all existing storage accounts available in your visible subscriptions. Click + Create to create a new storage account.
Basics
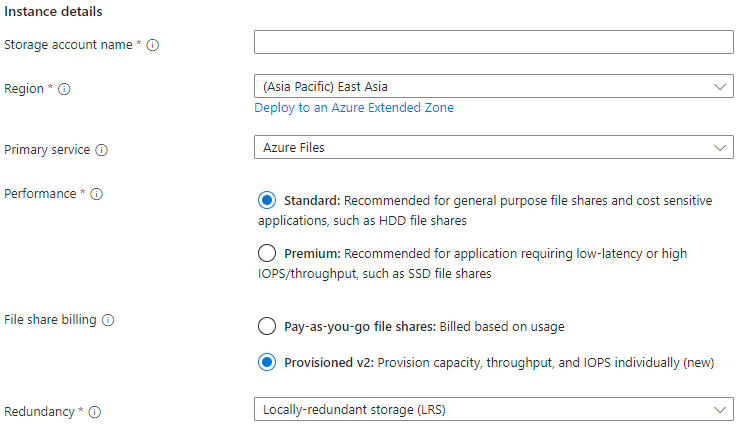
The first tab to complete to create a storage account is labeled Basics, which contains the required fields to create a storage account.
Field name
Input type
Values
Applicable to Azure Files
Meaning
Subscription
Drop-down list
Available Azure subscriptions
Yes
The selected subscription in which to deploy the storage account. The number of storage accounts per subscription is limited, so to deploy a new storage account into a selected subscription, if it has fewer storage accounts deployed than the subscription limit. See storage account scale targets for more information.
Resource group
Drop-down list
Available resource groups in selected subscription
Yes
The resource group in which to deploy the storage account. A resource group is a logical container for organizing for Azure resources, including storage accounts.
Storage account name
Text box
--
Yes
The name of the storage account resource to be created. This name must be globally unique. The storage account name is used as the server name when you mount an Azure file share via SMB. Storage account names must be between 3 and 24 characters in length. They may contain numbers and lowercase letters only.
Region
Drop-down list
Available Azure regions
Yes
The region for the storage account to be deployed into. This can be the region associated with the resource group, or any other available region.
Primary service
Drop-down list
Azure Blob Storage or Azure Data Lake Storage Gen 2
Azure Files
Other (tables and queues)
Only unpopulated and Azure Files
The service for which you're creating the storage account, in this case Azure Files. This field is optional, however, you can't select the provisioned v2 billing model unless you select Azure Files from the list.
Performance
Radio button group
Standard
Premium
Yes
The media tier of the storage account. Select Standard for an HDD storage account and Premium for an SSD storage account.
Redundancy
Drop-down list
Locally-redundant storage (LRS)
Geo-redundant storage (GRS)
Zone-redundant storage (ZRS)
Geo-zone-redundant storage (GZRS)
Yes
The redundancy choice for the storage account. See Azure Files redundancy for more information.
Make read access to data available in the event of region unavailability
Checkbox
Checked/unchecked
No
This setting only appears if you select the pay-as-you-go billing model with the Geo or GeoZone redundancy types. Azure Files doesn't support read access to data in the secondary region without a failover regardless of the status of this setting.
Advanced
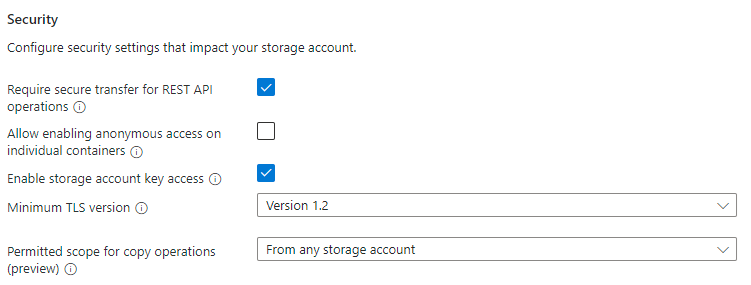
The Advanced tab is optional, but provides more granular settings for the storage account. The first section relates to Security settings.
Field name
Input type
Values
Applicable to Azure Files
Meaning
Require secure transfer for REST API operations
Checkbox
Checked/unchecked
Yes
This setting indicates that this applies to REST API operations, but it applies to SMB and NFS for Azure Files as well. If you plan to deploy NFS file shares in your storage account, or you have clients that need access to unencrypted SMB (such as SMB 2.1), uncheck this checkbox.
Allow enabling anonymous access on individual containers
Checkbox
Checked/unchecked
No
This setting controls whether Azure Blob storage containers are allowed to be accessed with anonymous access. This setting doesn't apply to Azure Files. This setting is available for FileStorage storage accounts containing provisioned v1 file shares even though it isn't possible to create Azure Blob storage containers in FileStorage storage accounts.
Enable storage account key access
Checkbox
Checked/unchecked
Yes
This setting controls whether the storage account keys (also referred to as shared keys) are enabled. When enabled, storage account keys can be used to mount the file share using SMB or to access the share using the FileREST API.
Minimum TLS version
Drop-down list
Supported TLS versions
Yes
This setting controls the minimum allowed TLS version that's used for protocols which use TLS. For Azure Files, only the FileREST protocol uses TLS (as part of HTTPS).
Permitted scope for copy operations
Drop-down list
Scopes for copy operations
Yes
This setting controls the scope of storage account to storage account copy operations using the FileREST API, usually facilitated through tools like AzCopy.
The Hierarchical Namespace section applies only to Azure Blob storage use, even in FileStorage storage accounts using the provisioned v1 or provisioned v2 billing models which can only contain Azure Files. Azure file shares support a hierarchical namespace regardless of the value of these settings.
Field name
Input type
Values
Applicable to Azure Files
Meaning
Enable hierarchical namespace
Checkbox
Checked/unchecked
No
This is an Azure Blob storage only setting. This setting is disabled for FileStorage storage accounts, but is active for storage accounts using the pay-as-you-go model, even if Azure Files is selected as the primary service.
The Access protocols section applies only to Azure Blob storage use, even in FileStorage storage accounts using the provisioned v1 or provisioned v2 billing models which can only contain Azure Files.
Field name
Input type
Values
Applicable to Azure Files
Meaning
Enable SFTP
Checkbox
Checked/unchecked
No
This is an Azure Blob storage only setting. This setting is disabled for FileStorage storage accounts, but is active for storage accounts using the pay-as-you-go model, even if Azure Files is selected as the primary service.
Enable network file system v3
Checkbox
Checked/unchecked
No
This is an Azure Blob storage only setting. This setting is disabled for FileStorage storage accounts, but is active for storage accounts using the pay-as-you-go model. SSD storage accounts can create NFS v4.1 file shares even though this setting is unchecked; in Azure Files, the file share's protocol is selected on the file share, not the storage account.
The Blob storage section applies only to Azure Blob storage use, even in FileStorage storage accounts using the provisioned v1 model which can only contain Azure Files.
Field name
Input type
Values
Applicable to Azure Files
Meaning
Allow cross-tenant replication
Checkbox
Checked/unchecked
No
This is an Azure Blob storage only setting. This setting is always available, even for FileStorage storage accounts which can't contain Azure Blob storage. Checking this checkbox has no impact on Azure Files.
Access tier
Radio button group
Blob storage access tiers
No
This is an Azure Blob storage only setting. This setting is always available, even for FileStorage storage accounts which can't contain Azure Blob storage. Selecting an option has no impact on Azure Files.
Networking
The networking section allows you to configure networking options. These settings are optional for the creation of the storage account and can be configured later if desired. For more information on these options, see Azure Files networking considerations.
Data protection
The Data protection tab contains ability to enable or disable soft-delete. The soft-delete option for Azure Files is under the Recovery section.
Field name
Input type
Values
Applicable to Azure Files
Meaning
Enable point-in-time restore for containers
Checkbox
Checked/unchecked
No
This is an Azure Blob storage only setting. This setting is always available, even for FileStorage storage accounts which can't contain Azure Blob storage, although checking this box for FileStorage storage accounts does result in a validation error message. For pay-as-you-go storage accounts, the selection for this setting doesn't apply to Azure Files.
Maximum restore point (days ago)
Textbox
Days (number)
No
When Enable point-in-time restore for containers is selected, this textbox is available. The value chosen doesn't apply to Azure Files.
Enable soft delete for blobs
Checkbox
Checked/unchecked
No
This is an Azure Blob storage only setting. This setting is always available, even for FileStorage storage accounts which can't contain Azure Blob storage, although checking this box for FileStorage storage accounts does result in a validation error message. For pay-as-you-go storage accounts, the selection for this setting doesn't apply to Azure Files.
Days to retain deleted blobs
Textbox
Days (number)
No
When Enable soft delete for blobs is selected, this textbox is available. The value chosen doesn't apply to Azure Files.
Enable soft delete for containers
Checkbox
Checked/unchecked
No
This is an Azure Blob storage only setting. This setting is always available, even for FileStorage storage accounts which can't contain Azure Blob storage, although checking this box for FileStorage storage account does result in a validation error message. For pay-as-you-go storage accounts, the selection for this setting doesn't apply to Azure Files.
Days to retain deleted containers
Textbox
Days (number)
No
When Enable soft delete for containers is selected, this textbox is available. The value chose doesn't apply to Azure Files.
Enable soft delete for file shares
Checkbox
Checked/unchecked
Yes
Enable the soft delete feature to protect against the accidental deletion of file shares. Soft delete is enabled by default, but you may choose to disable this setting if shares are frequently created and deleted as part of a business workflow. Soft deleted file shares are billed for their used capacity, even in provisioned models.
Days to retain deleted file shares
Textbox
Days (number)
Yes
When Enable soft delete for file shares is selected, this textbox is available. By default, file shares are retained for 7 days before being purged, however you may choose to increase or decrease this number depending on your requirements. Soft deleted file shares are billed for their used capacity, even in provisioned file shares, so retaining for a longer period of time can result in greater expenses due to soft-delete.
The Tracking section applies only to Azure Blob storage use, even in FileStorage storage accounts using the provisioned v1 billing model which can only contain Azure Files.
Field name
Input type
Values
Applicable to Azure Files
Meaning
Enable versioning for blobs
Checkbox
Checked/unchecked
No
This is an Azure Blob storage only setting. This setting is always available, even for FileStorage storage accounts which can't contain Azure Blob storage, although checking this box for FileStorage storage accounts does result in a validation error message. For pay-as-you-go storage accounts, the selection for this setting doesn't apply to Azure Files.
Enable blob change feed
Checkbox
Checked/unchecked
No
This is an Azure Blob storage only setting. This setting is always available, even for FileStorage storage accounts which can't contain Azure Blob storage, although checking this box for FileStorage storage accounts does result in a validation error message. For pay-as-you-go storage accounts, the selection for this setting doesn't apply to Azure Files.
The Access control section applies only to Azure Blob storage use, even in FileStorage storage accounts using the provisioned v1 billing model which can only contain Azure Files.
Field name
Input type
Values
Applicable to Azure Files
Meaning
Enable version-level immutability support
Checkbox
Checked/unchecked
No
This is an Azure Blob storage only setting. This setting is always available, even for FileStorage storage accounts which can't contain Azure Blob storage, although checking this box for FileStorage storage accounts does result in a validation error message. For pay-as-you-go storage accounts, the selection for this setting doesn't apply to Azure Files.
Encryption
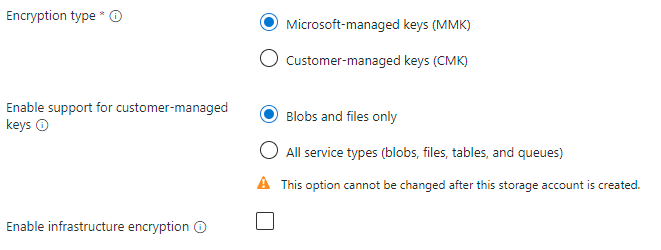
The Encryption tab controls settings related to encryption at rest.
Field name
Input type
Values
Applicable to Azure Files
Meaning
Encryption type
Radio button group
Microsoft-managed keys
Customer-managed keys
Yes
This setting controls who holds the encryption key for the data placed in this storage account. See Encryption for data at rest for more information.
Enable support for customer-managed keys
Radio button group
Blobs and files only
All service types (blobs, files, tables, and queues)
No
All kind/SKU combinations Azure file shares can exist in can support customer-managed keys regardless of this setting.
Enable infrastructure encryption
Checkbox
Checked/unchecked
Yes
Storage accounts can optionally use a secondary layer of encryption for data stored in the system to guard against one of the keys being compromised. See Enable infrastructure encryption for more information.
Tags
Tags are name/value pairs that enable you to categorize resources and view consolidated billing by applying the same tag to multiple resources and resource groups. These are optional and can be applied after storage account creation.
Review + create
The final step to create the storage account is to select the Create button on the Review + create tab. This button isn't available until all the required fields for a storage account are completed.
Create a provisioned v1 or pay-as-you-go storage account (PowerShell)
To create a provisioned v1 or pay-as-you-go storage account using PowerShell, use the New-AzStorageAccount cmdlet in the Az.Storage PowerShell module. This cmdlet has many options; only the required options are shown. To learn more about advanced options, see the New-AzStorageAccount cmdlet documentation.
To create a storage account for provisioned v1 or pay-as-you-go file shares, use the following command. Remember to replace the values for the variables $resourceGroupName, $storageAccountName, $region, $storageAccountKind, and $storageAccountSku with the desired values for your storage account deployment.
$resourceGroupName = "<my-resource-group>"
$storageAccountName = "<my-storage-account-name>"
$region = "<my-region>"

# Valid storage account kinds are FileStorage (SSD provisioned v1) and StorageV2
# (HDD pay-as-you-go). Create HDD provisioned v2 storage accounts with
# New-AzResource.
$storageAccountKind = "FileStorage"

# Valid SKUs for FileStorage are Premium_LRS (SSD Local provisioned v1) and
# Premium_ZRS (SSD Zone provisioned v1).
#
# Valid SKUs for StorageV2 are Standard_LRS (HDD Local pay-as-you-go),
# Standard_ZRS (HDD Zone pay-as-you-go), Standard_GRS (HDD Geo pay-as-you-go),
# and Standard_GZRS (HDD GeoZone pay-as-you-go).
$storageAccountSku = "Premium_LRS"

$storageAccount = New-AzStorageAccount `
        -ResourceGroupName $resourceGroupName `
        -Name $storageAccountName `
        -Location $region `
        -Kind $storageAccountKind `
        -SkuName $storageAccountSku
Create a provisioned v1 or pay-as-you-go storage account (Azure CLI)
To create a provisioned v1 or pay-as-you-go storage account using Azure CLI, use the az storage account create command. This command has many options; only the required options are shown. To learn more about the advanced options, see the az storage account create command documentation.
To create a storage account for provisioned v1 or pay-as-you-go file shares, use the following command. Remember to replace the values for the variables resourceGroupName, storageAccountName, region, storageAccountKind, and storageAccountSku with the desired values for your storage account deployment.
resourceGroupName="<my-resource-group>"
storageAccountName="<my-storage-account-name>"
region="<my-region>"

# Valid storage account kinds are FileStorage (SSD provisioned v1) and StorageV2
# (HDD pay-as-you-go). Create HDD provisioned v2 storage accounts with
# az resource create.
storageAccountKind="FileStorage"

# Valid SKUs for FileStorage are Premium_LRS (SSD Local provisioned v1) and
# Premium_ZRS (SSD Zone provisioned v1).
#
# Valid SKUs for StorageV2 are Standard_LRS (HDD Local pay-as-you-go),
# Standard_ZRS (HDD Zone pay-as-you-go), Standard_GRS (HDD Geo pay-as-you-go),
# and Standard_GZRS (HDD GeoZone pay-as-you-go).
storageAccountSku="Premium_LRS"

az storage account create \
    --resource-group $resourceGroupName \
    --name $storageAccountName \
    --location $region \
    --kind $storageAccountKind \
    --sku $storageAccountSku \
    --output none
Create a file share
After you create a storage account, you can create a file share. This process is different depending on whether you created a provisioned v1, or pay-as-you-go storage account.
Note
The name of your file share must be all lower-case letters, numbers, and single hyphens, and must begin and end with a lower-case letter or number. The name can't contain two consecutive hyphens. For details about naming file shares and files, see Naming and referencing shares, directories, files, and metadata.
Create an SSD provisioned v1 file share
When you create a file share using the provisioned v1 billing model, you specify how much storage your share needs, and IOPS and throughput capacity are computed for you based on how much storage provisioned. Depending on your individual file share requirements, you may find that you require more IOPS or throughput than our recommendations. In this case, you need to provision more storage to get the required IOPS or throughput. To learn more about the provisioned v1 model, see Understanding the provisioned v1 billing model.
Follow these instructions to create a new Azure file share using the Azure portal.
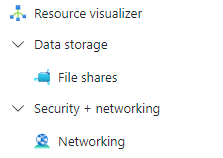
In your newly created storage account, select File shares under Data storage in the table of contents for the storage account.
In the file share listing, you should see any previously created file shares in this storage account or an empty table if no file shares exist. Select + File share to create a new file share.
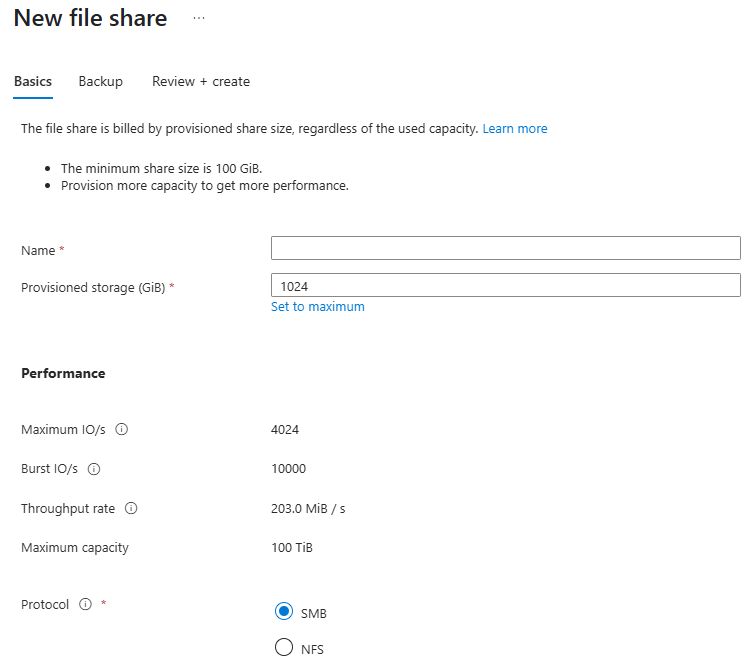
Complete the fields in the Basics tab of new file share blade:
Name: The name of the file share to be created.
Provisioned storage (GiB): The amount of storage to provision on the share. The provisioned storage capacity is the amount that you're billed for regardless of actual usage.
Protocol: The file sharing protocol to use on the share. By default, new shares use the SMB protocol. Select the NFS protocol for NFS v4.1 shares.
Root Squash: When NFS is selected as the chosen protocol, toggling the root squash behavior reduces the rights of the root user for NFS file shares.
Select Review + create and then Create to create the Azure file share.
You can create an Azure file share with the New-AzRmStorageShare cmdlet. The following PowerShell commands assume you set the variables $resourceGroupName and $storageAccountName as defined in the creating a storage account in the Azure PowerShell section.
To create a provisioned v1 file share, use the following command. Remember to replace the values for the variables $shareName, $provisionedStorageGib, and $protocol with the desired selections for your file share deployment.
$shareName = "<file-share>"

# The provisioned storage size of the share in GiB. Valid range is 100 to
# 102,400.
$provisionedStorageGib = 1024

# The protocol chosen for the file share. Valid set contains "SMB" and "NFS".
$protocol = "SMB"

New-AzRmStorageShare `
        -ResourceGroupName $resourceGroupName `
        -StorageAccountName $storageAccountName `
        -Name $shareName `
        -QuotaGiB $provisionedStorageGib `
        -EnabledProtocol $protocol | `
    Out-Null
You can create an Azure file share with az storage share-rm create command. The following PowerShell commands assume you set the variables resourceGroupName and storageAccountName as defined in the creating a storage account with Azure CLI section.
To create a provisioned v1 file share, use the following command. Remember to replace the values for the variables shareName, provisionedStorageGib, and protocol with the desired selections for your file share deployment.
shareName="<file-share>"

# The provisioned storage size of the share in GiB. Valid range is 100 to
# 102,400.
provisionedStorageGib=1024

# The protocol chosen for the file share. Valid set contains "SMB" and "NFS".
protocol="SMB"

az storage share-rm create \
    --resource-group $resourceGroupName \
    --storage-account $storageAccountName \
    --name $shareName \
    --quota $provisionedStorageGib \
    --enabled-protocols $protocol \
    --output none
Create an HDD pay-as-you-go file share
HDD pay-as-you-go file shares have a property called access tier. All three access tiers are stored on the exact same storage hardware. The main difference for these three access tiers is their data at-rest storage prices, which are lower in cooler tiers, and the transaction prices, which are higher in the cooler tiers. To learn more about the differences between tiers, see differences in access tiers.
Follow these instructions to create a new Azure file share using the Azure portal.
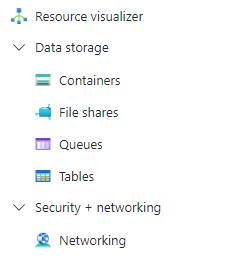
In your newly created storage account, select File shares under Data storage in the table of contents for the storage account.
In the file share listing, you should see any previously created file shares in this storage account or an empty table if no file shares exist. Select + File share to create a new file share.
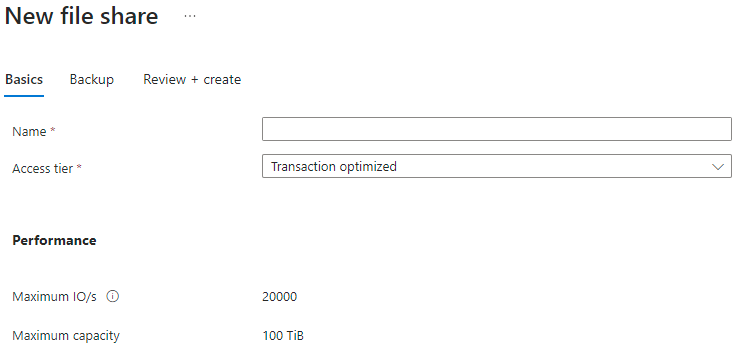
Complete the fields in the Basics tab of new file share blade:
Name: The name of the file share to be created.
Access tier: The selected access tier for a pay-as-you-go file share. We recommend picking the transaction optimized access tier possible during a migration, to minimize transaction expenses, and then switching to a lower tier if desired after the migration is complete.
Select Review + create and then Create to create the Azure file share.
You can create an Azure file share with the New-AzRmStorageShare cmdlet. The following PowerShell commands assume you set the variables $resourceGroupName and $storageAccountName as defined in the creating a storage account with Azure PowerShell section.
To create a pay-as-you-go file share, use the following command. Remember to replace the values for the variables $shareName and $accessTier with the desired selections for your file share deployment.
$shareName = "<file-share>"

# The access tier of the file share. Valid set contains "TransactionOptimized",
# "Hot", "Cool"
$accessTier = "Hot"

New-AzRmStorageShare `
        -ResourceGroupName $resourceGroupName `
        -StorageAccountName $storageAccountName `
        -Name $shareName `
        -AccessTier $accessTier | `
    Out-Null
You can create an Azure file share with the az storage share-rm create command. The following Azure CLI commands assume you set the variables $resourceGroupName and $storageAccountName as defined in the creating a storage account with Azure CLI section.
To create a pay-as-you-go file share, use the following command. Remember to replace the values for the variables shareName and accessTier with the desired selections for your file share deployment.
shareName="<file-share>"

# The access tier of the file share. Valid set contains "TransactionOptimized",
# "Hot", and "Cool".
accessTier="Hot"

az storage share-rm create \
    --resource-group $resourceGroupName \
    --storage-account $storageAccountName \
    --name $shareName \
    --access-tier $accessTier \
    --output none
Change the cost and performance characteristics of a file share
After creating your file share, you may need to adjust the provisioning (provisioned models) or access tier (pay-as-you-go model) of the share. The following sections show you how to adjust the relevant properties for your share.
Change the cost and performance characteristics of a provisioned v1 file share
After creating your provisioned v1 file share, you can change the provisioned storage size of the file share. Changing the provisioned storage of the share will also change the amount of provisioned IOPS and provisioned throughput. For more information, see provisioned v1 provisioning detail.
Follow these instructions to update the provisioning for your file share.
In your storage account, select File shares under Data storage in the table of contents for the storage account.
In the file share listing, select the file share for which you desire to change the provisioning.
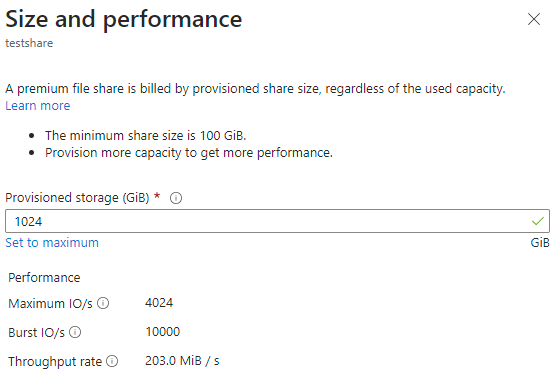
In the file share overview select Change size and performance.
The Size and performance pop out dialog has a single option, Provisioned storage (GiB). If you require more IOPS or throughput than the given amount of provisioned storage provides, you can increase your provisioned storage capacity to get additional IOPS and throughput.
Select Save to save provisioning changes. Storage, IOPS, and throughput changes are effective within a few minutes after a provisioning change.
You can modify a provisioned v1 file share with the Update-AzRmStorageShare cmdlet. Remember to replace the values for the variables $resourceGroupName, $storageAccountName, $fileShareName, and $provisionedStorageGib with the desired values for your file share.
# The path to the file share resource to be modified.
$resourceGroupName = "<resource-group>"
$storageAccountName = "<storage-account>"
$fileShareName = "<file-share>"

# The provisioning desired on the file share.
$provisionedStorageGib = 10240

# Update the file share provisioning.
Update-AzRmStorageShare `
        -ResourceGroupName $resourceGroupName `
        -StorageAccountName $storageAccountName `
        -Name $fileShareName `
        -QuotaGiB $provisionedStorageGib
You can modify a provisioned v1 file share with the az storage share-rm update command. Remember to replace the values for the variables resourceGroupName, storageAccountName, fileShareName, and provisionedStorageGib with the desired values for your file share.
# The path to the file share resource to be modified.
resourceGroupName="<resource-group>"
storageAccountName="<storage-account>"
fileShareName="<file-share>"

# The provisioning desired on the file share.
provisionedStorageGib=10240

# Update the file share provisioning.
az storage share-rm update \
        --resource-group $resourceGroupName \
        --storage-account $storageAccountName \
        --name $fileShareName \
        --quota $provisionedStorageGib
Change the cost and performance characteristics of a pay-as-you-go file share
After you've created your pay-as-you-go file share, there are two properties you may want to change:
Access tier: The access tier of the file share dictates to the ratio of storage to IOPS/throughput costs (in the form of transactions). There are three access tiers: transaction optimized, hot, and cool. Changing the tier of the Azure file share results in transaction costs for the movement to the new access tier. For more information, see switching between access tiers.
Quota: Quota is a limit on the size of the file share. The quota property is used in the provisioned v1 model to mean "provisioned storage capacity", however, in the pay-as-you-go model, quota has no direct impact on bill. The two primary reasons you might want to modify this are if you use quota to limit the growth of your file share to keep control of the used storage/transaction costs in the pay-as-you-go model, or if you have a storage account predating the introduction of the large file share feature, which enabled file shares to grow beyond 5 TiB. The maximum file share size for a pay-as-you-go file share is 100 TiB.
Follow these instructions to update the access tier of your file share.
In your storage account, select File shares under Data storage in the table of contents for the storage account.
In the file share listing, select the file share for which you desire to change the access tier.
In the file share overview, select Change tier.
Select the desired Access tier from the provided drop-down list.
Select Apply to save the access tier change.
For these instructions to update the quota of your file share.
In your storage account, select File shares under Data storage in the table of contents for the storage account.
In the file share listing, select the file share for which you desire to change the quota.
In the file share overview, select Edit quota.
In the edit quota pop-out, enter the desired maximum size of the share or select Set to maximum. There is no cost implication of setting the share to the maximum size.
Click OK to save quota changes. The new quota is effective within a few minutes.
You can modify the access tier and quota settings of a pay-as-you-go file share with the Update-AzRmStorageShare cmdlet. Remember to replace the values for the variables $resourceGroupName, $storageAccountName, $fileShareName, $accessTier, and $quotaGib with the desired values for your file share.
# The path to the file share resource to be modified.
$resourceGroupName = "<resource-group>"
$storageAccountName = "<storage-account>"
$fileShareName = "<file-share>"

# The settings to be changed on the file share. Set to $null to skip setting.
$accessTier = "Cool"
$quotaGib = $null

# Construct a parameters hash table for cmdlet splatting.
$updateParams = @{
    ResourceGroupName = $resourceGroupName
    StorageAccountName = $storageAccountName
    Name = $fileShareName
}

if ($null -ne $accessTier) { $updateParams += @{ AccessTier = $accessTier } }
if ($null -ne $quotaGib) { $updateParams += @{ QuotaGiB = $quotaGib } }

# Update the file share
Update-AzRmStorageShare @updateParams
You can modify the access tier and quota settings of a pay-as-you-go file share with the az storage share-rm update command. Remember to replace the values for the variables resourceGroupName, storageAccountName, fileShareName, accessTier, and quotaGib with the desired values for your file share.
# The path to the file share resource to be modified.
resourceGroupName="<resource-group>"
storageAccountName="<storage-account>"
fileShareName="<file-share>"

# The settings to be changed on the file share. Set to the empty string to skip
# setting.
accessTier="Cool"
quotaGib=""

command="az storage share-rm update --resource-group $resourceGroupName"
command="$command --storage-account $storageAccountName --name $fileShareName"

if [ ! -z "${accessTier}" ]; then
    command="$command --access-tier $accessTier"
fi

if [ ! -z "${quotaGib}" ]; then
    command="$command --quota $quotaGib"
fi

# Update file share (command is in variable)
$command
Delete a file share
Depending on your workflow, you may wish to delete unused or outdated file shares. You can use the following instructions to delete file shares. File shares in storage accounts with soft delete enabled can be recovered within the retention period.
In your storage account, select File shares under Data storage in the table of contents for the storage account.
In the file share list, select the ... for the file share you desire to delete.
Select Delete share from the context menu.
The Delete pop-out contains a survey about why you're deleting the file share. You can skip this, but we appreciate any feedback you have on Azure Files, particularly if something isn't working properly for you.
Enter the file share name to confirm deletion and select Delete.
You can delete a file share using the Remove-AzRmStorageShare cmdlet. Remember to replace the values for the variables $resourceGroupName, $storageAccountName, and $fileShareName with the desired values for your file share.
# The path to the file share resource to be deleted.
$resourceGroupName = "<resource-group>"
$storageAccountName = "<storage-account>"
$fileShareName = "<file-share>"

# Remove the file share
Remove-AzRmStorageShare `
        -ResourceGroupName $resourceGroupName `
        -StorageAccountName $storageAccountName `
        -Name $fileShareName
You can delete a file share using the az storage share-rm delete command. Remember to replace the values for the variables resourceGroupName, storageAccountName, and fileShareName with the desired values for your file share.
To view region supportability based on different billing models, use Azure PowerShell or Azure CLI.
# Login to Azure account
Connect-AzAccount -Environment AzureChinaCloud

# Track down the subscription ID in GUID format
$subscriptionID = "your-subscription-id-number"

# Get Token
$token = Get-AzAccessToken

# Invoke SRP list SKU API, and get the returned SKU list
$result = Invoke-RestMethod -Method Get -Uri "https://management.chinacloudapi.cn/subscriptions/$($subscriptionID)/providers/Microsoft.Storage/skus?api-version=2024-01-01" -Headers @{"Authorization" = "Bearer $($token.Token)"}

# Filter the SKU list to get the required information, customization requried here to get the best result.
$filteredResult = $result | `
    Select-Object -ExpandProperty value | `
    Where-Object {
        $_.resourceType -eq "storageAccounts" -and
        # Filter based on your needs. FileStorage kind includes pv2, and pv1 file share, where StorageV2 kind include PayGO file shares.
        $_.kind -in @("FileStorage", "StorageV2") -and
        # Filter based on your needs. "Standard_" for PayGO file share, "StandardV2_" for Pv2 file share, "Premium_" for pv1 file shares.
        # $_.name.StartsWith("StandardV2_") -and
        # Change region based on your need to see if we currently support the region (all small cases, no space in between).
        # $_.locations -eq "italynorth" -and
        $_.name -notin @("Standard_RAGRS", "Standard_RAGZRS")
    }

if ($filteredResult.Count -eq 0) {
    Write-Output "No results found."
} else {
    $filteredResult | `
        Select-Object `
            -Property `
                @{
                    Name = "sku";
                    Expression = { $_.name }
                }, `
                kind, `
                @{
                    Name = "mediaTier";
                    Expression = {
                        if ($_.tier -eq "Premium") {
                            "SSD"
                        } elseif ($_.tier -eq "Standard") {
                            "HDD"
                        } else {
                            "Unknown"
                        }
                    }
                }, `
                @{
                    Name = "billingModel";
                    Expression = {
                        if ($_.name.StartsWith("StandardV2_") -or
                            $_.name.StartsWith("PremiumV2_")
                        ) {
                            "ProvisionedV2"
                        } elseif ($_.name.StartsWith("Premium_")) {
                            "ProvisionedV1"
                        } else {
                            "PayAsYouGo"
                        }
                    }
                }, `
                @{
                    Name = "location";
                    Expression = { $_.locations | Select-Object -First 1 }
                } | ft sku, kind, mediaTier, billingModel, location
}
# Login to Azure account
Az login

# Track down the subscription ID in GUID format and set subscription ID
subscriptionID="your-subscription-id-number"

# Get Token
token=$(az account get-access-token --query accessToken --output tsv)

# Invoke SRP list SKU API, and get the returned SKU list
result=$(az rest --method get --uri "https://management.chinacloudapi.cn/subscriptions/$subscriptionID/providers/Microsoft.Storage/skus?api-version=2024-01-01" --headers "Authorization=Bearer $token")

# Filter the SKU list to get the required information, customization required here to get the best result.
filteredResult=$(echo $result | jq '.value[] | select(.resourceType == "storageAccounts" and (.kind == "FileStorage" or .kind == "StorageV2") and (.name | test("^(?!Standard_RAGRS|Standard_RAGZRS)")))' )

if [ -z "$filteredResult" ]; then
    echo "No results found."
else
    # Print the table header
    printf "%-30s %-15s %-10s %-20s %-15s\n" "SKU" "Kind" "MediaTier" "BillingModel" "Location"
    # Print the filtered results
    echo $filteredResult | jq -r '. | "\(.name)\t\(.kind)\t\(.tier | if . == "Premium" then "SSD" elif . == "Standard" then "HDD" else "Unknown" end)\t\(.name | if test("^StandardV2_|^PremiumV2_") then "ProvisionedV2" elif test("^Premium_") then "ProvisionedV1" else "PayAsYouGo" end)\t\(.locations)"' | while IFS=$'\t' read -r sku kind mediaTier billingModel location; do
        printf "%-30s %-15s %-10s %-20s %-15s\n" "$sku" "$kind" "$mediaTier" "$billingModel" "$location"
    done
fi