Note
Access to this page requires authorization. You can try signing in or changing directories.
Access to this page requires authorization. You can try changing directories.
Forced tunneling lets you redirect or "force" all Internet-bound traffic back to your on-premises location via a Site-to-Site VPN tunnel for inspection and auditing. This is a critical security requirement for most enterprise IT policies. Without forced tunneling, Internet-bound traffic from your VMs in Azure will always traverse from Azure network infrastructure directly out to the Internet, without the option to allow you to inspect or audit the traffic. Unauthorized Internet access can potentially lead to information disclosure or other types of security breaches.
The steps in this article apply to the classic (legacy) deployment model and don't apply to the current deployment model, Resource Manager. Unless you want to work in the classic deployment model specifically, we recommend that you use the Resource Manager version of this article.
Note
This article is written for the classic (legacy) deployment model. We recommend that you use the latest Azure deployment model instead. The Resource Manager deployment model is the latest deployment model and offers more options and feature compatibility than the classic deployment model. To understand the difference between these two deployment models, see Understanding deployment models and the state of your resources.
If you want to use a different version of this article, use the table of contents in the left pane.
Forced tunneling in Azure is configured via virtual network user-defined routes (UDR). Redirecting traffic to an on-premises site is expressed as a Default Route to the Azure VPN gateway. The following section lists the current limitation of the routing table and routes for an Azure Virtual Network:
Each virtual network subnet has a built-in, system routing table. The system routing table has the following three groups of routes:
- Local VNet routes: Directly to the destination VMs in the same virtual network.
- On-premises routes: To the Azure VPN gateway.
- Default route: Directly to the Internet. Packets destined to the private IP addresses not covered by the previous two routes will be dropped.
With the release of user-defined routes, you can create a routing table to add a default route, and then associate the routing table to your VNet subnet(s) to enable forced tunneling on those subnets.
You need to set a "default site" among the cross-premises local sites connected to the virtual network.
Forced tunneling must be associated with a VNet that has a dynamic routing VPN gateway (not a static gateway).
ExpressRoute forced tunneling isn't configured via this mechanism, but instead, is enabled by advertising a default route via the ExpressRoute BGP peering sessions. For more information, see the What is ExpressRoute?
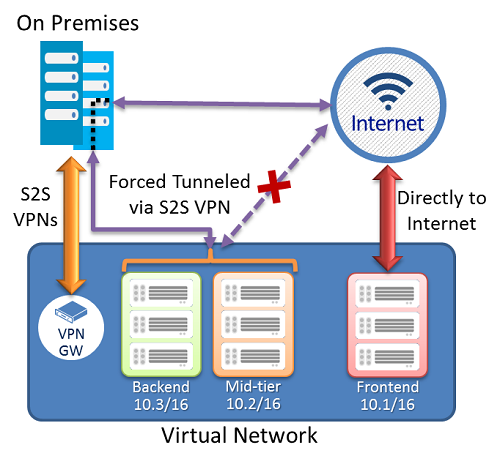
In the following example, the Frontend subnet isn't forced tunneled. The workloads in the Frontend subnet can continue to accept and respond to customer requests from the Internet directly. The Mid-tier and Backend subnets are forced tunneled. Any outbound connections from these two subnets to the Internet are forced or redirected back to an on-premises site via one of the S2S VPN tunnels.
This allows you to restrict and inspect Internet access from your virtual machines or cloud services in Azure, while continuing to enable your multi-tier service architecture required. You also can apply forced tunneling to the entire virtual networks if there are no Internet-facing workloads in your virtual networks.
Verify that you have the following items before beginning configuration:
- An Azure subscription. If you don't already have an Azure subscription, you can activate your MSDN subscriber benefits or sign up for a free account.
- A configured virtual network.
- When working with the classic deployment model, you can't use Azure Cloud Shell. Instead, you must install the latest version of the Azure Service Management (SM) PowerShell cmdlets locally on your computer. These cmdlets are different from the AzureRM or Az cmdlets. To install the SM cmdlets, see Install Service Management cmdlets. For more information about Azure PowerShell in general, see the Azure PowerShell documentation.
The following procedure helps you specify forced tunneling for a virtual network. The configuration steps correspond to the VNet network configuration file. In this example, the virtual network 'MultiTier-VNet' has three subnets: Frontend, Midtier, and Backend subnets, with four cross premises connections: 'DefaultSiteHQ', and three Branches.
<VirtualNetworkSite name="MultiTier-VNet" Location="North Europe">
     <AddressSpace>
      <AddressPrefix>10.1.0.0/16</AddressPrefix>
        </AddressSpace>
        <Subnets>
          <Subnet name="Frontend">
            <AddressPrefix>10.1.0.0/24</AddressPrefix>
          </Subnet>
          <Subnet name="Midtier">
            <AddressPrefix>10.1.1.0/24</AddressPrefix>
          </Subnet>
          <Subnet name="Backend">
            <AddressPrefix>10.1.2.0/23</AddressPrefix>
          </Subnet>
          <Subnet name="GatewaySubnet">
            <AddressPrefix>10.1.200.0/28</AddressPrefix>
          </Subnet>
        </Subnets>
        <Gateway>
          <ConnectionsToLocalNetwork>
            <LocalNetworkSiteRef name="DefaultSiteHQ">
              <Connection type="IPsec" />
            </LocalNetworkSiteRef>
            <LocalNetworkSiteRef name="Branch1">
              <Connection type="IPsec" />
            </LocalNetworkSiteRef>
            <LocalNetworkSiteRef name="Branch2">
              <Connection type="IPsec" />
            </LocalNetworkSiteRef>
            <LocalNetworkSiteRef name="Branch3">
              <Connection type="IPsec" />
            </LocalNetworkSiteRef>
        </Gateway>
      </VirtualNetworkSite>
    </VirtualNetworkSite>
The following steps set the 'DefaultSiteHQ' as the default site connection for forced tunneling, and configure the Midtier and Backend subnets to use forced tunneling.
Open your PowerShell console with elevated rights. Connect to your account using the following example:
Add-AzureAccountCreate a routing table. Use the following cmdlet to create your route table.
New-AzureRouteTable –Name "MyRouteTable" –Label "Routing Table for Forced Tunneling" –Location "North Europe"Add a default route to the routing table.
The following example adds a default route to the routing table created in Step 1. The only route supported is the destination prefix of "0.0.0.0/0" to the "VPNGateway" NextHop.
Get-AzureRouteTable -Name "MyRouteTable" | Set-AzureRoute –RouteTable "MyRouteTable" –RouteName "DefaultRoute" –AddressPrefix "0.0.0.0/0" –NextHopType VPNGatewayAssociate the routing table to the subnets.
After a routing table is created and a route added, use the following example to add or associate the route table to a VNet subnet. The example adds the route table "MyRouteTable" to the Midtier and Backend subnets of VNet MultiTier-VNet.
Set-AzureSubnetRouteTable -VirtualNetworkName "MultiTier-VNet" -SubnetName "Midtier" -RouteTableName "MyRouteTable"
Set-AzureSubnetRouteTable -VirtualNetworkName "MultiTier-VNet" -SubnetName "Backend" -RouteTableName "MyRouteTable"
Assign a default site for forced tunneling.
In the preceding step, the sample cmdlet scripts created the routing table and associated the route table to two of the VNet subnets. The remaining step is to select a local site among the multi-site connections of the virtual network as the default site or tunnel.
$DefaultSite = @("DefaultSiteHQ")
Set-AzureVNetGatewayDefaultSite –VNetName "MultiTier-VNet" –DefaultSite "DefaultSiteHQ"
Remove-AzureRouteTable -Name <routeTableName>
Get-AzureRouteTable [-Name <routeTableName> [-DetailLevel <detailLevel>]]
Remove-AzureRouteTable –Name <routeTableName>
Remove-AzureSubnetRouteTable –VirtualNetworkName <virtualNetworkName> -SubnetName <subnetName>
Get-AzureSubnetRouteTable -VirtualNetworkName <virtualNetworkName> -SubnetName <subnetName>
Remove-AzureVnetGatewayDefaultSite -VNetName <virtualNetworkName>