Nota:
El acceso a esta página requiere autorización. Puede intentar iniciar sesión o cambiar directorios.
El acceso a esta página requiere autorización. Puede intentar cambiar los directorios.
注意
Azure 推送通知服务 (MPNS) 已弃用,不再受支持。
概述
本教程演示如何使用 Azure 通知中心来广播突发新闻通知。 本教程涵盖 Windows 应用商店或 Windows Phone 8.1(非 Silverlight)应用程序。 如果你的目标是 Windows Phone 8.1 Silverlight,请参阅使用 Azure 通知中心向特定 Windows Phone 设备推送通知。
本教程介绍如何使用 Azure 通知中心将通知推送到运行通用 Windows 平台 (UWP) 应用程序的特定 Windows 设备。 完成本教程后,可注册感兴趣的突发新闻类别, 之后你仅会收到这些类别的推送通知。
在通知中心创建注册时,可通过加入一个或多个标记来启用广播方案 。 将通知发送到标记时,已注册该标记的所有设备将接收通知。 有关标记的详细信息,请参阅路由和标记表达式。
注意
Visual Studio 2019 中不支持 Windows 应用商店和 Windows Phone 项目 8.1 及更早的版本。 有关详细信息,请参阅 Visual Studio 2019 平台目标以及兼容性。
在本教程中,你将执行以下任务:
- 向移动应用添加类别选择
- 注册通知
- 发送带标记的通知
- 运行应用并生成通知
先决条件
在开始本教程之前完成教程:使用 Azure 通知中心向通用 Windows 平台应用发送通知。
向应用程序中添加类别选择
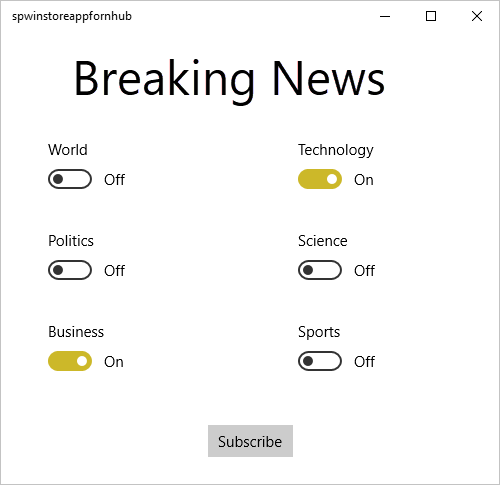
第一步是向现有主页添加 UI 元素,以便用户选择要注册的类别。 所选类别会存储在设备上。 应用启动时,系统会将所选类别当做标记在通知中心创建设备注册。
打开 MainPage.xaml 项目文件,并复制
Grid元素中的以下代码:<Grid> <Grid.RowDefinitions> <RowDefinition/> <RowDefinition/> <RowDefinition/> <RowDefinition/> <RowDefinition/> </Grid.RowDefinitions> <Grid.ColumnDefinitions> <ColumnDefinition/> <ColumnDefinition/> </Grid.ColumnDefinitions> <TextBlock Grid.Row="0" Grid.Column="0" Grid.ColumnSpan="2" TextWrapping="Wrap" Text="Breaking News" FontSize="42" VerticalAlignment="Top" HorizontalAlignment="Center"/> <ToggleSwitch Header="World" Name="WorldToggle" Grid.Row="1" Grid.Column="0" HorizontalAlignment="Center"/> <ToggleSwitch Header="Politics" Name="PoliticsToggle" Grid.Row="2" Grid.Column="0" HorizontalAlignment="Center"/> <ToggleSwitch Header="Business" Name="BusinessToggle" Grid.Row="3" Grid.Column="0" HorizontalAlignment="Center"/> <ToggleSwitch Header="Technology" Name="TechnologyToggle" Grid.Row="1" Grid.Column="1" HorizontalAlignment="Center"/> <ToggleSwitch Header="Science" Name="ScienceToggle" Grid.Row="2" Grid.Column="1" HorizontalAlignment="Center"/> <ToggleSwitch Header="Sports" Name="SportsToggle" Grid.Row="3" Grid.Column="1" HorizontalAlignment="Center"/> <Button Name="SubscribeButton" Content="Subscribe" HorizontalAlignment="Center" Grid.Row="4" Grid.Column="0" Grid.ColumnSpan="2" Click="SubscribeButton_Click"/> </Grid>在“解决方案资源管理器” 中,右键单击该项目,然后选择“添加” > “类”。 在“添加新项”中,将类命名为 Notifications,然后选择“添加”。 必要时向类定义添加
public修饰符。向新文件添加以下
using语句:using Windows.Networking.PushNotifications; using Microsoft.WindowsAzure.Messaging; using Windows.Storage; using System.Threading.Tasks;将以下代码复制到新的
Notifications类:private NotificationHub hub; public Notifications(string hubName, string listenConnectionString) { hub = new NotificationHub(hubName, listenConnectionString); } public async Task<Registration> StoreCategoriesAndSubscribe(IEnumerable<string> categories) { ApplicationData.Current.LocalSettings.Values["categories"] = string.Join(",", categories); return await SubscribeToCategories(categories); } public IEnumerable<string> RetrieveCategories() { var categories = (string) ApplicationData.Current.LocalSettings.Values["categories"]; return categories != null ? categories.Split(','): new string[0]; } public async Task<Registration> SubscribeToCategories(IEnumerable<string> categories = null) { var channel = await PushNotificationChannelManager.CreatePushNotificationChannelForApplicationAsync(); if (categories == null) { categories = RetrieveCategories(); } // Using a template registration to support notifications across platforms. // Any template notifications that contain messageParam and a corresponding tag expression // will be delivered for this registration. const string templateBodyWNS = "<toast><visual><binding template=\"ToastText01\"><text id=\"1\">$(messageParam)</text></binding></visual></toast>"; return await hub.RegisterTemplateAsync(channel.Uri, templateBodyWNS, "simpleWNSTemplateExample", categories); }此类使用本地存储区存储此设备必须接收的新闻类别。 使用模板注册来注册类别时,应调用
RegisterTemplateAsync方法,而不能调用RegisterNativeAsync。如果需要注册多个模板,请提供模板名称,例如 simpleWNSTemplateExample。 为模板命名以便更新或删除模板。 可以注册多个模板,一个用于 toast 通知,一个用于磁贴。
注意
通过通知中心,设备可使用同一标记注册多个模板。 在这种情况下,针对该标签的传入的邮件将导致系统向设备发送多个通知(每个通知对应一个模板)。 此过程可以在多个可视通知中显示同一消息,如显示为 Windows 应用商店应用中的徽章和 toast 通知。
有关详细信息,请参阅模板。
在 App.xaml.cs 项目文件中,将以下属性添加到
App类:public Notifications notifications = new Notifications("<hub name>", "<connection string with listen access>");使用此属性创建和访问
Notifications实例。在代码中,将
<hub name>和<connection string with listen access>占位符替换为通知中心的名称和之前获取的 DefaultListenSharedAccessSignature 的连接字符串。注意
使用客户端应用分发的凭据通常不安全,因此请使用客户端应用仅分发具有侦听访问权限的密钥 。 拥有侦听访问权限后,应用可注册通知,但是无法修改现有注册,也无法发送通知。 在受保护的后端服务中使用完全访问权限密钥,以便发送通知和更改现有注册。
在 MainPage.xaml.cs 文件中添加以下行:
using Windows.UI.Popups;在 MainPage.xaml.cs 文件中添加以下方法:
private async void SubscribeButton_Click(object sender, RoutedEventArgs e)
{
    var categories = new HashSet<string>();
    if (WorldToggle.IsOn) categories.Add("World");
    if (PoliticsToggle.IsOn) categories.Add("Politics");
    if (BusinessToggle.IsOn) categories.Add("Business");
    if (TechnologyToggle.IsOn) categories.Add("Technology");
    if (ScienceToggle.IsOn) categories.Add("Science");
    if (SportsToggle.IsOn) categories.Add("Sports");

    var result = await ((App)Application.Current).notifications.StoreCategoriesAndSubscribe(categories);

    var dialog = new MessageDialog("Subscribed to: " + string.Join(",", categories) + " on registration Id: " + result.RegistrationId);
    dialog.Commands.Add(new UICommand("OK"));
    await dialog.ShowAsync();
}
此方法创建一个类别列表并使用
Notifications类将该列表存储在本地存储中。 它还会向通知中心注册相应的标记。 类别更改时,会使用新类别重新创建注册。
现在,应用可在设备的本地存储中存储一组类别。 每当用户更改类别选择时,应用都会向通知中心注册。
注册通知
本部分中将使用存储在本地存储中的类别,在启动时向通知中心注册。
注意
由于 Windows 通知服务 (WNS) 分配的通道 URI 随时可能更改,因此应该经常注册通知以避免通知失败。 此示例在每次应用程序启动时注册通知。 对于经常运行(例如,一天一次以上)的应用,如果距上次注册时间不到一天,可以跳过注册,以节省带宽。
若要使用
notifications类基于类别订阅,请打开 App.xaml.cs 文件,然后更新InitNotificationsAsync方法。// *** Remove or comment out these lines *** //var channel = await PushNotificationChannelManager.CreatePushNotificationChannelForApplicationAsync(); //var hub = new NotificationHub("your hub name", "your listen connection string"); //var result = await hub.RegisterNativeAsync(channel.Uri); var result = await notifications.SubscribeToCategories();此过程可确保应用启动时会从本地存储区检索类别 并请求注册这些类别。 我们已在使用 Azure 通知中心向通用 Windows 平台应用发送通知教程中创建
InitNotificationsAsync方法。在 MainPage.xaml.cs 项目文件的
OnNavigatedTo方法中添加以下代码:protected override void OnNavigatedTo(NavigationEventArgs e) { var categories = ((App)Application.Current).notifications.RetrieveCategories(); if (categories.Contains("World")) WorldToggle.IsOn = true; if (categories.Contains("Politics")) PoliticsToggle.IsOn = true; if (categories.Contains("Business")) BusinessToggle.IsOn = true; if (categories.Contains("Technology")) TechnologyToggle.IsOn = true; if (categories.Contains("Science")) ScienceToggle.IsOn = true; if (categories.Contains("Sports")) SportsToggle.IsOn = true; }此代码基于以前保存的类别状态更新主页。
应用现已完成。 它可以在设备的本地存储中存储一组类别。 当用户更改类别选择时,保存的类别用于向通知中心注册。 下一部分将定义一个后端,该后端可将类别通知发送到此应用。
运行 UWP 应用
在 Visual Studio 中,选择 F5 编译并启动应用。 应用 UI 提供了一组开关,可以使用它们选择要订阅的类别。

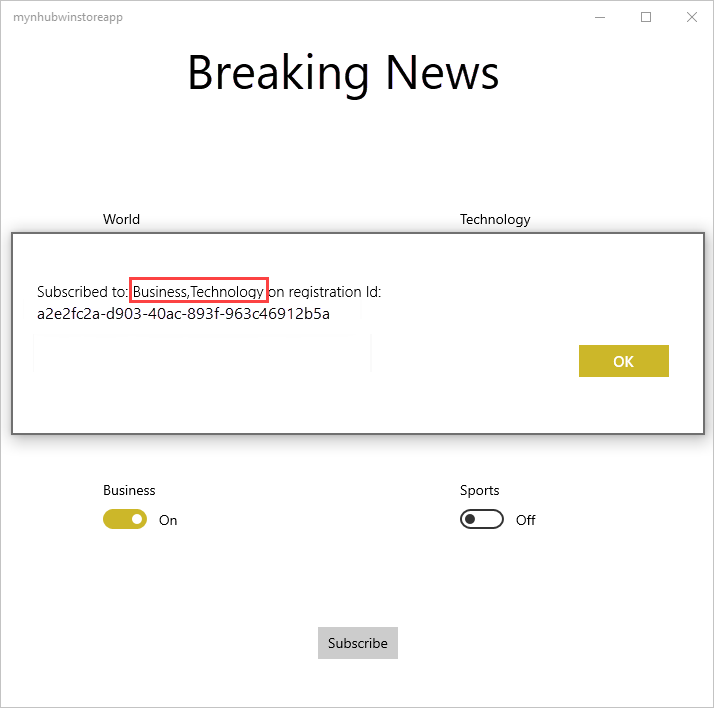
启用一个或多个类别切换,然后选择“订阅” 。
应用程序将所选类别转换为标签并针对所选标签从通知中心请求注册新设备。 应用在对话框中显示注册的类别。

创建一个控制台应用以发送带标记的通知
本部分说明如何从 .NET 控制台应用以标记模板通知的形式发送突发新闻。
在 Visual Studio 中创建新的 Visual C# 控制台应用程序:
- 在菜单中,选择“文件”>“新建”>“项目”。
- 在“创建新项目”中,选择模板列表中适用于 C# 的“控制台应用(.NET Framework)”,然后选择“下一步”。
- 输入应用程序的名称。
- 对于“解决方案”,选择“添加到解决方案”,然后选择“创建”以创建项目。
选择“工具”>“NuGet 包管理器”>“包管理器控制台”,然后在控制台窗口中运行以下命令 :
Install-Package Microsoft.Azure.NotificationHubs此操作会使用 Microsoft.Azure.NotificationHubs 包添加对 Azure 通知中心 SDK 的引用。
打开文件 Program.cs 并添加以下
using语句:using Microsoft.Azure.NotificationHubs;在
Program类中,添加以下方法,或替换此方法(如果已存在):private static async void SendTemplateNotificationAsync() { // Define the notification hub. NotificationHubClient hub = NotificationHubClient.CreateClientFromConnectionString("<connection string with full access>", "<hub name>"); // Apple requires the apns-push-type header for all requests var headers = new Dictionary<string, string> {{"apns-push-type", "alert"}}; // Create an array of breaking news categories. var categories = new string[] { "World", "Politics", "Business", "Technology", "Science", "Sports"}; // Send the notification as a template notification. All template registrations that contain // "messageParam" and the proper tags will receive the notifications. // This includes APNS, WNS, and MPNS template registrations. Dictionary<string, string> templateParams = new Dictionary<string, string>(); foreach (var category in categories) { templateParams["messageParam"] = "Breaking " + category + " News!"; await hub.SendTemplateNotificationAsync(templateParams, category); } }此代码将针对字符串数组中的所有 6 个标记发送模板通知。 使用标记是为了确保设备仅接收已注册类别的通知。
在前面的代码中,将
<hub name>和<connection string with full access>占位符替换为通知中心名称和从通知中心仪表板获取的 DefaultFullSharedAccessSignature 的连接字符串。在
Main()方法中添加以下行:SendTemplateNotificationAsync(); Console.ReadLine();生成控制台应用。
运行控制台应用以发送带标记的通知
运行上一部分中创建的应用。 所选类别的通知作为 toast 通知显示。
后续步骤
我们已通过本文了解了如何按类别广播突发新闻。 后端应用程序将带标记的通知推送到特定设备,这些设备已注册接收该标记的通知。 若要了解如何向特定用户推送通知而不管这些用户使用什么设备,请转到以下教程: