重要
自 2025 年 5 月 1 日起,Azure AD B2C 将不再可供新客户购买。 在我们的常见问题解答中了解详细信息。
在开始之前,请使用此页面顶部的 “选择策略类型 选择器”来选择要设置的策略类型。 Azure Active Directory B2C 提供了两种方法来定义用户如何与应用程序交互:通过预定义的 user 流或通过完全可配置的 custom 策略。 对于每种方法,本文中所需的步骤都不同。
可以配置 Azure Active Directory B2C(Azure AD B2C),以允许使用本地帐户登录的用户更改其密码,而无需使用电子邮件验证来证明其身份。
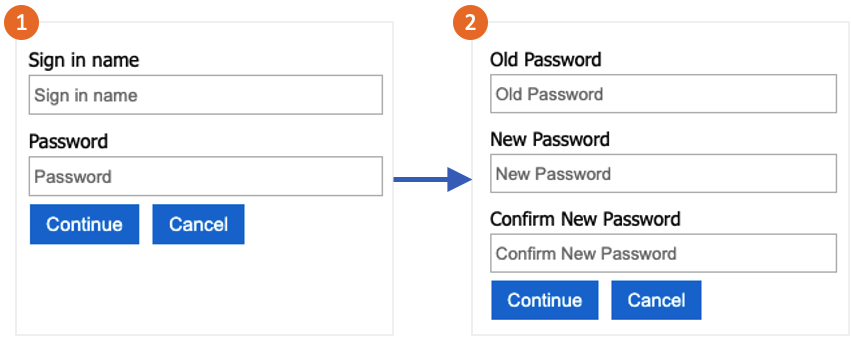
密码更改流涉及以下步骤:
用户登录到其本地帐户。 如果会话仍然处于活动状态,Azure AD B2C 授权用户并跳到下一步。
在 旧密码中,用户验证其当前密码。 在新 密码中,他们创建并确认其新密码。
小窍门
用户只能使用本文中所述的密码更改流,前提是他们知道其密码,并且想要更改密码。 我们还建议启用 自助密码重置 ,以支持用户忘记其密码的情况。
此功能仅适用于自定义策略。 对于设置步骤,请在前面的选择器中选择“自定义策略”。
先决条件
- 完成 在 Active Directory B2C 中开始使用自定义策略中的步骤。
- 在 Azure Active Directory B2C 中注册 Web 应用程序。
添加元素
打开 TrustFrameworkExtensions.xml 文件。 将以下 ClaimType 元素添加到 ClaimsSchema 元素,标识符为
oldPassword:<BuildingBlocks> <ClaimsSchema> <ClaimType Id="oldPassword"> <DisplayName>Old Password</DisplayName> <DataType>string</DataType> <UserHelpText>Enter your old password</UserHelpText> <UserInputType>Password</UserInputType> </ClaimType> </ClaimsSchema> </BuildingBlocks>ClaimsProvider 元素包含用于用户身份验证的技术档案。 将以下声明提供程序添加到 ClaimsProviders 元素:
<ClaimsProviders>
  <ClaimsProvider>
    <DisplayName>Local Account SignIn</DisplayName>
    <TechnicalProfiles>
      <TechnicalProfile Id="login-NonInteractive-PasswordChange">
        <DisplayName>Local Account SignIn</DisplayName>
        <InputClaims>
          <InputClaim ClaimTypeReferenceId="oldPassword" PartnerClaimType="password" Required="true" />
          </InputClaims>
        <IncludeTechnicalProfile ReferenceId="login-NonInteractive" />
      </TechnicalProfile>
    </TechnicalProfiles>
  </ClaimsProvider>
  <ClaimsProvider>
    <DisplayName>Local Account Password Change</DisplayName>
    <TechnicalProfiles>
      <TechnicalProfile Id="LocalAccountWritePasswordChangeUsingObjectId">
        <DisplayName>Change password (username)</DisplayName>
        <Protocol Name="Proprietary" Handler="Web.TPEngine.Providers.SelfAssertedAttributeProvider, Web.TPEngine, Version=1.0.0.0, Culture=neutral, PublicKeyToken=null" />
        <Metadata>
          <Item Key="ContentDefinitionReferenceId">api.selfasserted</Item>
        </Metadata>
        <InputClaims>
          <InputClaim ClaimTypeReferenceId="objectId" />
        </InputClaims>
        <OutputClaims>
          <OutputClaim ClaimTypeReferenceId="oldPassword" Required="true" />
          <OutputClaim ClaimTypeReferenceId="newPassword" Required="true" />
          <OutputClaim ClaimTypeReferenceId="reenterPassword" Required="true" />
        </OutputClaims>
        <ValidationTechnicalProfiles>
          <ValidationTechnicalProfile ReferenceId="login-NonInteractive-PasswordChange" />
          <ValidationTechnicalProfile ReferenceId="AAD-UserWritePasswordUsingObjectId" />
        </ValidationTechnicalProfiles>
      </TechnicalProfile>
    </TechnicalProfiles>
  </ClaimsProvider>
</ClaimsProviders>
UserJourneys 元素定义用户在与应用程序交互时采用的路径。 如果不存在 UserJourneys 元素,则添加 UserJourneys 元素,其 UserJourney 标识符为
PasswordChange:<UserJourneys> <UserJourney Id="PasswordChange"> <OrchestrationSteps> <OrchestrationStep Order="1" Type="ClaimsProviderSelection" ContentDefinitionReferenceId="api.signuporsignin"> <ClaimsProviderSelections> <ClaimsProviderSelection TargetClaimsExchangeId="LocalAccountSigninEmailExchange" /> </ClaimsProviderSelections> </OrchestrationStep> <OrchestrationStep Order="2" Type="ClaimsExchange"> <ClaimsExchanges> <ClaimsExchange Id="LocalAccountSigninEmailExchange" TechnicalProfileReferenceId="SelfAsserted-LocalAccountSignin-Email" /> </ClaimsExchanges> </OrchestrationStep> <OrchestrationStep Order="3" Type="ClaimsExchange"> <ClaimsExchanges> <ClaimsExchange Id="NewCredentials" TechnicalProfileReferenceId="LocalAccountWritePasswordChangeUsingObjectId" /> </ClaimsExchanges> </OrchestrationStep> <OrchestrationStep Order="4" Type="ClaimsExchange"> <ClaimsExchanges> <ClaimsExchange Id="AADUserReadWithObjectId" TechnicalProfileReferenceId="AAD-UserReadUsingObjectId" /> </ClaimsExchanges> </OrchestrationStep> <OrchestrationStep Order="5" Type="SendClaims" CpimIssuerTechnicalProfileReferenceId="JwtIssuer" /> </OrchestrationSteps> <ClientDefinition ReferenceId="DefaultWeb" /> </UserJourney> </UserJourneys>保存 TrustFrameworkExtensions.xml 策略文件。
复制使用初学者包下载 的ProfileEdit.xml 文件,并将其命名 为ProfileEditPasswordChange.xml。
打开新文件,并使用唯一值更新 PolicyId 属性。 此值是策略的名称。 例如,B2C_1A_profile_edit_password_change。
修改 DefaultUserJourney 中的 ReferenceId 属性,以匹配所创建的新用户旅程的 ID。 例如 PasswordChange。
保存更改。
上传并测试策略
- 登录到 Azure 门户。
- 如果有权访问多个租户,请选择顶部菜单中的 Settings 图标,从 Directories + subscriptions 菜单中选择Azure AD B2C 租户。
- 在Azure门户左上角选择所有服务,然后搜索并选择Azure AD B2C。
- 选择“Identity Experience Framework”。
- 在 自定义策略中,选择“ 上传策略”。
- 选择“覆盖策略(若存在)”,然后搜索并选择 TrustFrameworkExtensions.xml 文件。
- 选择“上传”。
- 对信赖方文件重复步骤 5 到 7,例如 ProfileEditPasswordChange.xml。
运行策略
- 打开已更改的策略。 例如,B2C_1A_profile_edit_password_change。
- 对于 应用程序,请选择之前注册的应用程序。 若要查看令牌, 回复 URL 应显示
https://jwt.ms。 - 选择“立即运行”。 在打开的新选项卡中,从 URL 中删除“&prompt=login”并刷新选项卡。然后,使用之前创建的帐户登录。 密码更改对话框提供更改密码的选项。
相关内容
- 在 GitHub 上查找示例策略。
- 了解如何在Azure AD B2C 中配置密码复杂性。
- 设置 密码重置流。