参考文档 | 更多示例 | 包 (NuGet) | 库源代码
借助本快速入门,使用 .NET 客户端库创建命名实体识别 (NER) 应用程序。 在以下示例中,你将创建一个 C# 应用程序,该应用程序可以识别文本中 识别的实体 。
提示
可以使用 Language Studio 尝试汇总,而无需编写代码。
先决条件
- Azure 订阅 - 创建试用订阅
- Visual Studio IDE
设置
创建 Azure 资源
若要使用下面的代码示例,需要部署 Azure 资源。 此资源将包含用于对发送到 Azure 语言的 API 调用进行身份验证的密钥和终结点。
使用以下链接通过 Azure 门户创建语言资源。 需要使用 Azure 订阅登录。
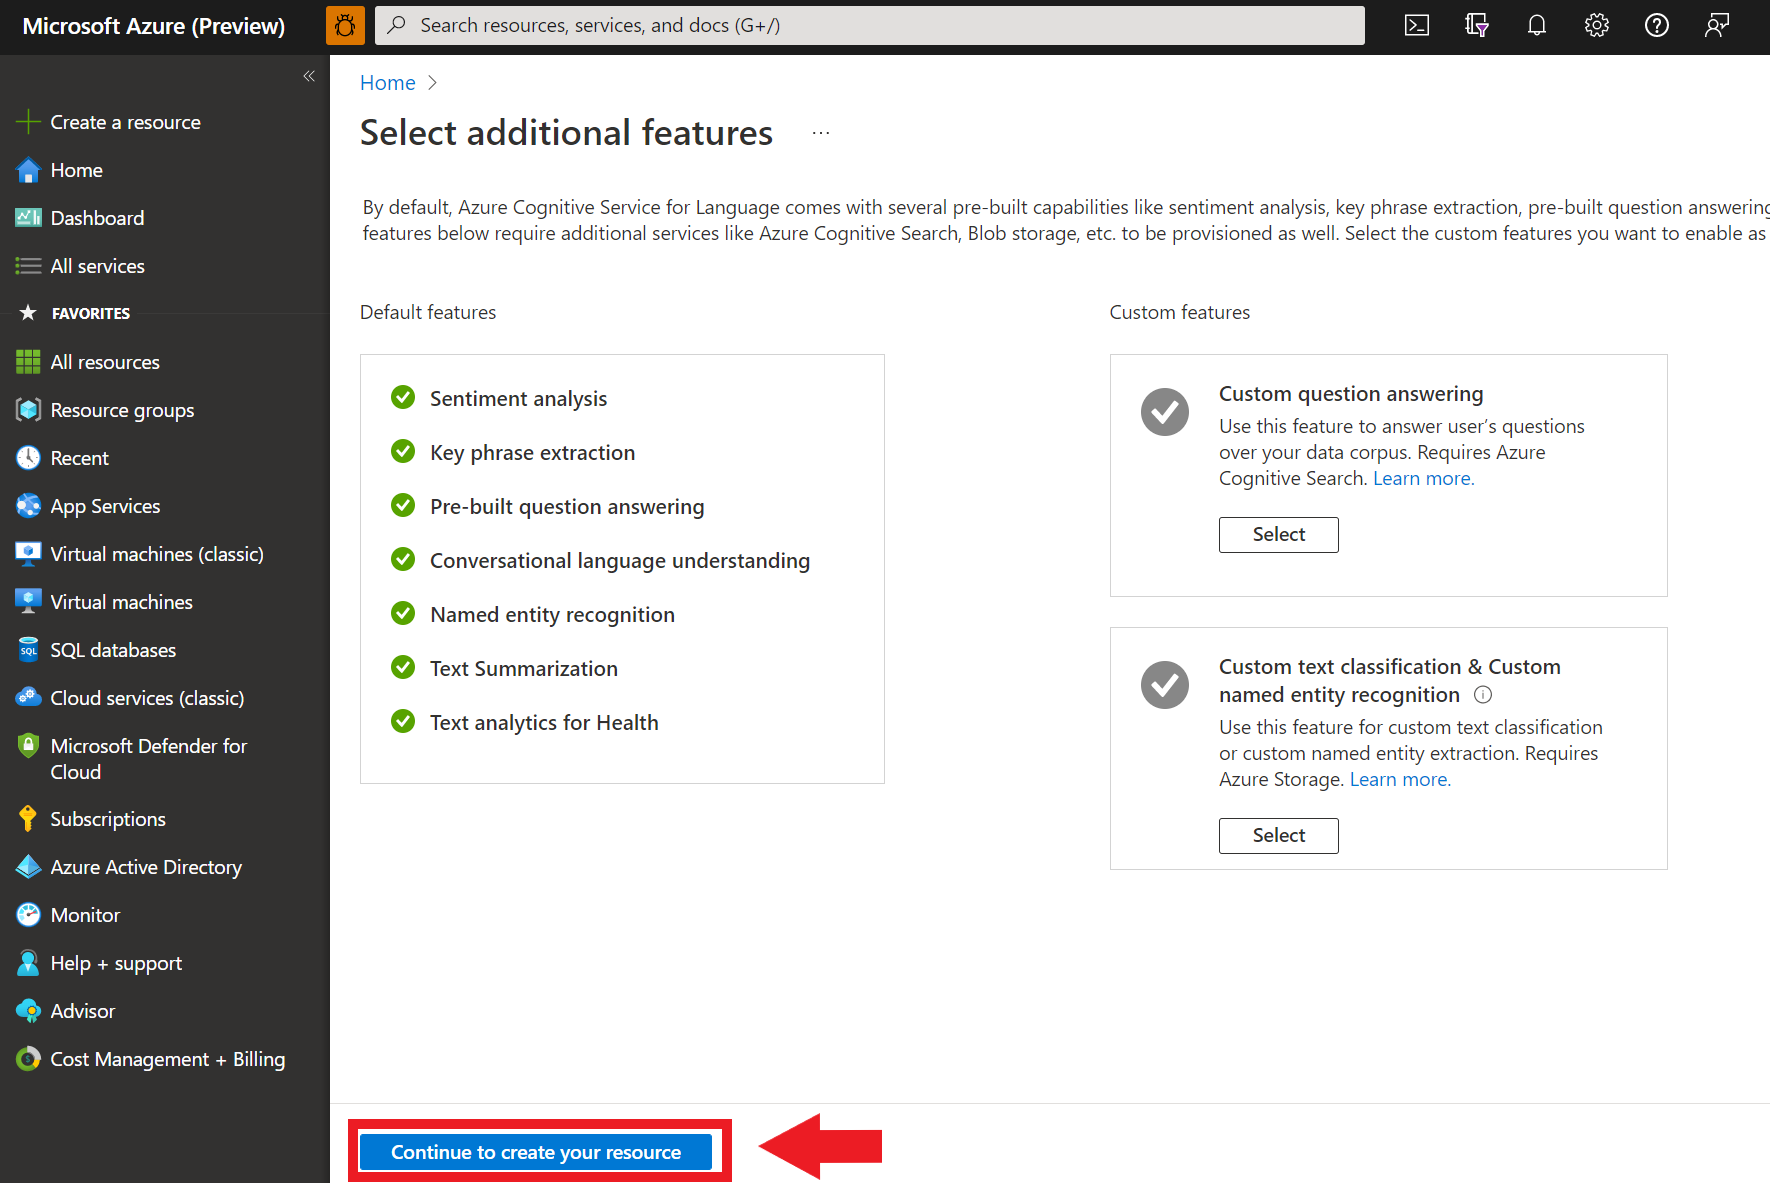
在显示的“选择其他功能”屏幕上,选择“继续创建资源”。
在“创建语言”屏幕中,提供以下信息:
详细信息 说明 订阅 资源将与之关联的订阅帐户。 从下拉菜单选择 Azure 订阅。 资源组 资源组是存储所创建资源的容器。 选择“新建”来创建一个新的资源组。 区域 语言资源的位置。 不同区域可能会导致延迟,具体取决于你的物理位置,但不会影响资源的运行时可用性。 对于本快速入门,请选择你附近的可用区域,或选择“中国东部 2”。 名称 语言资源的名称。 此名称还将用于创建应用程序用于发送 API 请求的终结点 URL。 定价层 语言资源的定价层。 可以使用免费 F0 层试用该服务,然后再升级到付费层进行生产。 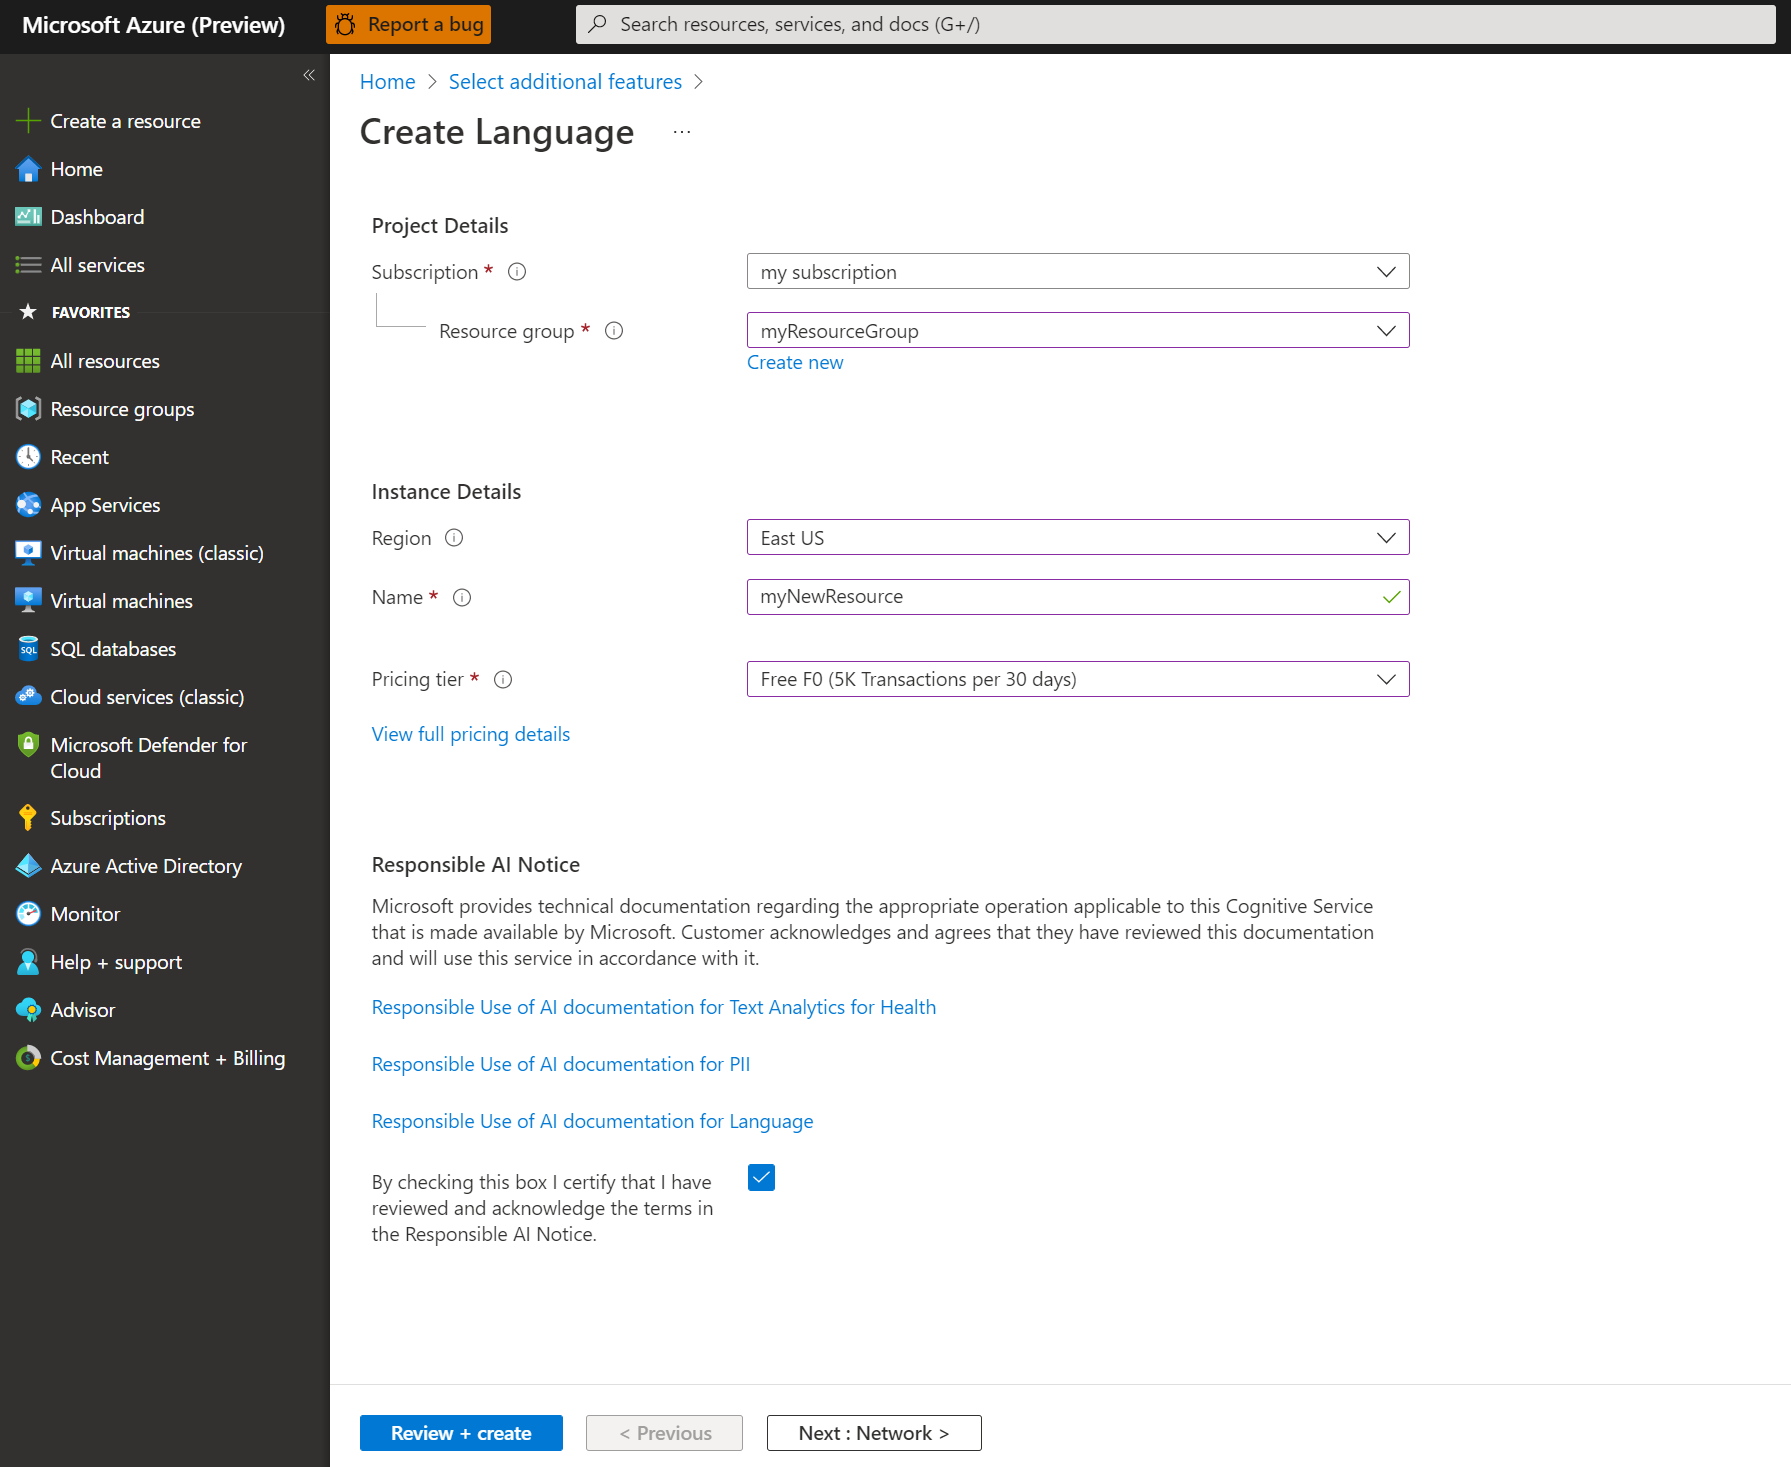
确保选中“负责任 AI 通知”复选框。
在页面底部选择“查看 + 创建” 。
在显示的屏幕中,确保验证已通过,并且已正确输入信息。 然后选择“创建”。


获取密钥和终结点
然后需要从资源获取密钥和终结点,以便将应用程序连接到 API。 稍后需要在本快速入门中将密钥和终结点粘贴到代码中。
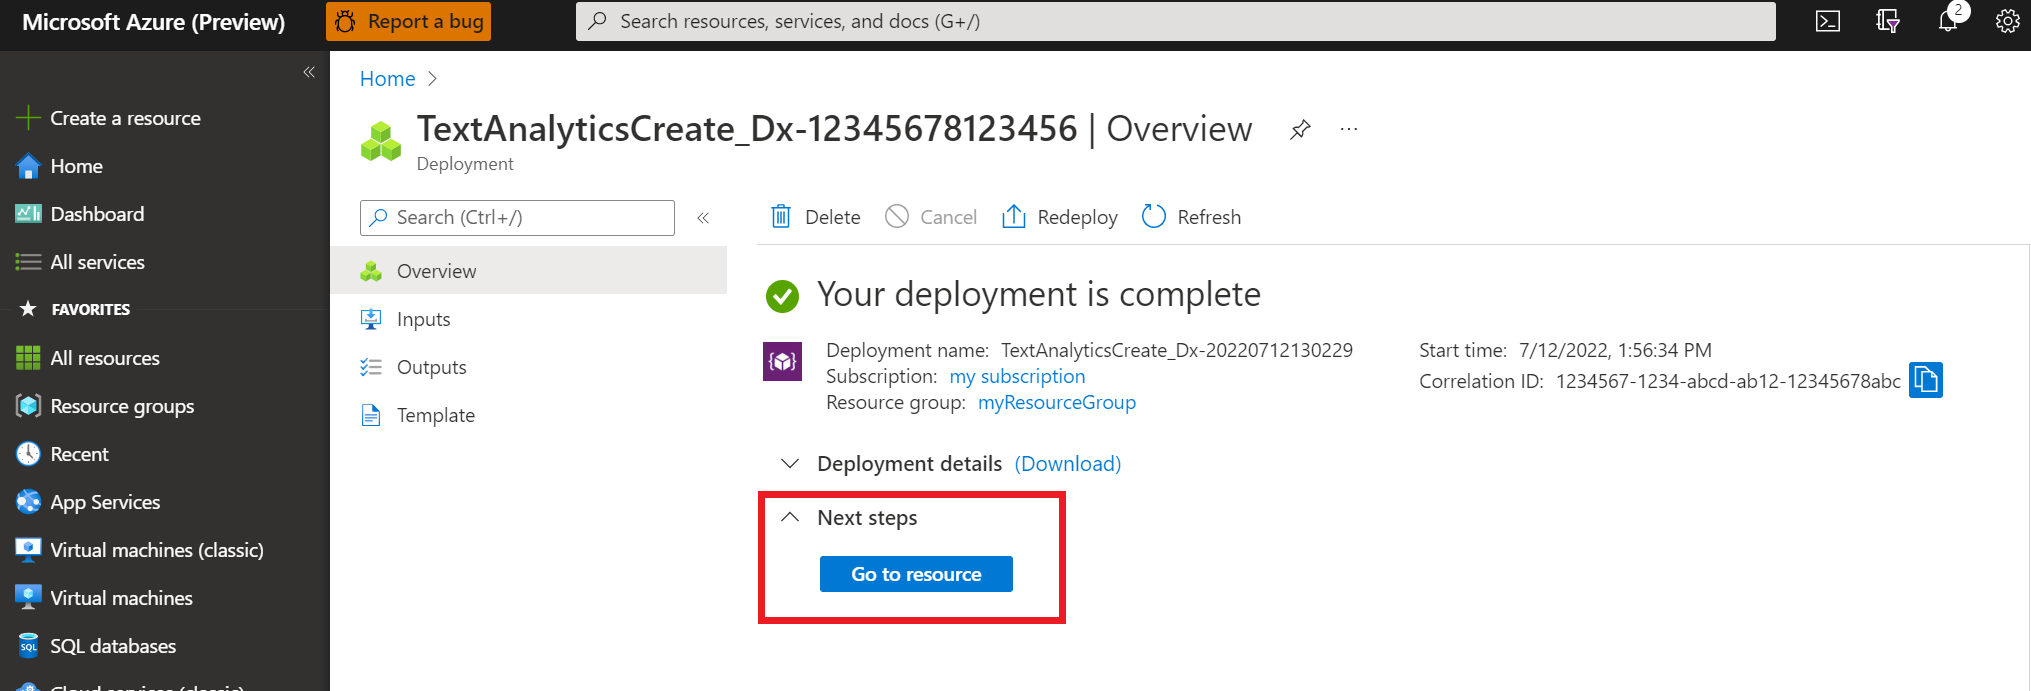
成功部署 Azure 语言资源后,单击“后续步骤”下的“转到资源”按钮。
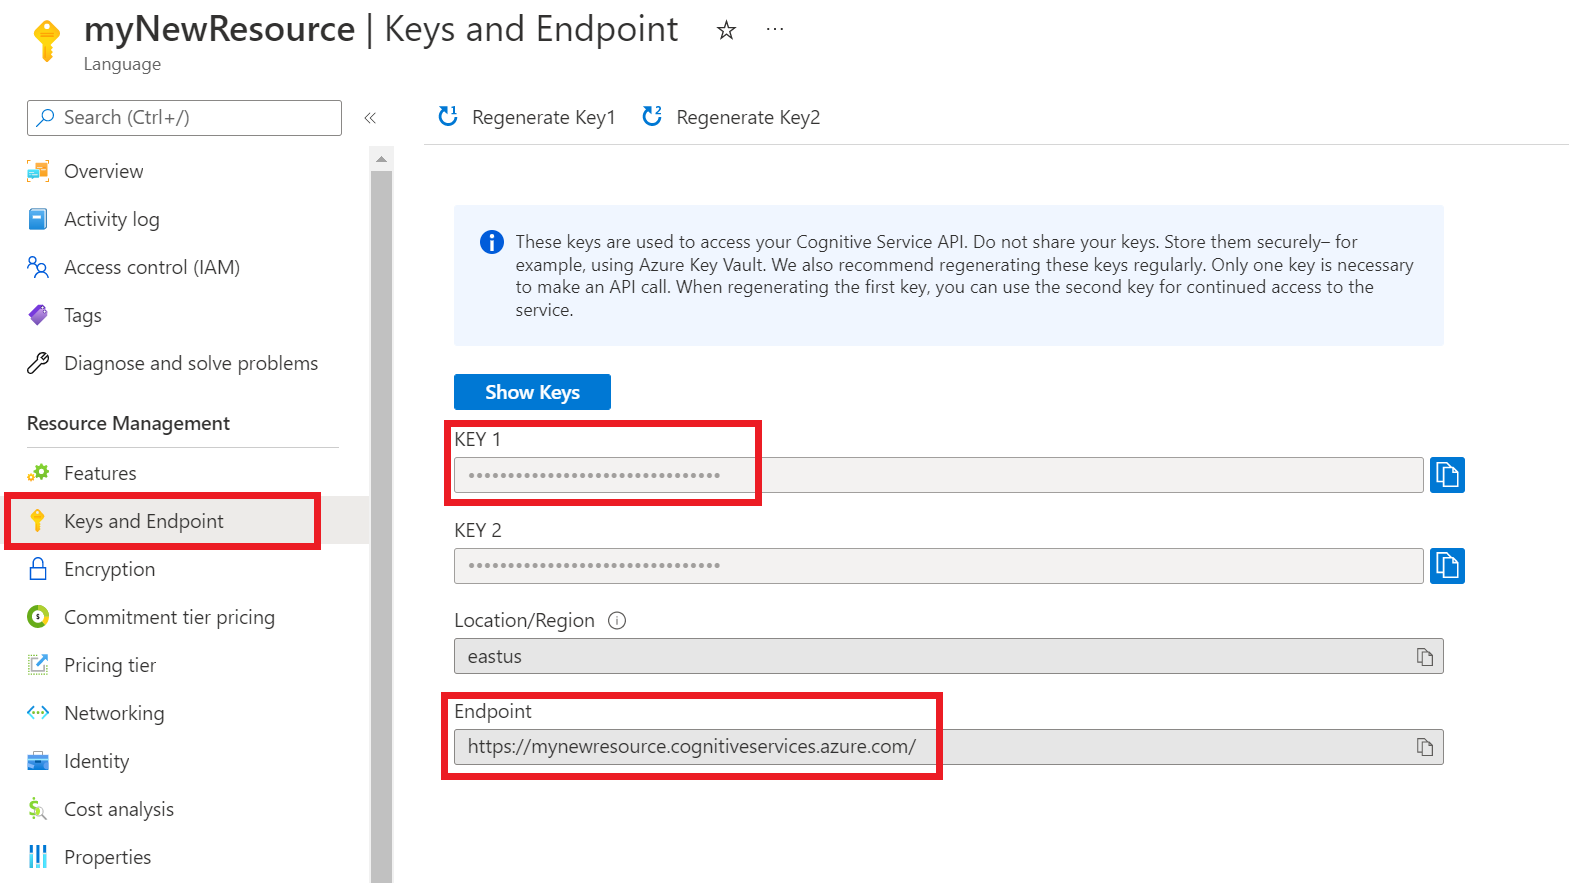
在资源屏幕上,选择左侧窗格中的“密钥和终结点”。 在以下步骤中,你将使用其中一个密钥和终结点。


创建环境变量
应用程序必须经过身份验证才能发送 API 请求。 对于生产,请使用安全的方式存储和访问凭据。 在此示例中,你将凭据写入运行应用程序的本地计算机上的环境变量。
若要为语言资源密钥设置环境变量,请打开控制台窗口,并按照操作系统和开发环境的说明进行操作。
- 若要设置
LANGUAGE_KEY环境变量,请将your-key替换为资源的其中一个密钥。 - 若要设置
LANGUAGE_ENDPOINT环境变量,请将your-endpoint替换为资源的终结点。
重要
我们建议使用 Azure 资源的托管标识进行 Microsoft Entra ID 身份验证,以避免将凭据随云中运行的应用程序一起存储。
请谨慎使用 API 密钥。 请不要直接在代码中包含 API 密钥,并且切勿公开发布该密钥。 如果使用 API 密钥,请将其安全地存储在 Azure Key Vault 中,定期轮换密钥,并使用基于角色的访问控制和网络访问限制来限制对 Azure Key Vault 的访问。
有关 Azure AI 服务安全性的详细信息,请参阅对 Azure AI 服务的请求进行身份验证。
setx LANGUAGE_KEY your-key
setx LANGUAGE_ENDPOINT your-endpoint
注意
如果只需要访问当前正在运行的控制台中的环境变量,则可以使用 set(而不是 setx)设置环境变量。
添加环境变量后,可能需要重启任何正在运行的、需要读取环境变量的程序(包括控制台窗口)。 例如,如果使用 Visual Studio 作为编辑器,请在运行示例之前重启 Visual Studio。
创建新的 .NET Core 应用程序
使用 Visual Studio IDE 创建新的 .NET Core 控制台应用。 此步骤创建包含单个 C# 源文件的“Hello World”项目: program.cs。
通过在 解决方案资源管理器 中右键单击解决方案并选择“ 管理 NuGet 包”来安装客户端库。 在打开的包管理器中选择“浏览”,搜索 。 选择版本 5.2.0,然后选择“安装”。 也可使用包管理器控制台。
代码示例
将以下代码复制到 program.cs 文件中,然后运行代码。
using Azure;
using System;
using Azure.AI.TextAnalytics;

namespace Example
{
    class Program
    {
        // This example requires environment variables named "LANGUAGE_KEY" and "LANGUAGE_ENDPOINT"
        static string languageKey = Environment.GetEnvironmentVariable("LANGUAGE_KEY");
        static string languageEndpoint = Environment.GetEnvironmentVariable("LANGUAGE_ENDPOINT");

        private static readonly AzureKeyCredential credentials = new AzureKeyCredential(languageKey);
        private static readonly Uri endpoint = new Uri(languageEndpoint);

        // Example method for extracting named entities from text
        static void EntityRecognitionExample(TextAnalyticsClient client)
        {
            var response = client.RecognizeEntities("I had a wonderful trip to Seattle last week.");
            Console.WriteLine("Named Entities:");
            foreach (var entity in response.Value)
            {
                Console.WriteLine($"\tText: {entity.Text},\tCategory: {entity.Category},\tSub-Category: {entity.SubCategory}");
                Console.WriteLine($"\t\tScore: {entity.ConfidenceScore:F2},\tLength: {entity.Length},\tOffset: {entity.Offset}\n");
            }
        }

        static void Main(string[] args)
        {
            var client = new TextAnalyticsClient(endpoint, credentials);
            EntityRecognitionExample(client);

            Console.Write("Press any key to exit.");
            Console.ReadKey();
        }

    }
}
输出
Named Entities:
        Text: trip,     Category: Event,        Sub-Category:
                Score: 0.74,    Length: 4,      Offset: 18

        Text: Seattle,  Category: Location,     Sub-Category: GPE
                Score: 1.00,    Length: 7,      Offset: 26

        Text: last week,        Category: DateTime,     Sub-Category: DateRange
                Score: 0.80,    Length: 9,      Offset: 34
参考文档 | 更多示例 | 包 (Maven) | 库源代码
借助本快速入门,使用 Java 客户端库创建命名实体识别 (NER) 应用程序。 在以下示例中,你将创建可在文本中识别已识别实体的 Java 应用程序。
先决条件
- Azure 订阅 - 创建试用订阅
- Java 开发工具包 (JDK) 版本 8 或更高版本
设置
创建 Azure 资源
若要使用下面的代码示例,需要部署 Azure 资源。 此资源将包含用于对发送到 Azure 语言的 API 调用进行身份验证的密钥和终结点。
使用以下链接通过 Azure 门户创建语言资源。 需要使用 Azure 订阅登录。
在显示的“选择其他功能”屏幕上,选择“继续创建资源”。
在“创建语言”屏幕中,提供以下信息:
详细信息 说明 订阅 资源将与之关联的订阅帐户。 从下拉菜单选择 Azure 订阅。 资源组 资源组是存储所创建资源的容器。 选择“新建”来创建一个新的资源组。 区域 语言资源的位置。 不同区域可能会导致延迟,具体取决于你的物理位置,但不会影响资源的运行时可用性。 对于本快速入门,请选择你附近的可用区域,或选择“中国东部 2”。 名称 语言资源的名称。 此名称还将用于创建应用程序用于发送 API 请求的终结点 URL。 定价层 语言资源的定价层。 可以使用免费 F0 层试用该服务,然后再升级到付费层进行生产。
确保选中“负责任 AI 通知”复选框。
在页面底部选择“查看 + 创建” 。
在显示的屏幕中,确保验证已通过,并且已正确输入信息。 然后选择“创建”。
获取密钥和终结点
然后需要从资源获取密钥和终结点,以便将应用程序连接到 API。 稍后需要在本快速入门中将密钥和终结点粘贴到代码中。
成功部署 Azure 语言资源后,单击“后续步骤”下的“转到资源”按钮。
在资源屏幕上,选择左侧窗格中的“密钥和终结点”。 在以下步骤中,你将使用其中一个密钥和终结点。
创建环境变量
应用程序必须经过身份验证才能发送 API 请求。 对于生产,请使用安全的方式存储和访问凭据。 在此示例中,你将凭据写入运行应用程序的本地计算机上的环境变量。
若要为语言资源密钥设置环境变量,请打开控制台窗口,并按照操作系统和开发环境的说明进行操作。
- 若要设置
LANGUAGE_KEY环境变量,请将your-key替换为资源的其中一个密钥。 - 若要设置
LANGUAGE_ENDPOINT环境变量,请将your-endpoint替换为资源的终结点。
重要
我们建议使用 Azure 资源的托管标识进行 Microsoft Entra ID 身份验证,以避免将凭据随云中运行的应用程序一起存储。
请谨慎使用 API 密钥。 请不要直接在代码中包含 API 密钥,并且切勿公开发布该密钥。 如果使用 API 密钥,请将其安全地存储在 Azure Key Vault 中,定期轮换密钥,并使用基于角色的访问控制和网络访问限制来限制对 Azure Key Vault 的访问。
有关 Azure AI 服务安全性的详细信息,请参阅对 Azure AI 服务的请求进行身份验证。
setx LANGUAGE_KEY your-key
setx LANGUAGE_ENDPOINT your-endpoint
注意
如果只需要访问当前正在运行的控制台中的环境变量,则可以使用 set(而不是 setx)设置环境变量。
添加环境变量后,可能需要重启任何正在运行的、需要读取环境变量的程序(包括控制台窗口)。 例如,如果使用 Visual Studio 作为编辑器,请在运行示例之前重启 Visual Studio。
添加客户端库
在首选 IDE 或开发环境中创建 Maven 项目。 然后在项目的 pom.xml 文件中,添加以下依赖项。 可联机找到用于其他生成工具的实现语法。
<dependencies>
     <dependency>
        <groupId>com.azure</groupId>
        <artifactId>azure-ai-textanalytics</artifactId>
        <version>5.2.0</version>
    </dependency>
</dependencies>
代码示例
创建名为 Example.java 的 Java 文件。 打开该文件,并复制以下代码。 然后运行代码。
import com.azure.core.credential.AzureKeyCredential;
import com.azure.ai.textanalytics.models.*;
import com.azure.ai.textanalytics.TextAnalyticsClientBuilder;
import com.azure.ai.textanalytics.TextAnalyticsClient;

public class Example {

    // This example requires environment variables named "LANGUAGE_KEY" and "LANGUAGE_ENDPOINT"
    private static String languageKey = System.getenv("LANGUAGE_KEY");
    private static String languageEndpoint = System.getenv("LANGUAGE_ENDPOINT");

    public static void main(String[] args) {
        TextAnalyticsClient client = authenticateClient(languageKey, languageEndpoint);
        recognizeEntitiesExample(client);
    }
    // Method to authenticate the client object with your key and endpoint
    static TextAnalyticsClient authenticateClient(String key, String endpoint) {
        return new TextAnalyticsClientBuilder()
                .credential(new AzureKeyCredential(key))
                .endpoint(endpoint)
                .buildClient();
    }
    // Example method for recognizing entities in text
    static void recognizeEntitiesExample(TextAnalyticsClient client)
    {
        // The text that needs to be analyzed.
        String text = "I had a wonderful trip to Seattle last week.";

        for (CategorizedEntity entity : client.recognizeEntities(text)) {
            System.out.printf(
                "Recognized entity: %s, entity category: %s, entity sub-category: %s, score: %s, offset: %s, length: %s.%n",
                entity.getText(),
                entity.getCategory(),
                entity.getSubcategory(),
                entity.getConfidenceScore(),
                entity.getOffset(),
                entity.getLength());
        }
    }
}
输出
Recognized entity: trip, entity category: Event, entity sub-category: null, score: 0.74, offset: 18, length: 4.
Recognized entity: Seattle, entity category: Location, entity sub-category: GPE, score: 1.0, offset: 26, length: 7.
Recognized entity: last week, entity category: DateTime, entity sub-category: DateRange, score: 0.8, offset: 34, length: 9.
借助本快速入门,使用 Node.js 客户端库创建命名实体识别 (NER) 应用程序。 在以下示例中,你将创建可在文本中识别已识别实体的 JavaScript 应用程序。
先决条件
设置
创建 Azure 资源
若要使用下面的代码示例,需要部署 Azure 资源。 此资源将包含用于对发送到 Azure 语言的 API 调用进行身份验证的密钥和终结点。
使用以下链接通过 Azure 门户创建语言资源。 需要使用 Azure 订阅登录。
在显示的“选择其他功能”屏幕上,选择“继续创建资源”。
在“创建语言”屏幕中,提供以下信息:
详细信息 说明 订阅 资源将与之关联的订阅帐户。 从下拉菜单选择 Azure 订阅。 资源组 资源组是存储所创建资源的容器。 选择“新建”来创建一个新的资源组。 区域 语言资源的位置。 不同区域可能会导致延迟,具体取决于你的物理位置,但不会影响资源的运行时可用性。 对于本快速入门,请选择你附近的可用区域,或选择“中国东部 2”。 名称 语言资源的名称。 此名称还将用于创建应用程序用于发送 API 请求的终结点 URL。 定价层 语言资源的定价层。 可以使用免费 F0 层试用该服务,然后再升级到付费层进行生产。
确保选中“负责任 AI 通知”复选框。
在页面底部选择“查看 + 创建” 。
在显示的屏幕中,确保验证已通过,并且已正确输入信息。 然后选择“创建”。
获取密钥和终结点
然后需要从资源获取密钥和终结点,以便将应用程序连接到 API。 稍后需要在本快速入门中将密钥和终结点粘贴到代码中。
成功部署 Azure 语言资源后,单击“后续步骤”下的“转到资源”按钮。
在资源屏幕上,选择左侧窗格中的“密钥和终结点”。 在以下步骤中,你将使用其中一个密钥和终结点。
创建环境变量
应用程序必须经过身份验证才能发送 API 请求。 对于生产,请使用安全的方式存储和访问凭据。 在此示例中,你将凭据写入运行应用程序的本地计算机上的环境变量。
若要为语言资源密钥设置环境变量,请打开控制台窗口,并按照操作系统和开发环境的说明进行操作。
- 若要设置
LANGUAGE_KEY环境变量,请将your-key替换为资源的其中一个密钥。 - 若要设置
LANGUAGE_ENDPOINT环境变量,请将your-endpoint替换为资源的终结点。
重要
我们建议使用 Azure 资源的托管标识进行 Microsoft Entra ID 身份验证,以避免将凭据随云中运行的应用程序一起存储。
请谨慎使用 API 密钥。 请不要直接在代码中包含 API 密钥,并且切勿公开发布该密钥。 如果使用 API 密钥,请将其安全地存储在 Azure Key Vault 中,定期轮换密钥,并使用基于角色的访问控制和网络访问限制来限制对 Azure Key Vault 的访问。
有关 Azure AI 服务安全性的详细信息,请参阅对 Azure AI 服务的请求进行身份验证。
setx LANGUAGE_KEY your-key
setx LANGUAGE_ENDPOINT your-endpoint
注意
如果只需要访问当前正在运行的控制台中的环境变量,则可以使用 set(而不是 setx)设置环境变量。
添加环境变量后,可能需要重启任何正在运行的、需要读取环境变量的程序(包括控制台窗口)。 例如,如果使用 Visual Studio 作为编辑器,请在运行示例之前重启 Visual Studio。
创建新的 Node.js 应用程序
在控制台窗口(例如 cmd、PowerShell 或 Bash)中,为应用创建一个新目录并导航到该目录。
mkdir myapp

cd myapp
运行 npm init 命令以使用 package.json 文件创建一个 node 应用程序。
npm init
安装客户端库
安装 npm 包:
npm install @azure/ai-language-text
代码示例
打开该文件,并复制以下代码。 然后运行代码。
"use strict";

const { TextAnalyticsClient, AzureKeyCredential } = require("@azure/ai-text-analytics");

// This example requires environment variables named "LANGUAGE_KEY" and "LANGUAGE_ENDPOINT"
const key = process.env.LANGUAGE_KEY;
const endpoint = process.env.LANGUAGE_ENDPOINT;

//an example document for entity recognition
const documents = [ "Microsoft was founded by Bill Gates and Paul Allen on April 4, 1975, to develop and sell BASIC interpreters for the Altair 8800"];

//example of how to use the client library to recognize entities in a document.
async function main() {
    console.log("== NER sample ==");

    const client = new TextAnalysisClient(endpoint, new AzureKeyCredential(key));

    const results = await client.analyze("EntityRecognition", documents);

    for (const result of results) {
      console.log(`- Document ${result.id}`);
      if (!result.error) {
        console.log("\tRecognized Entities:");
        for (const entity of result.entities) {
          console.log(`\t- Entity ${entity.text} of type ${entity.category}`);
        }
      } else console.error("\tError:", result.error);
    }
  }

//call the main function
main().catch((err) => {
    console.error("The sample encountered an error:", err);
});
输出
Document ID: 0
        Name: Microsoft         Category: Organization  Subcategory: N/A
        Score: 0.29
        Name: Bill Gates        Category: Person        Subcategory: N/A
        Score: 0.78
        Name: Paul Allen        Category: Person        Subcategory: N/A
        Score: 0.82
        Name: April 4, 1975     Category: DateTime      Subcategory: Date
        Score: 0.8
        Name: 8800      Category: Quantity      Subcategory: Number
        Score: 0.8
Document ID: 1
        Name: 21        Category: Quantity      Subcategory: Number
        Score: 0.8
        Name: Seattle   Category: Location      Subcategory: GPE
        Score: 0.25
借助本快速入门,使用 Python 客户端库创建命名实体识别 (NER) 应用程序。 在以下示例中,你将创建可在文本中识别已识别实体的 Python 应用程序。
先决条件
- Azure 订阅 - 创建试用订阅
- Python 3.8 或更高版本
设置
安装客户端库
在安装 Python 后,可以通过以下命令安装客户端库:
pip install azure-ai-textanalytics==5.2.0
代码示例
创建新的 Python 文件,并复制以下代码。 然后运行代码。
# This example requires environment variables named "LANGUAGE_KEY" and "LANGUAGE_ENDPOINT"
language_key = os.environ.get('LANGUAGE_KEY')
language_endpoint = os.environ.get('LANGUAGE_ENDPOINT')

from azure.ai.textanalytics import TextAnalyticsClient
from azure.core.credentials import AzureKeyCredential

# Authenticate the client using your key and endpoint
def authenticate_client():
    ta_credential = AzureKeyCredential(language_key)
    text_analytics_client = TextAnalyticsClient(
            endpoint=language_endpoint,
            credential=ta_credential)
    return text_analytics_client

client = authenticate_client()

# Example function for recognizing entities from text
def entity_recognition_example(client):

    try:
        documents = ["I had a wonderful trip to Seattle last week."]
        result = client.recognize_entities(documents = documents)[0]

        print("Named Entities:\n")
        for entity in result.entities:
            print("\tText: \t", entity.text, "\tCategory: \t", entity.category, "\tSubCategory: \t", entity.subcategory,
                    "\n\tConfidence Score: \t", round(entity.confidence_score, 2), "\tLength: \t", entity.length, "\tOffset: \t", entity.offset, "\n")

    except Exception as err:
        print("Encountered exception. {}".format(err))
entity_recognition_example(client)
输出
Named Entities:

    Text:    trip   Category:        Event  SubCategory:     None
    Confidence Score:        0.74   Length:          4      Offset:          18

    Text:    Seattle        Category:        Location       SubCategory:     GPE
    Confidence Score:        1.0    Length:          7      Offset:          26

    Text:    last week      Category:        DateTime       SubCategory:     DateRange
    Confidence Score:        0.8    Length:          9      Offset:          34
借助本快速入门,使用 REST API 发送命名实体识别 (NER) 请求。 在以下示例中,使用 cURL 识别文本中 已识别的实体 。
先决条件
- Azure 订阅 - 创建试用订阅
设置
创建 Azure 资源
若要使用下面的代码示例,需要部署 Azure 资源。 此资源将包含用于对发送到 Azure 语言的 API 调用进行身份验证的密钥和终结点。
使用以下链接通过 Azure 门户创建语言资源。 需要使用 Azure 订阅登录。
在显示的“选择其他功能”屏幕上,选择“继续创建资源”。
在“创建语言”屏幕中,提供以下信息:
详细信息 说明 订阅 资源将与之关联的订阅帐户。 从下拉菜单选择 Azure 订阅。 资源组 资源组是存储所创建资源的容器。 选择“新建”来创建一个新的资源组。 区域 语言资源的位置。 不同区域可能会导致延迟,具体取决于你的物理位置,但不会影响资源的运行时可用性。 对于本快速入门,请选择你附近的可用区域,或选择“中国东部 2”。 名称 语言资源的名称。 此名称还将用于创建应用程序用于发送 API 请求的终结点 URL。 定价层 语言资源的定价层。 可以使用免费 F0 层试用该服务,然后再升级到付费层进行生产。
确保选中“负责任 AI 通知”复选框。
在页面底部选择“查看 + 创建” 。
在显示的屏幕中,确保验证已通过,并且已正确输入信息。 然后选择“创建”。
获取密钥和终结点
然后需要从资源获取密钥和终结点,以便将应用程序连接到 API。 稍后需要在本快速入门中将密钥和终结点粘贴到代码中。
成功部署 Azure 语言资源后,单击“后续步骤”下的“转到资源”按钮。
在资源屏幕上,选择左侧窗格中的“密钥和终结点”。 在以下步骤中,你将使用其中一个密钥和终结点。
创建环境变量
应用程序必须经过身份验证才能发送 API 请求。 对于生产,请使用安全的方式存储和访问凭据。 在此示例中,你将凭据写入运行应用程序的本地计算机上的环境变量。
若要为语言资源密钥设置环境变量,请打开控制台窗口,并按照操作系统和开发环境的说明进行操作。
- 若要设置
LANGUAGE_KEY环境变量,请将your-key替换为资源的其中一个密钥。 - 若要设置
LANGUAGE_ENDPOINT环境变量,请将your-endpoint替换为资源的终结点。
重要
我们建议使用 Azure 资源的托管标识进行 Microsoft Entra ID 身份验证,以避免将凭据随云中运行的应用程序一起存储。
请谨慎使用 API 密钥。 请不要直接在代码中包含 API 密钥,并且切勿公开发布该密钥。 如果使用 API 密钥,请将其安全地存储在 Azure Key Vault 中,定期轮换密钥,并使用基于角色的访问控制和网络访问限制来限制对 Azure Key Vault 的访问。
有关 Azure AI 服务安全性的详细信息,请参阅对 Azure AI 服务的请求进行身份验证。
setx LANGUAGE_KEY your-key
setx LANGUAGE_ENDPOINT your-endpoint
注意
如果只需要访问当前正在运行的控制台中的环境变量,则可以使用 set(而不是 setx)设置环境变量。
添加环境变量后,可能需要重启任何正在运行的、需要读取环境变量的程序(包括控制台窗口)。 例如,如果使用 Visual Studio 作为编辑器,请在运行示例之前重启 Visual Studio。
使用示例请求正文创建 JSON 文件
在代码编辑器中,创建一个名为 test_ner_payload.json 的新文件并复制以下 JSON 示例。 在下一步中,此示例请求将发送到 API。
{
    "kind": "EntityRecognition",
    "parameters": {
        "modelVersion": "latest"
    },
    "analysisInput":{
        "documents":[
            {
                "id":"1",
                "language": "en",
                "text": "I had a wonderful trip to Seattle last week."
            }
        ]
    }
}
将 test_ner_payload.json 保存在计算机上的某个位置。 例如,桌面。
发送命名实体识别 API 请求
使用以下命令通过所使用的程序发送 API 请求。 将命令复制到终端并运行。
| 参数 | 说明 |
|---|---|
-X POST <endpoint> |
指定用于访问 API 的终结点。 |
-H Content-Type: application/json |
用于发送 JSON 数据的内容类型。 |
-H "Ocp-Apim-Subscription-Key:<key> |
指定用于访问 API 的密钥。 |
-d <documents> |
包含要发送的文档的 JSON。 |
将 C:\Users\<myaccount>\Desktop\test_ner_payload.json 替换为在上一步中创建的示例 JSON 请求文件的位置。
命令提示符
curl -X POST "%LANGUAGE_ENDPOINT%/language/:analyze-text?api-version=2022-05-01" ^
-H "Content-Type: application/json" ^
-H "Ocp-Apim-Subscription-Key: %LANGUAGE_KEY%" ^
-d "@C:\Users\<myaccount>\Desktop\test_ner_payload.json"
PowerShell
curl.exe -X POST $env:LANGUAGE_ENDPOINT/language/:analyze-text?api-version=2022-05-01 `
-H "Content-Type: application/json" `
-H "Ocp-Apim-Subscription-Key: $env:LANGUAGE_KEY" `
-d "@C:\Users\<myaccount>\Desktop\test_ner_payload.json"
JSON 响应
注意
- 正式版 API 和当前预览版 API 具有不同的响应格式。
- 预览版 API 自 API 版本
2023-04-15-preview开始可用。
{
	"kind": "EntityRecognitionResults",
	"results": {
		"documents": [{
			"id": "1",
			"entities": [{
				"text": "trip",
				"category": "Event",
				"offset": 18,
				"length": 4,
				"confidenceScore": 0.74
			}, {
				"text": "Seattle",
				"category": "Location",
				"subcategory": "GPE",
				"offset": 26,
				"length": 7,
				"confidenceScore": 1.0
			}, {
				"text": "last week",
				"category": "DateTime",
				"subcategory": "DateRange",
				"offset": 34,
				"length": 9,
				"confidenceScore": 0.8
			}],
			"warnings": []
		}],
		"errors": [],
		"modelVersion": "2021-06-01"
	}
}
清理资源
若要清理和删除 Azure AI 资源,可以删除单个资源或整个资源组。 如果删除资源组,也会删除包含的所有资源。