了解如何从 Azure 应用服务上运行的 Web 应用访问 Microsoft Graph。

你希望从 Web 应用添加对 Microsoft Graph 的访问权限,并以已登录用户的身份执行一些操作。 本部分介绍如何向 Web 应用授予委托的权限,以及如何从 Microsoft Entra ID 获取已登录用户的配置文件信息。
本教程介绍如何执行下列操作:
- 向 Web 应用授予委托的权限。
- 为已登录的用户从 Web 应用调用 Microsoft Graph。
如果没有 Azure 订阅,可在开始前创建一个试用帐户。
先决条件
- 在启用了应用服务身份验证/授权模块的 Azure 应用服务上运行的 Web 应用程序。
授予前端访问权限以调用 Microsoft Graph
现在,你已在 Web 应用上启用身份验证和授权,该 Web 应用在 Microsoft 标识平台上注册,并由 Microsoft Entra 应用程序提供支持。 在此步骤中,授予 Web 应用相应权限,为用户访问 Microsoft Graph。 (从技术上讲,你向 Web 应用的 Microsoft Entra 应用程序授予了访问用户的 Microsoft Graph Microsoft Entra 应用程序的权限。)
在“Azure 门户”菜单中,选择“Microsoft Entra ID”,或者在任何页面中搜索并选择“Microsoft Entra ID”。
选择“应用注册”>“拥有的应用程序”>“查看此目录中的所有应用程序”。 选择你的 Web 应用名称,然后选择“API 权限”。
依次选择“添加权限”、“Microsoft API”和“Microsoft Graph”。
选择“委托的权限”,然后从列表中选择“User.Read” 。 选择“添加权限”。
对应用服务进行配置,使之返回可用的访问令牌
Web 应用现在具有以已登录用户身份访问 Microsoft Graph 所需的权限。 在此步骤中,配置应用服务身份验证和授权,以便获取用于访问 Microsoft Graph 的可用访问令牌。 为完成此步骤,需要为下游服务 (Microsoft Graph) 添加 User.Read 范围:https://microsoftgraph.chinacloudapi.cn/User.Read。
重要
如果未将应用服务配置为返回可用的访问令牌,则在代码中调用 Microsoft 图形 API 时会收到 CompactToken parsing failed with error code: 80049217 错误。
使用 Azure CLI 调用应用服务 Web 应用 REST API 以获取并更新身份验证配置设置,使 Web 应用能够调用 Microsoft Graph。
打开命令窗口并登录到 Azure CLI:
az login获取现有的“config/authsettingsv2”设置,并将其保存到本地 authsettings.json 文件中。
az rest --method GET --url '/subscriptions/{SUBSCRIPTION_ID}/resourceGroups/{RESOURCE_GROUP}/providers/Microsoft.Web/sites/{WEBAPP_NAME}/config/authsettingsv2/list?api-version=2020-06-01' > authsettings.json使用偏好的文本编辑器打开 authsettings.json 文件。
找到“identityProviders”的“登录”部分 ->“azureActiveDirectory”。
添加以下“loginParameters”设置:
"loginParameters":[ "response_type=code id_token","scope=openid offline_access profile https://microsoftgraph.chinacloudapi.cn/User.Read" ]。"identityProviders": { "azureActiveDirectory": { "enabled": true, "login": { "loginParameters":[ "response_type=code id_token", "scope=openid offline_access profile https://microsoftgraph.chinacloudapi.cn/User.Read" ] } } } },保存对文件 authsettings.json 所做的更改,并将本地设置上传到你的 Web 应用:
az rest --method PUT --url '/subscriptions/{SUBSCRIPTION_ID}/resourceGroups/{RESOURCE_GROUP}/providers/Microsoft.Web/sites/{WEBAPP_NAME}/config/authsettingsv2?api-version=2020-06-01' --body @./authsettings.json
从 Node.js 调用 Microsoft Graph
Web 应用现在具有所需的权限,并且还将 Microsoft Graph 的客户端 ID 添加到登录参数中。
安装客户端库包
使用 npm 在项目中安装 @azure/identity 和 @microsoft/microsoft-graph-client 包。
npm install @microsoft/microsoft-graph-client
配置身份验证信息
创建一个对象以保存身份验证设置:
// partial code in app.js
const appSettings = {
    appCredentials: {
        clientId: process.env.WEBSITE_AUTH_CLIENT_ID, // Enter the client Id here,
        tenantId: "common", // Enter the tenant info here,
        clientSecret: process.env.MICROSOFT_PROVIDER_AUTHENTICATION_SECRET // Enter the client secret here,
    },
    authRoutes: {
        redirect: "/.auth/login/aad/callback", // Enter the redirect URI here
        error: "/error", // enter the relative path to error handling route
        unauthorized: "/unauthorized" // enter the relative path to unauthorized route
    },
    protectedResources: {
        graphAPI: {
            endpoint: "https://microsoftgraph.chinacloudapi.cn/v1.0/me", // resource endpoint
            scopes: ["User.Read"] // resource scopes
        },
    },
}
以用户身份调用 Microsoft Graph
下面的代码演示如何以应用身份调用 Microsoft Graph 控制器并获取一些用户信息。
// controllers/graphController.js

// get the name of the app service instance from environment variables
const appServiceName = process.env.WEBSITE_SITE_NAME;

const graphHelper = require('../utils/graphHelper');

exports.getProfilePage = async(req, res, next) => {

    try {
        // get user's access token scoped to Microsoft Graph from session
        // use token to create Graph client
        const graphClient = graphHelper.getAuthenticatedClient(req.session.protectedResources["graphAPI"].accessToken);

        // return user's profile
        const profile = await graphClient
            .api('/me')
            .get();

        res.render('profile', { isAuthenticated: req.session.isAuthenticated, profile: profile, appServiceName: appServiceName });
    } catch (error) {
        next(error);
    }
}
前面的代码依赖于以下 getAuthenticatedClient 函数来返回 Microsoft Graph 客户端。
// utils/graphHelper.js

const graph = require('@microsoft/microsoft-graph-client');

getAuthenticatedClient = (accessToken) => {
    // Initialize Graph client
    const client = graph.Client.init({
        // Use the provided access token to authenticate requests
        authProvider: (done) => {
            done(null, accessToken);
        }
    });

    return client;
}
清理资源
如果你完成了本教程(包含多个部分)中的所有步骤,那么就已在资源组中创建了应用服务、应用服务托管计划和存储帐户。 你还在 Microsoft Entra ID 中创建了应用注册。 如果不再需要这些资源和应用注册,请将其删除,以免继续产生费用。
在本教程中,你将了解:
- 删除按照本教程创建的 Azure 资源。
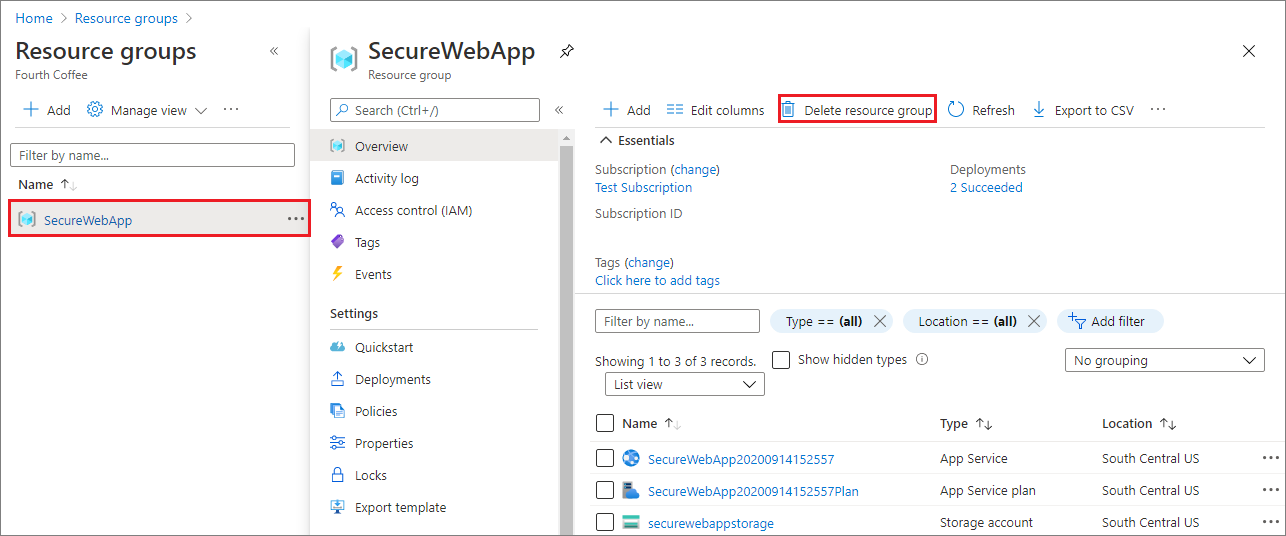
删除资源组
在 Azure 门户中,从门户菜单中选择“资源组”,然后选择包含应用服务和应用服务计划的资源组。
选择“删除资源组”,删除该资源组和所有资源。
此命令可能需要几分钟才能运行。
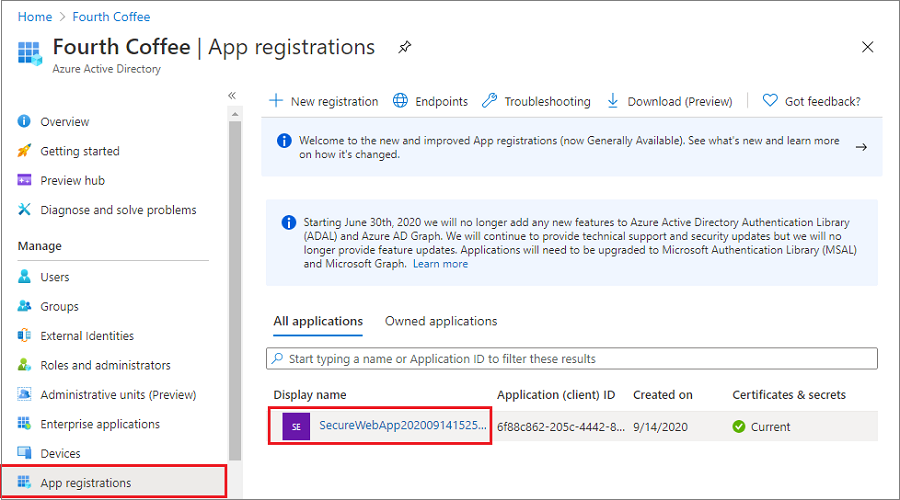
删除应用注册
在门户菜单中,选择“Microsoft Entra ID > 应用注册”。 然后,选择创建的应用程序。
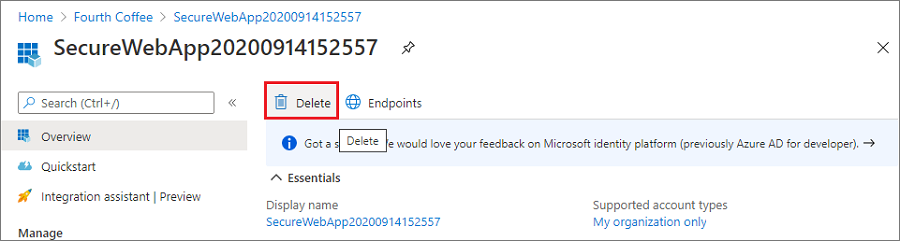
在应用注册概述中,选择“删除”。
后续步骤
在本教程中,你了解了如何执行以下操作:
- 向 Web 应用授予委托的权限。
- 为已登录的用户从 Web 应用调用 Microsoft Graph。